
Topic
This guide provides instructions for creating and mapping device roles, global custom fields, and end-user custom fields. For instructions about viewing and editing custom fields on the dashboard, refer to NinjaOne Custom Fields: View and Modify.
Environment
- NinjaOne Documentation
- NinjaOne Endpoint Management
Description
Custom fields allow you to publish data about a user, endpoint, organization, or location in NinjaOne. You create the custom fields and then use those fields to populate the Custom tabs on the dashboards. Custom tabs can hold multiple "sub-tabs," and each sub-tab may list different custom fields depending on the type of information you want to share with your users.
For custom field use case examples, refer to NinjaOne Custom Fields: Use Cases.
Select a category to learn more:
- Important Notes
- Configure Permissions for Custom Fields
- Create Custom Fields
- Mapping the Custom Fields
- Additional Resources
Important Notes
There are several different sources for custom fields. To learn how to map them to the display location, refer to NinjaOne Custom Fields: Mapping Custom Fields to the Organization Dashboard.
| Source | Setup Location | Display Location |
|---|---|---|
| Device | Administration → Devices → Device Custom Fields | Device dashboard → Custom |
| End user | Administration → Accounts → End User Custom Fields | End user dashboard → End user details → Custom |
| Organization | Administration → Organizations → Organization Custom Fields | Organization dashboard → Custom |
| Location | Administration → Organizations → Location Custom Fields | Organization dashboard → Custom |
| System | Administration → General → System custom fields | System dashboard → Custom |
Some fields may vary depending on the type of custom field selected. For example, some fields may also include Advanced Settings.
If you are using the custom field with the Custom fields condition, you must grant the Scripts value at least read-only access. For more information, refer to NinjaOne Policies: Condition Configuration.
Default Value Behavior
When creating custom fields, NinjaOne applies a default value only when a field is empty for a given entity, such as a device, end user, or organization. If you change this default value, it will only update the field for that given entity; you must update each field individually.
Permissions for Custom Fields
System administrators have default access to create and edit custom fields. To grant permissions to a technician, perform the following steps.
- Navigate to Administration → Accounts → All users or Technician roles and select a technician account or role to edit it.
- Select System and change the settings for one or more of the following permissions:
| Permission | Description |
|---|---|
| Custom fields export | Export custom fields data, where available |
| Access System Custom Fields | Edit system-level custom field values |
| Configure Custom Fields | Configure custom field definitions |
| Configure Custom Tabs | Change the order of custom fields and tabs for organizations, locations, and end users when mapping the custom fields |
| Configure Managed Roles | Add this permission to control the ability to update the tabs and fields for roles. |
| Configure Unmanaged Roles | Add this permission to control the ability to update the tabs and fields for roles. |
- Click Save changes.
Configure Custom Fields
To create a new custom field, perform the following steps:
- Refer to the table earlier in this article to determine what kind of custom field you would like to add. For this article, we will demonstrate how to add a device custom field. You can also use these instructions for end user, organization, and location custom fields.
- Click + Add custom field and select the custom field type you want to add. For a list of all custom fields and how you can use them, refer to NinjaOne Custom Fields: Types and Functionality.

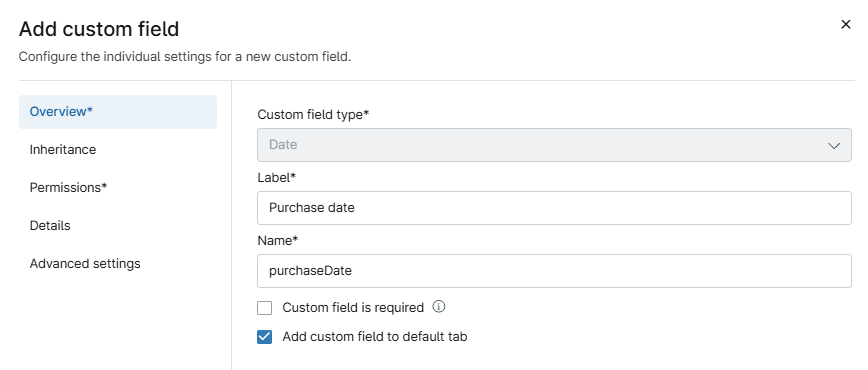
- In the Overview section of the Add custom field dialogue, add a Label, which is the name or title of the custom field the technician will see on the dashboard.
The Name field will populate automatically based on the value for Label and is intended for internal use.
- Select the checkbox labeled Custom field is required to make the custom field mandatory. A mandatory custom field means that if a technician edits the custom fields on the dashboard view, they must ensure this field has data before saving other changes.
- Select the checkbox labeled Add custom field to default tab if you want to automatically include the new custom field in a tab for the respective entity. As explained further in this article, you can create additional tabs through the mapping portion of this process.
- In the Inheritance section, select one or more checkboxes to configure the inheritance settings for the Inheritance outcome field. This data will specify the other places where values can be configured for this field, which enables you to use the custom field "globally" if inheritance is activated for device, end user, location, organization, and system. If the inheritance is configured for a single option, such as Device, it will be available only on the device dashboard.
- Open the Permissions section and use the following table to complete the fields.
| Field | Description |
|---|---|
| Automations | This permission allows technicians to access this field through scripts. Scripts cannot update fields whose definition scope is not set to device. |
| API | Allow technicians to access this field through the NinjaOne Public API. Select an option from the drop-down menu and then specify whether access will be for all technicians or only specific roles. |
| All Technicians | Make the Access field editable (technicians can update or insert data if they have access permitted for Device Administration in their account or role) or read-only. If set to None, the field will not be visible. |
| Specific technician roles | Configure access per role. Click Add role and then select the roles to give read-only access to. Select the role again and then click Edit access to configure the permission. When using role-based access, system administrators automatically receive the highest permission set for any role. |

- Open the Details section and use the following table to complete the fields.
| Field | Description |
|---|---|
| Description | Clarify the purpose of the custom field. Currently, this field is only visible when editing the custom field in Administration. |
| Tooltip Text | Add text to assist those who are updating the custom field on the dashboard. This setting adds a small (i) icon next to the field name that technicians must move their cursor over to see the text. |
| Footer | Add text to assist those who are using the custom field on the dashboard. This setting adds small font text below the data field. |
| Advanced Settings | Some custom fields may have an Advanced Settings option. These settings change depending on the device type selected. |
- Click Submit when ready.
After clicking Submit, a summary of your custom fields will display in NinjaOne.
The summary provides the field name, label, field type, creation date, and last update date. You can update or delete custom fields; refer to NinjaOne Custom Fields: View and Modify for more information.
Mapping the Custom Fields
After creating a device custom field, you can map it to a specific device role. For instructions, refer to Mapping Custom Fields to Device Roles.
To learn how to map custom fields to the organization dashboard, refer to NinjaOne Custom Fields: Mapping Custom Fields to the Organization Dashboard. These instructions work similarly for end user custom fields.
Additional Resources
Learn more about managing custom fields in our Custom Fields: Resource Catalog article.