Topic
This article explains how to deploy CrowdStrike to your devices after you enable the integration in NinjaOne, enable notifications for antivirus activities, and enable your technicians to take action on discovered threats.
Environment
- NinjaOne integrated vendors
- CrowdStrike antivirus
Description
With CrowdStrike enabled in NinjaOne, the integration is policy-driven from within NinjaOne. The policy triggers the NinjaOne agent to detect the existing installation of the CrowdStrike Sensor on the endpoint and perform installation automatically if the sensor is not present. If a device already has CrowdStrike installed before NinjaOne integration, the NinjaOne agent can read the existing agent ID.
Before you can deploy CrowdStrike as your endpoint antivirus tool, you must enable the integration in NinjaOne. To do so, refer to CrowdStrike: Integration Guide.
Then, select a category to learn more:
- Deploy CrowdStrike at the Policy Level
- Enable Notifications for Activities
- Set User Permissions for CrowdStrike
- View CrowdStrike Health Statuses and Activity Logs
Deploy CrowdStrike at the Policy Level
Selecting CrowdStrike as the policy's antivirus prompts the NinjaOne agent to install the CrowdStrike sensor on the affected endpoint(s).
- Go to Administration → Policies and select the policy that needs the CrowdStrike antivirus or create a new one.
- Open the Antivirus tab and select CrowdStrike from the drop-down. If another antivirus is already selected, you must first select "Disabled" before selecting "CrowdStrike." Important Note: If you are switching from a different antivirus to CrowdStrike, NinjaOne does not uninstall when you change the antivirus. You must go to the antivirus portal to uninstall. If you attempt to install CrowdStrike as your antivirus and the devices associated with that policy already have an antivirus installed, you will receive an activity for that device stating that the CrowdStrike installation failed and you must uninstall the other antivirus.
- Select from the options next to Installation to configure.
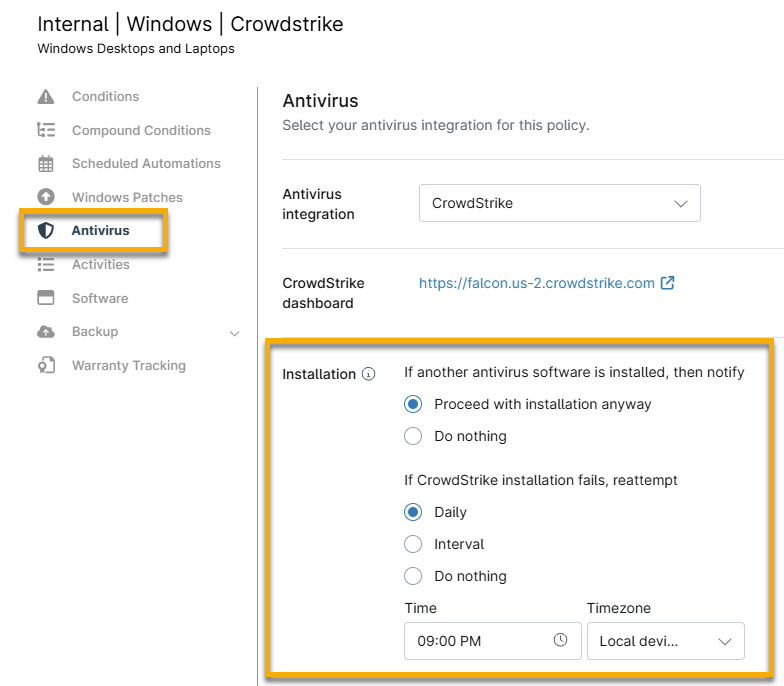
Figure 1: Installation options for the CrowdStrike antivirus in NinjaOne
- If another antivirus software is installed, then notify: Select whether you want to proceed with installation or take no action.
- If CrowdStrike installation fails, reattempt: You can turn this off by flipping the toggle switch or setting the schedule to daily (at a specified time) or interval (every [#] hour).
- Click Save.
When you set the antivirus to CrowdStrike at the policy level, the CrowdStrike application card displays on the device dashboard under Settings. Click the CrowdStrike Device Link hyperlink to select a specific host to display in the side panel on the CrowdStrike console.
If you disable CrowdStrike at the policy level or change the device's policy to one that does not use CrowdStrike, NinjaOne will remove all threats from the device's Health section; however, the CrowdStrike Falcon Sensor will not be uninstalled from those devices until you follow the uninstall instructions from the CrowdStrike Falcon vendor console.
If the installation fails, a notification appears under the Overview tab in the Health section. Click the arrow to use the Retry Install option.
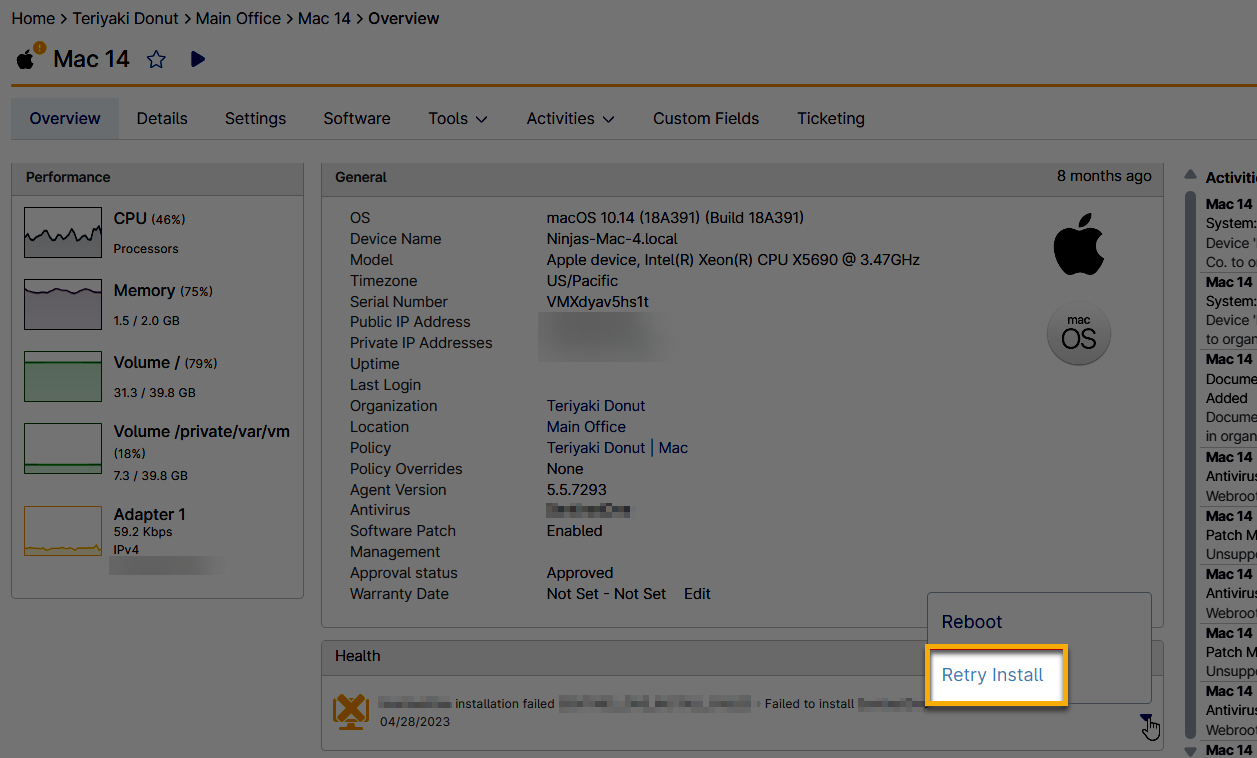
Figure 2: Retry a failed installation in NinjaOne
Enable Notifications for Activities
- Go to the policy configuration page.
- From the policy Activities tab, expand the CrowdStrike section and click any activity for which you want to enable notifications or create tickets.
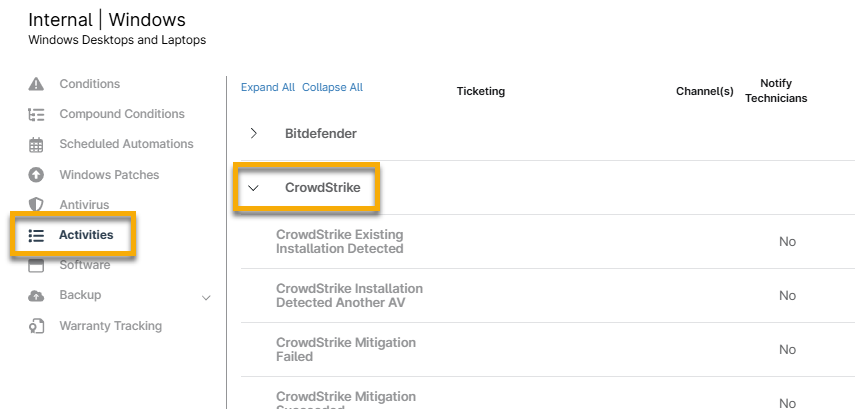
Figure 3: Configure notification and ticket actions for CrowdStrike in NinjaOne
- For instructions on configuring the activity fields, please see Activity Feed.
- Click Save in the top right corner of the policy page to set the changes.
Set User Permissions for CrowdStrike
NinjaOne automatically grants system administrators access to CrowdStrike. To enable other technicians and users, follow the steps below. Additional resource: User Permissions: Permission Options.
- Go to Administration → Accounts and select a technician account or role.
- Open the System tab and select "Allowed" for Configure CrowdStrike.
- Click Save.
View CrowdStrike Health Statuses and Activity Logs
Once you install the CrowdStrike Sensor or the NinjaOne agent detects an existing CrowdStrike Sensor, CrowdStrike Falcon activities appear from the NinjaOne organization level down to the device level.
Technicians can filter or search for only CrowdStrike events. These events could include agent installation/uninstallation feedback, threats, and others. NinjaOne continuously monitors the CrowdStrike Sensor of every device in each NinjaOne organization where you deployed CrowdStrike.
NinjaOne identifies and displays potential threats in the Health section of the device dashboard. When a potential threat is detected, NinjaOne links to the threat in CrowdStrike, allowing NinjaOne users to quickly navigate to their CrowdStrike Falcon console for research and threat remediation.
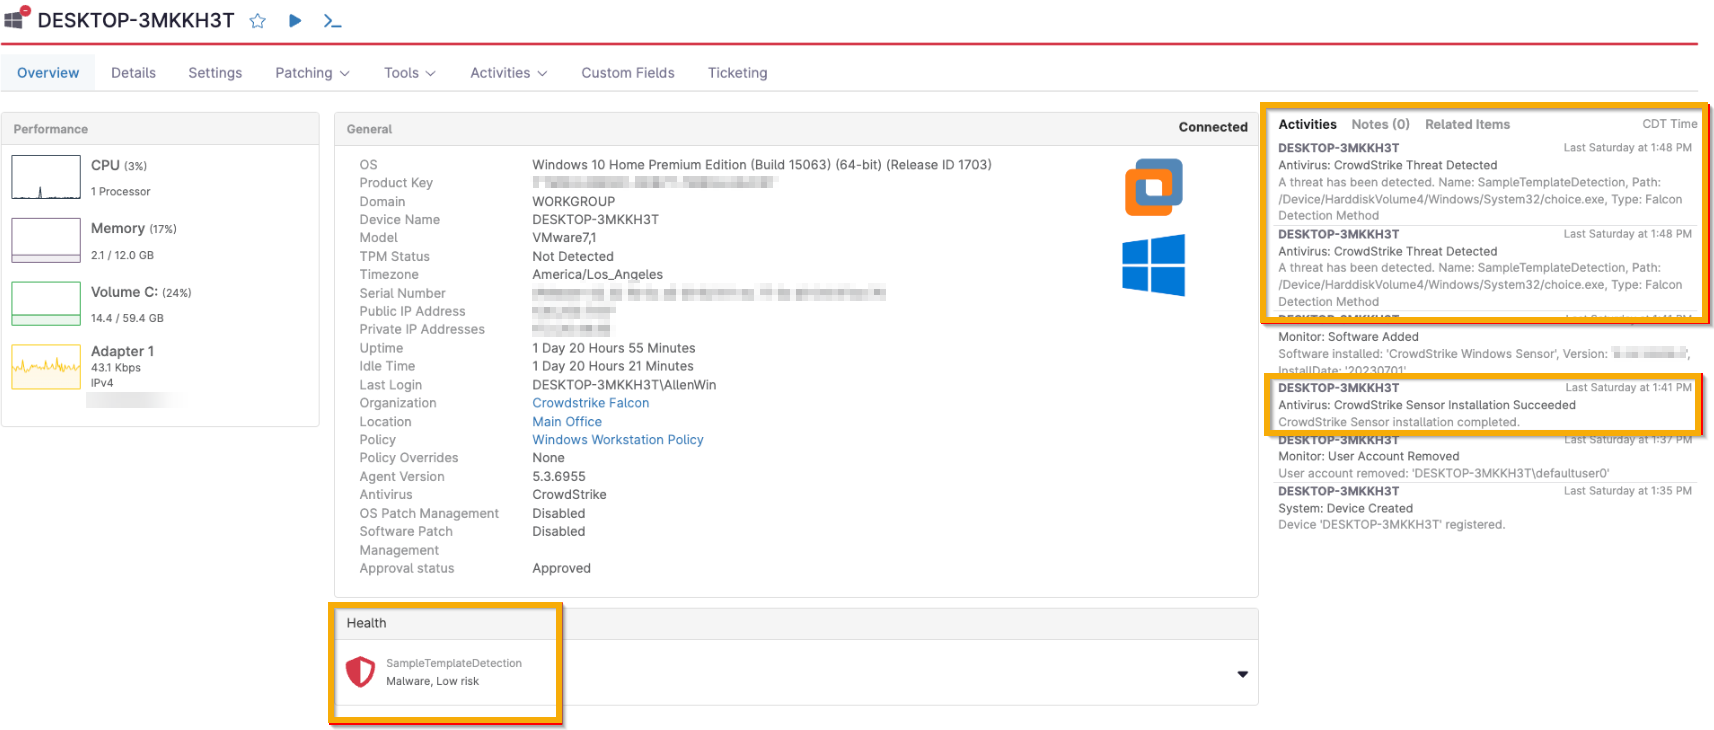
Figure 4: Location of health status and activity for CrowdStrike in NinjaOne
Take Action on Threats
All threat remediation occurs within the CrowdStrike Falcon console.
When a potential threat is detected, CrowdStrike provides NinjaOne with a unique threat identifier used in remediation. Click the health status on the device dashboard to navigate to the threat in the CrowdStrike platform, where you can take action.
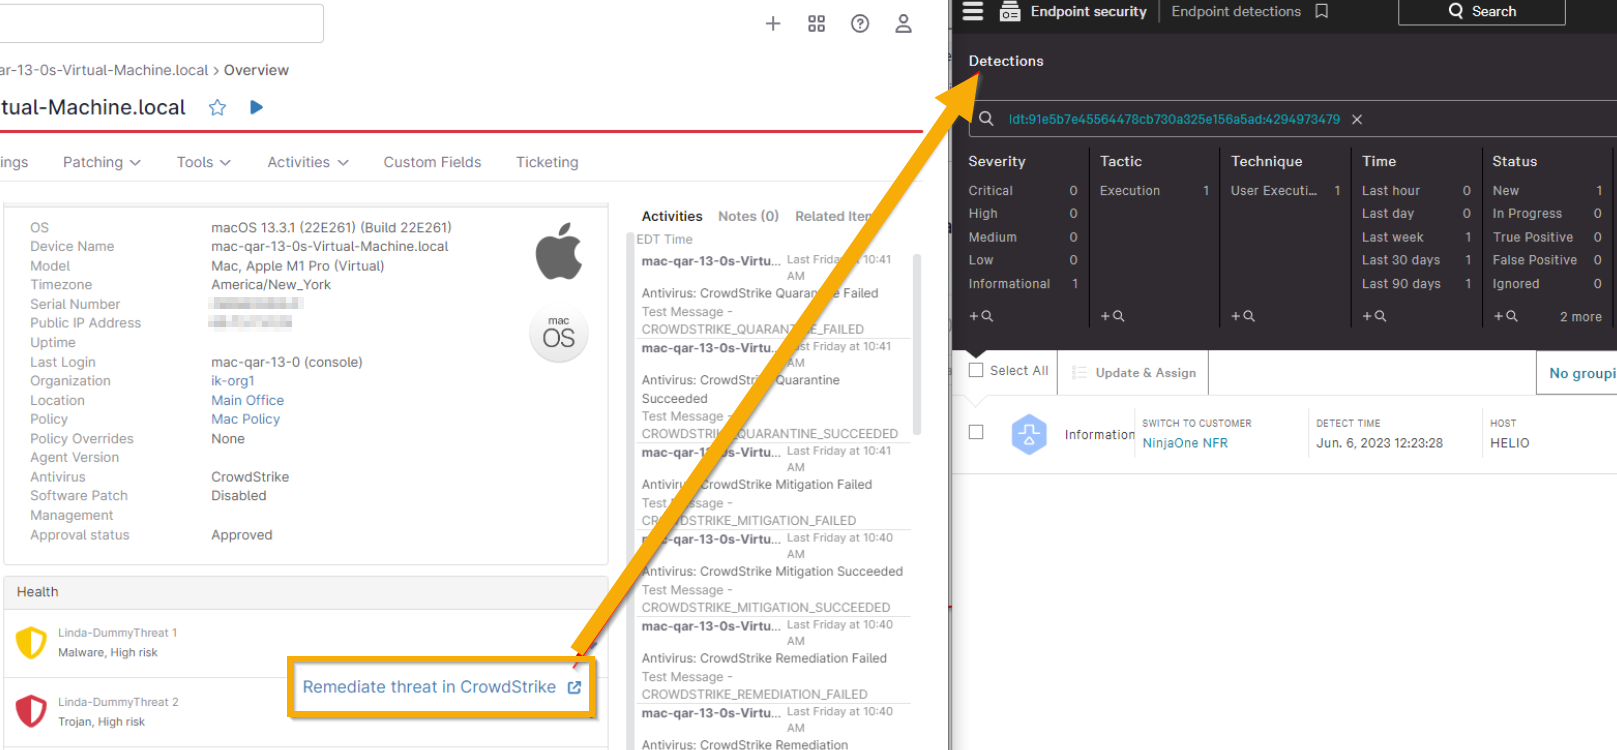
Figure 5: Remediate a threat for CrowdStrike from NinjaOne (click to enlarge)
Once you remediate a threat from within CrowdStrike with one of the status labels listed below, NinjaOne logs the activity and removes the threat from the device Health section in the NinjaOne UI.
CrowdStrike remediation statuses:
- True Positive
- False positive
- Closed
- Ignored
You can also take action on a threat from the system and/or organization dashboard. Select the affected device from the Devices → Threats tab on the organization dashboard and then click Remediate Threat in CrowdStrike at the top of the list. You can remediate only one threat at a time.
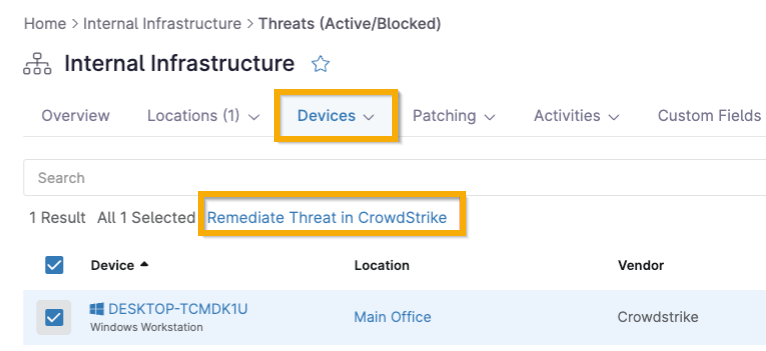
Figure 6: Remediate a threat for CrowdStrike from the NinjaOne organization dashboard
Filter for CrowdStrike Activity
Users can filter the activity logs for CrowdStrike events.
- On the device dashboard, click the Activities tab and select All.
- Select "CrowdStrike" from the Type(s) drop-down to see all CrowdStrike events in the Filter drop-down.