
As part of recent changes to our partner ecosystem, TeamViewer has ended its agreement with NinjaOne. This means that starting at the end of 2025, TeamViewer will no longer be available through NinjaOne, and customers currently using it will need to transition to another solution.
The good news is that NinjaOne Remote is already enabled and ready for use today. It provides a more powerful, secure, and fully integrated remote access experience within the NinjaOne platform—at no additional cost. This transition not only ensures continuity but also strengthens IT operations with a tool designed for both ad hoc troubleshooting and persistent management.
Why Choose NinjaOne Remote?
Thousands of organizations, from small businesses to large enterprises, have moved their remote support from standalone tools to NinjaOne’s integrated platform. Here’s what they gain by making the switch:
Work Without Interruption
Background Mode lets you troubleshoot and fix issues without interrupting your end users’ work. It’s a silent, fast, and efficient way to maintain devices and resolve problems behind the scenes.
A Complete Toolkit in One Place
NinjaOne’s remote access comes with all the powerful capabilities your technicians need, built right in:
- Remote printing and file transfers
- Session recording for training and compliance
- Clipboard syncing and support for multiple monitors
Everything your team needs is available from a single console.
Performance You Can Count On
NinjaOne Remote is optimized for speed. Our sessions launch up to two times faster than with standalone solutions, allowing your technicians to start working on issues immediately.
Security by Design
Every remote session is protected by enterprise-grade security features, giving you peace of mind and stronger control than with traditional peer-to-peer tools. You get:
- Encrypted sessions
- Role-based access controls
- Comprehensive audit trails and session logs
NinjaOne uses modern, high-performance cryptography — x25519 for secure key exchange, and XSalsa20 + Poly1305 for encryption and authentication. This combination ensures strong protection, data integrity, and reliable performance even on low-bandwidth or high-latency connections.
A Free Bonus: NinjaOne Quick Connect
As a special bonus, we’re including NinjaOne Quick Connect at no additional cost for the lifetime of your account. This feature lets your team:
- Instantly support unmanaged devices.
- Send on-demand connection links to users who need immediate help.
- Extend your support reach beyond your managed endpoints.
This valuable upgrade is free for anyone who transitions from TeamViewer.
Guide to Migrating from TeamViewer to NinjaOne Remote
NinjaOne provides a comprehensive, all-in-one platform for IT management. This detailed, step-by-step guide will walk you through the process of leveraging NinjaOne’s powerful automation capabilities to seamlessly and securely replace your existing remote access solution, TeamViewer, with the fully integrated NinjaOne Remote.
Note: To begin, please confirm that the NinjaOne Remote integration is enabled. Navigate to Administration > Apps > NinjaOne Remote and enable the application to proceed with the migration.
Step 1: Decommission the TeamViewer Integration within NinjaOne
The first crucial step is to disable the TeamViewer integration within your NinjaOne environment. This prevents any potential conflicts or technician-initiated connections through the old service once the new one is deployed.
- From the NinjaOne dashboard, navigate to the Administration menu.
- In the “Administration” sidebar, select the Apps option.
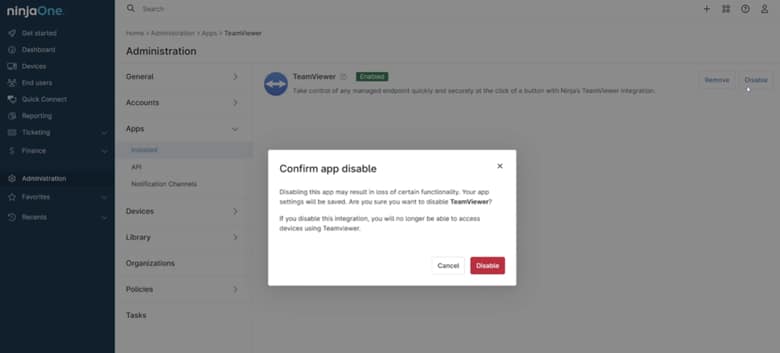
- On the “Apps” page, locate the TeamViewer tile within the list of third-party integrations and click on it.
- This will open the integration’s configuration page. In the top-right corner, click the Disable button.
- A confirmation pop-up will appear. Click Disable again to confirm and proceed. A success notification will briefly display, confirming that the integration has been successfully disabled.
Step 2: Configure and Enable NinjaOne Remote for Your Organizations
With the old integration disabled, you can now enable and configure NinjaOne’s native remote access tool for the organizations you manage.
- In the Administration menu, select Organizations.
- From the list of organizations, select the ones for which you want to enable remote access by checking the boxes next to their names.
- Click the Edit settings button at the top of the list and then NinjaOne remote.
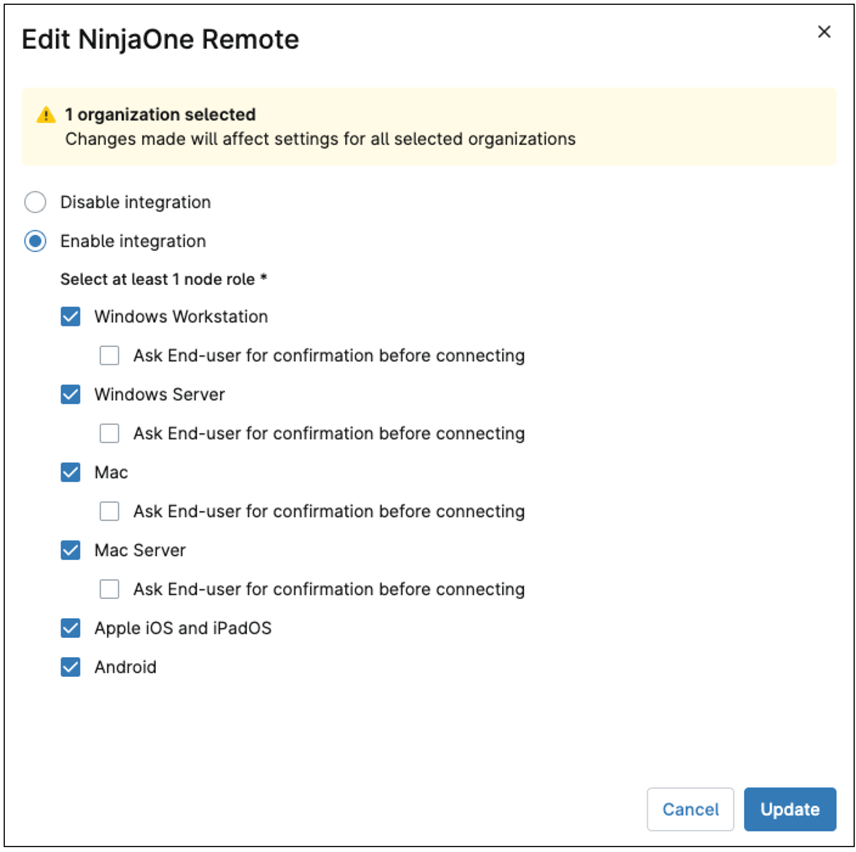
- A configuration pop-up titled “Edit NinjaOne Remote” will appear. Select the Enable Integration radio button.
- Next, check the boxes for the operating systems you support: Windows Workstation, Windows Server, Mac, Mac Server, Apple iOS, iPadOS and Android.
- To enhance security and user transparency, we highly recommend selecting the “Ask End-user for confirmation before connecting” option. You can also define a Timeout threshold in seconds for the prompt.
- Click Update to apply these remote access settings to the selected organizations.
- Confirm and enter your MFA method response.
Step 3: Automate TeamViewer Uninstallation via Scripting
NinjaOne’s automation engine is the most efficient way to remove the TeamViewer client from a large number of devices at scale. You can import and deploy a pre-built script for this purpose.
- In the Administration menu, navigate to Automation under the “Library” section.
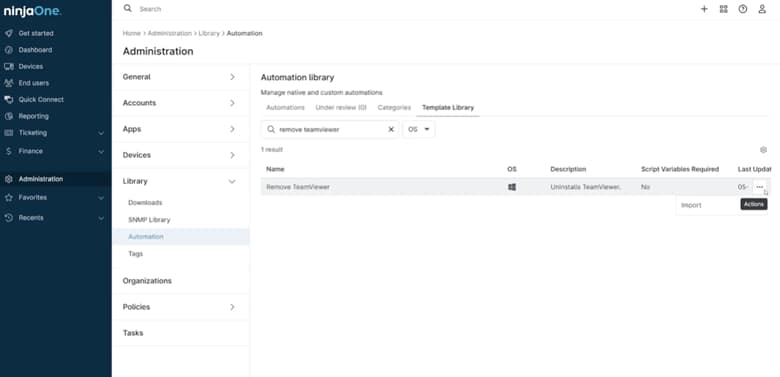
- Select the Template Library tab.
- Use the search bar to find the script named “Remove TeamViewer” (for Windows) or “Remove TeamViewer – macOS” depending on the device you are managing.
- Click on the script to review its details and then click the Import button to add it to your personal automation library.
- An “Attention” pop-up may appear, reminding you to test scripts before deploying them. Acknowledge and close this pop-up. The script will now be visible in your main automation library.
Step 4: Create a Dynamic Device Group to Target TeamViewer Installations
To ensure your uninstallation script targets only the correct devices, create a dynamic device group based on the presence of the TeamViewer software. Add an additional filter for the operating system (Windows or macOS) to ensure the script only runs on the intended devices.
- Navigate to the Devices menu.
- Click the More Filters button located at the top of the device list.
- Select Software Inventory from the filter options.
- In the pop-up, choose “Software Inventory” and set the operator to “Contains”.
- Click Add to add the software name. The Add Software modal appears.
- In the search field, type “TeamViewer”. Click the checkmark on the left of the name.
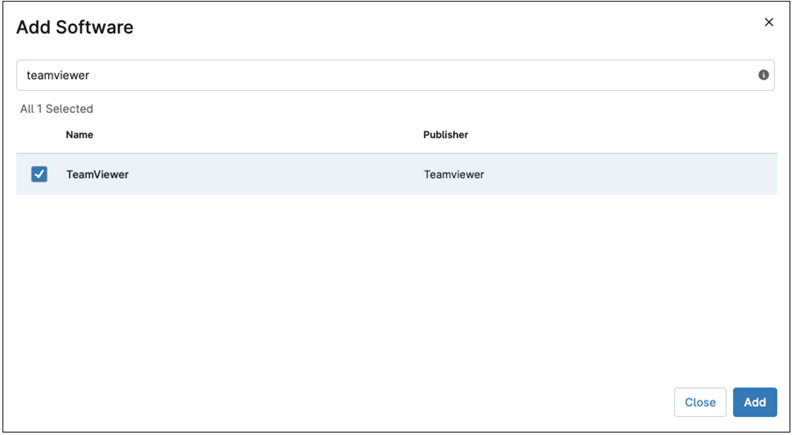
- Click Add and then Apply to filter the device list. This will display all devices with any version of TeamViewer installed.
- Click Save Group to save this filter as a dynamic group. Give the group a descriptive name, such as “Windows Devices With TeamViewer,” and click Save. This group will automatically and continuously update as devices are installed or uninstalled.
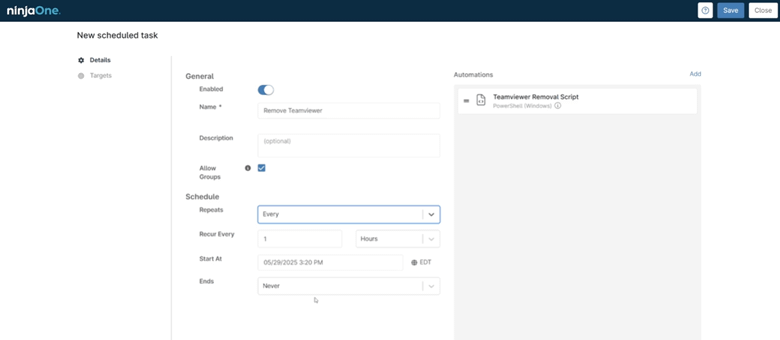
Step 5: Schedule the Uninstallation Task for Continuous Remediation
With the dynamic group and script prepared, you can now schedule a recurring task to automate the removal of TeamViewer.
- In the Administration menu, navigate to Tasks.
- Click the New Task button.
- Give the task a clear name, such as “Remove TeamViewer.”
- In the “Automations” section, click Add. Search for and select the “Remove TeamViewer” script you imported.
- Under the Schedule drop-down menu, select “Every” and choose your desired cadence (e.g., daily or weekly). This ensures that any new or rogue installations of TeamViewer are automatically removed as they are detected.
- Navigate to the Targets tab and click Add.
- Change the “Target” drop-down to Group. Search for and select the “Devices With TeamViewer” dynamic group.
- Click Apply and then Save to finalize and schedule the task.
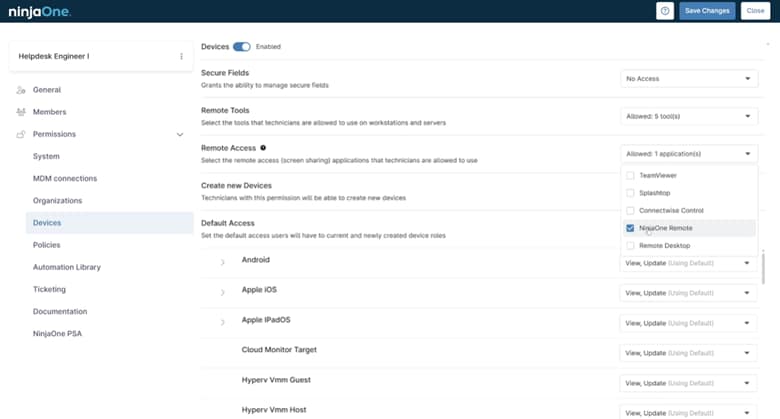
Step 6: Update User Role Permissions (Recommended)
To complete the migration and ensure compliance, update your technician roles to revoke access to the old tool and enforce the use of NinjaOne Remote.
- In the Administration menu, navigate to Roles.
- Select the technician role you want to edit.
- Go to the Permissions tab.
- Scroll down to the “Remote Access” section.
- Uncheck the box next to TeamViewer and check the box for NinjaOne Remote.
- Click Save Changes to apply the new permissions to all technicians assigned to this role.
This comprehensive process ensures a smooth, automated, and secure migration of your remote access capabilities, centralizing your IT management within the powerful NinjaOne platform.
Post-Transition Best Practices
- Monitor session usage with NinjaOne’s reporting features to validate adoption.
- Regularly review access policies and adjust roles as team responsibilities evolve.
- Leverage NinjaOne’s additional automation and monitoring tools to extend beyond remote access.
Ready to Make the Switch?
If you’re ready to transition or have any questions about the process, our team is here to help.
- Contact your Account Manager directly.
- Reply to the communication you received about this change.
We’re confident that you’ll be impressed with NinjaOne Remote’s simplicity, speed, and reliability, and we’re committed to making your transition as smooth and stress-free as possible.