Prohibited software or blacklisted software refers to any software that is restricted or illegal to use in an organization, due to various reasons. These reasons can range from copyright infringement and security risks to ethical concerns and potential harm.
It’s important to note that the definition of prohibited software can vary depending on the context. For example, software that is prohibited in an organization may be perfectly legal in another, or for personal use. Some of the reasons for prohibiting software may include.
- Security concerns: The software poses a potential security threat, such as being known to contain vulnerabilities, malware, or backdoors.
- Compliance issues: The software may violate licensing agreements, copyright laws, or internal policies related to software usage.
- Performance impact: The software may be resource-intensive and negatively impact the performance of other applications or devices.
- Compatibility issues: The software may not be compatible with the existing IT infrastructure or other software being used.
- Unapproved functionality: The software may have features or functions that are deemed inappropriate or unnecessary for the organization.
How Can I Manage Prohibited Software?
The first step is to establish a blacklist, a comprehensive list of all software explicitly forbidden for installation on endpoints. This list should be based on security assessments, compliance regulations, and organizational needs.
Second, compile a software inventory for each endpoint and compare it against the blacklist. If any blacklisted software is found, the third step is to address the violation promptly. This could include uninstalling the software and/or implementing measures to mitigate potential risks associated with the software.
Since users can install more software with time, this becomes continuous work. As the number of endpoints increases, performing this work manually becomes complicated. Using a solution like NinjaOne, facilitates this effort, no matter the number of endpoints. Once the blacklist is entered, NinjaOne can send alerts and even automatically uninstall the blacklisted software found.
How Can I Configure NinjaOne to Detect Prohibited Software?
Configuring NinjaOne to detect and alert in the event of prohibited software is easy by using policies, follow the next steps to add a condition to your existing policy. This is useful if you are adding this prohibited software condition organization-wide.
- Navigate to Administration, Policies, and then Agent Policies. Find the policy you want to add the condition to and click <Enter> on it.
- Select the conditions tab, then Click Add a condition.
- Click Select a condition.
- Select “Software”.
- Set Presence to Exists. On the Names field, add the application name you want to blacklist. Click Apply.
- Set the Notifications field to Send notifications.
- Click the Add button at the bottom of the dialog box.
This policy condition will notify you when the software condition is met, from there, upon notification, you can take actions like manually removing the software piece from the software inventory list*.
If the prohibited software policy is going to be applied to a certain group of devices within the organization, instead of adding the condition to an existing policy and linking it to the device role at the organization level, create a new one, and add the prohibited software conditions there.
Then, create a device location and move the computers needing the blacklist software policy in there. Then apply this new policy to this location. You can find an example of this below for further illustration.
Make sure that each condition specifies only one prohibited software name. in other words, you should add as many conditions as there are prohibited software names.
* Removing software from the software inventory list is not an option for MAC or Linux devices, however, scripts can be used instead.
How Can I Configure NinjaOne to Automatically Remove Prohibited Software?
Automatically removing any software requires adding an uninstall script. Unfortunately, there is no universal script for uninstalling, so you must create a specific script for each application. Here are the steps for adding a policy condition to uninstall some software, assuming that the uninstalled script is already available in the Automation Library.
- Navigate to Administration, Policies, and then Agent Policies. Find the policy you want to add the condition to and click <Enter> on it.
- Select the conditions tab, then Click Add a condition.
- Click Select a condition.
- Select “Software”.
- Set Presence to Exists. On the Names field, add the application name you want to blacklist. Click Apply.
- Click Add at the right of the dialog box, next to “Automation”.
- Select the automation you want to use for uninstalling this software.
- Click the Add button at the bottom of the dialog box.
Besides Using Policies, Are There Any Other Ways to Detect Prohibited Software With NinjaOne?
Yes, it´s possible to list devices containing prohibited software by using filters.
- To achieve that, go to the Device dashboard, and click on Additional Filters.
- From the drop-down select Software Inventory, and a dialog box appears.
- From here select All Time, then, select Contains, then select Any of the software.
- Click on Add and start adding the prohibited software name, here you can add more than one name.
Only the names found in the list can be added, but don’t worry, the list is huge and includes any software currently installed on systems in the environment.
After adding all the names, click Add. The list of devices having any of the software added will be displayed. Moreover, once the above filter has been applied, this filtered list can be saved as a device group, this group is dynamic and whenever any devices fall (or stop falling) into the condition parameters, the list will be updated.
You can consult this group at any time or create a report. This report can be run on demand or at a scheduled time.
What are the benefits of using NinjaOne for managing prohibited software?
Here are some of the multiple benefits of using NinjaOne for managing prohibited software.
- Centralized inventory: Gain a comprehensive overview of all installed software across your managed endpoints, allowing you to identify potentially prohibited applications.
- Automated scanning: Use automation to detect and prohibit software based on predefined criteria, reducing manual effort, and improving detection accuracy.
- Real-time monitoring: Continuously monitor for new software installations and potential violations, enabling swift responses to prevent unauthorized software usage.
- Reduced administrative burden: Automate routine tasks associated with prohibited software management, freeing up IT staff for more strategic initiatives.
- Automated reporting: Generate reports to track prohibited software usage trends, identify recurring issues, and measure the effectiveness of your management strategies.
Windows software detection and automatic removal strategy
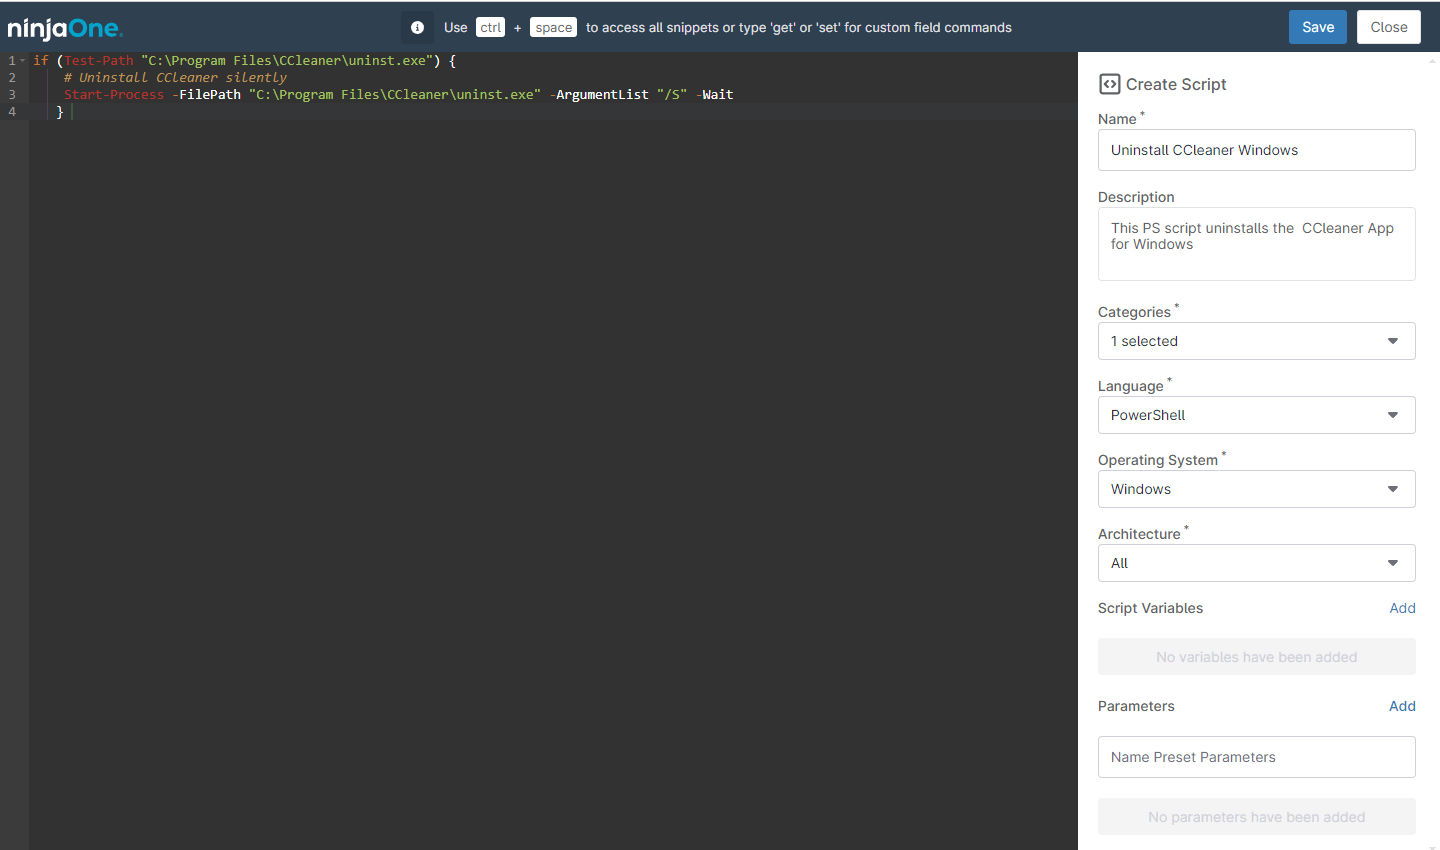
Let´s illustrate a real-world scenario with the next example: Create a policy that detects when the CCleaner software is installed and runs an automation to uninstall it. To achieve this, let´s create the following simple PowerShell uninstall script**:
if (Test-Path “C:\Program Files\CCleaner\uninst.exe”) {
# Uninstall CCleaner silently
Start-Process -FilePath “C:\Program Files\CCleaner\uninst.exe” -ArgumentList “/S” -Wait
}
** Disclaimer. This is a very simple script for illustration purposes. Although it works for our present example, users must validate functionality on different Windows and CCleaner versions and languages. It shouldn´t be taken as a NinjaOne-recommended script.
Let’s follow the next steps:
1. Create automation named “Uninstall CCleaner Windows”.
a) Go to Administration, then Automation. Click +Add and select new script.
b) Fill out the fields on the right side, and then copy the above-listed code to the black window at the left. (see screenshot below for reference)

c) Click Save, enter the MFA answer, and close.
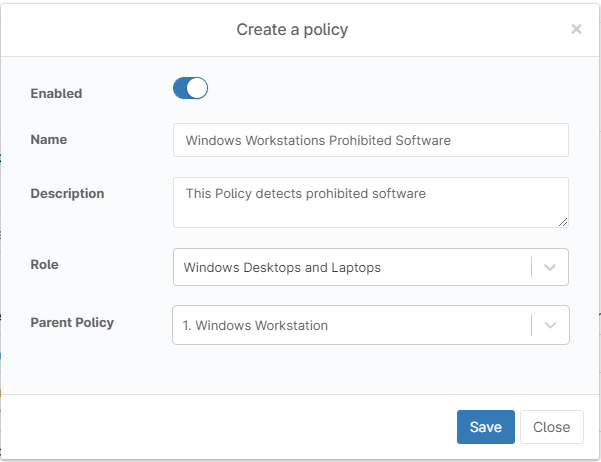
2. Create a new agent policy, inherited from Windows Workstations, and add a new condition that detects and removes the CCleaner software.
a) Go to Administration, then Policies, then Agent Policies. Click Create New Policy.
b) Name the new policy “Windows Workstations Prohibited Software”, on Role, and select Windows Desktops and Laptops. On Parent Policy, select Windows Workstations. Click Save.

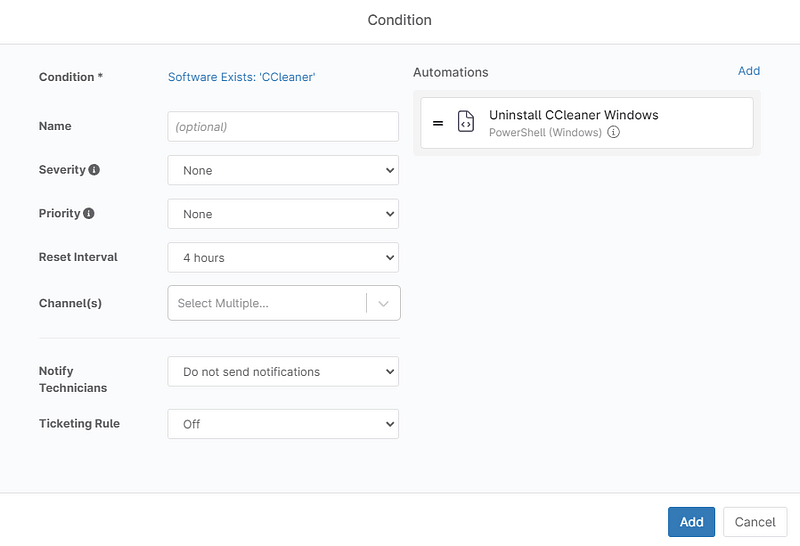
c) Click “Add a condition”, A Condition dialog box appears, click on Select a condition, and a new dialog box appears. Click on Select a condition and from the drop-down menu select “Software,” on Presence, select “Exists,” on name, type “CCleaner”, then hit the Enter key, then click the Apply button. If required, we can select “send notifications” in the Notify Technicians field, to alert about this software found.
d) Click Add at the right of the screen (next to Automation), and the automation library dialog box shows up, from there, find the “Uninstall CCleaner Windows” automation that we created previously and click on it. Confirm the “Run As” and Preset parameters” as needed and click Apply. Then click the Add button at the bottom of the dialog box.
Then Click Save, enter your MFA method answer, and close.
3. Create a new location and link the new policy.
a) Go to the Organization dashboard for your organization and click on edit at the right of the screen, then select Locations and click on Add Location.
b) Dialog box shows up. In the name field, type “Prohibited Software Computers “, address and Description are optional.
c) Go to the Policies tab, enable the Policy location overrides option moving the button to the right.
d) On the Windows Desktop policy, select Windows Workstations Prohibited Software policy from the drop-down menu.
e) Click the Add Location button.
f) Click Save, and close.
4. Move the devices that need this policy to the new added location.
a) Go to the Devices dashboard. Use the filters to find the target devices, then check mark them. Click on Configure, then select Organization/Location. A dialog box opens, showing the names of the selected devices. From there, select the new location, Prohibited Software Computers.
b) Click Save.
From now on, the selected computers will have the CCleaner software automatically uninstalled when detected. You can try it by downloading and installing the CCleaner software, on the selected devices. It will be detected and removed.

