Topic
This article provides instructions for adding or blocking apps for managed mobile devices at the policy level in NinjaOne.
Environment
- NinjaOne Mobile Device Management (MDM)
- Apple iOS and Apple iPadOS
Description
Add apps via the MDM policy editor to control which apps are available to end users and which apps can be blocked from being used.
In addition, NinjaOne's MDM tool supports apps assigned through Apple's App and Books (VPP) feature. Apple Business Manager (ABM) content tokens are supported per organization/location and provide information related to the token, assigned apps, and licenses from the MDM Configuration page in NinjaOne. To learn more about VPP support, refer to NinjaOne MDM: Apple Apps and Books.
Refer to our NinjaOne MDM Video Library to view videos related to NinjaOne MDM.
Index
Select a category to learn more.
About the Assignment Types
The device must be connected to an iCloud account to access the Public App Store.
| Assignment type | Description |
|---|---|
| Force Install | Installs the app and provides additional options for app management:
|
| Blocked | Restricts the device's user from using or installing the selected app if using a supervised device. This option is only available when installing apps at the policy level. |
The Applications table provides several data points at a glance. These columns can be removed or added by clicking the gear icon on the right side under the Add apps button. Refer to the table below for an outline of this information.
| Column name | Data |
|---|---|
| Name | The name of the app. |
| Seller | The vendor who owns or created the app. |
| Package ID | Apple's unique identifier for the app. |
| Cost | The price charged by the app. |
| Minimum OS support | Device version requirement to use the app. |
| Assignment Type | The assignment type configured when adding the app (refer to instructions below this table). You can change this when editing an app. |
| Distribution Type | The method in which the app was added (Public App Store or Apps and Books). |
| Status | "Active" indicates that the app is blocked or installed on the physical device per the configured settings. "Inactive" means that the app is neither blocked nor force-installed, and its availability defers to the Restrictions set in the policy. |
| Overrides | If you created the policy using the "parent policy" option, "Inherited" or "Overridden" tags will indicate that the value was modified from the original policy. |
Add Apps
If you do not set up your Apps and Books token, there will be no content under the Apps and Books tab. To learn how to do this, refer to NinjaOne MDM: Apple Apps and Books.
You can add apps at the policy level, which deploys to all devices using that policy and allows you to use your Apps and Books token, or you can add apps ad hoc at the device level, which will always default to the iOS Public App Store.
Add Apps via the Policy
To add apps at the policy level, perform the following steps:
- In the MDM Apple policy, open the Applications section. Click Add apps.
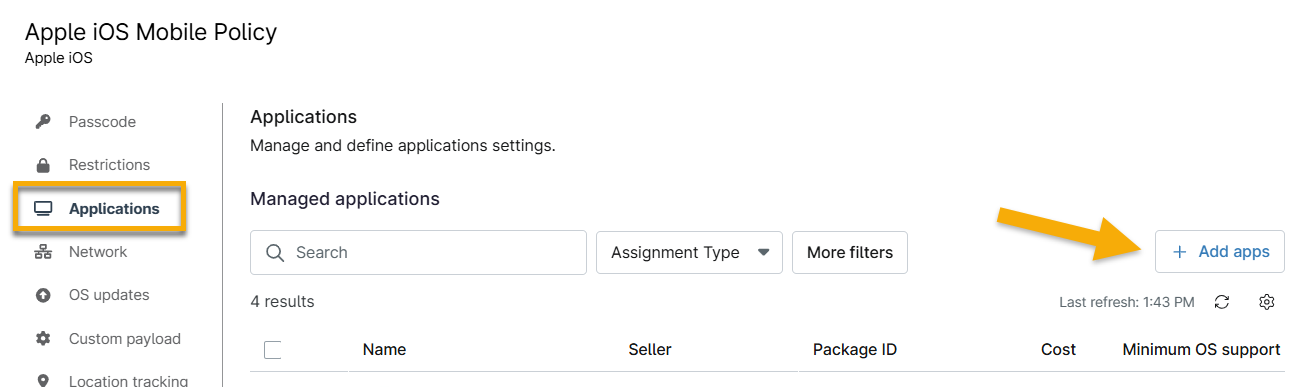
Figure 1: NinjaOne Apple MDM policy → Add apps
The Add apps search dialog displays.
- Use the tabs to select an app from your Apps and Books account or the Public App Store.
- Type the app's name or publisher in the search field. If unsure what to enter, type a single letter and click Search.

Figure 2: Add apps → Search
All apps matching the name entered display.
- Click the app to open the installation options; alternatively, move your cursor over the app row and click the ellipsis button to review management actions.
- Select either "Force Install" or "Blocked" from the Assignment Type drop-down, depending on whether you want the user to have access to the app. If you select "Force Install," you can allow users to uninstall the app on their end or enforce management and removal of the app upon certain conditions. This function also applies when you switch a device's policy in the Settings tab on the device dashboard.
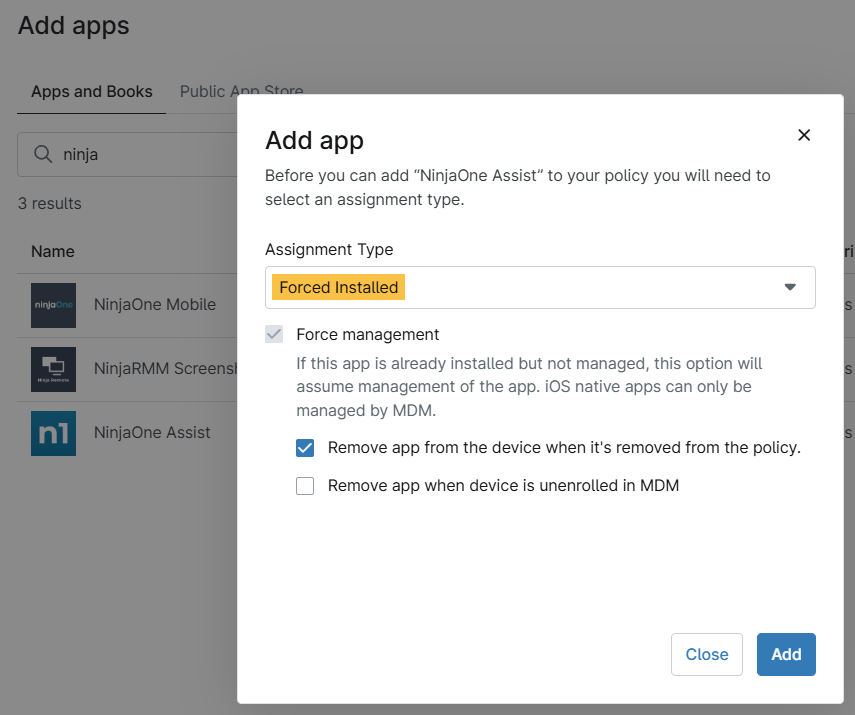
Figure 3: Add app → Forced installation options
- Click Add.
Add Apps via the Device
To add apps for a single, perform the following steps:
- From the Devices search page, click the action button and select Install apps.

Figure 4: Devices search page → Install apps
- Type the app's name into the search field and click Search.
- Click the app you want to install on the device. A new dialog will display to confirm that you are choosing to force install the app. Select the applicable checkboxes to allow the user to remove the app, enroll in force management, or remove the app if the device is unenrolled in MDM.
- Click Install.
Verify Installed Apps
The managed app is listed in the policy, showing the app details and assignment type, and on the device dashboard at Software → Inventory.
Configure Apps
You can edit an app by moving your cursor over the row and clicking the ellipsis to review modification options. Configuration options are dependent on the distribution type.
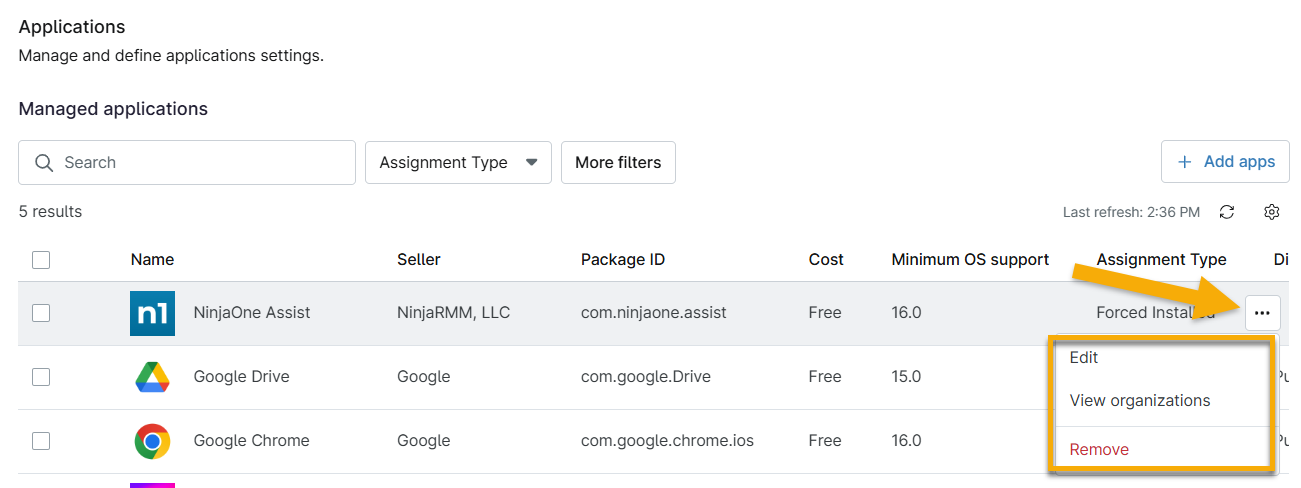
Figure 5: Policy apps → Actions
- Remove: Uninstall the app from all devices associated with the policy.
- Edit: Change assignment type.
- View organizations: This option allows you to view all organizations assigned a content token for this app. It is only available for apps added through Apps and Books.
- Revert overrides: This option only appears if you modified a variable inherited from an original policy. Reverting an override will restore the policy to its inherited value.
Third-Party Configuration Settings
When editing an app (regardless of distribution type), you can change the assignment type (General) or deploy third-party configurations. An example of a third-party configuration would be configuring your company's domain for your email service, so end users do not need to configure it manually.
To deploy third-party configurations:
- Click Configurations in the Edit app policy dialog.
- Enter the code variables into the gray block starting at line 2. The configuration should always begin with a <dict> tag and always end with a </dict> tag. Technicians must provide key-value pairs supported by the application using the p-list (property list) format. Application developers should provide documentation about supported keys and values, and may provide example p-list dictionaries that you can use directly.
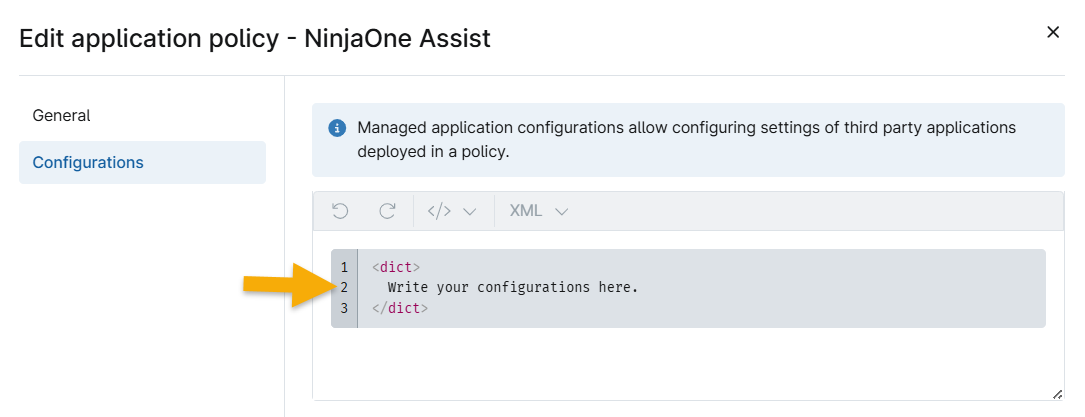
Figure 6: Managed app configuration
Refer to the example of a valid configuration below.
<dict>
<key>EmailAddress</key>
<string>${device.owner.email}</string>
</dict>
Refer to the list of supported variables below.
| Variable | Description |
|---|---|
| ${device.location.name} | The device's assigned location name value |
| ${device.location.id} | The device's assigned location ID value |
| ${device.organization.name} | The device's organization's name value |
| ${device.organization.id} | The device's organization's ID value |
| ${device.serialNumber} | The device's serial number value |
| ${device.id} | The device's GUID value (unique identifier) |
| ${device.owner.email} | The device's assigned user email address value |
| ${device.owner.firstName} | The device's assigned user's first name value |
| ${device.owner.lastName} | The device's assigned user's last name value |
| ${device.owner.displayName} | The device's assigned user's display name value |
Delete Apps in Bulk
If you remove an app and save the policy, the app will be uninstalled from all devices associated with the policy.
To remove multiple apps at once, click the checkboxes next to the app name and then click Remove at the top of the table.
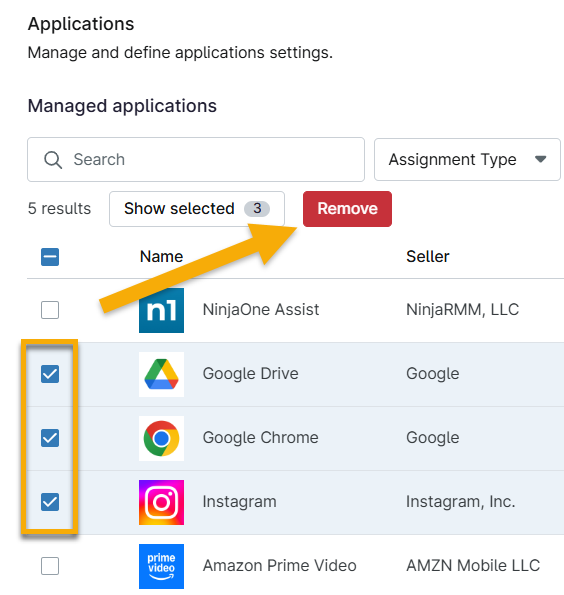
Figure 7: Remove apps
Additional Resources
Refer to NinjaOne Mobile Device Management (MDM): Resource Catalog to learn more about NinjaOne MDM.