Topic
This article explains how to use NinjaOne's Billing tool to create labor ticket time entry products.
Environment
- NinjaOne Billing
- NinjaOne Ticketing
Description
Create a labor ticket time entry product for automated billing of ticket time entries. This product includes time entries logged in NinjaOne Ticketing: Setup and Configuration.
Time entries are calculated automatically and converted to line items on the invoice. Refer to NinjaOne Billing: Time Entries to learn more about billing time entries.
Select a category to learn more:
- Create the Labor Ticket Time Entry Product
- Use the Labor Ticket Time Entry Product
- Additional Resources
Create the Labor Ticket Time Entry Product
To begin, create the labor ticket time entry as a product in NinjaOne Billing. Perform the following steps:
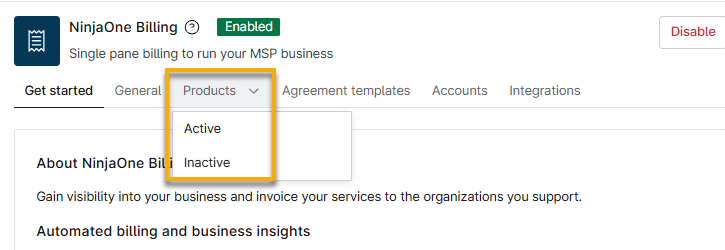
- Navigate to Administration → Apps → NinjaOne Billing and then open the Products tab to add product types. You can also create product types directly within the agreement template; refer to
Figure 1: NinjaOne Billing app configuration page → Products- Click Add and select the product type.
The New product configuration dialog displays with the General tab open by default. - Refer to the following table for a description of each field.
Field Name Description or Purpose Name Give the product a unique identifier. Description Provide a summary of the purpose for the product. Application user roles Optionally, select one or more user roles to which the product will apply. When you see system automation recorded as the user role, this indicates that automatic actions were triggered by conditions. If you do not select a role, the product will bill for all roles. 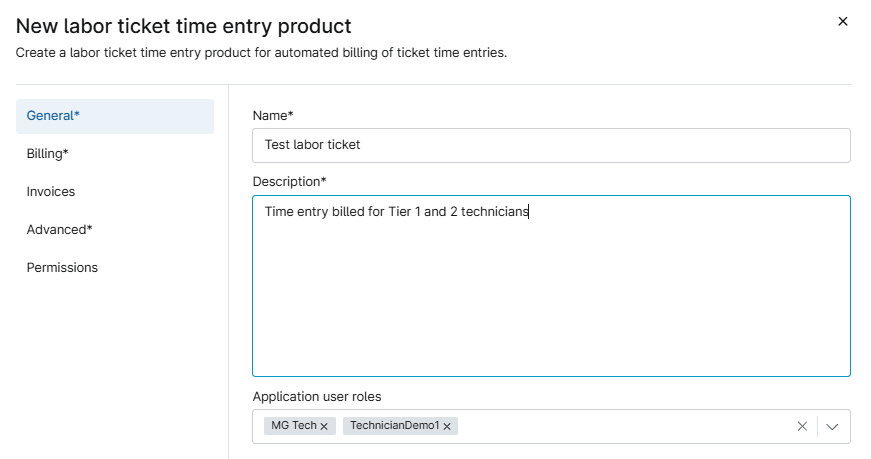
Figure 2: General information for a labor ticket time entry product Open the Billing tab. Use the following table as a guide to complete the fields.
Field Name Description or Purpose Schedule type Select whether you will log time entries as work done during normal hours (business) or non-business hours. Location type Select whether you will log time entries as work done on-site (at the office) or remote (away from the office). Price Enter the price that is charged to the customer.
This field also may be referred to as "retail price."Cost Enter the price you paid for the product. Taxable Select this checkbox to apply the sales tax. Billing - Billable: Charged normally to the invoice.
- No Charge: The product will be included on the invoice, but at no cost.
- Not Billable: The product will not be charged nor included on the invoice.
Normal hours multiplier This field only appears if you select the Normal hours checkbox for Schedule type. Multipliers allow you to multiply the Price amount based on where or when the work is performed. Off-hours multiplier This field only appears if you select the Off hours checkbox for Schedule type. Multipliers allow you to multiply the Price amount based on where or when the work is performed. Onsite multiplier This field only appears if you select the On-site checkbox for Location type. Multipliers allow you to multiply the Price amount based on where or when the work is performed. Remote multiplier This field only appears if you select the Remote checkbox for Location type. Multipliers allow you to multiply the Price amount based on where or when the work is performed. - Use the Invoices tab to include the amount of time with each invoice raised from this product. You can select either Unlimited or Limited.
- If you select Limited, you must also configure the number of hours to include with the invoice and whether to add a carryover limit. The carryover amount will be applied to the next billing cycle.
- If you select Unlimited, the labor ticket time entry will apply to all products with which it is associated.
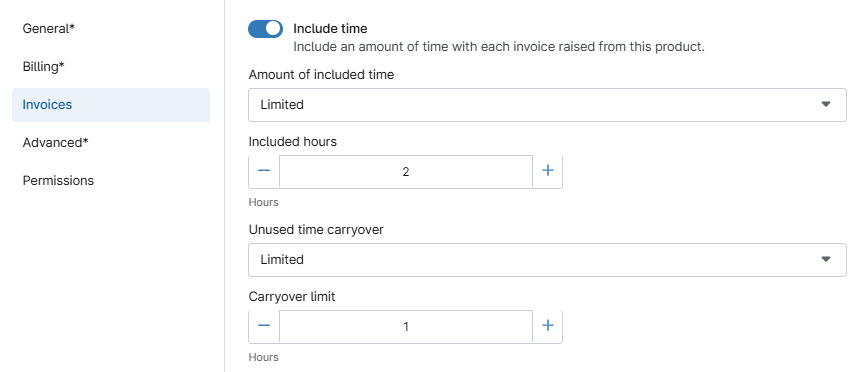
Figure 3: Invoice information for a labor ticket time entry product - You can auto-round time entries in the Advanced tab.
- Select the Permissions tab to control access to the product. You can allow all or only specific technicians to select the product in the Time entry product drop-down menu on the ticket.
Use the Labor Ticket Time Entry Product
Set a labor ticket time entry product by adding a comment on a ticket. You can also use comments to override the currently assigned product, ensuring your time is billed correctly. The time entry value defaults to the product that is configured by the time entry rules in the agreement for the assigned technician or role.
The options that display in the Time entry product field are products that you added as Labor Ticket Time Entry product types on the NinjaOne Billing app configuration page. The technician role you selected for the Application user roles field determines the options the technician may select. For example, a system administrator can only select labor ticket time entry products that include System administrator in the Application user roles field.
Labor ticket products added to the Products tab of the ticket will also appear in the Time entry product drop-down menu.
- Enter data into the ticket's Agreement field and ensure the Requester organization matches existing Labor Ticket Time Entry product types.
- Create either a Public Response or Private Note and write a summary of work into the WYSIWYG field.
- Ensure the Agreement field is populated. Agreements must be created in the Finance → Agreements section. Refer to NinjaOne Billing: Agreement Services for more information.
- Select an option from the Time entry product drop-down menu. If there are no options displayed, return to the agreement to add a time entry product.
- Click Publish.
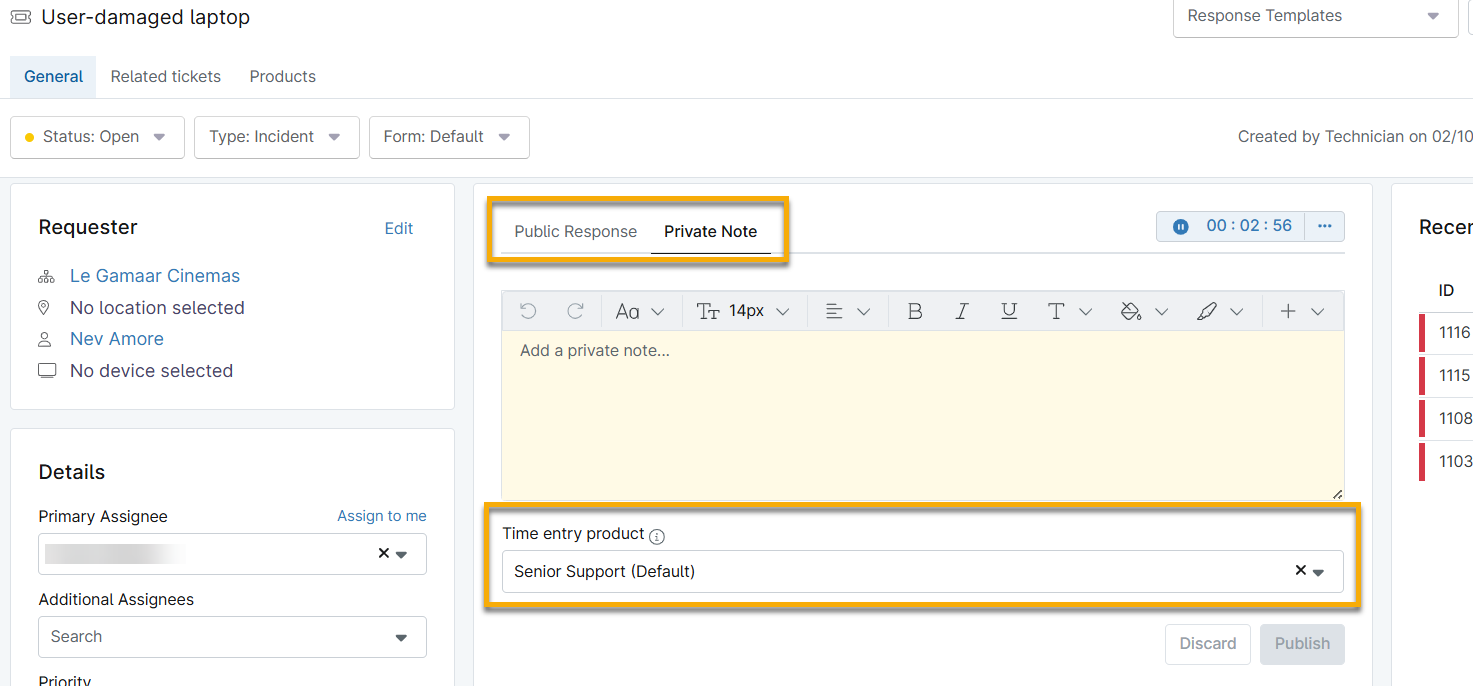
Figure 4: Add a time entry product via ticket commentsUpdate the Labor Ticket Time Entry
To change the amount of time logged for a labor ticket, you can do so directly from within the ticket:
- Click the time entry posted in the Ticket activity section.
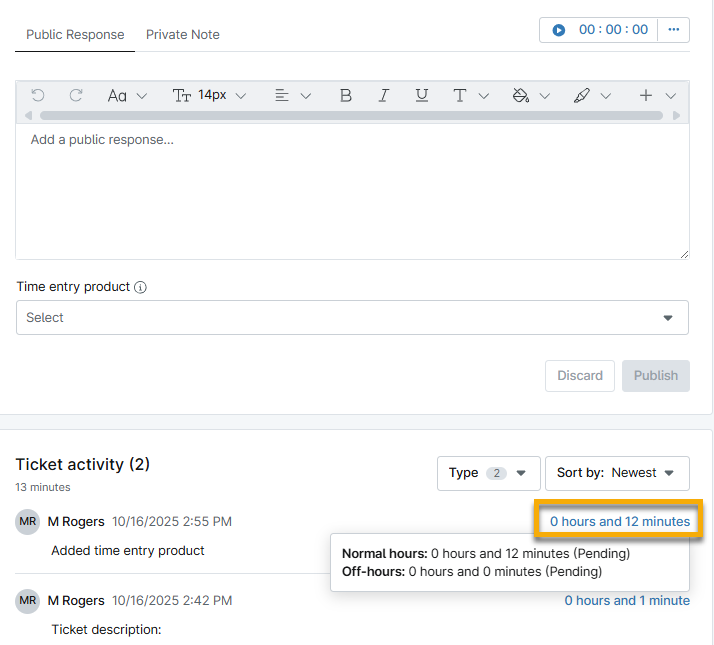
Figure 5: Update a time entry within a ticket - When the Edit time dialog displays, click each field to adjust the data. Then, click Apply.
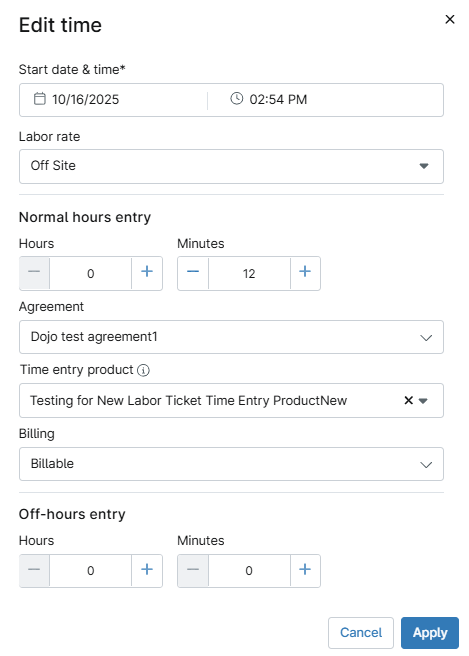
Figure 6: Edit time dialog Additional Resources
To learn more about configuring billing options and managing time entries in your tickets, refer to the following articles:
- Click Add and select the product type.