Topic
This article explains how to enable and configure the NinjaOne Browser Management application.
Environment
- NinjaOne Endpoint Management
- Microsoft Windows Browsers:
- Chrome
- Edge
- Firefox
Description
With NinjaOne's Browser Management application, you can inventory and manage your Microsoft Windows browser extensions and history directly in NinjaOne, specifically giving control and visibility for extensions, history, and URL access.
Index
Select a category to learn more:
- Activate the Feature
- Edit Block Message
- Deploy Browser Management Through Your Policy
- View Browser Data on the Dashboards
- Additional Resources
Activate the Feature
To use this feature, you must enable it. To do so, perform the following steps.
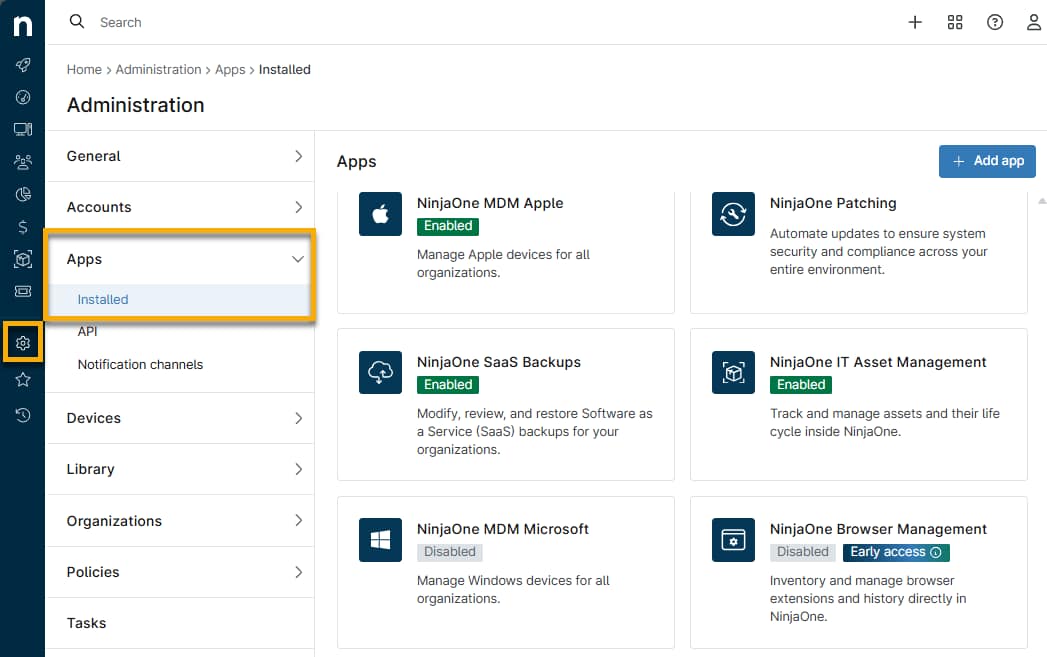
- Navigate to Administration → Apps → Installed.
- Select NinjaOne Browser Management and click Enable.
Edit Block Message
You can create a message that appears when users attempt to install a blocked extension.
- From the NinjaOne Browser Management page, select the General tab and click Edit.
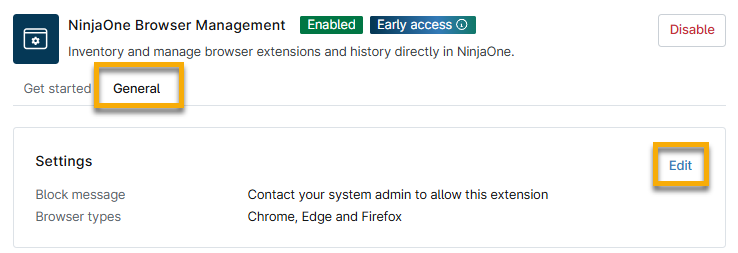
- Enter your message into the text field and then click Update.
Deploy Browser Management Through Your Policy
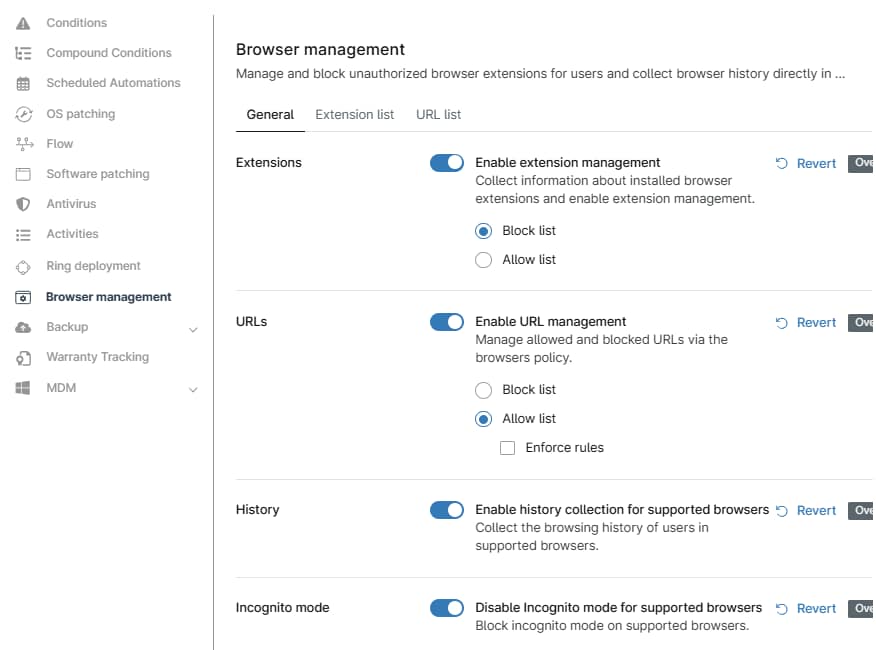
When the feature is active, you can configure its settings through your NinjaOne policies. Navigate to Administration → Policies, and select the applicable Windows Agent policy for deployment. From the policy configuration page, select Browser management, and then use the following sections to manage the settings.
General
In the General tab, select the toggle for each browser setting you want to manage. A description of each setting is provided on the page. When you activate a toggle, you may have additional options to specify whether to allow or block the data.
Refer to the following table for a description of each setting.
| Setting | Description |
|---|---|
| Extensions | This toggle will activate browser extension inventory and allow you to configure extension Installs and blocking in the Extension list tab. |
| URLs | This toggle will activate the URL inventory and permit you to configure block lists on the URL list tab. |
| History | Browser management allows you to collect 7 days of browser history and will return the domain information. |
| Incognito mode | When managing browsers, incognito mode presents a risk for managed environments, often allowing the bypass of controls or other mechanisms intended to keep the user and system safe. |
Extension List
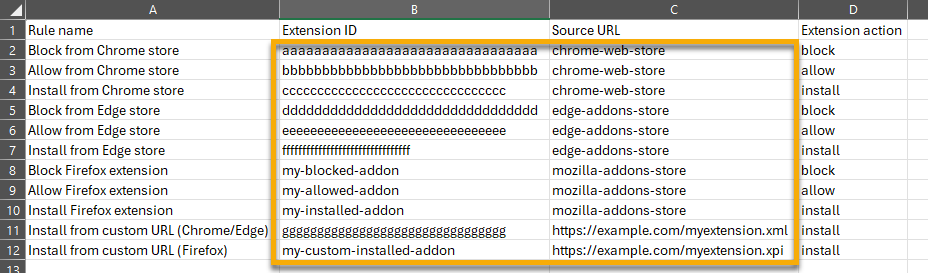
Extensions are installed by browser policy. To install, block, or allow an extension, you’ll need to know the Extension ID for the extension you wish to install, relevant to the supported browser store. Knowing the browser you are targeting and supporting impacts success. For example, setting an extension to install from the Chrome Store will not work for Firefox.
Select the Extension list tab to add or import the extension block list. Activate the Extensions toggle in the General tab to use this feature.
There are multiple ways to set up an install, block, or allow rule: through single rules, extension inventory, and import. We recommend testing any extension you plan to install, block, or allow. As an added benefit from the testing, you can use that test install as a reference for crafting your install policy.
When importing extensions, you must update the data in the Extension ID and Source URL columns and then specify the browser type in the Import extensions dialog. Delete any row that you will not use.
Refer to the following steps for a demonstration.
- Click + Add → Install browser extension.
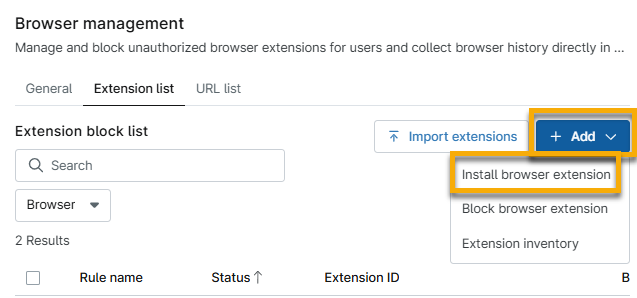
- Use the following table to complete the fields.
| Field | Support |
|---|---|
| Rule name | Add a unique identifier. |
| Browser type | Select the applicable option from the drop-down menu. |
| Source URL | Enter the address that will be blocked or permitted. |
| Browser store extension ID | Enter the extension ID from the browser URL. The quickest way to discover the extension ID for each browser is from the URL string, which you can obtain through the official extension website. You can use the + Add → Extension inventory option to select an extension from a list. |
- Click Apply and then click Save.
When the browser refreshes the policy on the targeted devices, the browser should install the extension.
To edit or remove a browser extension, select the checkbox next to the extension name to view available options. You can also move your cursor over the row to find the ellipsis actions menu.
URL List
With browser management, you can add rules to block or allow specific sites from being accessed from Chrome, Edge, and Firefox. NinjaOne supports both block and allow lists in enforcement modes, which apply to all supported browsers.
Activate the URLs toggle in the General tab to use this feature. Refer to the following steps for a demonstration.
- Click + Add and select Block URLs.
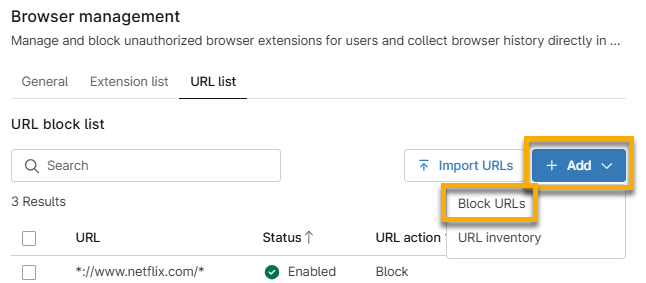
- Enter the URL to block. You can use asterisks as wildcards. For example: *.netflix.com.
- Click Apply and then click Save.
Use + Add → URL Inventory to select URLs to block from a list. You can also use the Import URLs to add a block list from a spreadsheet; download and use the CSV file from NinjaOne, and delete any rows that you will not use.
View Browser Data on the Dashboards
You can view browser data on the system, organization, and device dashboards. At each level, click Browser and then select either Extensions or URL history to view the number of installed or blocked devices, and perform the following actions:
- Install, unblock, or block browser extensions. This action will modify the data at the policy level.
- Click the extension name to view details, such as risks by permission and devices by extension status.
- Unblock or block a device's access to URLs based on current policy status and activity.

Additional Resources
For more information about policy management, refer to NinjaOne Policies: Resource Catalog.