Topic
This article explains how to configure single sign-on (SSO) in NinjaOne for a new identity provider (IdP).
Environment
- NinjaOne Platform
- NinjaOne Integrations
Description
You can use SSO to configure SAML (Security Assertion Markup Language) to access NinjaOne directly from your preferred provider portal. Use unique entity IDs to implement the same identity provider for SAML and SCIM (System for Cross-domain Identity Management).
Select a category to learn more:
- Important Considerations About Generic SSO Implementation
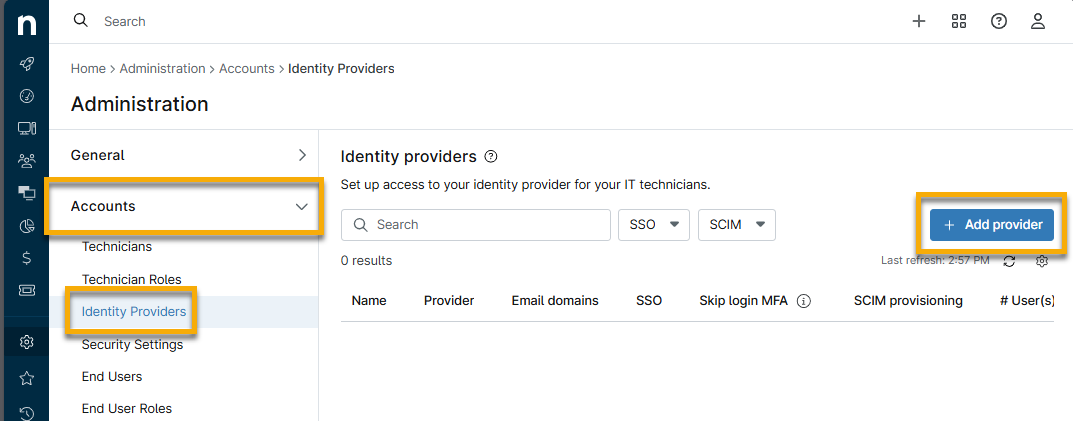
- Set Up SSO in NinjaOne
- Enable SSO for NinjaOne Technicians and End Users
- Additional Resources
Important Considerations About Generic SSO Implementation
Technicians can use SAML to access the NinjaOne application via SSO with their preferred IdP. You can use SAML with both the standard and branded NinjaOne site, which supports multiple IdPs.
You may use any IdP that supports SAML 2.0, and we provide user guides for configuring specific IdPs such as Duo, Okta, and Microsoft Azure, to name a few. You can access these guides from
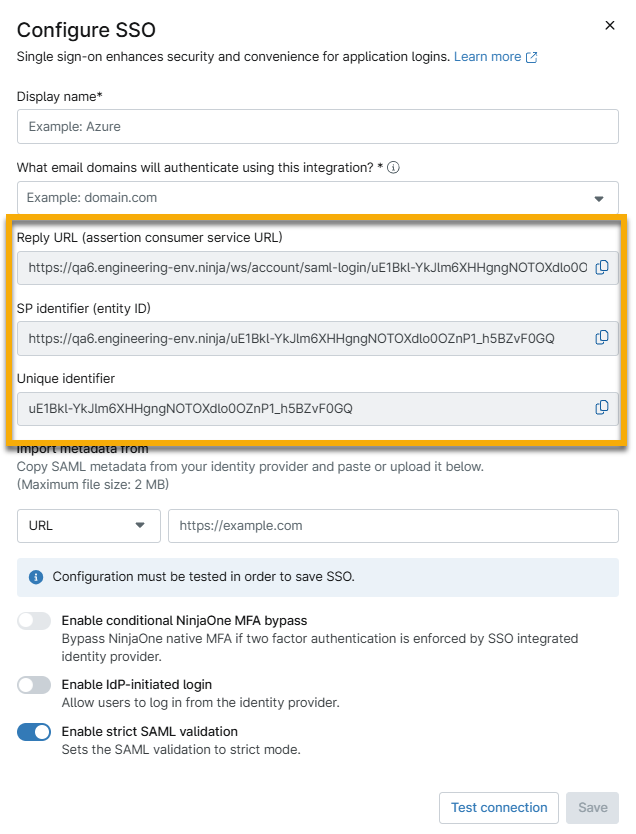
- Enter a unique identifier for the Display name. This can be the email domain that uses this integration.
- For What email domains will authenticate using this integration?, enter all characters following the @ in the target email domains.
- Copy the Reply URL and identifier data from NinjaOne, and paste it in the appropriate field in the SSO provider's settings. You can find examples for specific providers in the Additional Resources section of this article.
Figure 2: Copy the data requested by the IdP (click to enlarge)
- Copy the metadata from your IdP and paste it into the Import metadata from field. You can use a URL, file, or XML data; select the applicable option from the drop-down menu. For more information about the Enable conditional NinjaOne MFA bypass option, refer to Skip Multi-Factor Authentication (MFA).
- Test and establish the connection.
- After testing the connection, you may be prompted to log in. When the test succeeds, click Save, and on the resulting page, click Enable. Single sign-on will now be active.
Enable SSO for NinjaOne Technicians and End Users
To use SSO in NinjaOne, select Single sign-on as the Authentication Type value for each technician in NinjaOne for whom it should be active. You can find more information at End User Sharing and Device Access.
- Navigate to Administration → Accounts → Technicians or End Users. Find the technician or end user for whom you wish to enable SSO and open the account configuration page.
- In the General section, open the Security tab.
- Select Single Sign On from the Authentication Type drop-down menu.
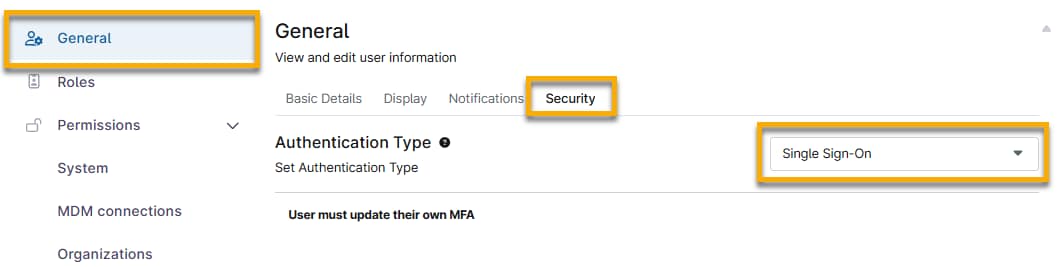
Figure 3: Enable SSO for a technician or end user
- To apply this change, click Save. Repeat this process for each technician for whom you would like to enable SSO.
Deactivate SSO
To deactivate SSO as a provider, perform the following steps.
- Navigate to Administration → Accounts → Identity Provider.
- Move your cursor over the IdP and click the actions menu button.
- Select Disable SSO.

Figure 4: Disable SSO for an IDP
To deactivate SSO for a single end user or technician:
- Open the account configuration page. In the General section, open the Security tab.
- Select a new option from the Authentication Type drop-down menu.
Additional Resources
Refer to Identity Authentication and Management: Resource Catalog to learn more about NinjaOne's identity services.