Topic
Integrate your Freshservice account with NinjaOne to enable your users to connect and map ITSM functions between the platforms.
Environment
- NinjaOne Integrations
- Freshservice
Description
With the Freshservice integration, you can:
- Automatically create Freshservice tickets from NinjaOne policy conditions.
- Automate ticket updates when a previously triggered condition is reactivated.
- Automate NinjaOne device matching to Freshservice assets. NinjaOne will automatically associate any pre-existing Freshservice asset with the Freshservice tickets it creates if the device's serial number matches. Likewise, for any Freshservice ticket linked to a Freshservice asset, the NinjaOne Freshservice sidebar app will attempt to locate the corresponding NinjaOne device by serial number.
- Discover NinjaOne devices by asset ID and serial number and access them remotely.
We are working to provide additional value in future releases, including the ability to map NinjaOne organizations to Freshservice companies. Submit any suggestions or feature requests through our idea submission form.
Select a category to learn more:
- Important Notes
- Give Technicians Access to the Integration Feature
- Prepare the API Key for Integration
- Enable the Integration in NinjaOne
- Install the Marketplace App
- Additional Resources
Important Notes
Consider the following information:
- The NinjaOne systray does not currently support creating Freshservice tickets. We plan to add this functionality in a future release.
- Authentication is handled entirely by Freshservice.
- Integration status is reported within Freshservice and NinjaOne.
- NinjaOne dashboard Activity pages will include information on when the integration is enabled or disabled.
Give Technicians Access to the Integration Feature
You must set technician or role permissions to "Allowed" for ITSM/PSA Integrations Configuration. You can find this permission in the System section.

Figure 1: NinjaOne → Administration → Accounts → Technician account configuration → System permissions
Prepare the API Key for Integration
To enable the integration in NinjaOne, you will be asked to provide an API key. To find your API key, refer to Where do I find my API key? : Freshservice (external link).
Enable the Integration in NinjaOne
To enable the Freshservice integration in NinjaOne, perform the following steps:
- In NinjaOne, navigate to Administration → Apps → Installed and click Add app.

Figure 2: NinjaOne → Administration → Apps → Installed → Add app
- Select Freshservice from the list and click Continue in the confirmation modal.
The Freshservice app configuration page displays. - Click Enable.
The Connection settings modal displays. Use the following table to complete the applicable fields.
Field Data Freshservice subdomain Enter the text that comes before "freshservice.com" in the URL field of your Freshservice account. Do not enter the full URL. For example, if the URL is "ninjaone.freshservice.com, " you will enter "ninjaone" into this field. API key Enter the API key you obtained from your Freshservice account. Requestor email The email address you provide will receive notifications on ticket creation. - Click Save.
Configure the Freshservice Integration in NinjaOne
After you enable the integration, you must configure the settings to ensure all data is correctly mapped and synced between Freshservice and NinjaOne.
Default Settings
The default settings will determine the behavior for Freshservice tickets.
On the Freshservice app configuration page in NinjaOne, click Edit in the Defaults widget.

Figure 3: NinjaOne → Freshservice application configuration → Edit defaults
A Workspace ID value is required to enable ticket creation. You can find this data in Freshservice at Global Settings → Workspace Settings. The Workspace Settings pages are numbered in the URL; for example, if the URL is ninjaonehelpdesk.freshservice.com/ws/2/admin/home, the Workspace ID field should have the value of "2."
Ticket Templates
To create a new ticket template, perform the following steps:
- Open the Ticket templates tab and click Add.
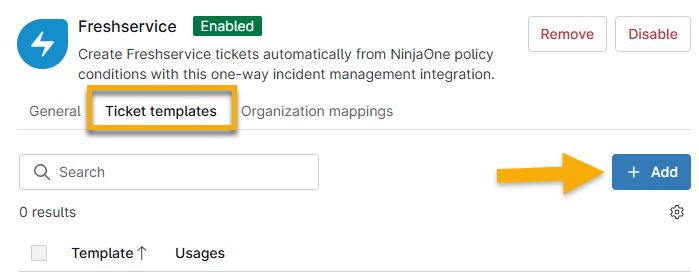
Figure 4: NinjaOne → Freshservice application configuration → Add ticket template
- Use the following table as a guide to fill out the fields.
| Tab | Data |
|---|---|
| General | Give the template a name to identify it. |
| Ticket creation | Assign a status and priority to all tickets that use this template. |
| Condition reset | Select the action that will occur depending on the current ticket status. You can choose to do nothing or change the ticket's status (for example, if the condition resets, you can make the ticket go back to an "open" status). You can select multiple statuses for the If the status is drop-down menu. |
| Condition retrigger | Select the action that will occur depending on the current ticket status. You can create a new ticket or add to an existing one. If you create a new ticket, the other fields on the page will be turned off, and the status and priority will default to the selection made in the Ticket creation section. |
- Assign the template to a policy for triggered conditions. To learn how, refer to Use Freshservice in NinjaOne to Create Tickets.
The first ticket template you create will be assigned as the default. You cannot change the default setting until you create an additional template. You cannot delete default templates or templates that are assigned to conditions.
The Usages column reflects the number of policies (conditions and scheduled automations) or activities using that specific template. This number is a hyperlink; click it to view the usage details. This column updates when you add or remove the template assignments.
To change the template settings, select the checkbox next to the template name and click Edit. You will find additional management options if the template is not set as the default.

Figure 5: NinjaOne → Freshservice application configuration → Edit ticket template or view usage
Organization Mappings
Mapping your NinjaOne organizations to your Freshservice departments ensures that tickets are associated with the correct clients. When successfully mapped, the organization name will display on the ticket in Freshservice. If the organization is not mapped to the department, tickets will only show the default email requester.
After you enable the Freshservice integration in NinjaOne, the Organization mappings tab on the app configuration page automatically updates with a list of all organizations created in your NinjaOne account. You must manually map the organization to its corresponding department in your Freshservice account.
To learn how to add departments in Freshservice, refer to Freshservice's support documentation, User Management: Freshservice (external link).
To map NinjaOne organizations to Freshservice departments:
- Open the Organization mappings tab on the Freshservice integration page.
- Select the checkbox to the left of the organization name, move your cursor over the row, and click the ellipsis button on the far-right side.
- Click Edit.

Figure 6: NinjaOne → Freshservice application configuration → Edit organization mapping
The Edit settings modal displays.
- Select the name of the Freshservice department that will be tied to the NinjaOne organization from the drop-down menu.
- Enter your Freshservice account email into the Requestor email field.
- Click Save.
After you complete the mapping, you can select it again to update or clear the data.
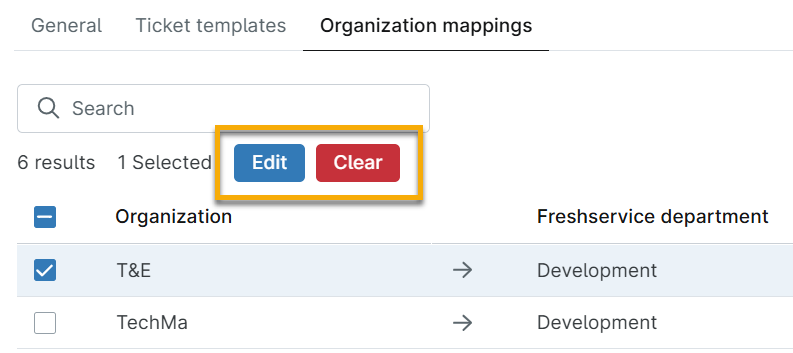
Figure 7: Edit or clear an organization mapping
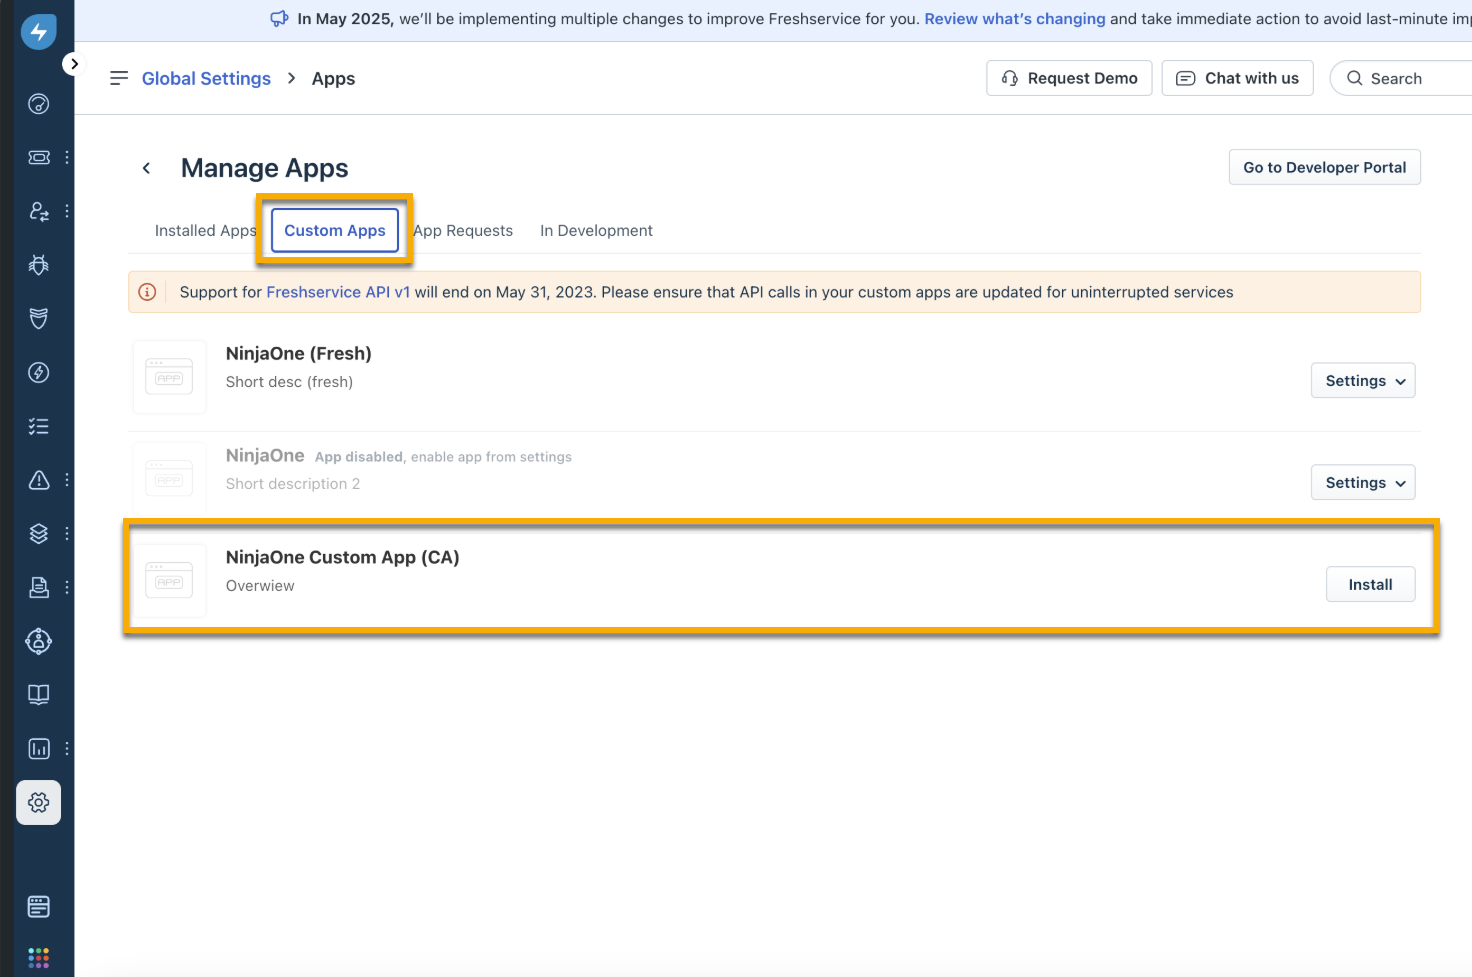
Install the Marketplace App
You can install the NinjaOne marketplace app in Freshservice to improve access to devices and remote tools.
To install the app, navigate to Global Settings → Apps and open the Custom Apps tab. Search for NinjaOne Custom App and click Install.
Figure 8: Install the NinjaOne app in the Freshservice Marketplace (click to enlarge)
Additional Resources
Refer to the following resources to learn more about Freshservice: