Already a NinjaOne customer? Log in to view more guides and the latest updates.

Ticketing Setup and Configuration

Topic

This article shows you how to enable NinjaOne's native ticketing tool and configure your customized settings. 

The NinjaOne platform is compliant with the Health Insurance Portability and Accountability Act of 1996 (HIPAA); please submit a request to your account manager for a signed Business Associate Agreement (BAA). It is best practice to exercise proactive security measures, use Simple Mail Transmission Protocol (SMTP) servers to transmit ticket data, and ensure sufficient protocols are in place to maintain HIPAA compliance in all actions.

Environment

NinjaOne Ticketing

Description

NinjaOne Ticketing allows users with the appropriate account permissions to create, track, and resolve tickets without the need for third-party software.

To set user permissions for NinjaOne Ticketing, refer to NinjaOne Ticketing: Technician and User Permissions. 

To view more videos about NinjaOne Ticketing, check out our Video Library

Terminology Used in this Article

Learn more at NinjaOne Terminology.

TermDefinition
IPInternet protocol
SMTPSimple mail transfer protocol
SSLSecure socket layer
SystraySystem tray

Enable NinjaOne Ticketing

Currently, only system administrators can enable the NinjaOne Ticketing app. 

  1. Click Administration in the left-side navigation pane and select Apps. The Installed page opens by default—click NinjaOne Ticketing
    The Ticketing editor displays.
  2. Click Enable.
  3. Select the options for your general settings, which are outlined in the following section of this article.

Configure General Settings

System administrators are prompted to configure these settings during the initial setup process for NinjaOne Ticketing. These settings can be updated at any time.

ticketing_general.png
Figure 1: Configure general ticketing settings (click to enlarge)

Email Domain

The first group of settings includes the option to configure your domain. This is the custom name of your Ticketing instance and is used to create email addresses for your users. This field is required and can reflect any name you want to display for ticket emails.

To learn more, refer to the section titled Configure Incoming Email Settings further in this article. 

SMTP Email Sending

The option to use a dedicated SMTP email server for sending ticketing emails is disabled by default, meaning that Ticketing uses NinjaOne's default email server for outgoing email. If you'd prefer to have Ticketing use your own configured SMTP server, click Edit to enter the necessary credentials. 

  1. Select "Basic" for Authentication Type to continue with non-Microsoft 365 setup, or refer to NinjaOne Ticketing: SMTP Microsoft 365 Configuration for instructions.
  2. Activate the Enabled toggle switch to power on the outgoing mail server.
  3. Enter the SMTP server name, the port, whether this dedicated server uses SSL, and the email and password.
  4. Click the Test button to verify the connection and resolve any errors that may be reported. Then, click Save
  • NinjaOne's mail server IP, 198.37.154.203, must be allowlisted. Refer to our Global Allowlist (Whitelist) Information for complete information.
  • Only a system administrator can configure the SMTP information.
  • If the SMTP connection stops working at any point (the credentials are changed but not updated in NinjaOne), an error message indicating this will be displayed as a banner in the ticket editor.
  • After saving the outgoing mail server settings for the SMTP Email Sending setup, a "Pending" status displays if the configuration is not complete. A "degraded" status indicates temporary or transient errors and changes to "Healthy" when the issue is resolved. If the error persists, the status will transition to "Unhealthy" with a tooltip that explains the reason for the error.
  • Clicking Test sends an email to confirm the correct configuration settings.
  • If you select the checkbox to Use SMTP Username, an additional field will display, allowing you to provide an SMTP username. Use this option if your provider requires a username, rather than just an email address.

Settings

Ticketing Settings affect general ticket behavior.

SettingDescription
Timers
  • Disabled = no ticket timer
  • Auto-start = timer starts as soon as a ticket is opened by a technician
  • Manual = the technician must activate the timer
Starting ticket numberThe ticket number that should be assigned to the next incoming ticket (this is intended to assist users who are transitioning from another ticketing product but want to pick up from the previous numbering system). The default value is 1000.
Attachments The ability for end-users to attach files to tickets and the requirement for technicians to authenticate their identity to view those attachments.
Technician email responseThis option creates either a public response to the requester or a private internal note when the response to a ticket is via email rather than from within the ticket in NinjaOne.
Systray help requestThe options here relate to your system tray ("systray") branding options. For more information about systray branding, refer to Branding: Systray Icon.
If this setting is enabled, the contact can be created either under the organization that manages the device or as a global contact.
If this option is disabled, tickets created from systray help requests will not automatically provide a requester.
Email receptionsThis option controls whether NinjaOne Ticketing will include the From, To, Date, and Subject headers in forwarded emails. If this is disabled, the headers will be removed and will not be recoverable. 
Automatically assign device for single-device usersIf a user is the owner of a single device and that device is assigned to the same organization named in the ticket, that device will be automatically assigned to the user's tickets. To learn how to set a user as the owner of a device, refer to Add or Change Device Owner

Business Hours

The next settings allow administrators to designate their business hours (the standard hours of work and communication for your business). These hours refer to the entire business rather than individual technician work schedules. 

Business hours are set to "24 hours, 7 days a week" by default but can be customized for each day of the week. 

Use the toggle switches to determine whether your business is closed or open on a particular day, and specify the hours during which you are open. The business hours you select reflect the time zone you entered at AdministrationGeneralSettings. Automations can be configured according to your business hours.

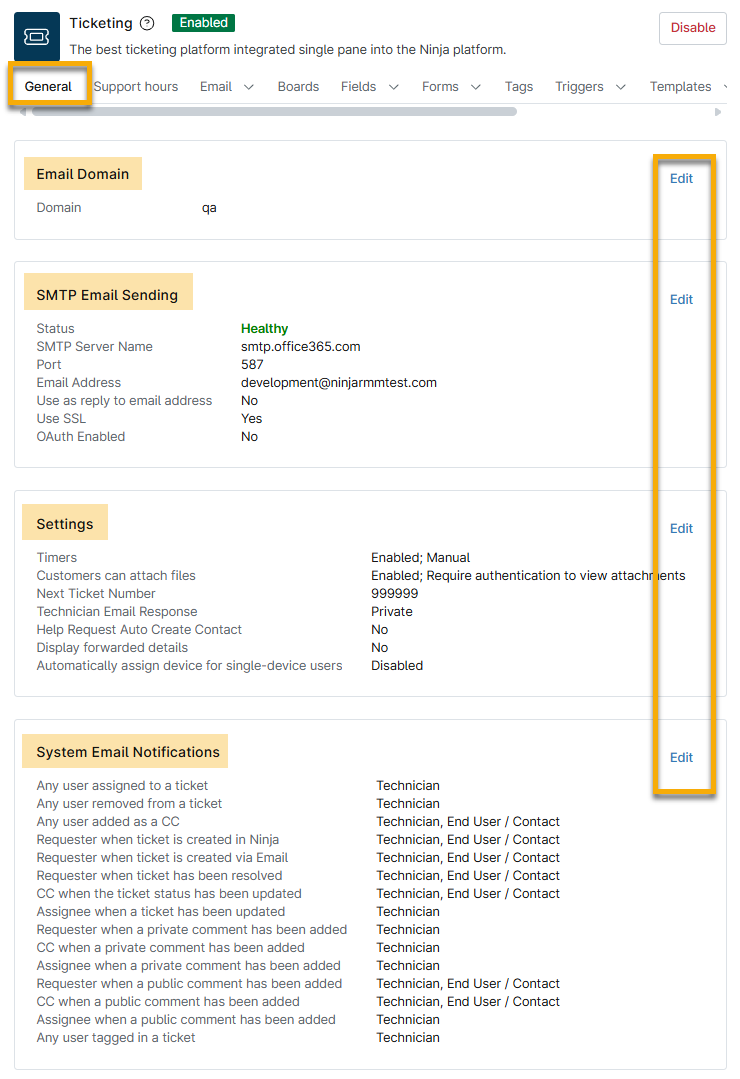
System Email Notifications

System notification email settings enable you to enable or turn off email notifications for various types of system or ticketing events, depending on whether the user is a technician or an end user. 

Use the tabs on the left side of the configuration modal to switch between technician and user notifications and then select whether the recipient will receive a notification and, if so, which email template will be used for the notification. To learn more about email templates, refer to NinjaOne Ticketing: Email and Notification Management.

Email

To learn how to configure these settings, refer to NinjaOne Ticketing: Email and Notification Management.

ticketing_email tab.png
Figure 3: Configure email settings for NinjaOne Ticketing

Boards

Use ticket boards to organize your tickets into different categories.

The boards outlined in the following table are available for each account by default. Default boards are labeled with "System" under the board name. 
BoardDescription
All ticketsAll existing tickets in the Ticketing system.
Open ticketsAll tickets that have not been resolved.
My ticketsAll tickets assigned to the logged-in technician.
Deleted ticketsAll deleted tickets.
Unassigned ticketsAll tickets that have yet to be assigned to a technician.
Organization Dashboard TicketsRelates to the Ticketing tab on the organization-level dashboard. Refer to NinjaOne Ticketing: Device and Organization Dashboards for more information. 
Device Dashboard TicketsRelates to the Ticketing tab on the device-level dashboard. Refer to NinjaOne Ticketing: Device and Organization Dashboards for more information.

Add a Ticketing Board

To add a new ticketing board, perform the following steps: 

  1. Open the Boards tab and click Add.
ticketing_boards_add.png
Figure 4: Add a new ticketing board in NinjaOne
  1. Use the following table as a guide to complete the applicable fields. 

    FieldData
    General
    NameProvide a unique identifier for the board
    DescriptionOptionally, provide a summary of what kind of tickets will be sent to this board.
    Conditions
    Meets all conditionsYou can add one or more conditions under this field. If you add multiple conditions, the ticket will be created only if all conditions are met. 
    The more conditions you add here, the narrower the requirements for routing that ticket to the board.
    Meets any conditionYou can add one or more conditions under this field. If you add multiple conditions, the ticket will be created if only one of the conditions is met. 
    Columns and sorting
    Use the fields in this section to change the default sorting and display of the board. You can add or remove columns and rearrange the way they are presented, so you can see only the information that is important to you. 

    If you have conditions under both All and Any, and the ticket meets the Any conditions but not the All conditions, then the ticket will not be routed to the board. 

    Tickets can exist on multiple boards simultaneously, and if the conditions for a specific board are no longer met, it will be removed from that board.

  2. Click Save.

Edit, Copy, or Delete a Ticketing Board

Custom boards may be edited, copied, or deleted by selecting the checkbox next to the board name and then clicking Edit, Copy, or Delete. Alternatively, move your cursor over the board name and click the ellipses button to view these options. 

Default boards labeled "System" cannot be deleted, but you can edit and copy them.

ticketing_boards_edit copy or delete.png
Figure 5: Edit, copy, or delete a ticketing board

Configure Board Layout

To change the layout of your ticketing board, perform the following steps: 

  1. Click Display Order.
ticketing_boards_display order.png
Figure 6: Change the display order of your ticketing boards
  1. Use the Visible boards field at the top of the configuration modal to determine how many boards are visible in the left-side navigation pane before NinjaOne displays the Show All option (this will not include the "Pending Emails (#)" option). This value can be set to any value between 1 and 20, and defaults to 5. An eye icon visible.pngdisplays for each row that is considered "visible."
visible boards example.png
Figure 7: Example of how the Visible boards field affects the left side navigation pane
  1. To reorder the boards, click and hold the row and then drag it to the desired spot.
  2. Click Save to confirm changes. 

Fields

Custom fields may be created in the Fields tab to further customize different ticketing forms. Learn more about custom ticketing forms in the following section. 

Forms

To help facilitate your understanding of ticketing forms, we created NinjaOne Ticketing: Configure Custom Fields and Forms for Tickets. Refer to this article to learn how to create, edit, deactivate, and implement the forms.

Tags

You can use tags to dictate which boards a ticket applies to, or create automations based on those tags. This tab allows you to create new tags, and rename, merge, and delete existing tags.

You can also add tags by typing in the new tag information from any tickets, automations, and other tag locations within NinjaOne. For more information, refer to Getting Started with NinjaOne Device Tags.

Triggers

Ticketing automation is separated into the Triggers and Templates tabs on the NinjaOne Ticketing application configuration page. 

To learn about ticketing automations, refer to NinjaOne Ticketing: Automation Triggers and Response Templates.

ticketing_triggers and templates.png
Figure 16: Automate ticketing rules with the Triggers and Templates tabs

Custom Status

This feature allows users to create new custom statuses that display as children of existing system statuses (New, Open, Waiting, Paused, Resolved, Closed). These custom statuses can be assigned to any ticket and can be applied to board conditions, board filters, and automations. 

For more information, refer to NinjaOne Ticketing: Ticket Creation and Management.

The NinjaOne Ticketing Custom tab is separated into two sections; click the section name to learn more: 

ticketing_custom.png
Figure 17: Configure custom statuses and relationships for NinjaOne Ticketing

Custom Ticketing Statuses

Use the status of the ticket to communicate the progress of the ticket (pending, testing, backlogged, and more). 

If there is a number next to the status name, this indicates that custom statuses have been added; click the arrow to expand the section and view new statuses. 

To manage custom statuses, open the Custom → Status tab on the NinjaOne Ticketing configuration page; move your cursor over the status to view customization options.

  • If the status is at the top or primary level, you have the following options:
    • Edit status: Change the display name and notification options.
    • Add custom status: Create a secondary status.
  • If the status is at the secondary level, you have the following options:
    • Edit status: Change the display name and notification options.
    • Delete: Erase the status.
ticketing_custom_status_edit.png
Figure 18: Ticket status → Change status settings or create a sub-status

The Resolved setting at Custom → Status works differently from other custom statuses; in addition to creating a display name, you must also select an option for Automatic transition for resolved tickets and Transition time for resolved tickets

The data for the Automatic transition for resolved tickets drop-down menu is dependent on the custom fields configured for Closed statuses. 

ticketing_custom_status_resolved.png
Figure 19: Select an automatic transition for resolved tickets

Custom Ticketing Relationships

Use ticketing relationships when linking tickets or assigning parent tickets on the ticketing boards; refer to the Related Tickets section of the NinjaOne Ticketing: Ticket Handling article to learn more. 

You must enable the Ticket Relations permission for technicians to access this setting. Check out our NinjaOne Ticketing: Technician and User Permissions article for more information. 

To create a custom relationship for linked tickets, perform the following steps: 

  1. Open the Custom Relationships tab on the NinjaOne Ticketing configuration page and click Add relationship
ticketing_custom_relationship_add.png
Figure 20: Custom ticketing → Add relationship
  1. Give the Relationship name a unique identifier and optionally add a description.
  2. Click Add

You can deactivate or change the name and description of relationships that you added in the system. You can only deactivate the native relationships that are tagged as "System." 

Currently, you cannot restore deactivated relationships.
ticketing_custom_relationship_actions.png
Figure 21: Custom ticketing → Custom relationship modification options (click to enlarge)

Additional Resources

Refer to the Ticketing Resource Catalogue to learn more about NinjaOne Ticketing.

FAQ

Next Steps