Topic
This article describes how to view and work with NinjaOne Network Management System (NMS) in the Devices dashboard.
Environment
NinjaOne Network Management System (NMS)
Description
From the Devices search page, you can run actions, create tickets, and edit organization, device role, assigned user, tags, and asset status. You can navigate to the device dashboard from the Devices search page.
From the NMS device dashboard, you can perform all of the same actions and view additional details, including assets, activities, custom fields, and settings. Select a topic to continue.
- Find NMS Devices in NinjaOne
- Discover and Deploy Agents to Network Devices
- View Managed NMS Data on the Device Dashboard
- Additional Resources
Find NMS Devices in NinjaOne
You can view your NMS-managed devices from the Devices page. In NinjaOne, click Devices, then click the Type drop-down menu and select NMS.
Discover and Deploy Agents to Network Devices
Agent Discovery and Deployment allows technicians to scan a network for devices and deploy the NinjaOne agent to eligible Windows endpoints. NinjaOne uses an NMS delegate to scan the specified IP range and assess each discovered device's readiness for agent deployment.
Prerequisites for Agent Deployment
Before running a discovery scan, confirm that target devices meet the following requirements. NinjaOne assesses each discovered device against these criteria and assigns a deployment status accordingly.
Agent deployment is currently supported on Windows devices running a version that NinjaOne fully supports. NinjaOne discovers Mac and Linux devices during a scan but cannot deploy to them at this time.
The following ports must be open on each target device:
| Port | Protocol/Service | Purpose |
|---|---|---|
| 139 | NetBIOS Session Service | Administrative Share deployment method |
| 445 | Microsoft-DS (SMB) | Administrative Share deployment method |
| 5985 | WinRM (HTTP) | PowerShell Remoting (PSRemoting) deployment method |
| 5986 | WinRM (HTTPS) | PowerShell Remoting (PSRemoting) deployment method |
Configure and Run a Discovery Scan
- In NinjaOne, navigate to Devices → Add Device → Agent Discovery and Deployment.
- In the Agent Discovery and Deployment dialog, configure the following settings:
| Setting | Description |
|---|---|
| Organization | Select the organization that the discovered devices belong to. |
| Location | Select the location within the organization. |
| NMS delegate | Select the delegate NinjaOne uses to run the network scan. The delegate must have network access to the specified IP targets. |
| IP targets | Enter the Internet Protocol (IP) addresses, ranges, or subnets to scan, separated by commas. Supported formats:
|
| Deployment credential | Select the Windows credential NinjaOne uses to authenticate against target devices during the scan and deployment. |
- Click Run Discovery. NinjaOne scans the specified IP targets and populates the results table.
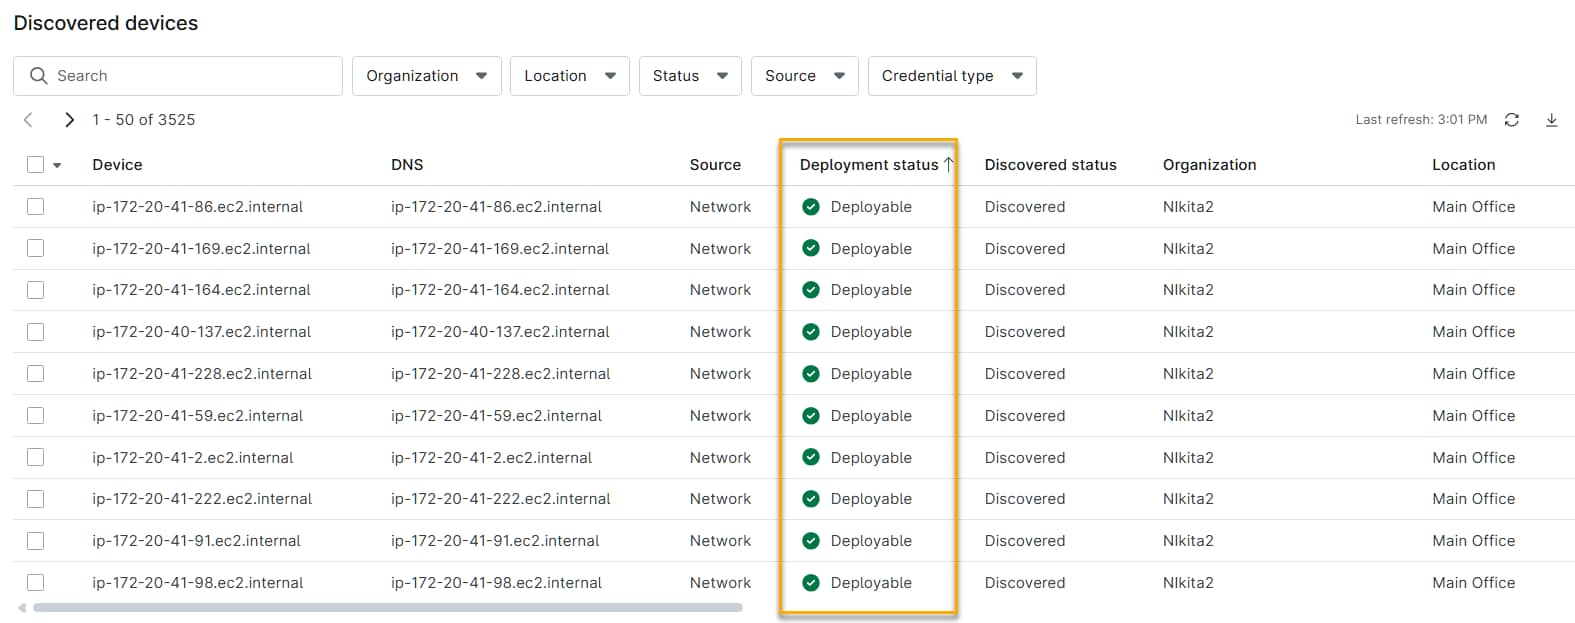
Review Discovery Results
After the scan completes, NinjaOne displays the discovered devices in a table. NinjaOne assigns one of the following statuses to each device:
| Status | Description |
|---|---|
| Agent already installed | The NinjaOne agent is already installed and running on this device. No deployment action is required. |
| Deployable | The device meets all prerequisites for agent deployment. NinjaOne can attempt to install the agent on this device. |
| Not Applicable | NinjaOne cannot deploy to this device at this time. Select the status icon to see the specific reason. Common reasons include:
|
Use the Status filter to narrow the results by deployment readiness.
Deploy Agents to Discovered Devices
- In the discovery results table, select one or more devices with a Deployable status.
- Click Deploy. NinjaOne attempts to install the agent on each selected device.
Review Deployment Results
After the deployment attempt completes, NinjaOne displays the results for each device. Use the status filter to view results by outcome:
| Status | Description |
|---|---|
| Successfully Deployed | The NinjaOne agent installed successfully on the device. |
| Failed | The deployment attempt did not succeed. The status includes a specific failure reason — for example, Failed: Blocked by firewall or Failed: Incorrect credentials. |
To retry a failed deployment on an individual device, select that device and click Redeploy.
To save the deployment results, click Export to download a CSV file.
View Managed NMS Data on the Device Dashboard
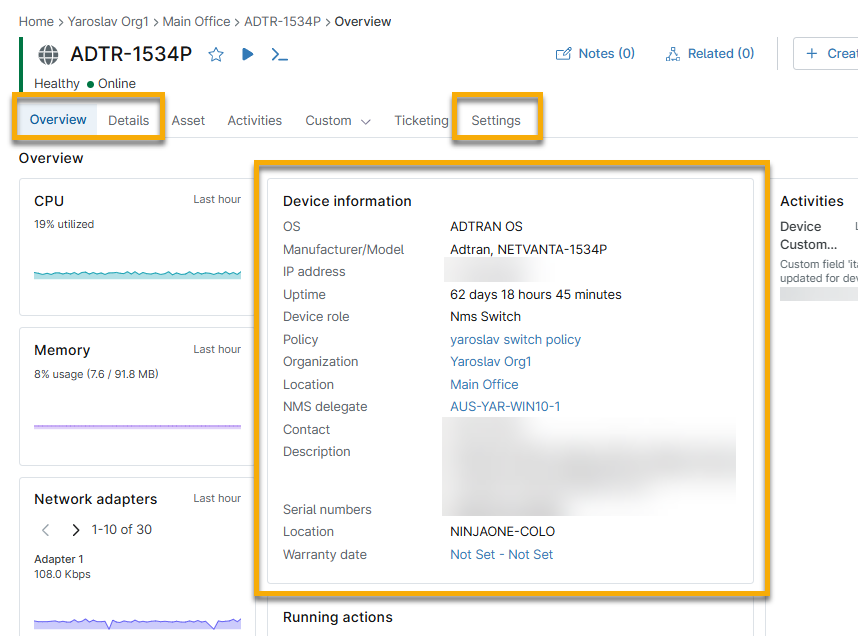
Select an NMS device from the Devices search page to open the NMS device dashboard.
The Overview tab on the device dashboard provides a summary of a device's details. NinjaOne shows the device's details in the Device information card. The information displayed varies, depending on the type of device.
You can find additional information in the Details or Settings tabs.
The following items relate to NMS device management (items with an asterisk require valid SNMP credentials to view):
- OS*
- Manufacturer/Model*
- IP address
- Uptime*
- Device role
- Policy
- Organization
- Location
- NMS delegate
- Contact*
- Description*
- Serial numbers*
- Warranty date
Editing Device Information
Follow these steps to edit device information:
- In the device's dashboard, click the Settings tab, then click Edit in the Device information card.
- In the Edit device information dialog, edit the following settings:
| Setting | Description |
|---|---|
| Display name | Define a name for the device. This name appears on dashboards and reports. |
| Organization | The organization to which the device belongs. You cannot change the organization for NMS devices. |
| Monitor by | Select the parameter NinjaOne uses to identify and monitor the device:
|
| Monitor by <criteria> | The available options for this field depend on your selection in the Monitor by field above. |
| Device role | Change the device role. Note that changing the device's role will impact its policies and delete custom field values not present in the tabs associated with the new role. |
| Location | Select the physical location of the device within your organization. |
| Assigned user | Select the user within your organization who should act as the owner of the device. |
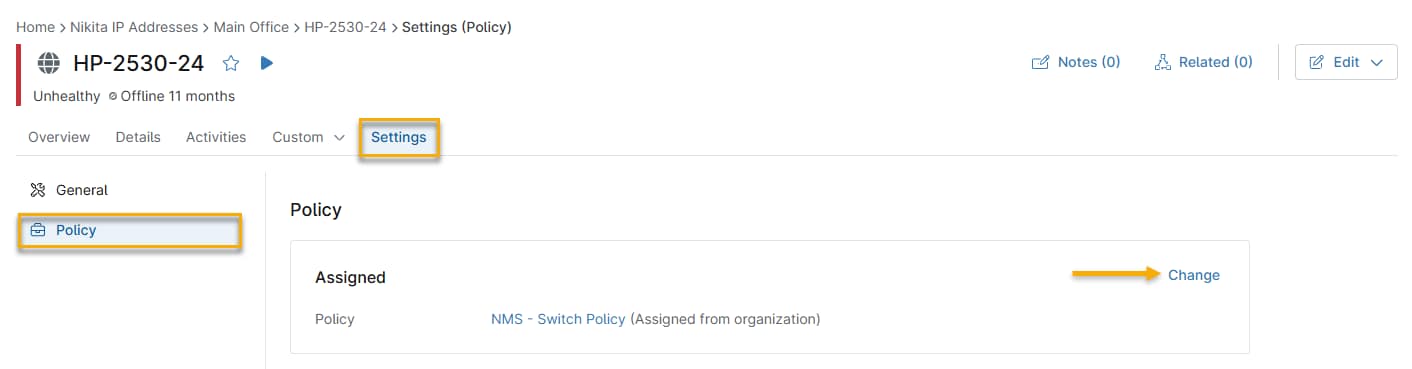
Changing Policies
You can switch between management policies on the Settings page.
- In the device's dashboard, navigate to Settings → Policy, then click Change.
- Select the new policy from the drop-down menu, then click Update.
Viewing Device Activity
On the devices dashboard, NinjaOne shows activities taking place on the device in the Activities card.
Open the Activities tab to filter activity by type, status, user, and date range.
The following items are related to NMS device management:
- Credential changes
- Settings adjustments
- Policy updates
- Secure Shell (SSH) and Telnet sessions
- Maintenance mode entry and exit
- Condition triggers and resets
Viewing NMS Asset Information
If you have NinjaOne IT Asset Management (ITAM) activated, you can track and manage the lifecycle of your NMS devices. Refer to NinjaOne ITAM: Getting Started for more information.
Viewing NMS Custom Field Information
Custom fields allow you to publish data about a user, endpoint, organization, or location in NinjaOne. You create the custom fields and then use those fields to populate the Custom tabs on the dashboards. Refer to NinjaOne Custom Fields: Getting Started for more information.
Viewing NMS Ticketing Information
NinjaOne Ticketing allows you to create, track, and resolve tickets with the appropriate account permissions, without the need for third-party software. Refer to NinjaOne Ticketing: Getting Started for instructions.
Additional Resources
Refer to NinjaOne NMS: Resource Catalog to learn more about managing NMS devices in NinjaOne.