
Topic
This article discusses how to activate the Splashtop integration in NinjaOne.
Environment
- NinjaOne Integrations
- Splashtop
Description
Splashtop is a remote access software you can integrate with NinjaOne to manage your devices. Using the integration in NinjaOne allows you to use Splashtop to access devices from the NinjaOne dashboard remotely.
Index
Select a topic to learn more:
- Security Note
- Enabling Splashtop
- Connecting to Devices
- Requiring Confirmation From the End User to Connect
Security note
To establish a connection to the Splashtop for RMM Streamer, the Splashtop RMM Viewer must provide a unique token that can only be obtained from a private Splashtop API.
Requests to this API are only possible from allowlisted IP addresses (NinjaOne Servers). They are authenticated using a custom username, password, and Uniform Resource Identifier (URI) only available through a partnership with Splashtop. Tokens are generated on demand and expire after a short time.
In addition, access is secured by a unique, randomly generated password that the NinjaOne agent sets when the connection is requested. For auditing purposes, each connection request timestamp is recorded in the activity log.
Installation notes
- TeamViewer and Splashtop applications are no longer integrated into NinjaOne by default. Contact your account manager to activate them.
- NinjaOne supports the latest version of Splashtop (3.8 as of this writing) for Apple macOS and Microsoft Windows, which also includes support for FIPS-compliant cryptographic modules. If a newer version of Splashtop is released, you can update the version from within the Splashtop app. For more information, refer to the following Splashtop resource: Splashtop FIPS Compliance - Support (external link).
- Read the Apple macOS installation details section of the Splashtop Installation Instructions (external link) for information about installing Splashtop on macOS devices.
Installing Splashtop for RMM integration
To install the Splashtop integration in NinjaOne, follow these steps.
- Navigate to Administration → Library → Downloads.
- Click the hyperlink for the appropriate operating system.

Figure 1: The Splashtop Download link (click to enlarge)
Enabling Splashtop
- Navigate to the organization editor that you would like to enable Splashtop for (Administration → Organizations) and select the Splashtop tab on the left navigation pane.
- Select the Managed button and select the endpoints for which you are enabling Splashtop. This automatically triggers the installation of the Splashtop streamer.

Figure 2: NinjaOne organization configuration page → Splashtop
Requiring Confirmation from the End User to Connect
Your end users may request the option to accept or deny incoming Splashtop connections. We currently offer an "Ask for Confirmation" feature to accommodate this. Follow these steps to configure the Ask the end-user for confirmation to connect option:
- Navigate to the organization editor (Administration → Organizations) and open the Splashtop tab.
- For each device type with Splashtop activated, check the box next to Ask the end-user for a connection confirmation.

Figure 3: End user confirmation to connect (click to enlarge)
- Select the preferred behavior for when the request expires (after 30 seconds of no response).
To activate or deactivate the connection confirmation feature for specific machines, navigate to the Settings tab on the Device dashboard and click Change in the Splashtop widget.

Figure 4: Splashtop confirmation to connect (click to enlarge)
When you request a connection to a device with this setting activated, the end user receives an alert requesting to allow or reject the incoming Splashtop connection.
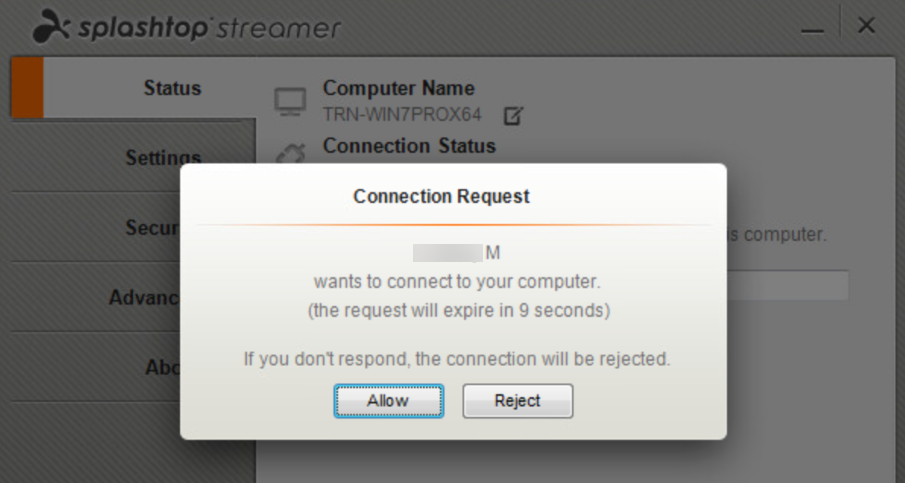
Figure 5: End user confirmation (click to enlarge)
You will also see a dialog message from Splashtop stating that the system is waiting for the partner to confirm the request. Once the end user accepts the connection, the technician can view and control their screen.
Connecting to Devices
To connect to a device via Splashtop, perform the following steps:
- Navigate to the device dashboard and click the Splashtop icon next to the device name.

Figure 6: The Splashtop icon in the Device dashboard (click to enlarge)
- Download Splashtop for RMM on the device you are connecting from. When you click the Splashtop icon, a download link for Splashtop for RMM appears.

Figure 7: Splashtop download dialog (click to enlarge)
The credentials may take some time to be passed to the device. If you cannot connect immediately, wait a couple of minutes and then try again. If you are experiencing issues connecting to a device via Splashtop, navigate to Splashtop's connectivity site (external link) on the device to check its connection.
Rejected Connection Alerts
The technician receives a rejection alert if:
- The end user rejects the connection.
- The end user does not respond, and the connection is set to reject connection attempts that do not receive a response.
Deactivate Splashtop for Specific Devices
Once activated, you can deactivate Splashtop for specific devices. Navigate to a device dashboard, open the Settings tab, then use the switch on the Splashtop card.

Figure 8: Splashtop settings (click to enlarge)
Additional Resources
To learn more about Splashtop in NinjaOne, refer to Splashtop FAQs.