Topic
This article describes the process for patching Windows endpoints via NinjaOne's patch management features.
For general details about leveraging patch management in NinjaOne, refer to our Patching Resource Catalogue.
Environment
NinjaOne patch management
Description
In NinjaOne's Windows patch management, you can use the Control mode to either approve or reject patches before a scan detects them. If you prefer, you can also manually approve or reject patches by Knowledge Base (KB) number or patch ID after the scan identifies them. Depending on your policy settings, NinjaOne will categorize the patch as Approved, Rejected, or Pending.
Select a topic to continue.
- How NinjaOne Prioritizes Approvals and Rejections at Different Levels
- Preemptively Approving or Rejecting Patches
- Automatically Approving Patches Based on a Designated Number of Days
- Manually Approving or Rejecting Patches
- Manually Rejecting or Approving Patches in the Pending State
- Manually Scanning for or Applying Updates
- Uninstalling Patches
How NinjaOne Prioritizes Approvals and Rejections at Different Levels
There are four different levels at which NinjaOne could approve or reject a patch:
- Device-level overrides
- Policy-level overrides
- Global preemptive approvals/rejections
- Policy-level automated approvals/rejections
NinjaOne prioritizes the closest level to the device in the patch approval process. Device-level overrides take precedence, followed by policy-level overrides, global approvals or rejections, and automated approvals or rejections at the policy level.
When there are clashes between the Knowledge Base (KB) and the Patch ID at the same level (device, policy, or global), NinjaOne prioritizes patch rejections above all else. If the KB rejects a patch but the Patch ID approves it, NinjaOne will reject the patch. Similarly, if the Patch ID rejects a patch but the KB approves it, NinjaOne will also reject the patch.
For an overview of various avenues in the patch approval process, refer to the following diagram.

Preemptively Approving or Rejecting Patches
Only system administrators can preemptively approve or reject patches at the global level.
You can only preemptively approve or reject patches by KB. You cannot preemptively approve or reject a patch without an associated KB (such as a driver).
Preemptively Approving or Rejecting OS Patches at the Global Level
To approve or reject a patch at the global level:
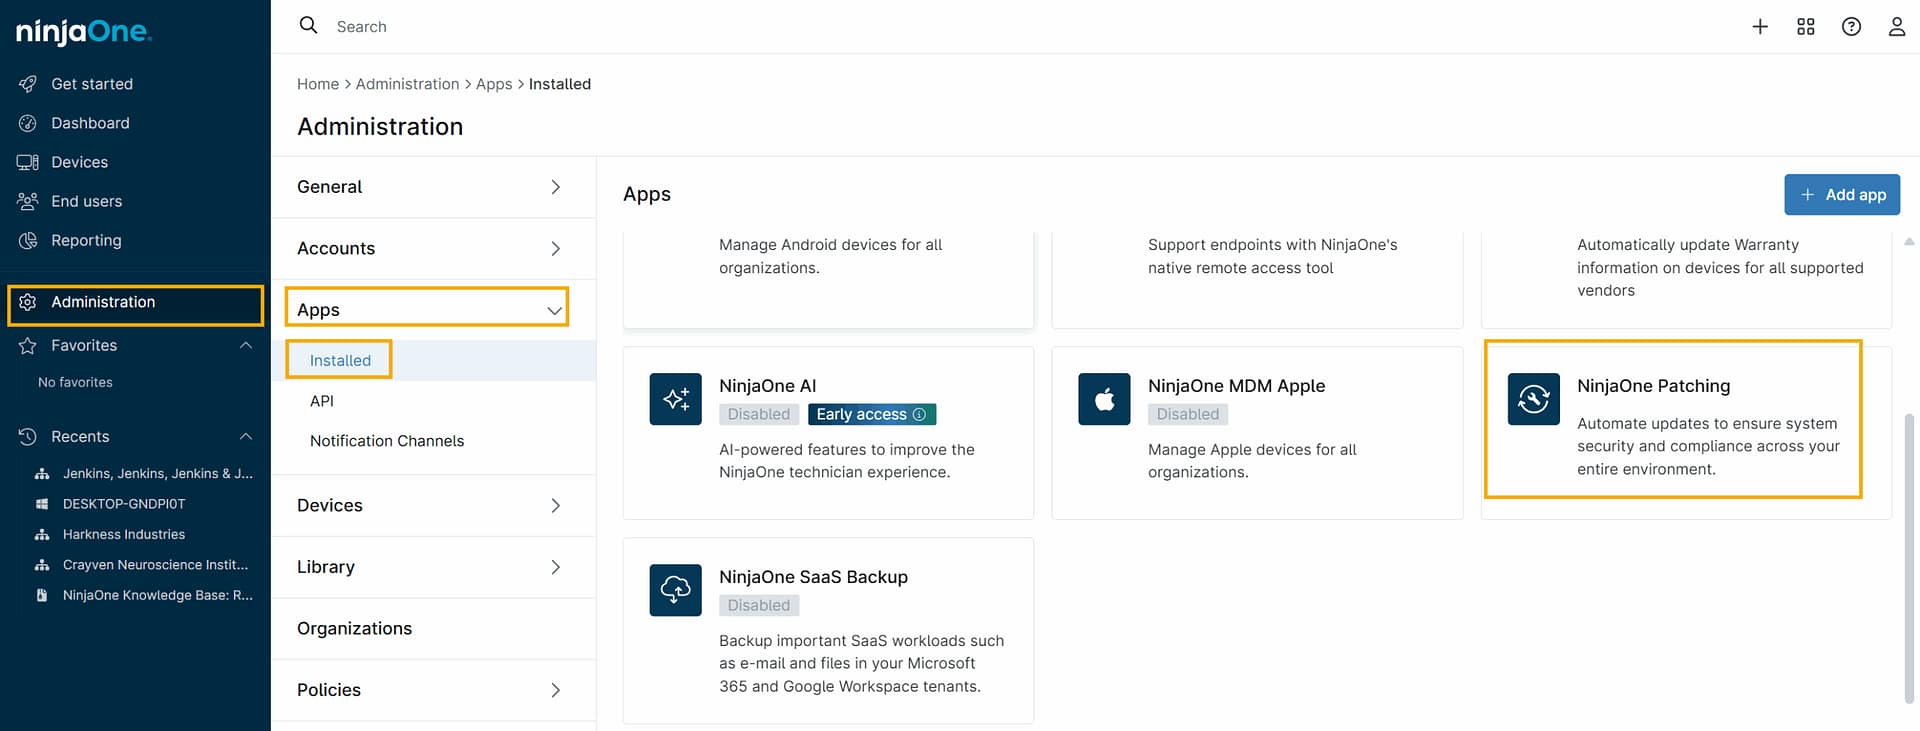
- Navigate to the NinjaOne Patching App at Administration → Apps → Installed → NinjaOne Patching.
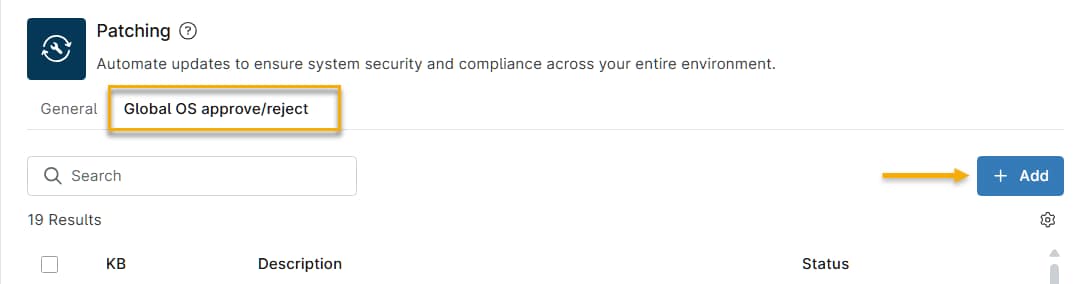
- Click the Global OS approve/reject tab, then click Add.
- Enter the KB number for the patch and select Approve or Reject. Refer to Automate Patching Approval / Rejection for more information about patching options.
Preemptively Approving or Rejecting OS Patches at the Policy Level
You can approve or reject a patch at the policy level by using the following workflow.
- In NinjaOne, navigate to Administration → Policies and select a Windows policy.
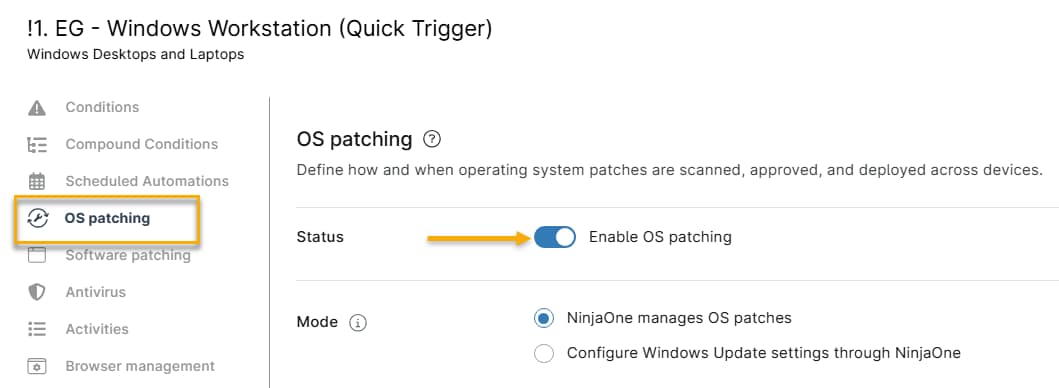
- The policy's configuration options will open. Click OS Patching and ensure that Enable OS patching is active.
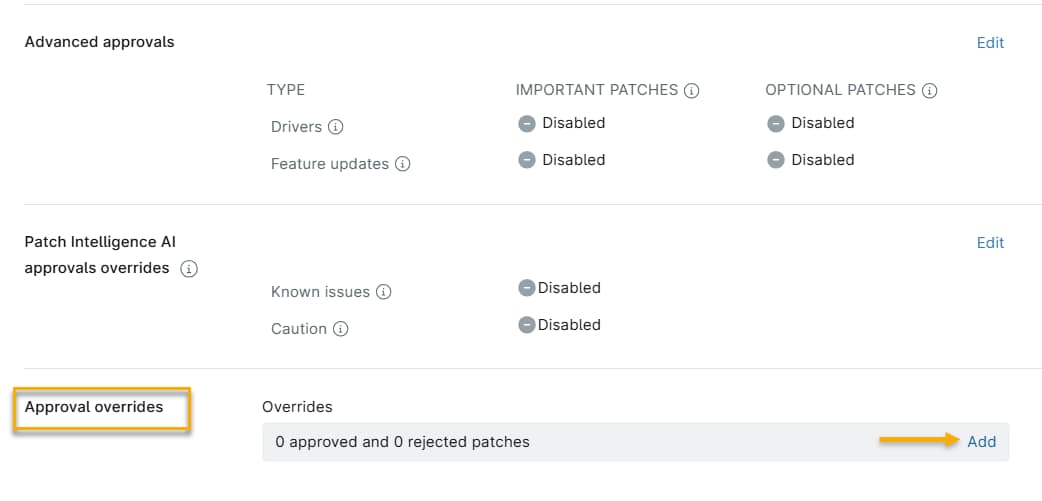
- Scroll to the Approval overrides card and click Add.
- Click the link listing the current number of approved and rejected patches, as shown in the following screenshot.
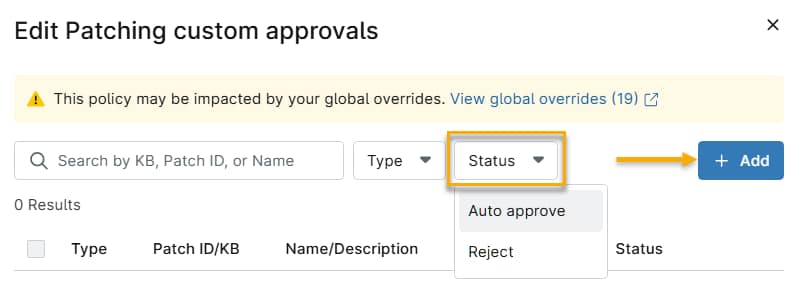
- The Edit patching custom approvals window will appear. Use the search field to search for the patch, or enter its KB number, then use the Status menu to select Auto approve or reject.
Automatically Approving Patches Based on a Designated Number of Days
In the NinjaOne Policy Editor, you can automatically approve Windows patches after a specific number of days. You can set a limit of up to 30 days for all updates. You can also approve feature updates for up to 365 days. This delayed approval helps reduce the risk of potentially faulty patches. You can configure each patch type with its own unique delay period.
When you set a patch to Approve After X Day(s), the countdown starts from the release date, not from when NinjaOne identifies the patch.
Follow these instructions to automatically approve patches after a specified number of days.
- In NinjaOne, navigate to Administration → Policies and select a Windows policy.
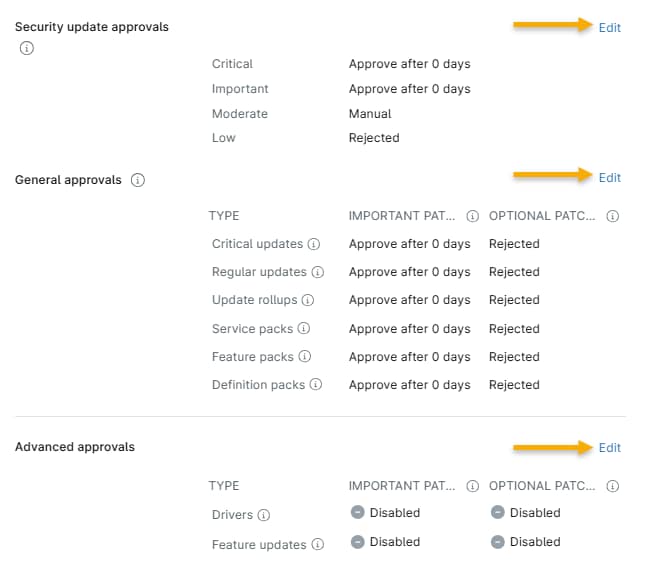
- The policy's configuration options will open. Click OS Patching and ensure that Enable OS patching is active. Scroll to the Approvals section and click Edit. NinjaOne segments these sections into Security update approvals, General approvals, and Advanced approvals. Refer to NinjaOne Patching: Windows OS Patch Management to learn more about patch approval categories.
Manually Approving or Rejecting Patches
You can manually approve or reject patches via the dashboard. To learn more, refer to our Dashboards: Patch Management article. The following approval and rejection options are available.
| Approval/Rejection Options | Description |
|---|---|
| Approve/Reject for this device | Select this category to create a device-level override for a single device using the Patch ID to target the correct path. You can access this option when you view a pending, approved, or rejected patch from the device level. |
| Approve/Reject for this device by KB | Select this category to create a device-level override for a single device. You can access this option when you view a pending, approved, or rejected patch from the device level. |
| Approve/Reject | This option uses the Patch ID to target the correct path. You might find multiple patches with the same KB number, but each will have its own unique Patch ID. |
| Approve/Reject by KB | KB labels on Microsoft patches indicate a specific update. Multiple patches can share the same KB label. If you approve or reject a patch based on its KB, you automatically approve or reject all patches associated with that KB. |
| Approve/Reject for policy/policies | This option creates a policy-level override for the policies linked to the devices with a pending, approved, or rejected patch. You can choose this workflow when viewing a patch on the system dashboard, the organization dashboard, or at the device level. |
Manually Rejecting or Approving Patches in the Pending State
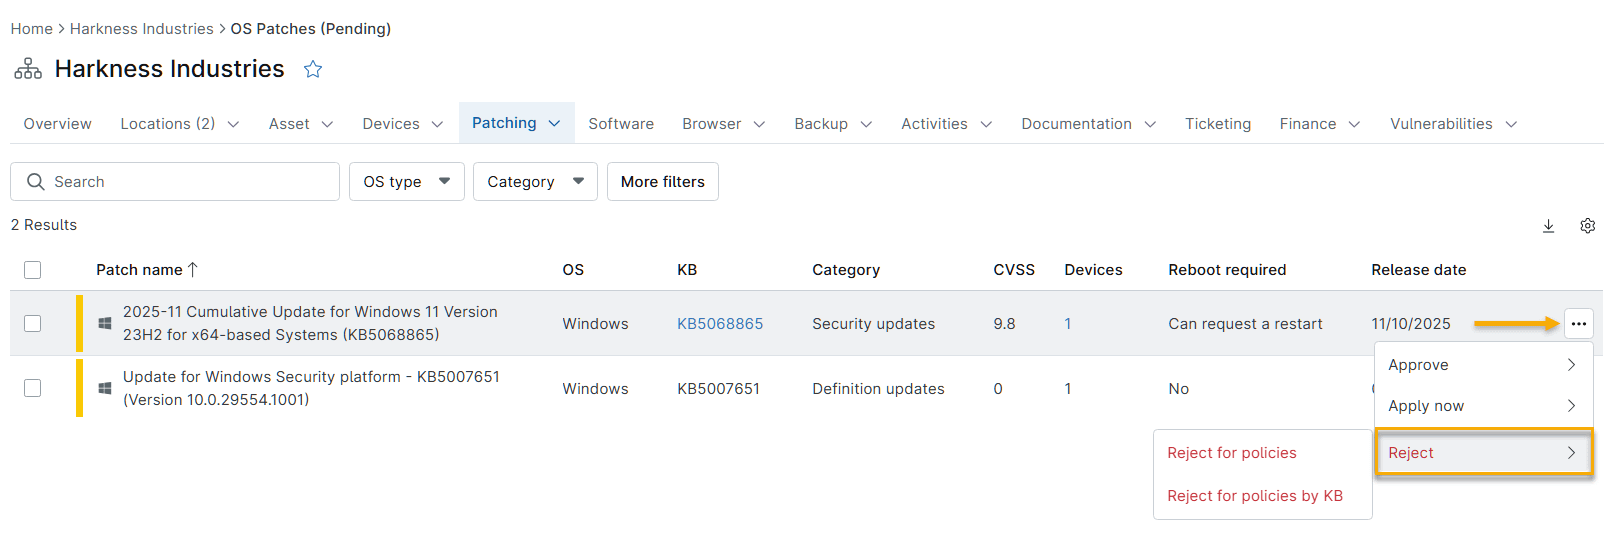
If a patch is waiting for approval or rejection, decide whether to approve or reject it. Determine if the patch logic should use the KB number or Patch ID, and specify whether it applies to the device or the policy:
- In NinjaOne, navigate to the Dashboard page.
- Move your mouse over the Devices tab.
- Select Approvals → Pending.
- Click the device name you'd like to manage.
- On the device's Overview page, scroll to the Health section.
- Click the downward-pointing chevron next to the patch to be approved or rejected.
- In the menu, select whether you want to reject or approve the patch and whether to do so by KB or Patch ID for the device or the policy.
Manually Scanning for or Applying Updates
NinjaOne can initiate an on-demand patch scan and update cycle on any endpoint. NinjaOne installs all available updates and will reboot the device if necessary. If a device hasn't received a patch update in over 60 days, it might need several reboots to apply all updates because some updates depend on NinjaOne installing others first.
To manually scan for or apply updates to a single device:
- In NinjaOne, navigate to the Devices page.
- Click the device name you'd like to manage.
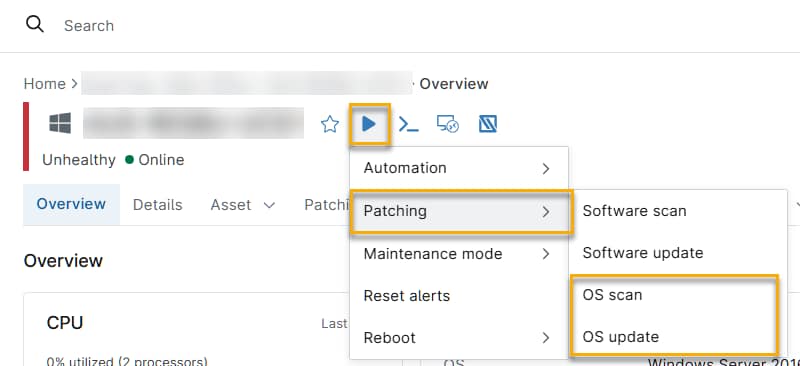
- Move your mouse over the Run option in the menu at the top of the list.
- Select Patching, then click OS scan to scan for new patches or OS update to apply existing patches.
To run an ad-hoc scan or update on multiple devices:
- In NinjaOne, navigate to the Devices page.
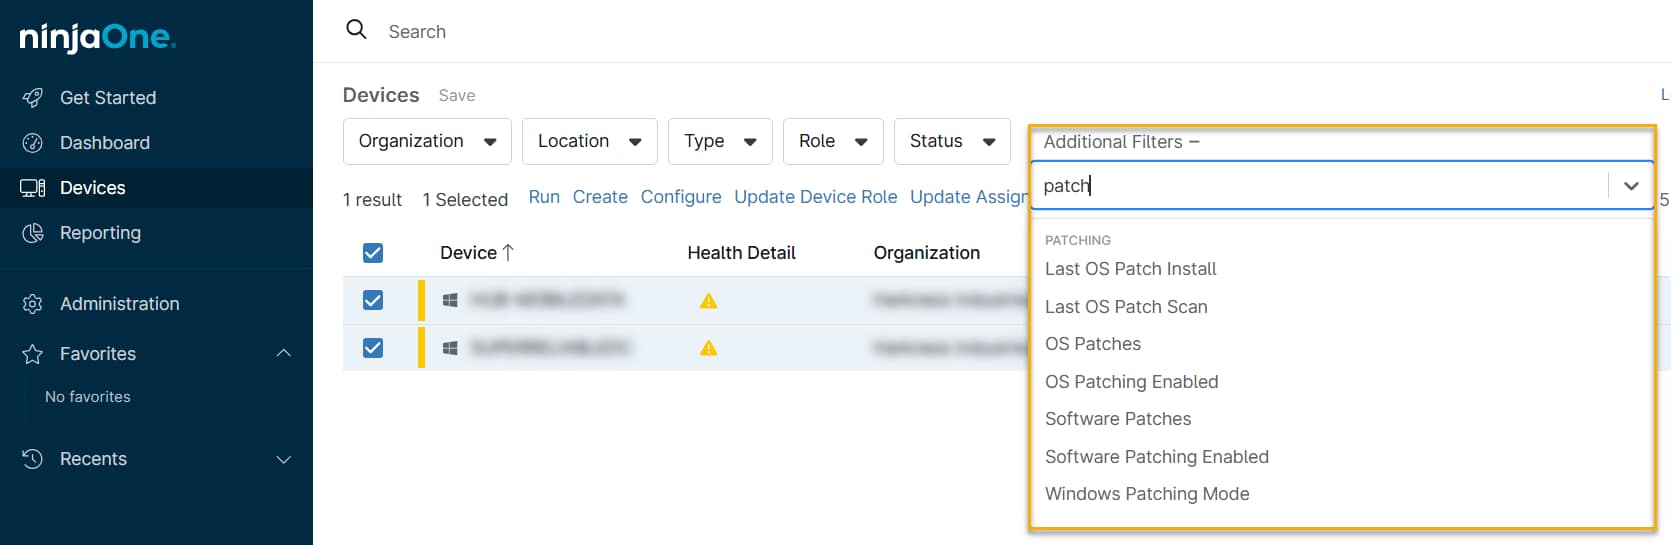
- Select the checkboxes next to the devices you'd like to include in the scan or update cycle.
- Move your mouse over the Run option in the menu at the top of the list.
- Select Patching, then click OS scan to scan for new patches or OS update to apply existing patches.

- Ensure that Windows patch management is active for the policy applicable to your devices and verify that they are online. The Additional Filters option lets you quickly locate these devices.
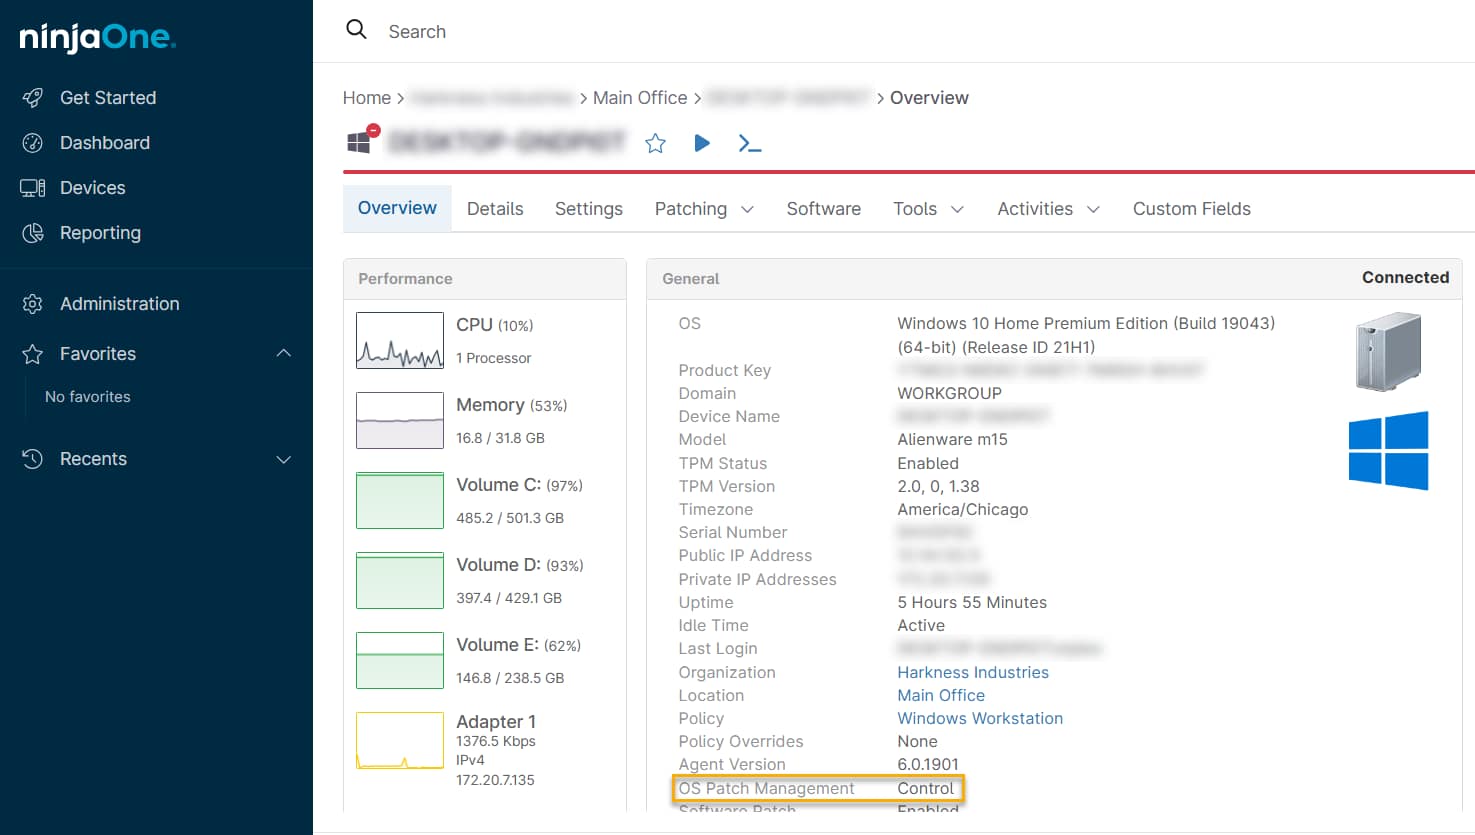
You can also see the Windows patch status at the device level. If you have patches set to manual approval or rejection, you can take those actions from the Overview tab on the device dashboard.
Uninstalling Patches
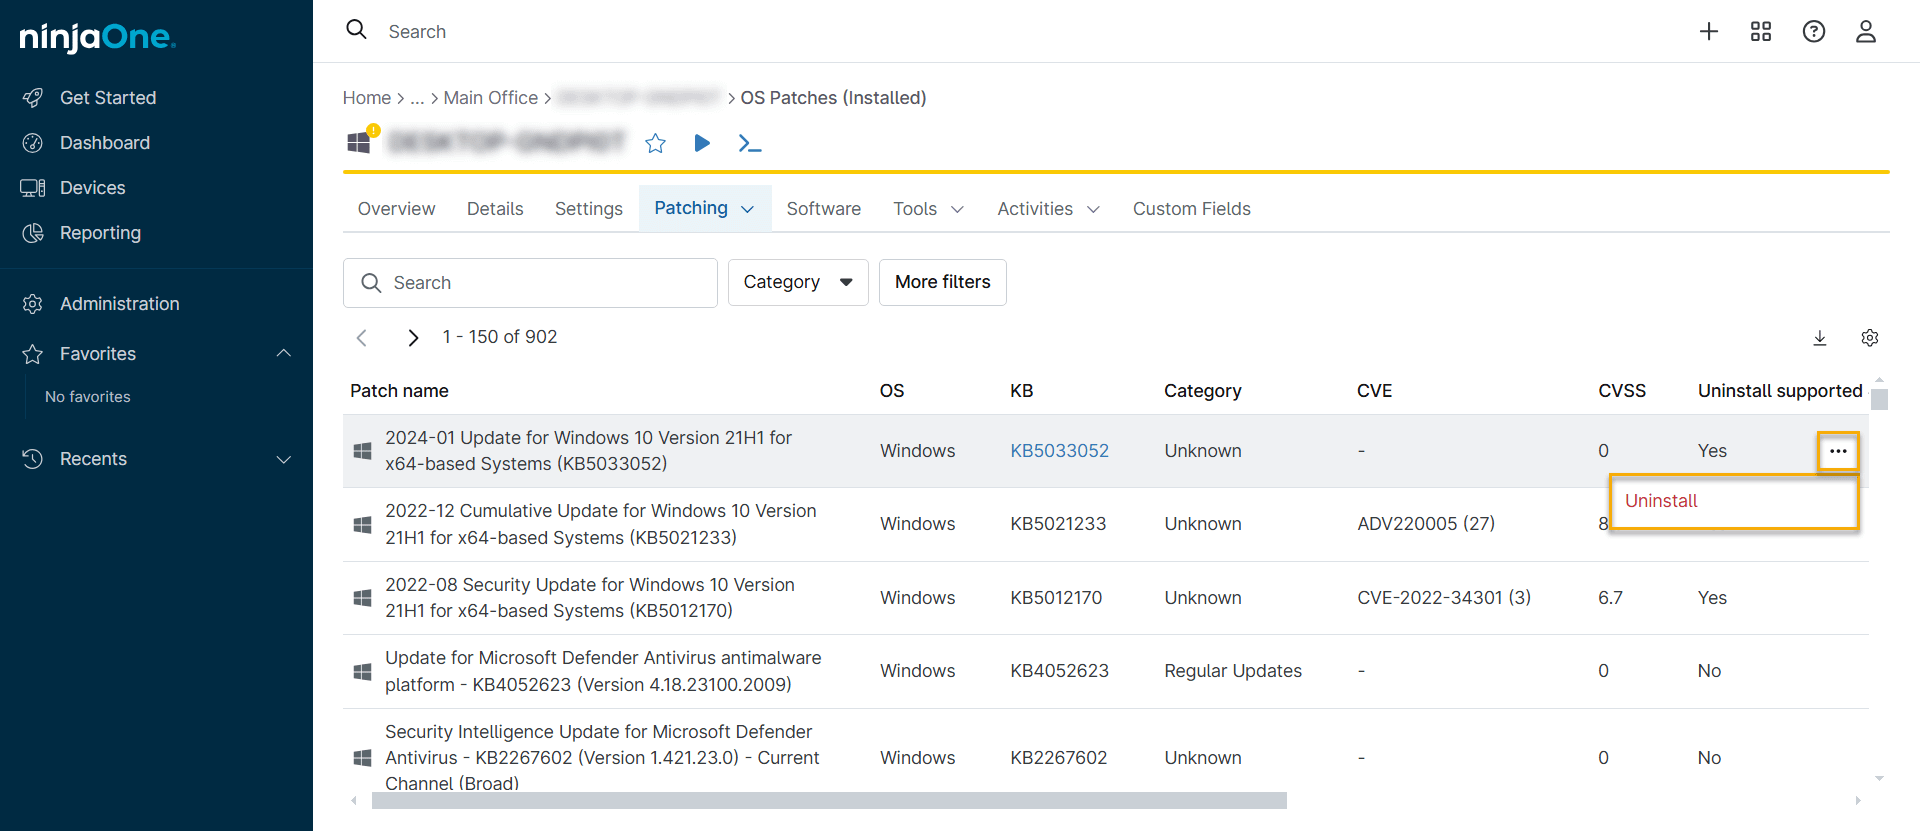
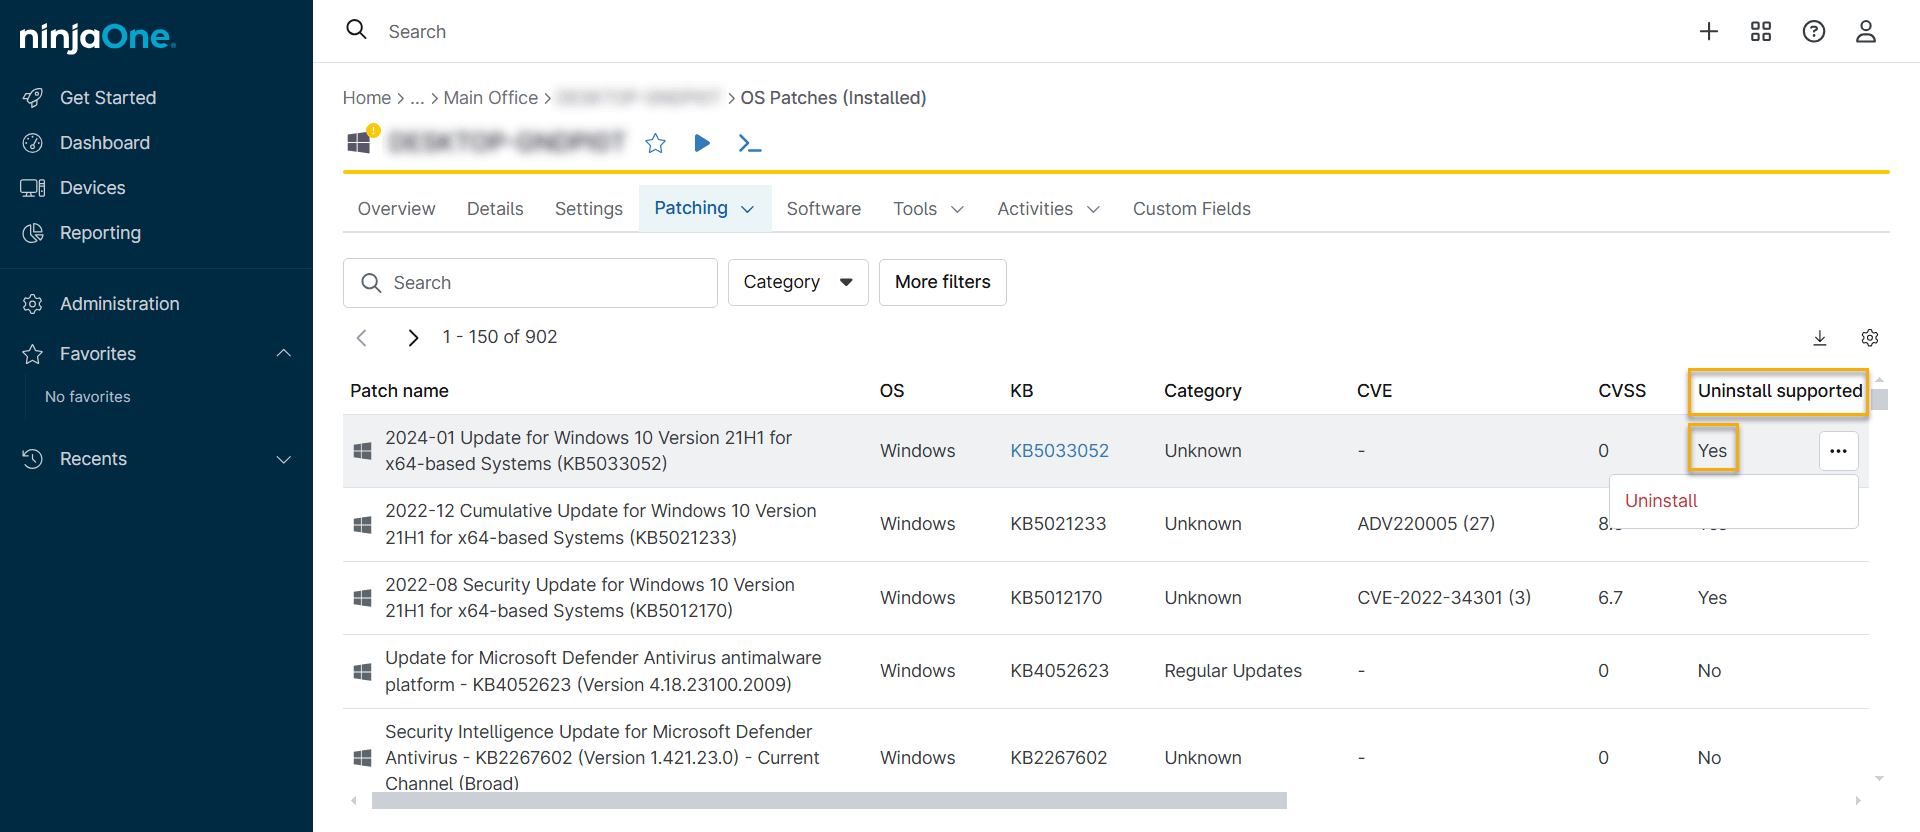
You can uninstall individual patches from the device detail page. To do so, perform the following steps.
- In NinjaOne, navigate to the Devices page.
- Click the device name you'd like to manage.
- On the device's Overview page, move your cursor over the Patching menu.
- Select OS patches. Then, click Installed.
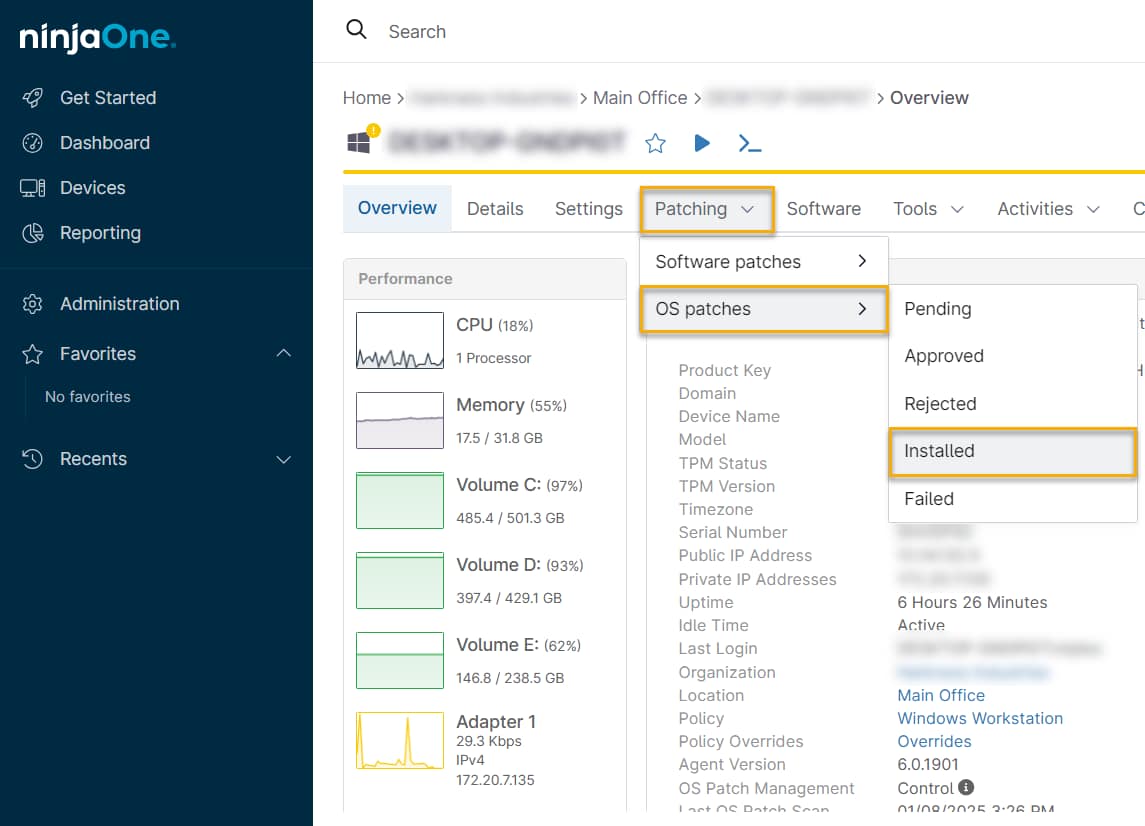
- Move your cursor over the patch row and click the actions menu.
- Click Uninstall.