Topic
This article describes how to integrate the Okta application with NinjaOne by using Security Assertion Markup Language (SAML).
Environment
- NinjaOne Integrations
- Okta
Description
SAML allows technicians to access the NinjaOne application using a single sign-on (SSO) with their preferred provider. SAML can be used with both the standard and branded NinjaOne web application, which supports multiple IDPs (Identity Providers). For more information about using SAML with NinjaOne, refer to NinjaOne Identity Authentication Management: About IDP-Initiated Security Assertion Markup Language (SAML).
Index
- NinjaOne SAML Integration
- Configure SSO in NinjaOne
- Configure SSO for Existing Users
- Additional Resources
NinjaOne SAML Integration
Prerequisites
Ensure that for every SSO user in NinjaOne, there is an email in Okta that matches.
- If using a branding URL, ensure that both the branding and native hostnames are specified in the Okta integration setup. This will ensure both are set as Assertion Consumer Service (ACS) URLs.
- If you are planning to use the NinjaOne login multi-factor authentication (MFA) bypass option:
- Configure your authentication policies in Okta to perform MFA during Okta login.
- You will need to configure a property in your Okta application that references "session.amr" by following the instructions at Pass Dynamic Authentication Context | Okta Classic Engine (external link). By default, NinjaOne is looking for a SAML attribute named "amr" which should contain the value "mfa" when the user performs MFA for the session. NinjaOne adds this attribute by default to the app, which is in the Okta Integration Network (OIN) catalogue.
- MFA bypass will only occur for accounts that accessed Okta with multifactor authentication. If Okta does not return the Authentication Methods Reference (AMR) attribute “mfa,” NinjaOne will not bypass the native NinjaOne MFA. Review your Authentication Policy in Okta to confirm that MFA is required to access at least NinjaOne by accessing App sign-in policies | Okta Identity Engine (external). Okta Verify does not return an AMR value of “mfa” and requires an accompanying MFA method to bypass NinjaOne’s MFA.
- If you have an existing NinjaOne SSO configuration with Okta and wish to add the IDP-initiated SSO feature, you will need to remove and re-create the Identity Provider app within NinjaOne and Okta.
Supported features
For more information on the listed features, refer to the Okta Glossary.
- SP-initiated SSO
- IDP-initiated SSO
Configure SSO in NinjaOne
Refer to Login Security: Configure Single Sign-On in NinjaOne to configure SSO for your IDP in NinjaOne.
- For the field What email domains will authenticate using this integration?, add email domains for the users who will be authenticating with this identity provider. If you leave this field blank, any user with a domain that is not specified in another IDP will be directed to this identity provider by default.
- In a separate browser tab, navigate to the Okta Admin console to continue with setup. Leave the Configure SSO modal open in NinjaOne.
Create a NinjaOne SAML Integration in Okta via the Okta Integration Network (OIN) Template
In the Okta Admin console, you can add the NinjaOne SAML integration by performing the following steps:
- Navigate to Applications → Browse App Catalog. Search "NinjaOne" and click the NinjaOne application, then select Add Integration.
- Set the Display Name to the name that you would like to display to users.
- Return to NinjaOne and open the IDP configuration. Copy the Unique Identifier and paste it into the SP Unique Identifier field in Okta.

- Set the NinjaOne Primary Hostname to your branded or non-branded site (for example, "mycompany.rmmservice.com" or "app.ninjarmm.com"). This will be the default URL used for IdP-initiated logins.
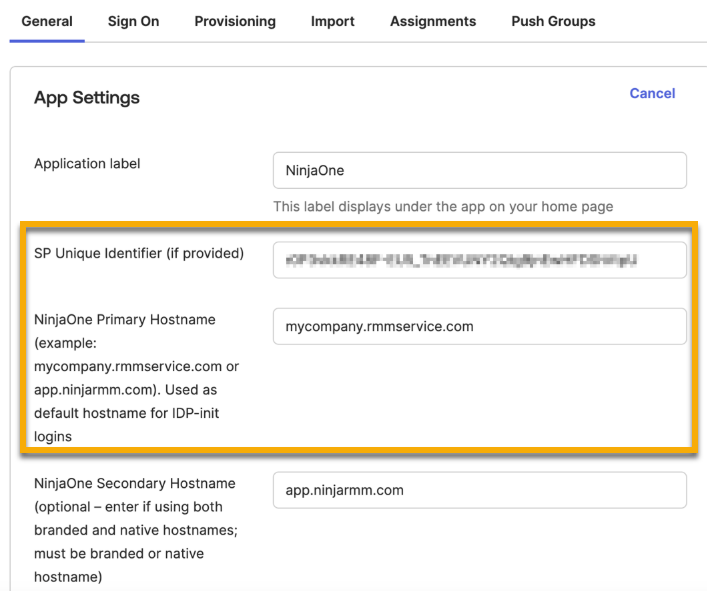
- Optionally, add the unused branded or non-branded site value to the NinjaOne Secondary Hostname as an alternate site URL. The secondary hostname is required if you intend to sign in to the NinjaOne console via SP-initiated workflow with your secondary URL. If the non-branded URL is your secondary, we recommend adding it, as identity providers occasionally use the default URL as an intermediary during the login process.
- Set the Application Visibility to either display the application as available for users or not, based on your organization's needs.
- Click Done to create the SAML application.
- Remain in the Okta Admin console and navigate to the Assignments tab of the newly created SAML app.
- Use the Assign drop-down menu to add target users or groups for the application.
- Navigate to the Sign On tab and copy the Metadata URL.
Complete the SSO Setup in NinjaOne
Return to the Configure SSO modal in NinjaOne to complete SSO setup.
- In NinjaOne, paste the Metadata URL that you copied from Okta into the Import metadata from form using the default URL submission type.
- Activate the Enable toggle switches depending on your organization’s needs.
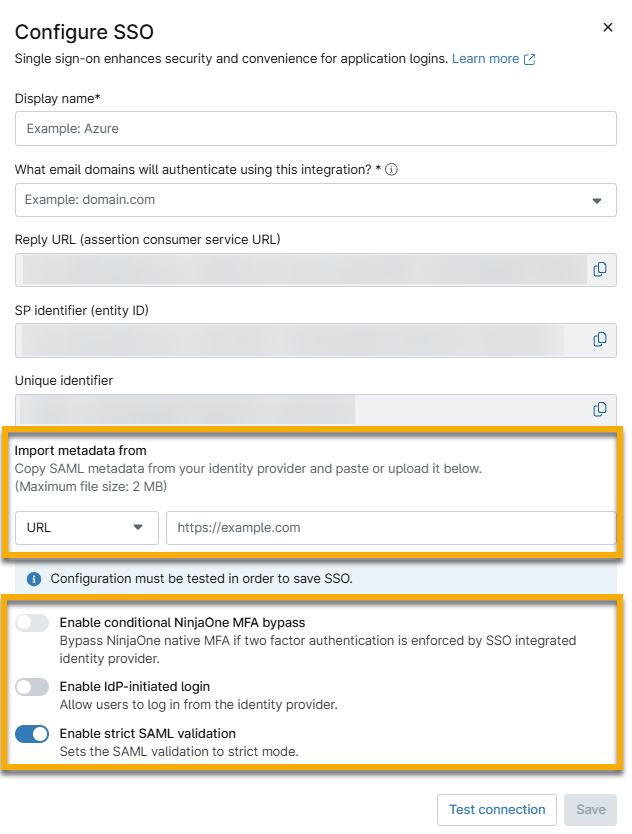
- Click Test connection to complete the final authentication process required for setup.
Once the SAML response is validated successfully, you'll see a message confirming "Your connection has been validated."
- Click Save when finished.
Configure NinjaOne SAML with a Custom SAML 2.0 App
If functionalities included in the NinjaOne OIN template do not meet the advanced configuration requirements of your organization’s identity setup, you can configure NinjaOne SAML with a custom SAML 2.0 app.
- In the Okta Admin console, navigate to Applications → Create App Integration → SAML 2.0.
- Enter a unique identifier for the App Name that you would like to display to users.
- Configure the App Visibility and App Logo settings based on your organization’s needs and click Next.
- In NinjaOne, copy the Reply URL and paste it into the Single sign-on URL field in Okta. If you intend to use IdP-initiated SSO, this URL will be used to navigate users to the branded or non-branded site.
- In NinjaOne, copy the SP identifier (entity ID) and paste it into the Audience URI (SP Entity ID) field in Okta
- Leave Default RelayState blank and keep Name ID format as "Unspecified."
- The Application username field for Okta username can generally remain as the default entry. However, you should set this attribute to "Email" if the Okta username is not an email address. This value needs to match the email address in NinjaOne.
- Leave Update application username unchanged.
- Optionally, if you would like to bypass NinjaOne’s native MFA when signing in: In the Attribute Statements section, create an attribute with the name "amr" and a value of "session.amr." For more information, review the MFA bypass materials included in the Prerequisites section earlier in this article.
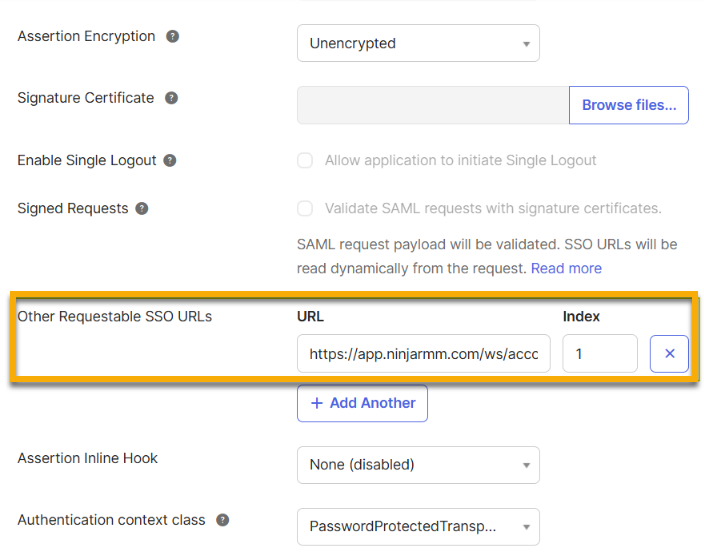
- Perform the following steps to configure the Native Reply URL (example: "https://app.ninjarmm.com"), which can be used for SP-initiated SSO and Native MFA:
- Copy the SP identifier (entity ID) from the Configure SSO modal in NinjaOne.
- Click Show Advanced Settings in Okta.
- Paste the SP identifier (entity ID) in the Other Requestable SSO URLs field.
- Set Index value to "1."
- Click Next.
- Leave entries in the Feedback page blank and click Finish.
- Complete Steps 8-10 from the section Create a NinjaOne SAML integration in Okta using the Okta Integration Network (OIN) Template. The steps in question are:
- Remain in the Okta Admin console and navigate to the Assignments tab of the newly created SAML app.
- Use the Assign drop-down menu to add target users or groups for the application.
- Navigate to the Sign On tab and copy the Metadata URL.
- Complete all steps from the section Complete the SSO Setup in NinjaOne to finish the setup process.
Test the SP-Initiated and IDP-initiated Logins
We recommend testing both the SP-initiated and IdP-initiated login flows with a test account before changing all target NinjaOne users' authentication types from Native to Single Sign-on. This will prevent potential NinjaOne account access issues.
- Sign in to NinjaOne with a system administrator account that you are comfortable using for testing and is assigned access to the Okta identity provider app.
- In NinjaOne, click your avatar icon in the upper-right corner of the console and click your name to open your user settings.
- Navigate to the Security tab and select Single Sign-On from the Authentication Type drop-down menu. Save changes.

To Test SP-initiated SSO
To test the SP-initiated SSO, perform the following steps:
- In a private or incognito browser tab, navigate to the branded or non-branded NinjaOne site. The site URL is dependent on your primary and secondary Hostname configuration settings in Okta.
- Enter your NinjaOne username. The password field should disappear; click Sign in with Okta.
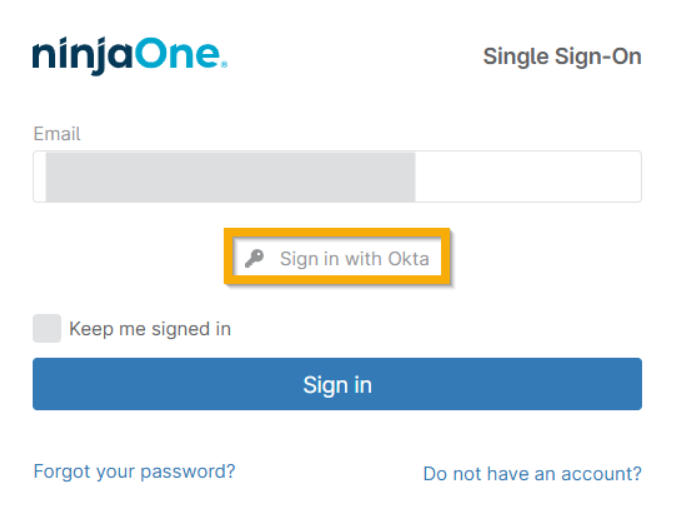
You will be directed to Okta to enter your credentials and then redirected to NinjaOne once authentication is successful.
This confirms the SP-initiated SSO flow. If MFA bypass is enabled and you have completed MFA via Okta, you will not be prompted for NinjaOne’s Native MFA.
To Test IdP-initiated SSO
To test the IdP-initiated SSO, perform the following steps:
- In a private or incognito browser tab, navigate to your Okta end user dashboard.
- Click the NinjaOne app icon located in the My Apps section. This should redirect you to the NinjaOne dashboard and confirm the IdP-initiated SSO flow.
If MFA bypass is enabled and you have completed MFA via Okta, you will not be prompted for NinjaOne’s Native MFA.
Configure SSO for Existing Users
You can configure Okta SSO for existing NinjaOne users from the NinjaOne console.
- Co to Administration → Accounts → All Users.
- Select the technicians or end users you want to configure for SSO.
- Click Actions and select Change authentication.
- Set the authentication type to Single Sign-On (SSO) and click Update to save changes.
The authentication type can also be updated per user in the Security section on the account configuration page.

Additional Resources
To learn more about NinjaOne's identity services, refer to Identity Authentication and Management: Resource Catalog.
To learn more about enabling SCIM for Okta, refer to Configuring NinjaOne SCIM in Okta.