
Topic
This article describes how to use the Apps & Services tool in NinjaOne's Documentation feature.
Environment
NinjaOne Documentation
Description
The Apps & Services tool empowers you to manage documents for each of your organizations. Use this tool to create and manage templates and add or view documents on the organization dashboard.
Want to learn more about NinjaOne Documentation? Check out our video library.
Select a category to learn more:
Create a Document Template
Before you can start adding documents to the Apps & Services tab on the organization dashboard, you must create a document template on the NinjaOne Documentation configuration page. Templates can contain specific custom fields for technicians to fill out, or can act as a folder for uploading files.
- Navigate to Administration → Apps → Installed → NinjaOne Documentation. The Documentation tab will be open by default.
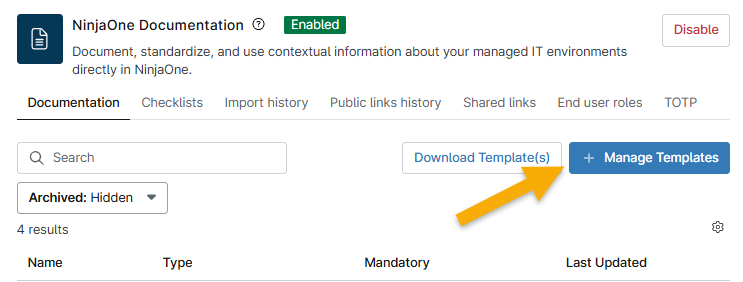
- Click Manage Templates.
Figure 1: Documentation configuration app → Manage templates (click to enlarge)
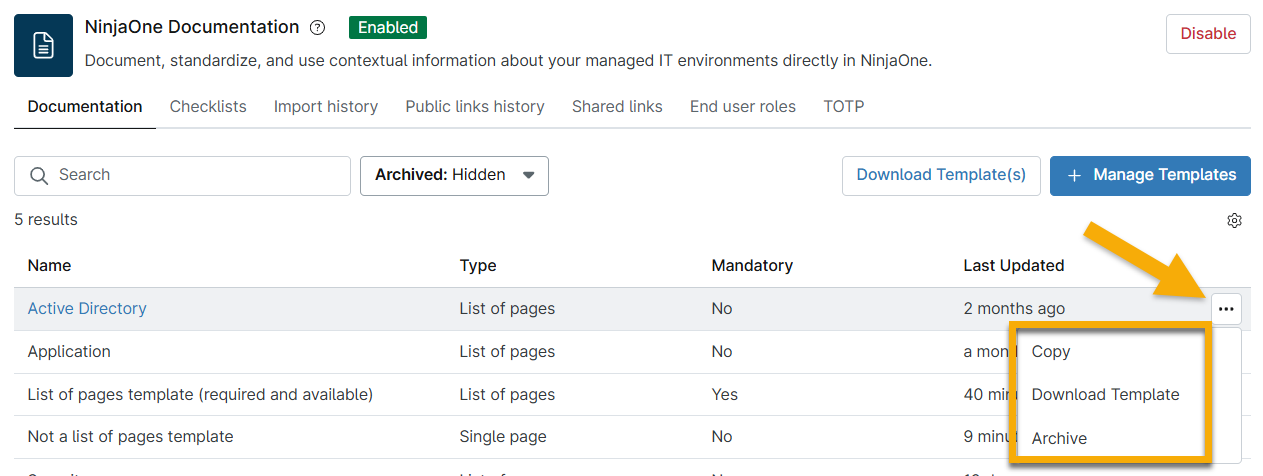
- Select an option from the drop-down menu. Refer to the following sections for instructions pertaining to your selection.
Figure 2: Documentation configuration app → Template actions (click to enlarge)
Add Template
To create a new documentation template, perform the following steps.
- Click Manage Templates and select Add template.
- Use the tabs in the configuration dialog to modify settings. If you need a description of these settings, refer to the table in the following section.
- Click Create.
Template Configurations
When creating or reading documents on an organization's dashboard, you may notice different document icons or options. This section provides examples of the template configurations.
| Custom Field Option | Description or Example |
|---|---|
| List of pages = yes | You can add multiple documents to this template. Identify these templates in an organization by the icon to the left of the template name (there will be a folder icon instead of a paper icon). If you select this option, a new checkbox appears, allowing you to show the description in the table view. |
| List of pages = no | This template acts as a single document. Identify these templates in an organization by the icon to the left of the template name (there will be a paper icon instead of a folder icon). |
| Required | The template shows an icon and a Required tag, and the data is mandatory. |
| UI Elements | UI elements add a title, description, or separator (line break) to a document template. You can add as many as you need to customize your template. |
| Details | When you add a custom field to a template, you can use the Details tab to configure the following:
|
Import Templates From Library
NinjaOne provides several default templates that you can use to import your documents. To import a template, perform the following steps.
- Click Manage Templates and select Import Templates from Library.
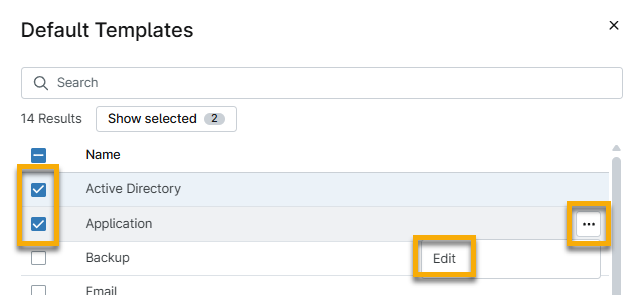
- In the Default Templates dialog, select all the checkboxes that you want to apply.
- To edit the default template, move your mouse cursor over the row, click the actions menu, and select Edit. The Create document template dialog displays, where you can configure settings as you would a new custom template. Use the previous section of this article, Add Template, for instructions.
- Click Save.
Import Documents From CSV
Use an import wizard to upload multiple documents at the same time.
- Click Manage Templates and select Import Document(s) from CSV.
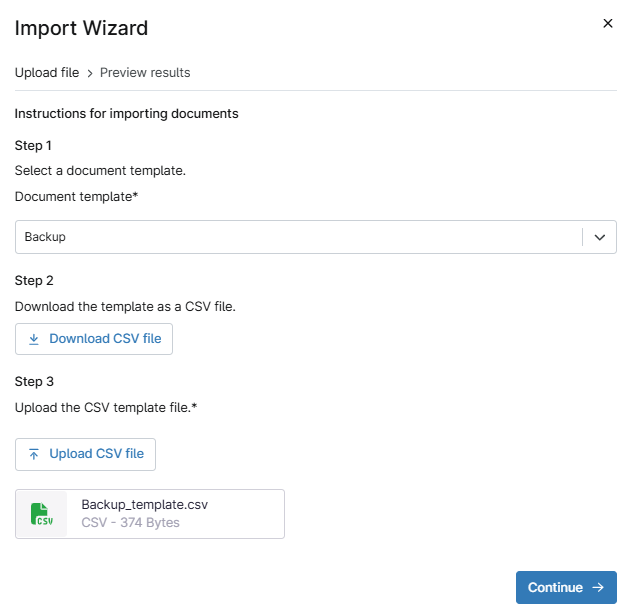
- Select a custom or default template from the Document template drop-down menu.
- Click Download CSV file, and then open the spreadsheet on your computer.
- Enter data into all columns to the best of your knowledge. Note that the following data is required:
- Organization Name: If you do not enter the exact name for the organization, the import wizard will not be able to assign the document to a dashboard.
- Document Name: The name must match an existing document on your computer, or the import wizard will show an error and not allow the import.
- Click Continue.
- If the required information is present, click Import. If the required information is not preset, this button will not be active, and the affected column will show an error icon.
How to Use Apps and Services
Use the Documentation → Apps & Services tab to manage your document templates. To learn about adding documentation via the WYSIWYG field or uploading files, refer to NinjaOne Documentation: Knowledge Base Feature.
Navigate the Apps & Services Menu
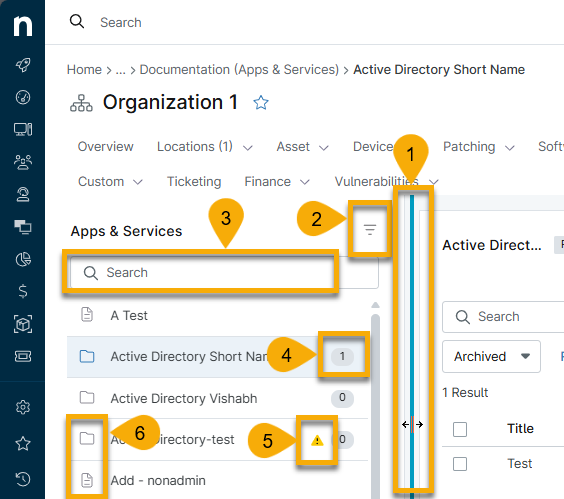
Use the following table with Figure 5 to learn about the icons and menu options in Apps & Services.
| Number | Purpose or Definition |
|---|---|
| 1 | Change the size of the Apps & Services sidebar. Place your cursor over the area, and then click and drag to the left or right. |
| 2 | View archived or incomplete documentation. Archived documentation will show a bin icon next to the template name. |
| 3 | Search for a template by name. |
| 4 | This number indicates how many documents are uploaded to the List of Pages template. |
| 5 | This icon indicates that the item is required and incomplete. |
| 6 | These icons identify the template type. |
Add a Document (List of Pages)
A List of Pages template acts as a folder where technicians can upload multiple documents. To add a document to a List of Pages template, perform the following steps.
- Navigate to an organization from the system dashboard; open the Documentation drop-down menu and select Apps & Services.
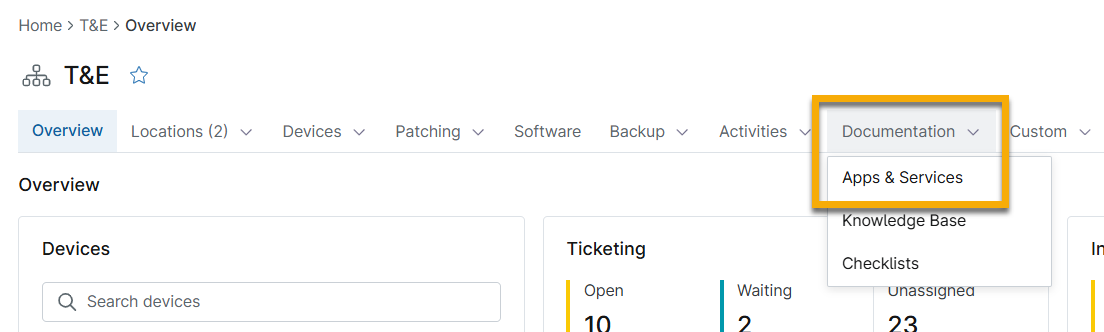
Figure 6: Access the Apps & Services documentation (click to enlarge)
- Select one of the templates in the Apps & Services sidebar.
- Click Add document.
Figure 7: Add new list of pages Apps & Services documentation (click to enlarge)
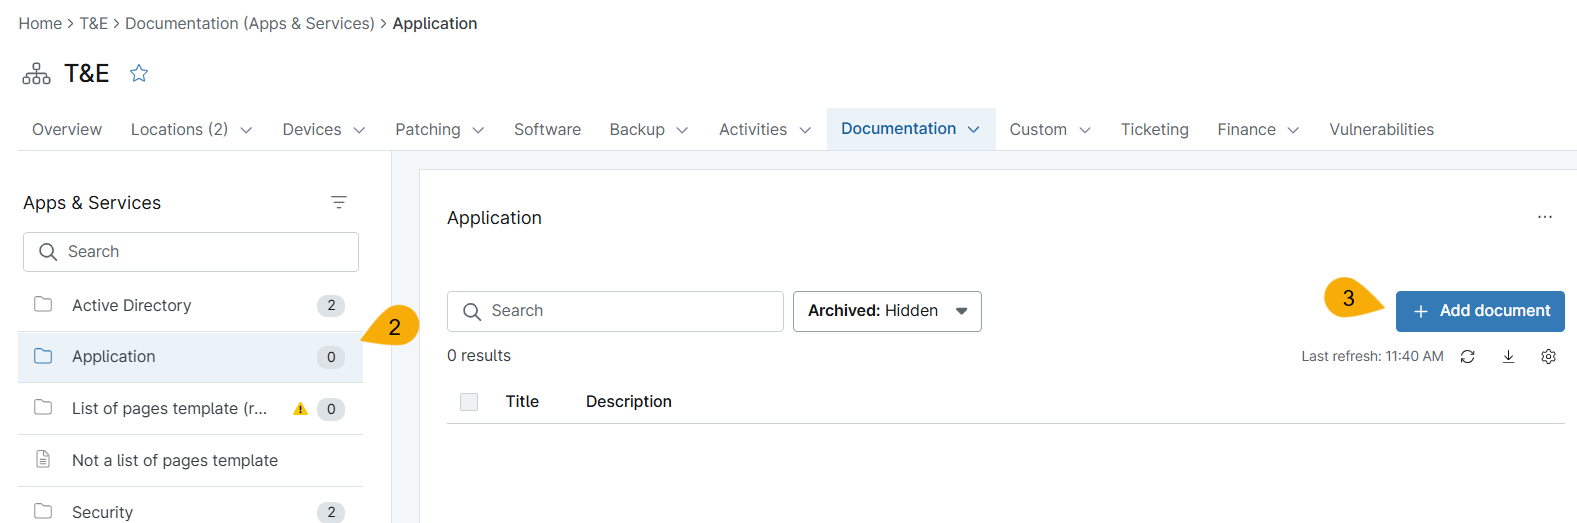
The page updates to display the custom fields configured for that template.
- Fill out the information and then click Create.
Figure 8: Add new Apps & Services documentation → Create (click to enlarge)
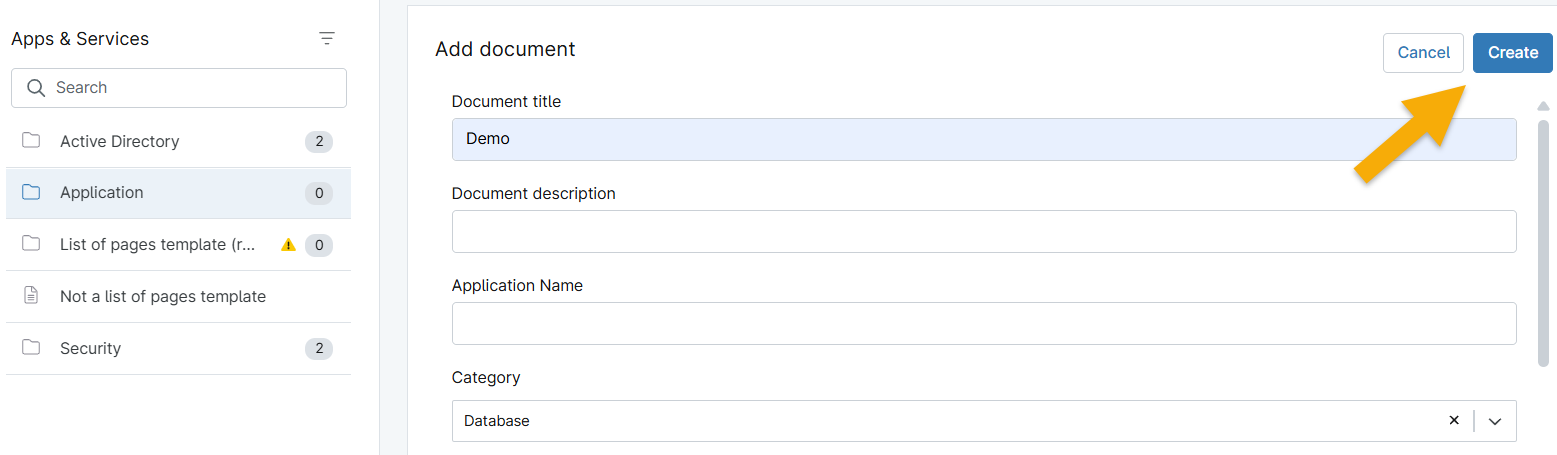
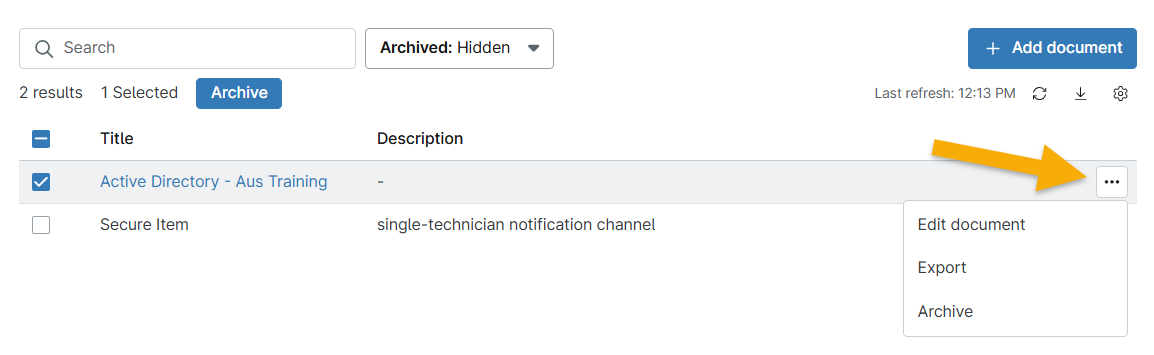
Your document displays in the template folder. Click the title to edit the fields, or move your cursor over the row and click the actions menu to see more options. With list of pages templates, you can click Add document to create multiple documents.
Figure 9: Apps & Services documentation actions (click to enlarge)
Add a Document to an Organization Dashboard (Single Page)
To add a single-page document, perform the following steps.
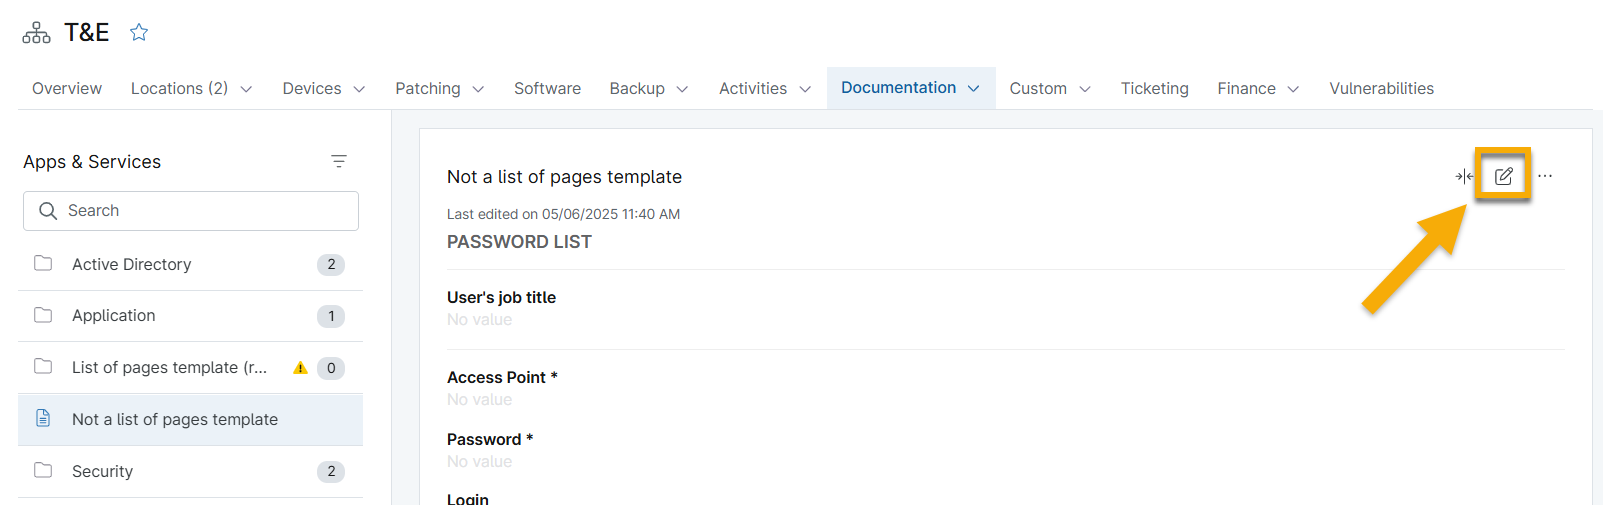
- Select a template that does not have the list of pages option and then click the edit icon.
Figure 10: Add new Apps & Services documentation (click to enlarge)
- Fill out the information and then click Create.
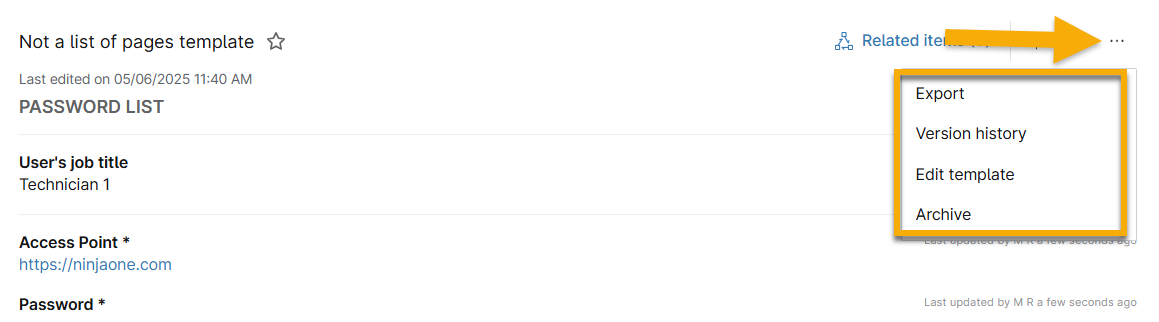
Your data will display on the page. To change the data, click the edit icon again. You can view additional actions by clicking the actions menu.
Figure 11: Actions for Apps & Services documentation (click to enlarge)
Manage List of Pages Documents
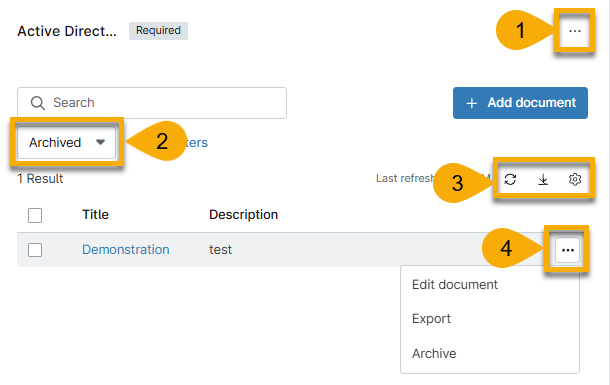
After you add a document to a List of Pages template, you can perform several actions, as described in the following table and Figure 10.
| Number | Purpose or Description |
|---|---|
| 1 | Edit the template |
| 2 | Hide or display archived content. |
| 3 | Manage the data table. Move your cursor over the icons to view their purpose. |
| 4 | Edit, export, or archive the document. Move your cursor over the row and click the ellipsis icon to select the applicable option. |
Manage Single Page Documents
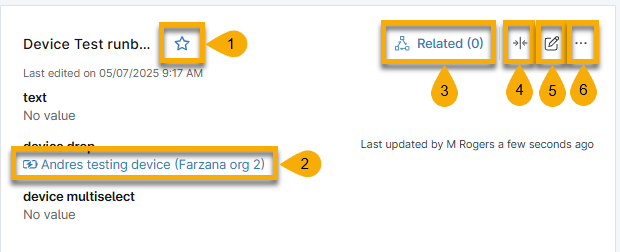
After you add a document to a List of Pages template, you can perform several actions, as described in the following table and Figure 11.
| Number | Purpose or Description |
|---|---|
| 1 | Save the document to your Favorites list. To remove from your Favorites list, click the icon again. |
| 2 | Depending on the custom field type, you can click the data to navigate to the applicable device or organization dashboard. |
| 3 | Add or view related items. For more information, refer to NinjaOne Documentation: Device Notes and Related Items. |
| 4 | Condense or expand the data that is displayed. |
| 5 | Edit or add data to the document. |
| 6 | Export the document, view version history, edit the template, or archive the document. |
Add a Document to Favorites
To save a document, perform the following steps. To learn more about Favorites, refer to NinjaOne Platform: Viewing Recent and Favorited or Saved Content.
- Navigate to the Organization → Documentation; select a document type and open the document.
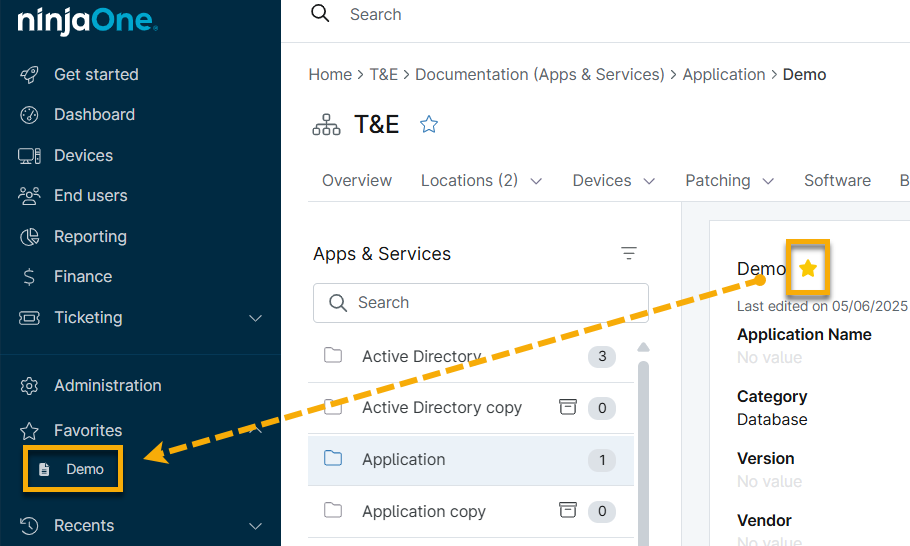
- Click the star next to the document title.
The star turns yellow, and the document appears in the Favorites drop-down menu on the sidebar menu.
Figure 14: Save document as a favorite (click to enlarge)
You can remove an article from the Favorites section either by deselecting the star in the article or by clicking the X icon when moving your cursor over the article title in the Favorites section.
Additional Resources
Refer to the following resources to learn more about NinjaOne Documentation: