Topic
This article explains how to manage user identities via the System for Cross-domain Identity Management (SCIM) with NinjaOne.
Environment
- NinjaOne Platform
- NinjaOne Integrations
- Microsoft Entra ID
Description
Integrate your Identity Provider (IdP) via SCIM to automatically create and delete technicians and end users within NinjaOne.
This article serves as a starting point for SCIM configuration in NinjaOne. Configuration is dependent on your specific Microsoft Entra setup, so we recommend reviewing the Additional Resources section to find related processes.
How to Integrate Microsoft Entra, Part 2 (NinjaOne, Inc., 04:33) — Refer to NinjaOne Integrations: Configure Security Assertion Markup Language (SAML) for Microsoft Entra ID for Part 1
Chapters
- 0 to 0:34 - Intro - watch part 1 first!
- 0:35 to 1:02- Creating app roles
- 1:03 to 1:31 - Assigning app roles to user groups
- 1:32 to 1:59 - Configuring SCIM in NinjaOne
- 2:00 to 2:47 - Creating and mapping the userType attribute
- 2:48 to 3:16 - Scoping end users to specific orgs
- 3:17 to 3:35 - Advanced attribute mapping
- 3:36 to 3:47 - Provisioning
- 3:48 to 4:00 - Map groups to roles
- 4:01 to 4:10 - Deactivating users
- 4:11 to end - Intune integration
Index
Select a category to learn more:
- Important Considerations
- SCIM Configuration
- Group Mapping in NinjaOne
- Deactivate SSO and SCIM
- View SCIM and SSO Activities
- Additional Resources
Important Considerations
Consider the following:
- If you are creating an IdP for a vendor that does not support the use of groups, you will receive an error when attempting to configure group assignment for SCIM.
- Users managed via SCIM cannot be edited or deleted in NinjaOne, unless SCIM is temporarily deactivated. However, you can change the phone number, language, and other minor settings not managed by SCIM. Deleting and editing users must be done in the IdP.
- Users provisioned via SCIM will not receive an invitation to set up their password or multi-factor authentication (MFA), as their email addresses will already be considered activated by the identity provider.
- When revoking SCIM tokens or disabling single sign-on (SSO), the user will be prompted to verify MFA by entering the time-based code.
- You cannot assign system administrators via SCIM. You must assign them manually in NinjaOne. For instructions about adding a system administrator, refer to NinjaOne Platform: Create a Technician Account.
- When users are no longer members of a company, the IdP will automatically mark them as Inactive in NinjaOne. However, they will still appear in the users list.
SCIM Configuration
The following instructions use Microsoft Entra ID as an example. If you wish to use Okta as your IdP, read NinjaOne Identity Access Management (IAM): Activate SCIM for your Identity Provider. The instructions in this article assume your IdP supports SCIM. You should test a hybrid SSO configuration before activating it through NinjaOne.
To activate SCIM and generate the secret token, perform the following steps:
- Create a Microsoft Entra ID Enterprise application in Microsoft Azure and configure it as an IdP in NinjaOne. Refer to NinjaOne Integrations: Configure Security Assertion Markup Language (SAML) for Microsoft Entra ID for instructions.
- Navigate to Administration → Accounts → Identity Providers and open the Microsoft Entra ID provider entry you created in the previous step.
- Click Enable for System for Cross-domain Identity Management (SCIM).
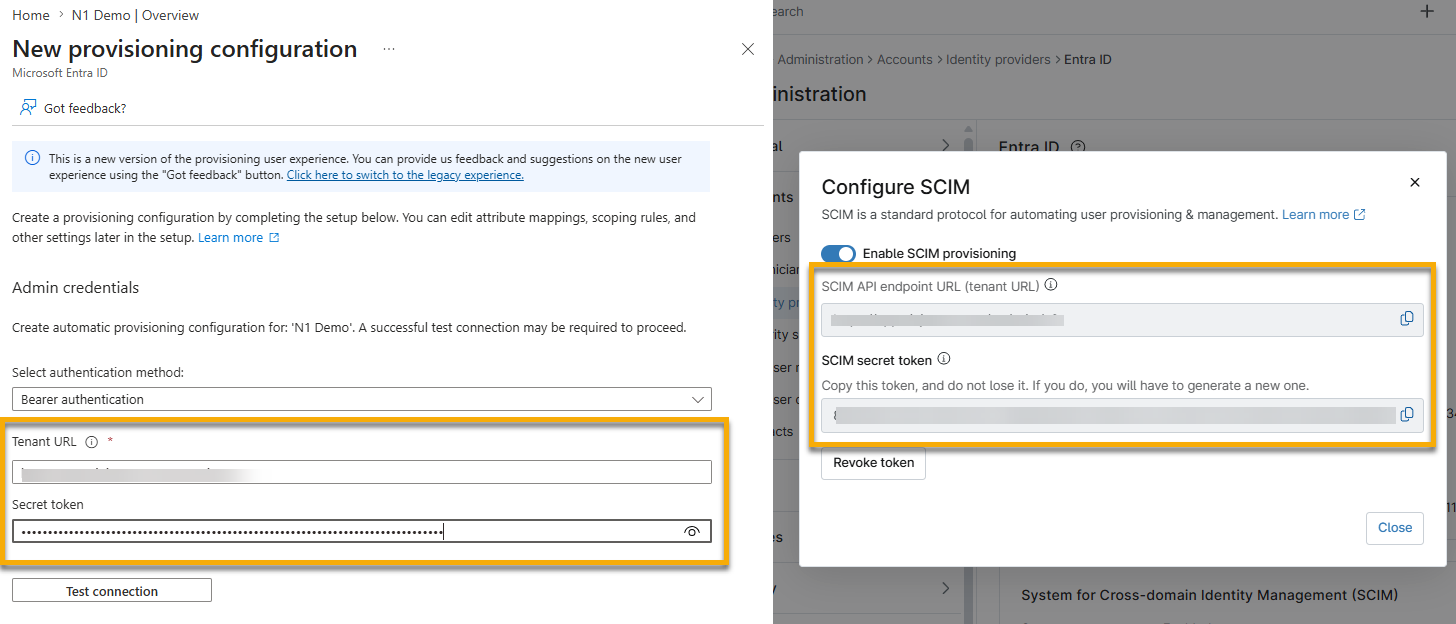
- Activate the Enable SCIM provisioning toggle in the configuration dialog and then click Generate token. Keep this configuration dialog open so you can copy the data for the upcoming steps.
Provision SCIM
To manage provisioning for SCIM, perform the following steps:
- From the Microsoft Entra admin center, navigate to Enterprise apps → All applications and locate the NinjaOne application you created for the IdP SSO process.
- Select Get started for 3. Provision User Accounts.

- Click Connect your application.
- In NinjaOne, copy the SCIM API endpoint URL (tenant URL) and paste it into the Tenant URL field in the Microsoft Entra admin center.
- In NinjaOne, copy the SCIM secret token and paste it into the Secret token field in the Microsoft Entra admin center.
- Click Test connection and then click Create.
Configure Attributes
To configure attributes for your identity provider, perform the following steps:
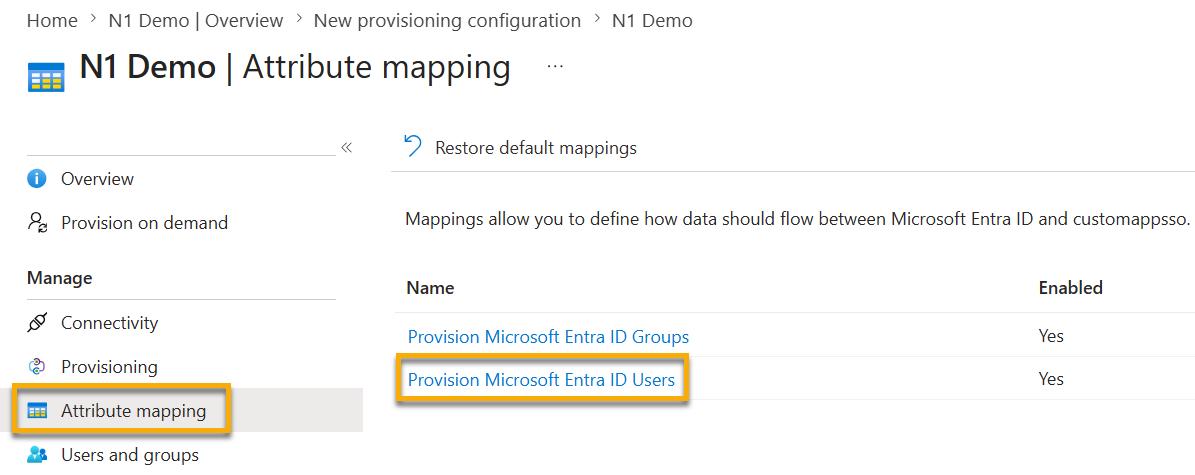
- In your NinjaOne application in the Microsoft Entra admin center, select Attribute mapping and click Provision Microsoft Entra ID Users.
- Scroll to the Attribute Mappings section. Click Edit to configure the following attributes as described in the following table.
| customappsso Attribute | Azure Active Directory Attributes |
|---|---|
| userName | userPrincipalName |
| active | Switch([IsSoftDeleted], , "False", "True", "True", "False") |
| name.givenName | givenName |
| name.familyName | surname |
| externalId | objectId |
- Click Delete to remove all other attributes from the mapping, as they are not in use.
- Select the Show advanced options checkbox, and then click Edit attribute list for customappsso.
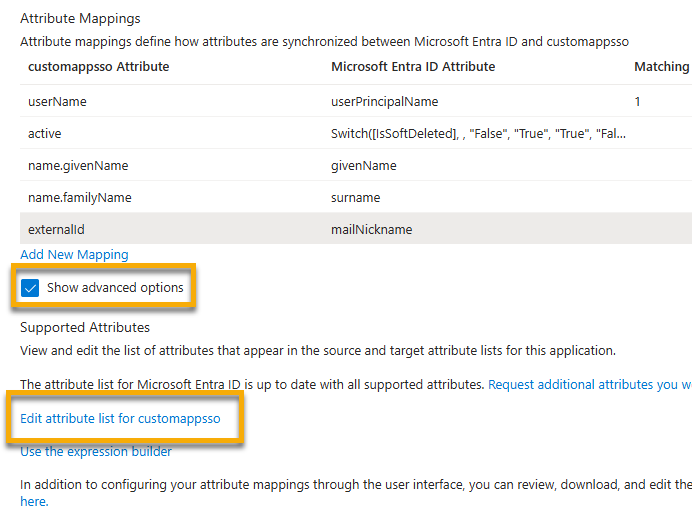
Figure 4: Advanced Attribute Options in Entra ID (click to enlarge)
- Scroll to the end of the attribute list and add the following:
- Name: urn:ietf:params:scim:schemas:extension:ninjaone:2.0:User:organizationId
- Type: String
- Required?: Select this option
- Leave all other options blank and click Save.
- If you are creating NinjaOne technicians with SCIM, add the following attribute for Name:
urn:ietf:params:scim:schemas:extension:ninjaone:2.0:User:userType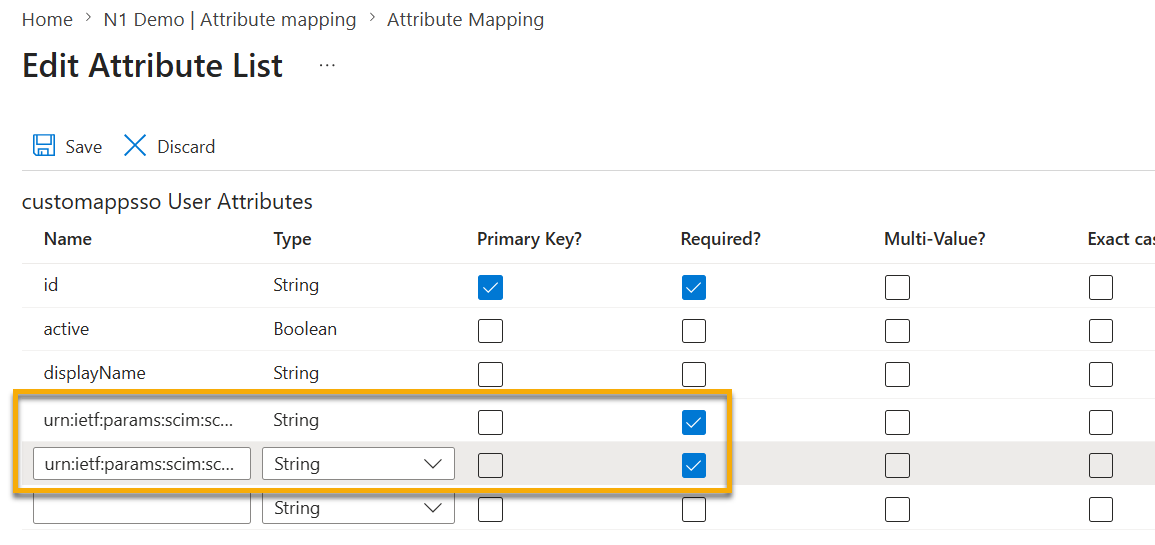
Map End Users
You can map end users to specific organizations in NinjaOne or assign them as a global end user that is not assigned to a particular group. In most situations, you should use expressions to dynamically assign users to their correct organizations.
- In your Microsoft Entra account, navigate to Provisioning → Attribute mapping → Provision Microsoft Entra ID Users.
- Open NinjaOne in a separate tab or window and navigate to Administration → Organizations. Move your cursor over the Actions menu on the right edge of the Organization row and select Copy Org ID.
- Return to your Microsoft Entra account and click Add new mapping.

- Select the Mapping type based on whether you are mapping end users to a single or multiple organizations:
- Select Constant if you are mapping the end users to a single organization. Then, paste the single organization ID into the Constant Value field.
- Select Expression if you are mapping end users to multiple organizations. Then, create an expression that references the target NinjaOne organization IDs and enter it into the Constant Value field. End users are mapped based on the expression results. To learn more about creating expressions for organization mapping, refer to Reference for writing expressions for attribute mappings in Microsoft Entra Application Provisioning - Microsoft Entra ID | Microsoft Learn (external link).
- Enter the following into the Target attribute field to map end users to their respective NinjaOne organization ID:
urn:ietf:params:scim:schemas:extension:ninjaone:2.0:User:organizationId - Use All as the end user's organization ID to create a global end user.
- Click Ok, and then click Save.
Set the User Type for End User or Technician
By default, Entra ID creates SCIM-managed users as end user accounts. If you added the optional User Type attribute to your SCIM configuration as described in step 6 of the Configure attributes section, you can now create technician accounts via SCIM.
- In your Microsoft Entra account, navigate to Provisioning → Attribute mapping → Provision Microsoft Entra ID Users.
- Click Add new mapping.
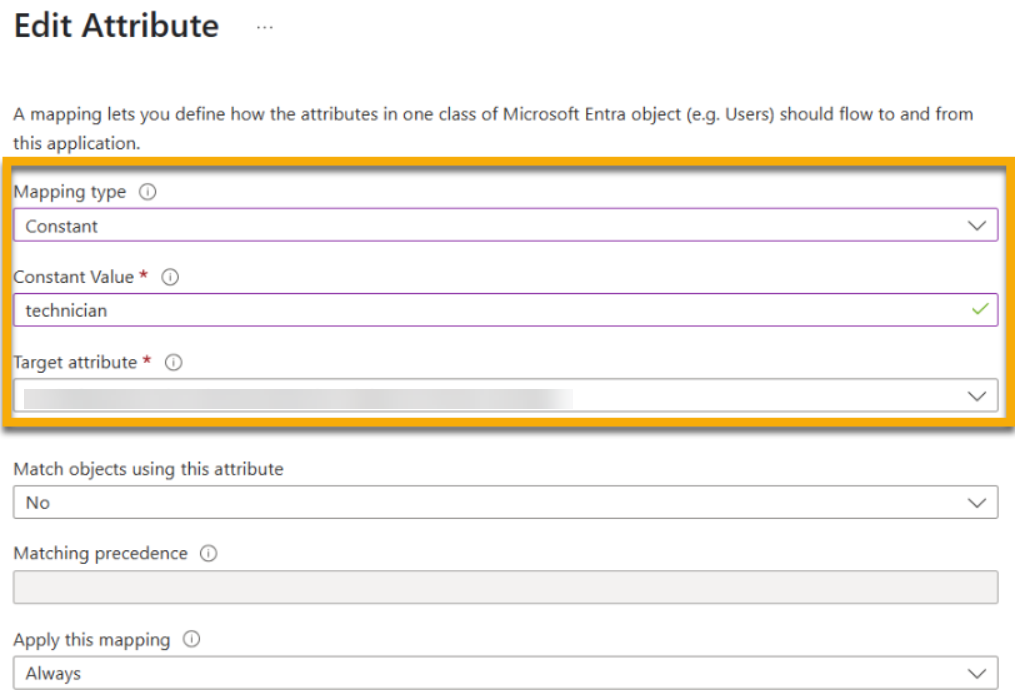
- Select the Mapping type based on whether you are creating end users or technicians:
- Select Constant when creating technicians. Then, enter technician (case-sensitive) into the Constant Value field.
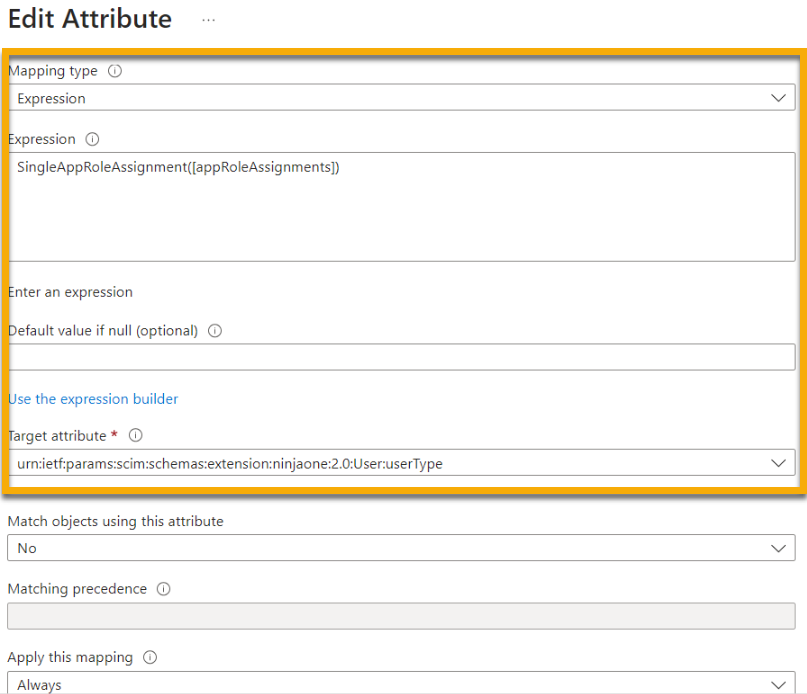
- Select Expression if creating end user and technician accounts. Then, create an expression that assigns end user accounts the value endUser and technicians the value technician. Expressions are case-sensitive. To learn more about creating expressions for organization mapping, refer to Reference for writing expressions for attribute mappings in Microsoft Entra Application Provisioning - Microsoft Entra ID | Microsoft Learn (external link).
- Enter the following into the Target attribute field to map end users to their respective user type.
urn:ietf:params:scim:schemas:extension:ninjaone:2.0:User:userType
- Click Ok, and then click Save.
Save the Configuration
Return to the Provisioning page, activate Provisioning Status, and then click Save. NinjaOne will provision users automatically.
Group Mapping in NinjaOne
After you've provisioned the group in your IdP, it will appear in the Group Mapping section of the Identity Provider page in NinjaOne. Group mapping allows you to assign end user or technician roles to an identity group, including global end users; however, you cannot assign the system administrator permission as a group through SCIM.
- Identity group: Groups mapped from the Identity Provider (IdP)
- User roles: Roles assigned to the group
To change group mapping for your identity provider, perform the following steps:
- If you are a system administrator, you can add roles to users in each group by clicking Edit.
- Add one or more roles to each drop-down menu as necessary. Users flagged as end users will be assigned end user roles, and users flagged as technicians will be assigned technician roles.

NinjaOne will display each user and their role on the NinjaOne account configuration page, allowing you to track mapping or edit as needed.
- The Source column on the account configuration page in the Roles will indicate if a role was assigned manually or via SCIM. Roles indicating Native were assigned manually.
- You cannot edit roles assigned via SCIM in NinjaOne. You must update them through the IdP used to initially assign the roles. In the examples used in this article, you would update the roles in Microsoft Entra.
Deactivate SSO and SCIM
On the Single-Sign-On page, you can deactivate SSO, SCIM provisioning, and revoke tokens.
Deactivate SSO
To deactivate SSO as a provider, perform the following steps:
- Navigate to Administration → Accounts → Identity Providers.
- Move your cursor over the IdP and click the actions menu button. Select Disable SSO.
Deactivate SCIM
To deactivate SCIM provisioning, perform the following steps:
- Navigate to Administration → Accounts → Identity Providers and click the provider's name to edit the settings.
- Click Edit in the System for Cross-domain Identity Management (SCIM) section.
- Deactivate the Enable SCIM provisioning switch, and then click Disable SCIM in the confirmation window.
- Click Close.
Revoke Token
To revoke a token, perform the following steps:
- Navigate to Administration → Accounts → Identity Provider and click the provider's name to edit the settings.
- Click Edit in the System for Cross-domain Identity Management (SCIM) section.
- Click Revoke token and then click Revoke token again in the confirmation window.
- Click Close.
View SCIM and SSO Activities
- In NinjaOne, navigate to the system or organization dashboard → Activities → All.
- Select SSO in the Activity type drop-down menu.
Use the Status drop-down menu to further filter the results. Options are available for the following activities:
- SCIM:
- End User Created via SCIM
- End User Deleted via SCIM
- End User Deleted via SCIM
- End Usep Updated via SCIM
- SCIM Disabled
- SCIM Enabled
- SCIM Token Created
- SCIM Token Removed
- SSO Created
- SSO Deleted
- SSO Disabled
- SSO Enabled
Additional Resources
The following resources contain additional information about NinjaOne SCIM: