Issue
The NinjaOne Network Management user interface contains incorrect or missing information about certain CPU, memory, or network adapters.
Environment
NinjaOne NMS
Cause
NinjaOne's monitoring servers are not receiving SNMP traffic from your environment.
Resolution
Use the Paessler SNMP Tester To Evaluate Network Health
Perform the following steps to ensure nothing is blocking SNMP traffic between your network and NinjaOne's monitoring servers.
- On an endpoint within your network, download and install the Paessler SNMP tester (external link).
- In the Paessler SNMP tester, set the following value for the Custom OID field: 1.3.6.1.2.1.1.1.0
- The Value must contain a result to indicate success. If the value is successful but issues persist, take a screenshot of the successful Paessler test. Then, proceed to the Use SNMPWalk To Triage Communication Issues section of this article.
Use SNMPWalk To Triage Communication Issues
If there is nothing blocking SNMP traffic, complete the following workflow to generate an SNMPWalk file to submit to NinjaOne Support.
- Download the Net-SNMP installer from SourceForge (external link).
- Run the application. You'll see a message similar to the screenshot below. Click OK to continue.

Figure 1: Net-SNMP Setup (click to enlarge)
- When prompted, click Next and accept the EULA.
- On the Choose Components screen, ensure all boxes are unchecked, and click Next.

Figure 2: Select components to install (click to enlarge)
- In the Destination Folder field, define an install location and click Next.

Figure 3: Destination Folder (click to enlarge)
- Click Install to start the installation process. When it completes, click Finish.
Launch Windows Command Prompt as an administrator.
From the command line, navigate to the Destination Folder address you defined in Step 5.
- Navigate to the Net-SNMP /bin folder.
Use the dir command to ensure all of the files shown in the following screenshot are present.
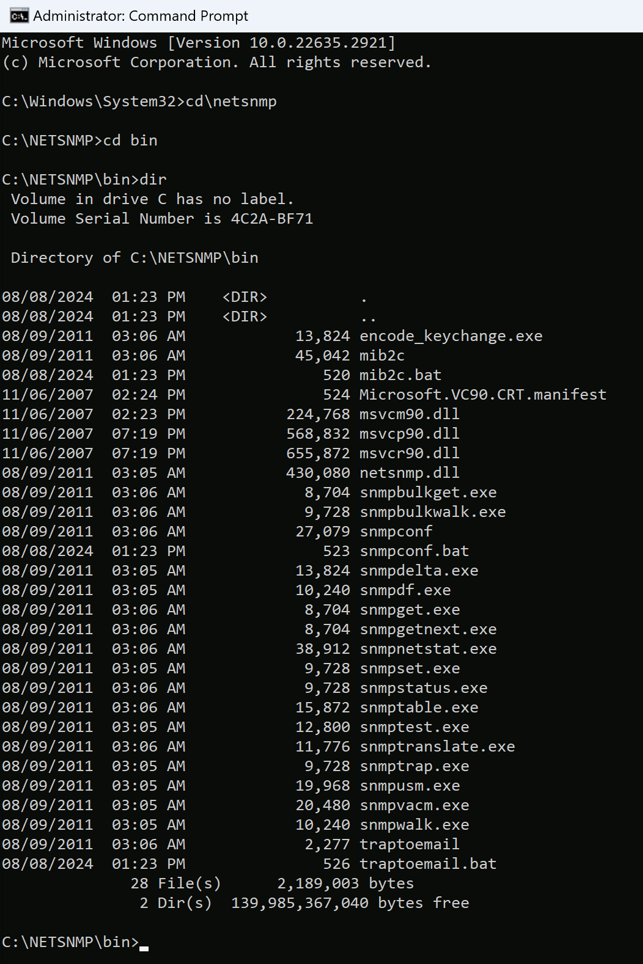
Figure 4: Net-SNMP /bin folder (click to enlarge)
- One you have confirmed that all of the files shown in Figure 4 are present, run the following command to begin the "walk" and generate the output file:
snmpwalk -v2c -c<read-community> -One -t 20 -r 5 <device IP address> .1 > <filepath>
Example: snmpwalk -v2c -cpublic -One -t 20 -r 5 192.168.16.101 .1 > c:ajtestidrac.txt
- After you've completed the process, open a ticket with NinjaOne Support. Include the Net-SNMP output file and a screenshot of the successful Paessler test that you captured in the Use the Paessler SNMP Tester To Evaluate Network Health section of this article. Doing so will ensure you're not asked to reproduce any testing you've already done.
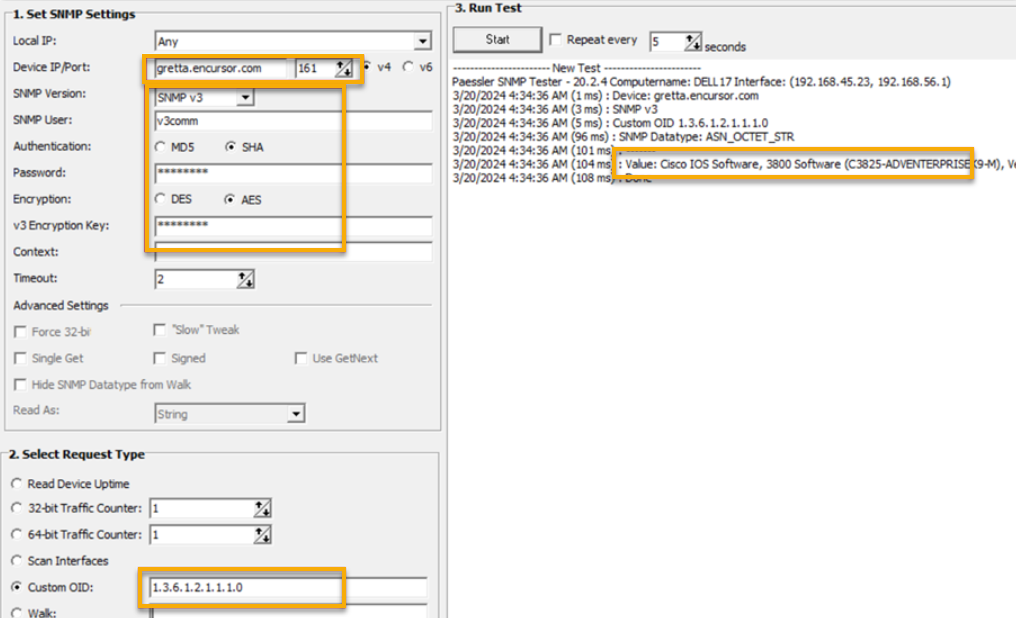
Figure 5: Successful SNMP connection (click to enlarge)
Additional Resources
For additional NMS troubleshooting help, refer to the following articles: