
What are policies in NinjaOne?
In NinjaOne, policies are the core mechanism that determines how endpoints are configured, monitored, secured, managed, and automated. A policy defines the operational and security settings applied to devices—such as monitoring rules, alert thresholds, patching behavior, antivirus settings, and backup configurations—and ensures these settings are consistently enforced across all assigned endpoints.
Policies also enable automations, which are script-based actions that run by schedule or in response to specific conditions detected on the device. For example, if a monitoring condition triggers—such as low disk space, a stopped service, or high CPU usage—the policy can automatically execute a predefined script or remediation workflow. This allows NinjaOne to fix common issues proactively and reduce manual intervention.
Policies are the core of device management in the RMM platform: they push configuration instructions to each device through the NinjaOne agent, and once applied, the endpoint reports telemetry back to the system. This feedback loop allows NinjaOne to monitor health, enforce security-related settings, and run automated remediations, ensuring consistent and reliable endpoint management.
Policies also play a key role in standardizing configurations across the environment, ensuring that every endpoint follows the same operational, security, and monitoring rules. By enforcing consistent settings—such as patching schedules, hardening options, software requirements, backup parameters, or alert thresholds—policies reduce configuration drift and make device behavior predictable. This consistency directly supports compliance and governance, because organizations can demonstrate that all managed endpoints adhere to documented standards, regulatory controls, and internal best practices. With policies defining and enforcing these baselines automatically, IT teams gain better auditability, improved security posture, and greater confidence in the reliability of their managed infrastructure.
Policies also support scalability by letting administrators define configurations once and apply them to any number of endpoints. New devices automatically inherit the correct settings, eliminating repetitive manual work. This consistency reduces errors, accelerates onboarding, and ensures environments stay aligned as they grow. With centralized policy management, small teams can efficiently support large or distributed device fleets.
What kind of policies does NinjaOne have?
NinjaOne provides different types of policies depending on the kind of device being monitored. The following sections explain each policy type and how they are used.
Agent policies.
Designed to monitor a wide range of devices, including Windows servers, desktops, and laptops; macOS servers, desktops, and laptops; and Linux workstations and servers. Each endpoint runs the NinjaOne agent, which applies the assigned policy and communicates with the NinjaOne RMM platform to perform monitoring and report device health.
NMS policies.
These policies are designed to monitor devices using SNMP or ICMP, such as switches, routers, firewalls, access points, and printers. This monitoring focuses on network-level performance rather than OS-level telemetry. Because these devices do not run the NinjaOne agent, NMS policies operate in an agentless manner.
VM policies.
VM policies are used to monitor both virtualization hosts and their guest virtual machines. For guest VMs, NinjaOne installs the agent inside the VM, but the policy is lighter than a standard agent-based policy because it does not monitor physical hardware parameters. For Hyper-V and VMware hosts, NinjaOne applies host-level monitoring to collect platform metrics such as resource usage and VM status. Together, these policies provide visibility into the virtual infrastructure while minimizing overhead on guest VMs.
MDM policies.
MDM policies are designed to manage and monitor mobile devices such as Android, iOS, and iPadOS. These policies are agentless and rely on the native mobile device management frameworks to apply configurations, enforce restrictions, deploy apps, and collect essential device information.
Each policy type is further divided into more specific policies based on the device’s role. For example, agent policies may include variants for Windows servers, Windows workstations, Mac desktops, and Mac laptops, while NMS policies can cover switches, routers, printers, and other network devices. Mobile devices also have dedicated policy variants tailored to their operational needs. These are only examples—the number of policies within each type is not fixed, and additional policies can be created as required. This structure ensures that every device receives the appropriate configuration and monitoring settings for its intended function.
Using NinjaOne’s Predefined Policies and Creating New Ones.
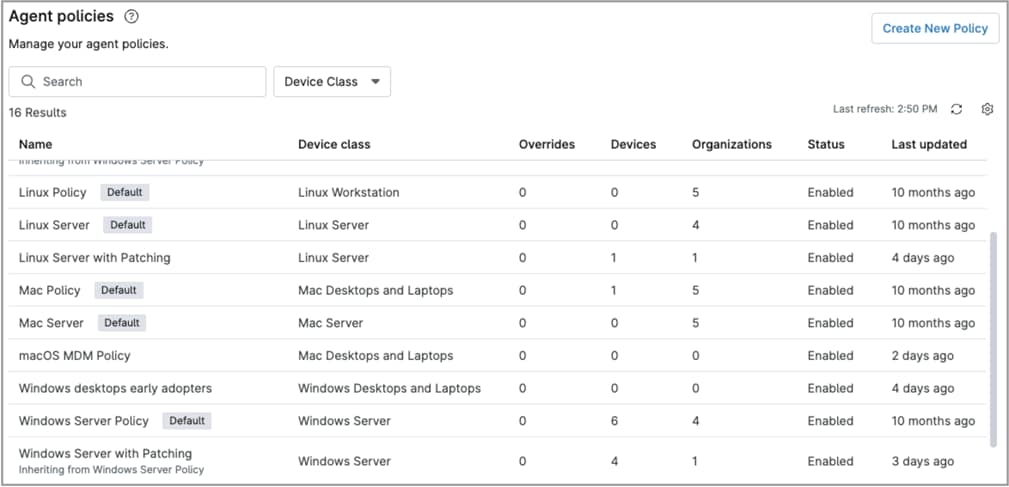
NinjaOne provides a set of predefined policies for each device role. These policies include default settings based on common best practices, and they can be customized as needed. You can also create new policies to match your specific requirements. Predefined policies can be identified by the “Default” label next to their name.
The screenshot below shows the policies page showing some policies with the “Default” label.
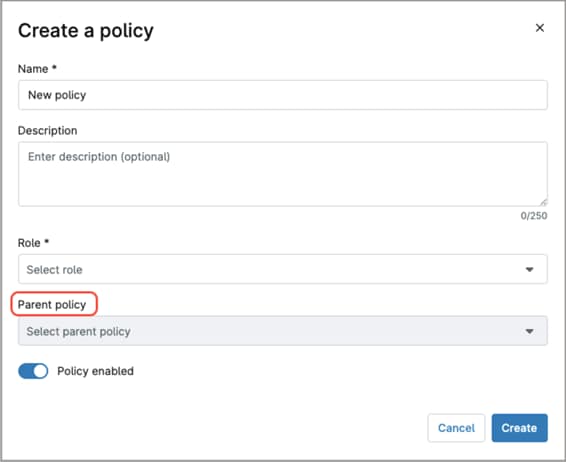
NinjaOne’s inheritance feature allows you to create a new policy based on an existing one and modify only the settings that need to differ. This approach works much like creating a policy from a template, giving you a starting point with predefined configurations while avoiding the need to maintain separate template files. Inheritance eliminates the need to rebuild policies from scratch and is especially useful when a subset of devices requires slightly different settings than the rest. To create a new policy that inherits from an existing one, select the desired parent policy in the Parent Policy field when creating the new policy.
To create a new policy, follow the steps below.
- Navigate to Administration > Policies.
- In the sidebar, select the policy type of your preference; the policies page appears.
- Click Create New Policy; the “Create a policy” modal dialog appears.
- Fill out the Name, Description, Role and optionally the Parent policy.
- Toggle the Policy enabled switch if needed. This switch prevents the policy from being used until it is ready for deployment (fully configuring a policy may be a lengthy process).
- Click Create; The policy editor appears.
- Configure the settings; the next topic provides an explanation of each option.
- Click Save. You may be prompted to confirm using your MFA.
What sections comprise NinjaOne’s policies?
NinjaOne policies are divided into sections to better organize their functions. The following explanations describe the sections a policy may include. Note that not all sections appear in every policy, as some sections apply only to specific policy types.
| Section name | Description | Used on |
| Conditions | Defines the criteria that, when met, trigger specific actions such as opening tickets or sending alerts, and optionally running automations. | Agent policies NMS policies VM policies |
| Compound Conditions | Similar to “Condition,”, but they allow you to combine multiple criteria that must be met before the action is triggered. | Agent policies |
| Scheduled Automations | Define scripts that run automatically at a specified date, time, or recurring schedule. | Agent policies |
| OS patching | This section is used to configure operating system patching settings such as scan schedules, update schedules, reboot options, and other related behaviors. | Agent policies |
| Antivirus | Defines the antivirus integration for the endpoints. Once configured, NinjaOne will attempt to deploy the antivirus to all devices governed by the policy. | Agent policies |
| Activities | This section lists a series of endpoint-related events. For each event, you can configure whether to send alerts, which notification channels to use, the severity level, and the associated ticketing rule. | Agent policies |
| Software patching | This section is used to configure third-party software patching settings, including scan schedules, update schedules, reboot options, and other related behaviors. These rules apply only to the software you select in this section. | Agent policies |
| Backup | This section is used to define backup plans, including the backup destination, items to back up, exclusions, filters, power options, and any pre- or post-backup automations. | Agent policies |
| MDM | This section allows you to configure a wide range of Mac-specific settings and controls, enabling granular management of macOS devices. You can enforce security requirements, apply configuration settings, install software, and automate device behaviors to ensure consistent management across all assigned Macs. | Agent policies MDM policies (Mac-only) |
| Network Performance | Configure the protocols used to monitor network performance, as well as the specific ports and metrics you want to track. | NMS policies |
| Configuration Backup | Used to configure and manage device configuration backups of HP or Cisco network devices. | NMS policies |
| Syslog | Here you can choose different monitoring facilities and severities within the syslog on the device. The system will not consider any facilities and severities you uncheck in the conditions. | NMS policies |
| NetFlow/sFlow/JFlow Collector | These settings govern the type of NetFlow traffic you’d like to monitor, any IP addresses from which you’d like to discard data, and the flow noise configuration. | NMS policies |
| SNMP Monitoring | These settings allow you to monitor basic SNMP data, like CPU, memory, Disk, or Network Adapter. | MDM policies |
| Passcode | Used to allow mobile devices configuration for password values, lock after failed attempts, passcode criteria and update requirements, and auto-lock settings. | MDM policies |
| Restrictions | These are settings that limit or control what a user or device is allowed to do. They enforce security, prevent unwanted behavior, and ensure that the device complies with organizational requirements. | MDM policies |
| Applications | These settings control which applications are allowed or blocked and provide a managed method for installing approved applications. | MDM policies |
| Personal usage | Define application policies for the personal profile of devices with a work profile. | MDM policies |
| Network | Manage device network settings, like proxy settings and Wi-Fi networks. | MDM policies |
| Security | Allows system administrators to encrypt the device, manage developer settings, define how data is moved for work, and more. | MDM policies |
| Policy enforcement | Allows you to set rules that define the behavior when a policy cannot be applied to a device. | MDM policies |
| Location tracking | Enables NinjaOne to collect and report the geographical location of the device. | MDM policies |
| OS updates | Manage how users can install software updates and define enforced OS versions. | MDM policies |
| Custom payload | Allow administrators to deploy advanced or platform-specific configuration settings that are not exposed through the standard MDM interface | MDM policies |
How are devices assigned to policies?
There are several ways to assign devices to policies, they can be assigned:
- At the organization level.
- At the location level.
- At the device level.
How to assign devices to policies at the organization level?
Follow the steps below to complete this kind of assignment.
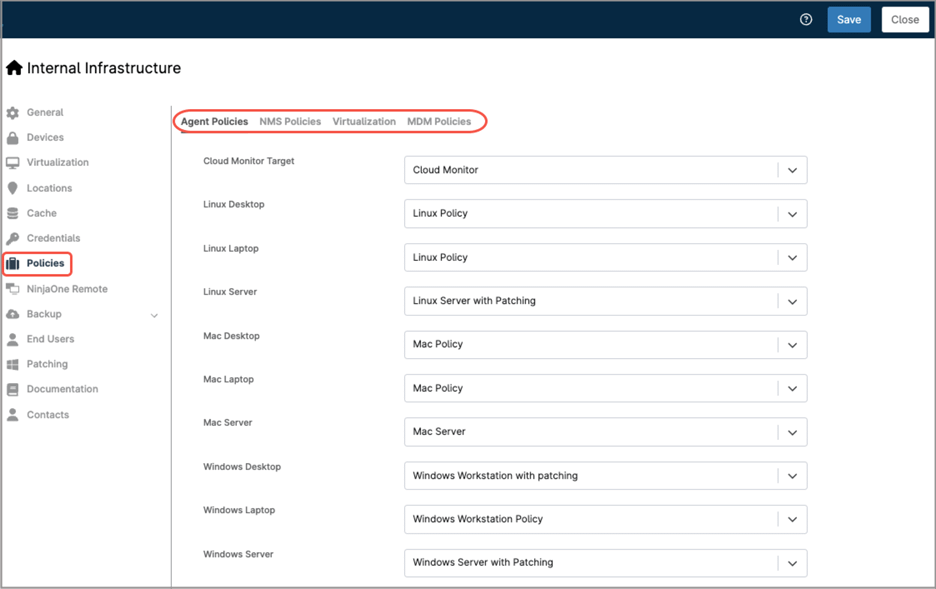
- Go to the Organization Editor.
- In the sidebar, select Policies.
- On the right side, you will see all policy assignments. At the top of the page, choose the policy type you want to configure.
- The device roles will appear showing the default policy assignment. Adjust as necessary, making sure your devices are attached to the policy of your preference. Once done, save and close.
How to assign devices to policies at the location level?
Follow the steps below to complete this kind of assignment.
- Go to the Organization Editor.
- In the sidebar, select Locations.
- On the right side, you will see the existing locations.
- Hover over the location you want to modify; the Edit button will appear. Click it.
- In the “Edit Location” modal, select Policies from the left sidebar.
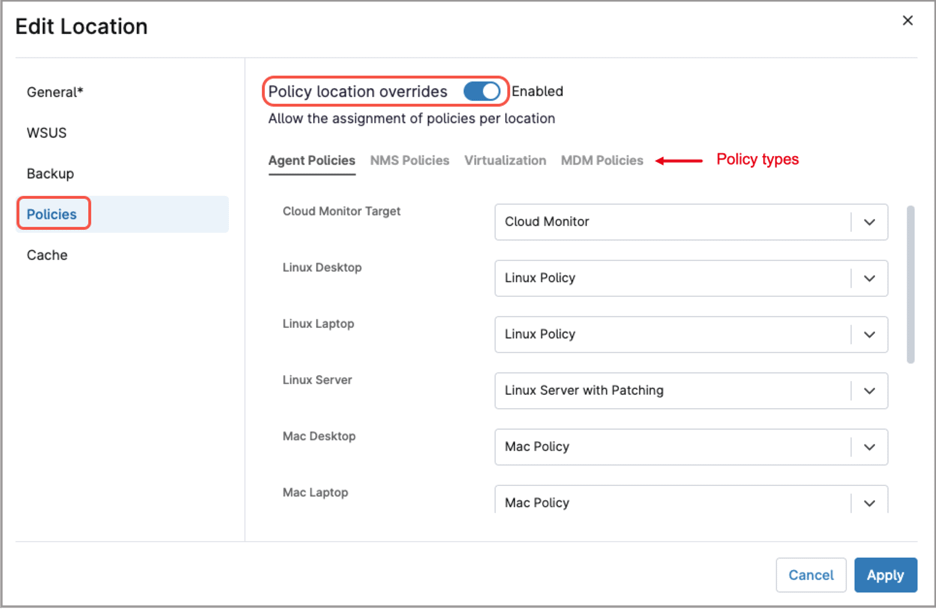
- Toggle the Policy location overrides button.
- Choose the policy type you want to configure.
- The device roles will appear showing the default policy assignment. Adjust as necessary, making sure your devices are attached to the policy of your preference. Once done, save and close.
This location-level assignment overrides any assignments made at the organization level.
How to assign a device to a policy individually?
Follow the steps below to complete this kind of assignment.
- From the device dashboard of the endpoint you want to modify, select Settings.
- In the sidebar, select Policies.
- On the right side, you will see all assigned policy; click Change.
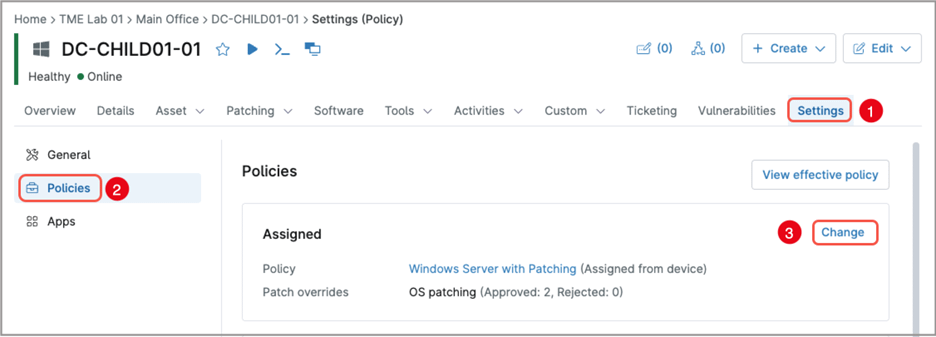
- In the dialog modal, select the policy you want to assign.
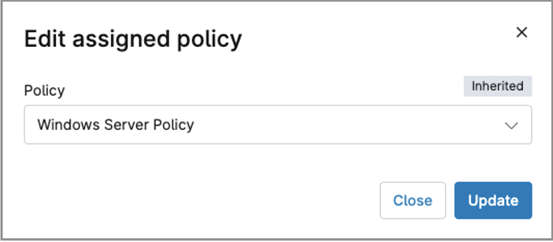
- Click Update.
This device-level assignment overrides any assignments made at the organization or location levels.