Topic
This article discusses boot verification for NinjaOne Device Backup.
Environment
NinjaOne Device Backup
Description
Boot Verification tests your image backups and verifies you'll be able to boot them in the event of a restoration requirement. NinjaOne Device Backup creates a snapshot of the endpoint screen as evidence of the backup's viability. Boot Verification is available for Microsoft Windows Servers that use Image Backup.
Select a topic to learn how to manage boot verification settings and review the results of bootability tests.
- Enabling Boot Verification
- Viewing Results
- Boot Verification Reporting
- Known Issues and Limitations
- Additional Resources
Enabling Boot Verification
- In the NinjaOne navigation menu, click Administration.
Select Policies → Agent Policies and select Windows Server Policy.
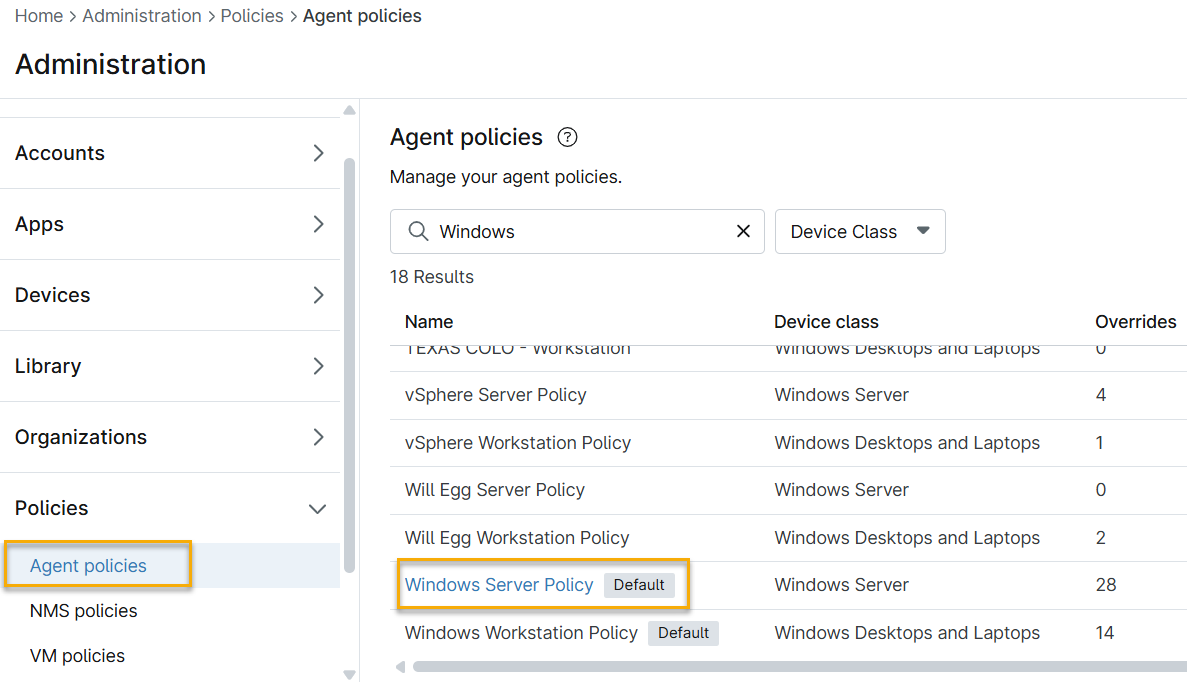
Figure 1: Windows Server Policy (click to enlarge) - In the policy's navigation menu, expand Backup. Then, select Image from the flyout menu. You'll see the Boot Verification section.
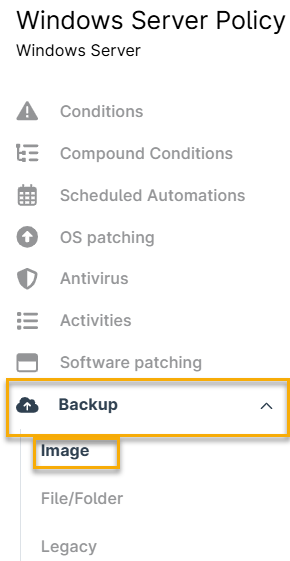
Figure 2: Backup → Image (click to enlarge) - Select the Test the Windows OS volume for the ability to boot image backup checkbox.
- In the Schedule drop-down menu, you can select Bi-Weekly or Monthly as the frequency. Recovery tests will begin within a week of initial enablement and then repeat based on this setting.


Viewing Results
In the Global View
- In the NinjaOne dashboard, navigate to the organization you wish to view.
- Select Backup → Device → Overview from the navigation menu.
- The backup overview page will open. Boot verification status appears in the last column. You will only see results for boot verification status if one has run on the device.

- To view a verification screenshot, move your cursor over the entry for the endpoint you wish to review. An actions menu will appear next to the Boot verification column.
- Select View boot verification in the actions menu to display your screenshot.
At the Device Level
When viewing the device-level dashboard, the procedure is essentially the same as described above. Place your cursor over the row of a selected endpoint to reveal the actions menu next to the Boot verification entry. Select View boot verification in the actions menu to view the screenshot.

Boot Verification Reporting
You can include a section for boot verification results directly in your Backup Summary reports in NinjaOne.
The Backup Boot Verification History includes screenshots of your successful boots and also lists the following parameters:
- Device
- Organization
- Result
- Start time
- End time

Known Issues and Limitations
The following are known issues and limitations of this feature:
- At this time, machines with pending Windows updates may report a successful boot without being at a login screen. In addition to reaching a login screen, we also measure boot success by the device's ability to communicate with the backup service. We anticipate isolating Windows Update screenshots with a warning in the future.
- A non-successful boot verification does not indicate a problem with your backup data. Most failures are due to NinjaOne learning how to boot a variety of machines in different hardware configurations during the Early Access period.
- Boot Verification is only available for the Windows Server Role and Windows Server Policy.
Additional Resources
Refer to NinjaOne Reporting: Summary Reports To learn more about creating summary reports.