Topic
This guide covers the essential steps for deploying the NinjaOne agent in your environment, including creating an organization template, configuring installer settings, and choosing a deployment method for your endpoints.
Environment
NinjaOne Endpoint Management
Description
This deployment guide walks through creating a template organization, importing organizations, generating a NinjaOne agent installer, and deploying the agent to endpoints.
Select a category to continue:
- Create an Organization Template
- Import Organizations
- Enable Installer Management
- Obtain the Installation Details
- Install the NinjaOne Agent
- Additional Resources
Procedure
Follow these steps to deploy the NinjaOne agent to your endpoints.
Create an Organization Template
In NinjaOne, organizations control critical functionality such as:
- Which remote access solution is on an endpoint
- How policies are mapped to device roles
- How devices are added to the platform
If you plan to have multiple organizations in your environment, creating the first organization as a template with the correct configurations will save you time and enable you to mass-create additional organizations via import.
- Create an organization. Refer to NinjaOne Endpoint Management: Creating and Editing Organizations for instructions.
- Configure your organization. You can make dozens of configuration choices when setting up an organization. The following table describes the most important configurations:
| Configuration | Description |
|---|---|
| Policy Mapping | Policies define how NinjaOne manages devices. A single policy manages every device. Organizations define how each device, based on its role, is mapped to a policy when added to NinjaOne. Having the correct policy mapping can save a lot of time during the deployment process.
|
| Systray icon | The systray icon gives end users the ability to interact with your team and the NinjaOne agent in predefined ways. For example, you can add:
You can set up the systray icon once for all your organizations to streamline configuration. |
| Device approval | This security setting defines whether a newly onboarded device:
We recommend setting device approval to Automatic during initial onboarding to avoid duplicating work. |
| Remote access | If your subscription includes remote access, activate the remote access solution of your choice when setting up your organization template. Key configurations to consider include remote access solution, end-user confirmation, and device roles. |
Import Organizations
If you only plan to have a single organization in your NinjaOne instance, you can skip this step. This step allows you to import organizations via comma-separated values (CSV) so that each organization is configured the same as the template organization you created above. This can save you significant time. Refer to
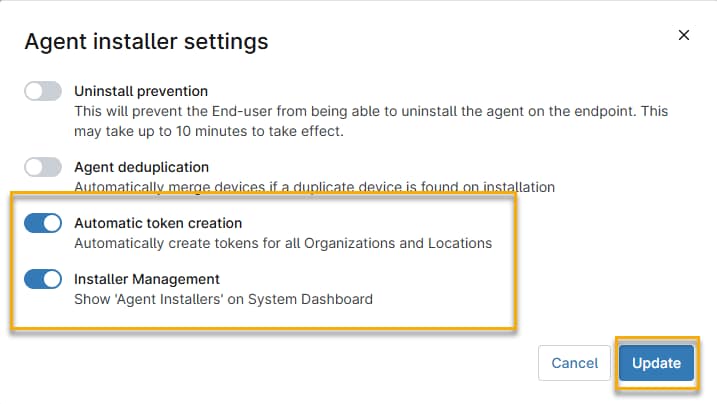
- In the Agent installer settings window, activate Installer Management. If you are bulk-installing the agent onto multiple machines, activate Automatic token creation as well. NinjaOne will automatically create an installation token for each machine. When finished, click Update.
Obtain the Installation Details
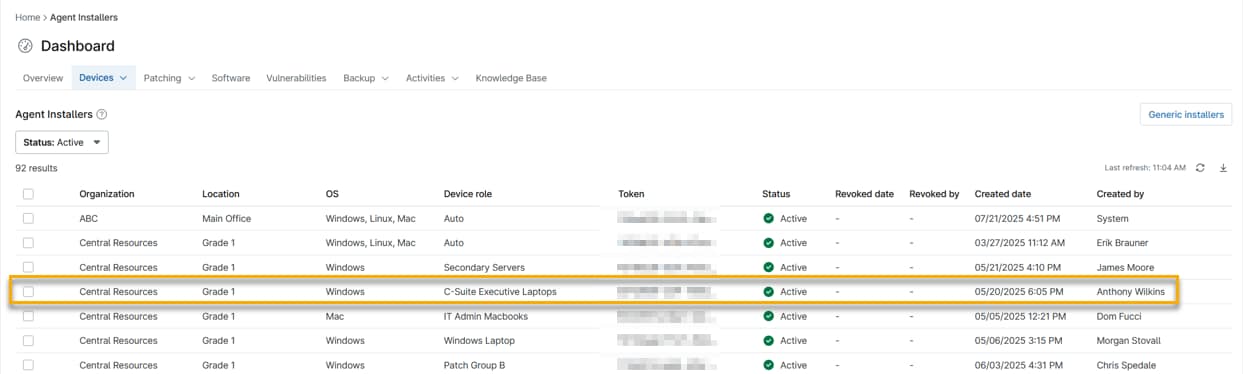
From the NinjaOne system dashboard, click the Devices tab and select Agent Installers from the drop-down menu.
- In the Installers list, find the agent installer you wish to use and click anywhere within its row.
- The Installer details window opens, displaying the installer link and the install command, complete with the authentication token for this installer. You can use the command itself to install an agent on any device, but the token is device-specific. The link will vary based on the organization's region.
NinjaOne structures the install command differently depending on the device operating system (OS).
Example Installer Commands by Operating System
Microsoft Windows
  Invoke-WebRequest -Uri "https://app.ninjarmm.com/ws/api/v2/generic-installer/NinjaOneAgent-x86.msi"
  -OutFile ".NinjaOneAgent-x86.msi" msiexec.exe -i NinjaOneAgent-x86.msi TOKENID="the token value"
Apple macOS (PKG)
curl https://app.ninjarmm.com/ws/api/v2/generic-installer/NinjaOneAgent.pkg -L --output NinjaOneAgent.pkg
sudo echo ""the token value""  /tmp/.~; sudo installer -pkg NinjaOneAgent.pkg -target /
Debian Linux
curl https://app.ninjarmm.com/ws/api/v2/generic-installer/NinjaOneAgent-x86_64.deb -L --output NinjaOneAgent-x86_64.deb
sudo TOKENID="the token value" dpkg -i NinjaOneAgent-x86_64.deb
The token will appear in the Token field in the Installer details window and contains the approval for an installer to access NinjaOne resources.
Installing the NinjaOne Agent
Now that you have set up all your organizations and created all your installers, you can deploy the NinjaOne agent to your endpoints. There are several deployment methods:
- Manually install the agent on a machine: For a small number of devices, you can either physically visit the machine with a USB containing the NinjaOne agent or use an existing remote access tool to install the agent on endpoints manually, one by one. We only recommend this method for small organizations or in cases where no other option is feasible.
- Send MSI links to end-users: If end-users have permissions to install applications on their endpoints, you can send them the direct Microsoft Installer (MSI) link to the installation file. This link is within Download Installer in the Installer details window, shown in Figure 5 above. We only recommend this method for small organizations or in cases where no other option is feasible.
- Leverage Group Policy for Windows Devices: If you are using Microsoft Active Directory (AD), you can deploy the NinjaOne agent at scale via Group Policy. Refer to Custom Script: NinjaOne Agent Deployment by AD Immediate Scheduled Task GPO to learn more.
- Deploy via Intune: If you are using Microsoft Intune, you can add NinjaOne and assign the application to end-user devices. Refer to NinjaOne Agent Installation: Deployment via Microsoft Intune. If you are using a Windows endpoint, refer to NinjaOne Integrations: Getting Started with the Microsoft Intune Integration.
- Use NinjaOne's native Active Directory Discovery and Deployment: NinjaOne includes a native Active Directory Discovery and Deployment feature, which lets you see all your Active Directory organizational units (OUs) and deploy the NinjaOne agent ad hoc or on a schedule. You must first install the agent on your Active Directory server, then follow the instructions in our NinjaOne Endpoint Management: Active Directory Discovery and Deployment Dojo article.
- Deploy via your existing RMM or Endpoint Management solution:
- Leverage your tool's native application deployment feature: Most endpoint management tools have a software deployment feature that enables you to install an application silently via MSI or executable (EXE) through your Remote Monitoring and Management (RMM) solution. Upload the NinjaOne installer to your existing tool and deploy the application using this functionality for the fastest deployment.
- Deploy NinjaOne through a PowerShell script: Most endpoint management tools can deploy a PowerShell script remotely. Use NinjaOne Academy's Migration from other RMM solutions (MAIN) scripts (login required) or the appropriate tools from our NinjaOne Endpoint Management: Mass-Deploying the NinjaOne Agent article to deploy the NinjaOne agent via PowerShell with your existing tool.
Our MSI installer is silent by default, so there are no command-line switches required to deploy it silently.
Additional Resources
The following resources will help you get the most out of NinjaOne:
- NinjaOne Endpoint Management: Creating and Editing Organizations
- NinjaOne Endpoint Management: Device Roles
- NinjaOne Agent: Device Role Selection
- API OAuth Token Configuration
- NinjaOne Endpoint Management: Active Directory Discovery and Deployment
- NinjaOne Endpoint Management: Mass-Deploying the NinjaOne Agent
- Microsoft Ignite Site: Use Group Policy to remotely install software (external link)
- Microsoft Ignite site: Add and Deploy Apps to Devices (external link)