Topic
This article explains how to enable NinjaOne Remote at the organization or device level for remote access to managed devices.
Environment
NinjaOne Remote
Description
NinjaOne Remote enables secure remote access to managed devices. To learn how to activate the application for deployment, refer to Getting Started with NinjaOne Remote.
Select a category to learn more:
- Important Considerations
- Setting up NinjaOne Remote for Organizations
- Setting up NinjaOne Remote on an Individual Device
- Additional Resources
Important Considerations
Before deploying NinjaOne Remote, review these key points.
NinjaOne Remote App Activation
You must activate the NinjaOne Remote app in Administration → Apps before you can set up NinjaOne Remote across an organization or on an individual device.
Device Terminology
A NinjaOne Remote connection involves two devices:
- The player device: The device from which NinjaOne Remote connects (the host device).
- The streamer device: The remote device to which NinjaOne Remote connects (the client device).
Mobile Devices
Review the following requirements and behaviors when using managed mobile devices:
- If you are enabling NinjaOne Remote for Apple iOS or Android, you must also install the NinjaOne Assist mobile app on all organization-owned mobile devices. Refer to NinjaOne Assist Mobile Application for more information.
- NinjaOne Remote will not function for mobile devices if:
- The Allow screenshots and screen recording setting is deactivated in your Apple mobile device management (MDM) policies.
- The Screen capture disabled setting is active in your Android policies.
- On mobile devices using Quick Connect, you must select a region before attempting to connect. Refer to NinjaOne Remote: Quick Connect for more information about setting up this feature.
- When viewing an iOS or Apple iPadOS device, screen sharing will be paused if the end user views their device notifications. The end user must open the NinjaOne Assist app and resume sharing to continue the session.
End-User Connection Confirmation
You can require end-user approval before connecting, and further configure NinjaOne Remote to allow access if:
- No user is logged in.
- The user does not respond within a defined time limit.
Refer to the Assigning Node Roles section of this article to learn how to set these preferences.
Screen Sharing on Apple macOS
Apple macOS devices acting as streamer devices require permissions for screen recording, accessibility, and full disk access. Navigate to System Settings → Privacy & Security and allow the NinjaOne Remote Streamer service before connecting with NinjaOne Remote.
Setting up NinjaOne Remote for Organizations
To deploy NinjaOne Remote at the organization level, follow these steps:
Activating NinjaOne Remote in the Organization
- In NinjaOne, navigate to Administration → Organizations and select your organization from the list.
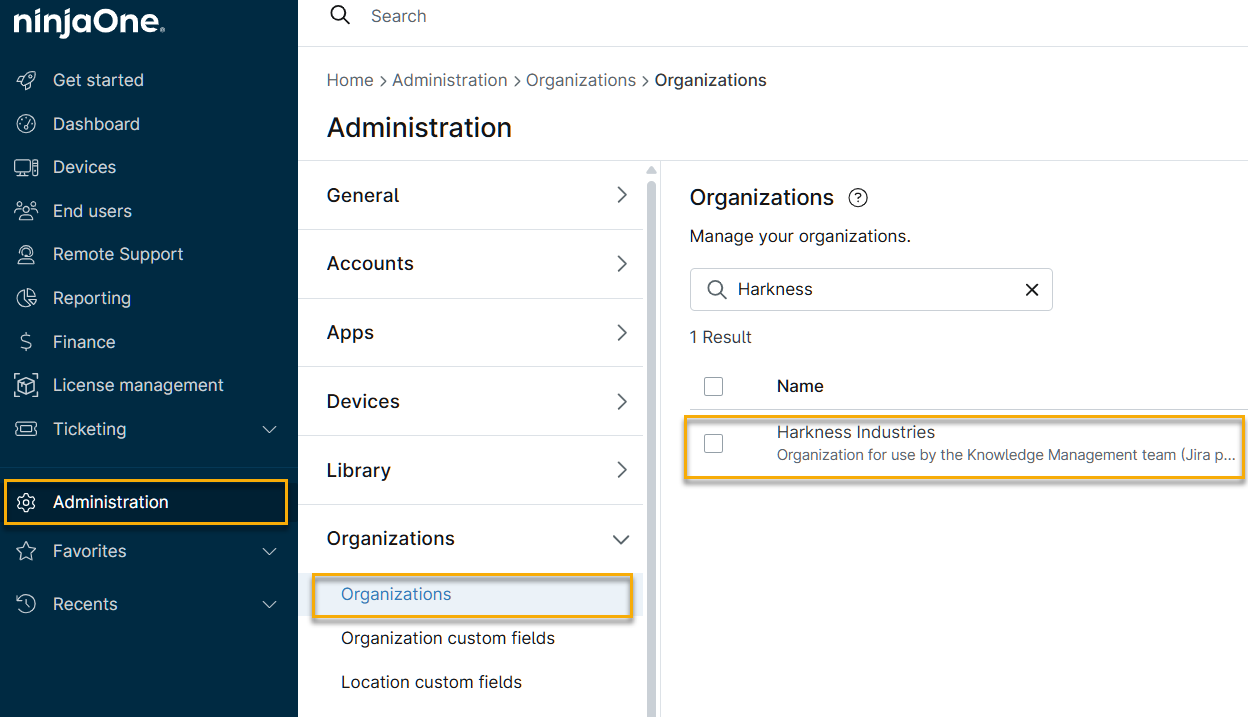
- On the organization's configuration page, click NinjaOne Remote, then click the General tab and select Enable integration.
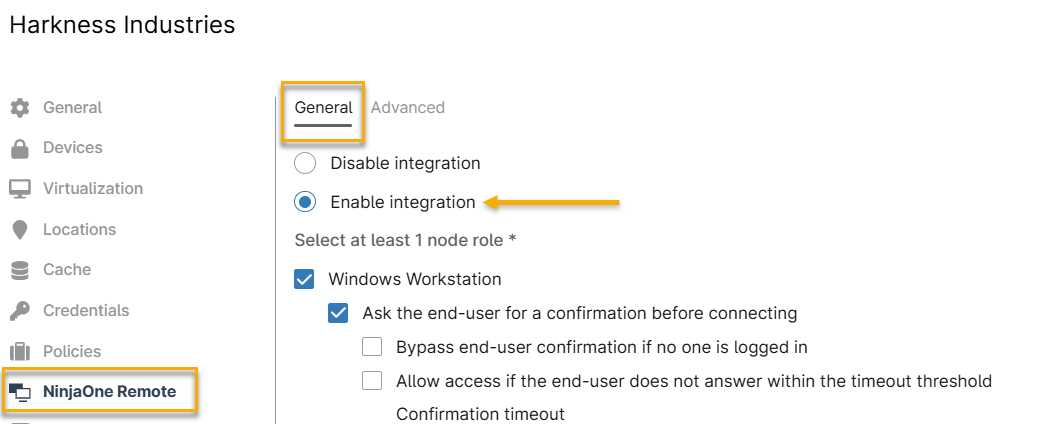
Assigning Node Roles
After activating NinjaOne Remote in the organization, assign at least one node role to define the device type and connection permissions.
Available Node Roles
- Windows Workstation
- Windows Server
- Mac
- Mac Server
- Linux Workstation
- Linux Server
- Apple Mobile
- Android Devices
Node Role Options
For each node role, you can configure the following connection options:
| Setting Name | Applies to | Description |
|---|---|---|
| Ask the end-user for a confirmation before connecting | All roles (except mobile) | Requires the end user to approve the connection before it begins. |
| Bypass end-user confirmation if no one is logged in | Windows Workstation and Windows Server roles | Allows the connection automatically if no users are logged in. |
| Allow access if the end-user does not answer within the timeout threshold | All roles except Linux Server | Allows the connection to proceed automatically if the user does not respond within the configured time limit. |
| Confirmation timeout | All roles except Linux Server | Defines the number of seconds the endpoint waits for user approval before proceeding with the connection. |

Configuring Advanced Settings
The Advanced tab contains additional session settings. On the organization's configuration page, navigate to NinjaOne Remote → Advanced.
| Setting | Description |
|---|---|
| Global Default | Use the settings defined globally in Administration → Apps → NinjaOne Remote. |
| Custom | Customize organization-level settings. Selecting this option enables the remaining settings. |
| Display name for connection | Choose the name the end user will see when a technician connects to their computer. |
| Default Player Settings | Define how the player device handles session behavior. You can set the following parameters:
|
| Prevent inactivity timeout | Stop the remote device from idling or going to sleep due to inactivity. |
| Synchronize clipboard | Copy the clipboard contents between the technician's and the remote device's clipboards. |
| Clear clipboard when session is closed | Clear the clipboard for both the remote device and the technician's device when the session ends. |
| Prevent technician keyboard and mouse | Block all cursor input from the technician on the remote device. |
Editing Multiple Organizations
Follow these steps to activate NinjaOne Remote for multiple organizations. NinjaOne applies these settings to all organizations you select for activation.
- Select the checkbox for each organization, then click Edit settings and select NinjaOne Remote.
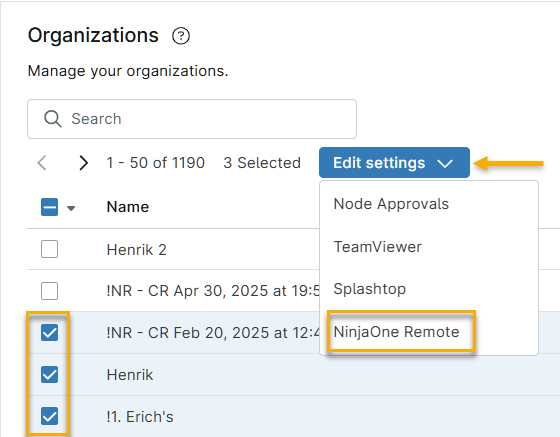
- The Edit NinjaOne Remote window opens. Select the Enable integration option, then select the node roles you need from the list. When finished, click Update.

Setting up NinjaOne Remote on an Individual Device
You can activate and configure NinjaOne Remote on individual devices within an organization rather than enabling it for all devices of that type.
- On the device's dashboard, navigate to Settings → Apps.
- On the NinjaOne Remote card, click Edit.

- The Edit NinjaOne Remote settings window opens with the same configuration options available at the organization level. If NinjaOne Remote is already deployed at the organization level, these settings will be preconfigured to match. Settings that match the organization configuration display an Inherited label. Settings you have modified display an Overridden label.

Additional Resources
for more information about NinjaOne Remote, refer to Remote Access: Resource Catalog.