Topic
AutoDiscover Service is a virtual directory tool developed by Microsoft to simplify access to EWS (Exchange Web Services) endpoints and other configurations. This allows the server to discover the mailbox settings so that users don't have to deal with manually configuring advanced settings.
In NinjaOne, AutoDiscover monitors whether any new mailboxes or SharePoint sites are available under the SaaS Backup and adds them automatically. Partners can enable email notifications to be notified if there aren’t enough seats under the organization (click here to learn about enabling notifications in the Partner Portal).
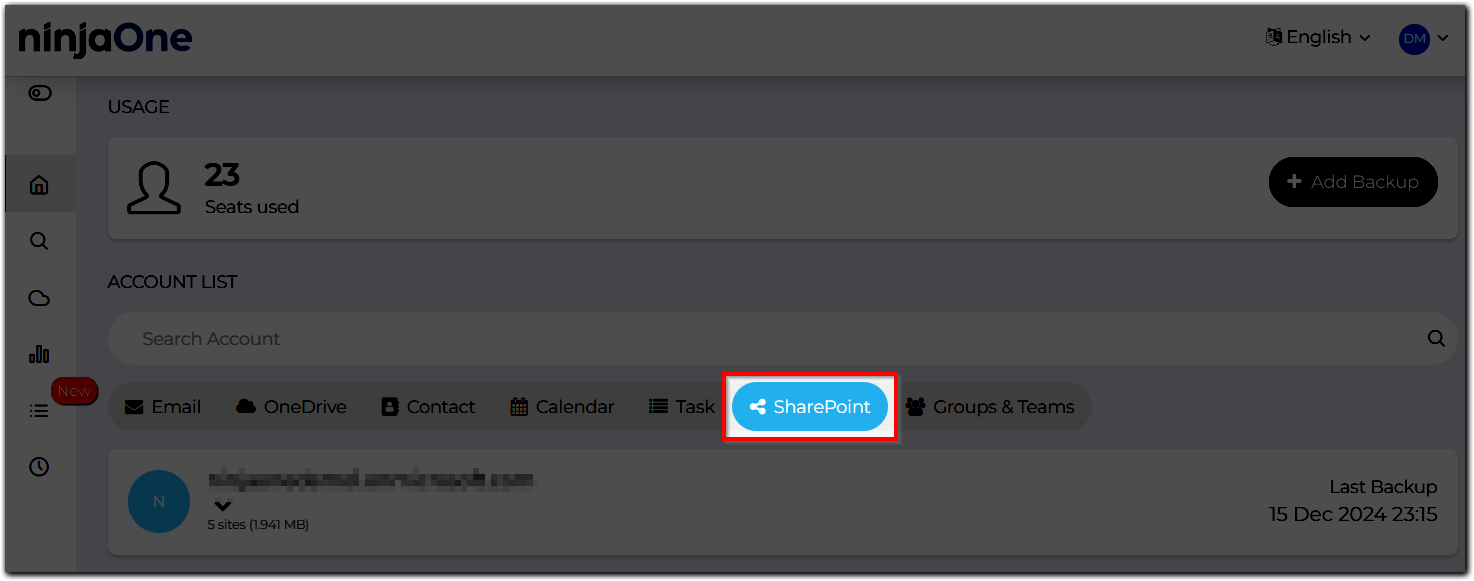
The current SharePoint backup method is straightforward. Users simply need to add their mailboxes to NinjaOne SaaS Backup successfully, and then SharePoint backup will be initiated seamlessly.
With these enhancements, we now offer a more flexible approach to backing up SharePoint. The system adds a new AutoDiscover toggle, allowing users to choose whether to enable this feature. Additionally, users can exclude SharePoint from backups if needed.
Key Highlights
- Ease of use: The SharePoint AutoDiscover toggle automates the identification of new sites, reducing the need for manual additions.
- Enhanced user control: Users can disable SharePoint AutoDiscover for granular backup control.
- Customization: The SharePoint backup exclusion feature allows users to specify what should not be included in the backup.
- If AutoDiscover is enabled, you can use the Exclude button to exclude any mailboxes you would not like to be backed up.
Environment
Description
NinjaOne SaaS Backup is a cloud backup platform that helps businesses securely backup, manage, recover, and protect their business information. The automated and incremental backups simplify the backup, recovery, and compliance experience. It works with Microsoft 365 (Hosted Exchange, Groups and Teams, SharePoint, OneDrive), Gmail (including Calendars, Contacts, and Tasks), and other IMAP email servers. NinjaOne uses 256-bit (AES) encryption at rest and in transit, supporting multifactor authentication (MFA).
Index
- Overview
- SharePoint Restore and Download
- Add a New M365 Backup
- Manage a Backed-up M365 Tenant
- Frequently Asked Questions
SharePoint Restore and Download
For SharePoint Online, you can:
- Restore the SharePoint Site, subsite, and single file folder in SharePoint.
- Do point-in-time restore: You can restore on any date since the backup started.
- Restore data to the same site or any other site in the same tenant.
Download SharePoint
- Login to the Organization Email Portal.
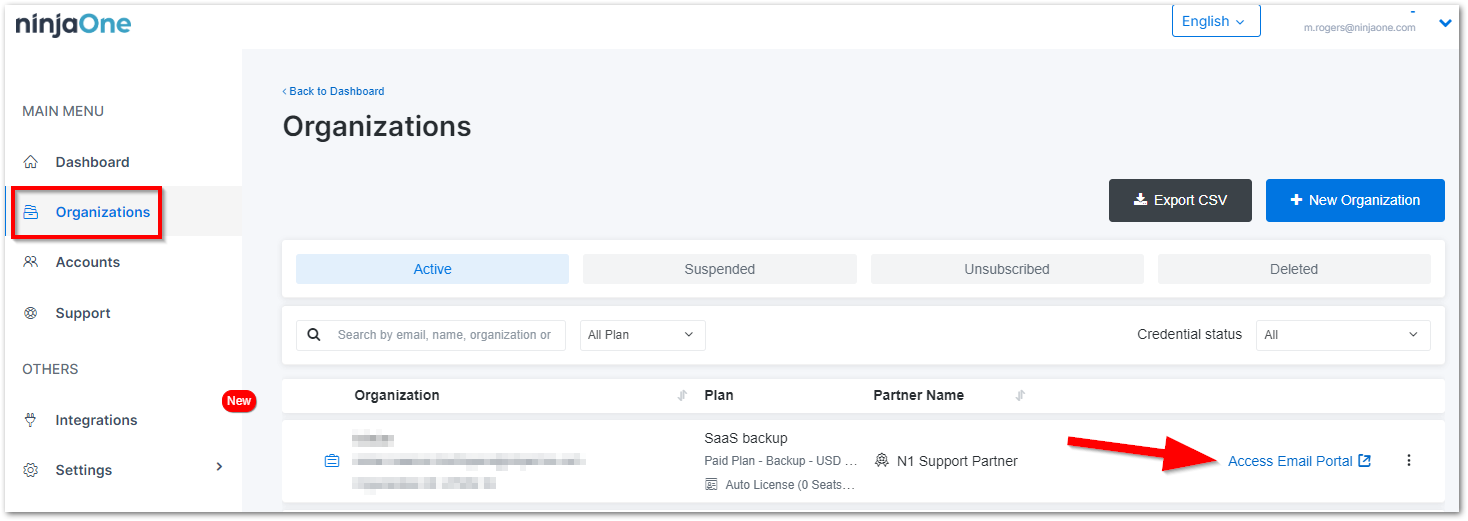
- Open the SharePoint tab.
- Hover on the site you wish to download.
- If you want to download the entire site, click Download (technician must have full permissions to see this option).
- On the next screen, you will see the following options:
- Backup Date: This will download the site as it existed on that date.
- Backup Time: Since we do three backups a day for SharePoint, select the version you want to download on the backup date.
- Select the subsites to be downloaded: You can choose any/all of the sites to be included in the download.
- Select the options, select Generate Download, and click Yes, Continue.
If you want to download only one subsite, expand the main site and click Download for the sub-site. You can then proceed through the download as outlined in steps 5 and 6 above (excluding bullet 5.3).
If you want to download selected folders and files in a sub-site, click on the sub-subsite and open it. You can then select the files and folders and click Restore. Select the versions to be restored.
You can check the status of your downloads by clicking on System Status > Downloads on your Dashboard.
Restore SharePoint
- Login to the Organization Email Portal.
- Open the SharePoint tab.
- Hover on the site you wish to restore.
- If you want to restore the main site, click Restore.

- On the next screen, you will see the following options:
- Backup Date: This will download the site as it existed on that date.
- Backup Time: Since we do three backups a day for SharePoint, select the version you want to download on the backup date.

- Select the options, select Generate Download, and click Yes, Continue.
If you want to restore a subsite, expand the main site and click Download for the subsite. 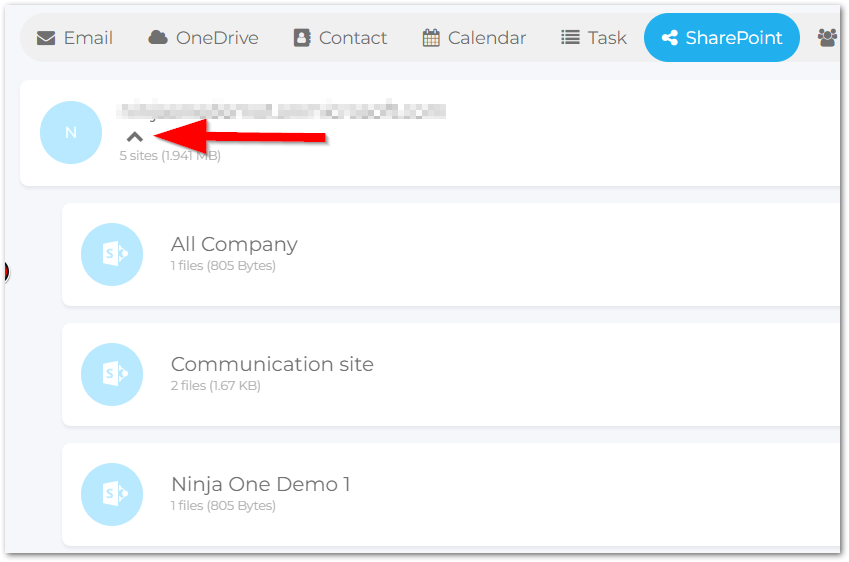
For this, you will have the following options:
- Backup Date: This will restore the site as of that date.
- Backup Time: Since we do three backups a day for SharePoint, select the version you want to restore on the backup date.
- Destination: You can choose to restore it to the same main site or any other site in the same.
- Default Folder: This will restore everything to the same folder from where the data was backed up from.
- Create New Folder: Create a new folder in the site and restore the data there.
- Advanced Option: Use this to decide what to do in case a file conflict occurs during restore. A conflict arises when you restore a file to a location that already has a file with the same name and type.
If you want to download selected folders and files in a subsite, click on the sub-subsite and open it. You can then select the files and folders and click Restore. Select the versions to be restored. For this, you will have these options:
- Destination: You can choose to restore it to the same main site or any other site in the same
- Default Folder: This will restore everything to the same folder from where the data was backed up
- Create New Folder: Create a new folder in the site and restore the data there
- Advanced Option: Use this to decide what to do in case a file conflict occurs during restore. A conflict arises when you restore a file to a location that already has a file with the same name and type.
Add a New M365 Backup
Adding a new M365 backup is the first step in integrating your mail tenant with NinjaOne servers, also known as an initial backup. Users will now find an additional step, “AutoDiscover Setting,” when they start to add an M365 backup. There are two methods for M365 backup: using Global Admin or Service Principal.
The AutoDiscover setting includes two features for M365 backup: AutoDiscover and SharePoint Site backup exclusion. These features are independent, so users can exclude SharePoint Sites without enabling AutoDiscover.
Manage a Backed-up M365 Tenant
Users who have already backed up their M365 tenant will find an additional Sites tab. This tab includes the AutoDiscover toggle, which allows for deeper exploration of the feature.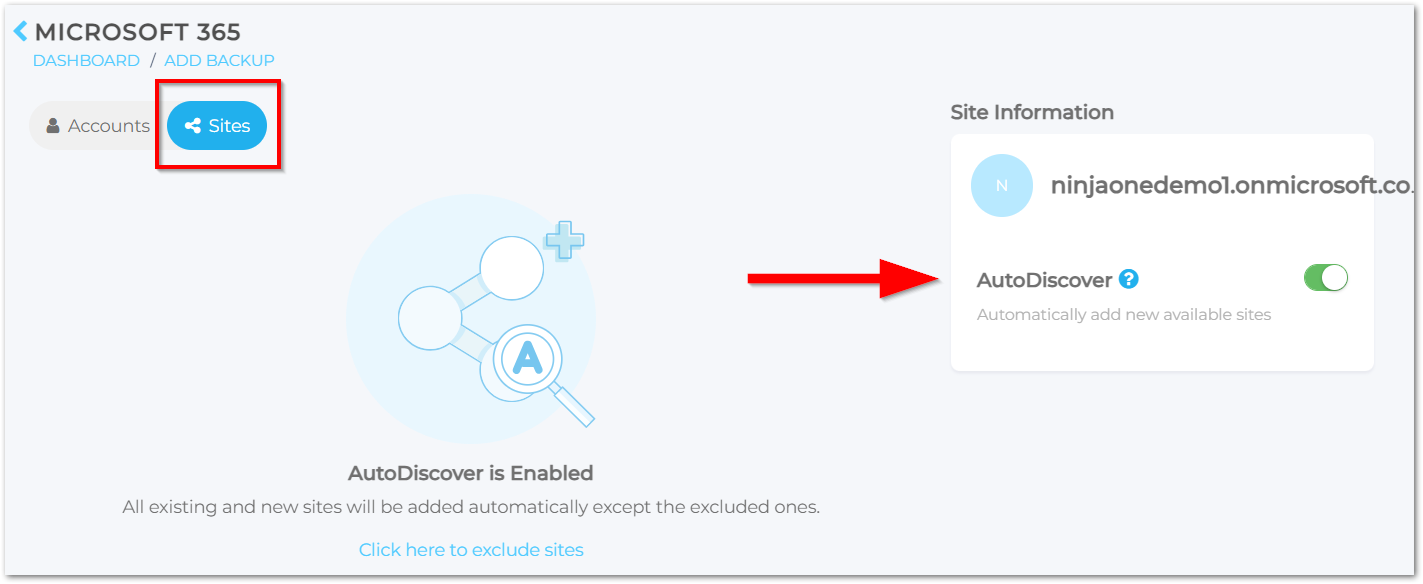
Enable AutoDiscover
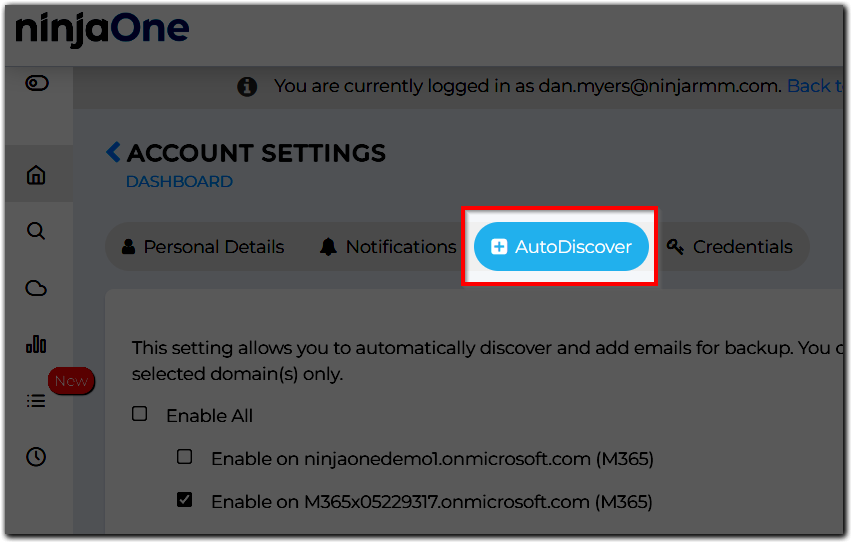
- Login to the Organization Email Portal.
- Click your profile icon in the top right corner of the page and select Account Settings.
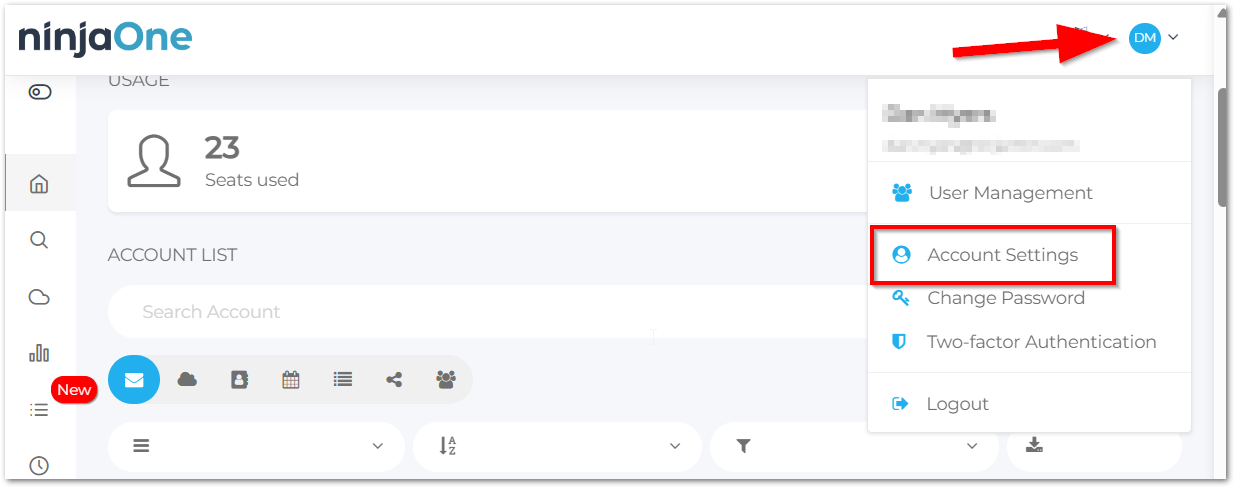
- Open the AutoDiscover tab. This is where you can enable for all or pick specific domains.
Enable AutoDiscover for SharePoint
To enable SharePoint AutoDiscover:
During M365 Authentication: Locate and turn on the AutoDiscover toggle.
On the M365 Backup List page:
- Locate and turn on the AutoDiscover toggle so that it is green.
- Confirm by clicking the Continue button in the pop-up confirmation.
Disable SharePoint AutoDiscover
Disabling SharePoint AutoDiscover means you will manually add specific sites to the backup. Follow these steps:
- Login to the Organization Email Portal.
- Click the +Add Backup button.
- Click the backed-up tenant.
- Switch off the AutoDiscover toggle so that it is not green.
- Click the OK button in the popup confirmation.
Exclude SharePoint Sites
This process excludes specific sites from being identified by AutoDiscover and automatically added to the backup.
During Initial Setup:
- Find SharePoint exclusion in step 3 of the AutoDiscover Settings above.Note: The SharePoint exclusion and AutoDiscover features are independent. You can exclude SharePoint sites without enabling AutoDiscover.
- Select which sites to exclude from the backup.
- Click the Exclude button in the right-side drawer.
- Click the Finish Setup button.
For Existing Backups with AutoDiscover Enabled:
- Click the Click here to exclude site button on the M365 tenant page.
- Select the sites to exclude and click the Exclude button.

- Click the Finish Setup button.
Frequently Asked Questions
- SharePoint Restore and Download
- How Many SharePoint Versions are Backed Up?
- I got this warning after finishing the M365 Authorization setup. What does this mean?
- Can I re-add the excluded Site to the backup system?
Do You Back Up SharePoint Site Pages?
Yes, we do backup SharePoint Site Pages. During the backup process, we convert the original format “.aspx” to “.html.” During the restore process, it is restored in “.html” format.
How Many SharePoint Versions are Backed Up?
SharePoint backup runs three times per day. For example, SharePoint Backup can have a maximum of three versions of a file per day. Because of this, it is likely that the amount of data shown as backed up will differ from what is seen within the tenant itself. Typically, the size shown within M365 will be higher than what is shown in NinjaOne.
I got this warning after finishing the M365 Authorization setup. What does this mean?
If you receive a warning after completing the M365 Authorization setup, it means you haven't added an email account yet. Please add at least one email account to proceed with backing up the site.
Can I re-add the excluded Site to the backup system?
To re-add an excluded site to the backup system:
- Go to the Add Backup page.
- Select the backed-up tenant.
- Open the SharePoint tab.
- Click the link showing the number of excluded SharePoint sites.
- Select the desired site and then click the Add to backup button.