Topic
This article describes the process for automatically discovering endpoints and deploying the NinjaOne agent to them via Active Directory.
Environment
NinjaOne Endpoint Management
Description
NinjaOne's Active Directory Discovery and Deployment tool allows technicians to automatically deploy the NinjaOne agent to devices that belong to a domain.
Index
Select a category to learn more:
- Supported Client Operating Systems
- Prerequisites
- How to Run an Active Directory Discovery Job
- How to View AD Discovery Jobs
- How to Cancel or Update AD Discovery Jobs
- Additional Resources
Supported Client Operating Systems
NinjaOne supports the following operating systems (OSs) for discovery and deployment:
- Microsoft Windows Vista
- Windows 7
- Windows 8.1
- Windows 10
- Windows 11
- Server 2008r2
- Server 2012/2012r2
- Server 2016
- Server 2019
- Server 2022
Prerequisites
The Domain Controller used for discovery must have the NinjaOne agent installed.
- NinjaOne Agent Installation: Mac
- NinjaOne Agent Installation: Linux
- NinjaOne Agent Installation: Windows
You must have domain administrator credentials saved in the credentials store in the organization configuration. For more information, refer to NinjaOne Endpoint Management: Credential Exchange.
You must enable File and Printer Sharing on all client devices to push the Microsoft Software Installer (MSI). On Windows Vista, File Sharing is a separate setting from Printer Sharing, and only File Sharing is required. For more information on setting up File and Printer Sharing, you can view the following resource in the Microsoft forums: SMB - File and printer sharing ports should be open | Microsoft Learn (external link).
Client devices must be part of a domain and currently part of the network where the Domain Controller resides. Clients can sometimes be part of a domain but not be currently in the same network as the Domain Controller, in which case the agent deployment will fail.
Client devices must be online in order for Active Push to work; otherwise, a Group Policy Object (GPO) will be created with a startup script that will install the agent upon OS startup or reboot.
How to Run an Active Directory Discovery Job
You can run AD discovery jobs through the organization in NinjaOne.
- Navigate to Administration → Organizations. Select the organization needing the ad-hoc discovery job.
- From the organization configuration page, select Devices and open the Discovery Jobs tab.

- Click Add and select whether you want to run an immediate discovery job (ad hoc) or schedule the job for a future date and time.
- Select your Domain Controller from the drop-down menu.
- When you select the Domain Controller, the folders for organizational unit (OU) paths related to the selected controller will display. Click through the folders to view their device information. Use the search field to find a specific OU path.
- Click Next.

On the Set Location and Status to New Devices screen, the workflow will change depending on whether you selected Adhoc Discovery or Scheduled Discovery.
Select an option to view instructions:
Run an ad hoc Discovery Job
If you selected Adhoc Discovery to create the job, continue with the following steps.
- Select the checkbox next to a device and click Select to configure the credentials for that device.
Click Set Location and Status. There are several options for the status that can be applied to a device. Note that the status you choose affects all devices selected on the previous screen. Each device can have a different status within the same job. For more information about the device approval process, refer to NinjaOne Endpoint Management: Device (Node) Approval.
Status Definition Discovered Identifies devices that were newly discovered. No action occurs. Pending Sets the selected devices as pending for deployment of the NinjaOne agent at a later time. Approved Flags the devices for instant installation of the NinjaOne agent. Rejected Prevents the selected devices from receiving the NinjaOne agent.

- Once you have selected the devices and set the credentials for location and status, click Apply.
Select the checkbox next to Save discovery job for later use to create a copy of the AD Discovery jobs. Click Yes to confirm this job.
NinjaOne will not process more than one AD Discovery job at a time. Attempting to set up a second immediate job results in an error, as that Domain Controller or OU Path is already in use. Within a single job, you can assign different statuses to each device.
Schedule a Discovery Job
If you selected Scheduled Discovery to create the job, continue with the following steps.
Set your credentials for the job and select a group of devices. Click Set Location and Status to choose the location and status for those devices. Note that the status you choose affects all devices selected on the previous screen. Each device can have a different status within the same job. For more information about the device approval process, refer to NinjaOne Endpoint Management: Device (Node) Approval. There are three options for scheduled Status:
Status Definition None The NinjaOne agent will not be deployed. Pending Approval NinjaOne will wait to deploy the agent until approved. Auto Approve The devices will be automatically approved, and the NinjaOne agent will deploy when the scheduled job runs. - Click Set Schedule. This provides the option to configure when and how frequently the job runs.

There are four options when setting the schedule for an AD discovery job:
| Schedule | Definition |
|---|---|
| Hourly | This job will repeat every specified number of hours until all devices have successfully installed the NinjaOne agent. |
| Daily | This job will repeat every specified number of days until all devices have successfully installed the NinjaOne agent. |
| Weekly | This job will repeat every specified number of weeks on specified days of the week until all devices have successfully installed the NinjaOne agent. |
| Monthly | This job will repeat every specified number of months on a specified day of the month until all devices have successfully installed the NinjaOne agent. |
- When the job is configured, click Save.
- Give the job a unique identifier for the name and then click Confirm.
How to View AD Discovery Jobs
You can easily view all scheduled, current, and past discovery jobs from the organization configuration page.
- Navigate to Administration → Organizations. Select an organization, click Devices and open the Discovery Jobs tab.
The Lists tab displays current ad hoc or scheduled jobs:
Column Description Name The title given to that job. Type Adhoc or Scheduled. Domain Controller The domain controller being used for this job. OU Path The OU Path for the device(s). Schedule When the job is scheduled to run (for scheduled jobs only). 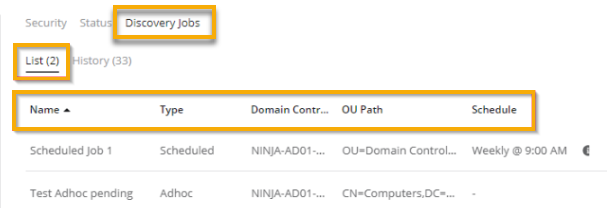
Figure 5: View current and scheduled discovery jobs The History tab displays previously completed jobs along with a summary of those jobs:
Column Description Name The title given to that job. Type Ad hoc or scheduled. Date The date the job was completed. Summary A summary of what actions were involved. User The technician who created the job. 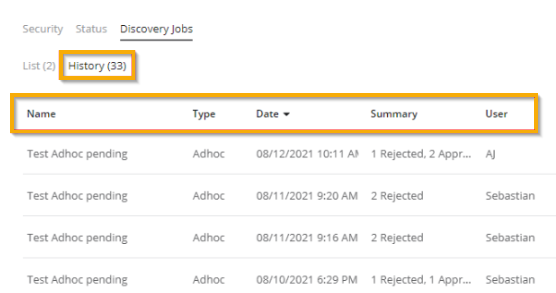
Figure 6: View completed discovery jobs
How to Cancel or Update AD Discovery Jobs
You can cancel or update scheduled discovery jobs that have not started. To do so, perform the following steps.
- Navigate to Administration → Organizations. Select an organization, click Devices and open the Discovery Jobs tab.
Place your cursor over the job you wish to manage and select Edit or Delete as applicable.

Figure 7: Edit or delete a scheduled discovery job
Additional Resources
To learn more about how to manage your endpoints in NinjaOne, refer to NinjaOne Endpoint Management: Device Enrollment & Management: Resource Catalog.