![]()
This guide provides instructions for synchronizing an organization in NinjaOne to existing accounts/companies in Autotask, based on scenarios regarding different device details.
Table of Contents
Synchronization Scenarios:
Synchronization behavior between NinjaOne and Autotask varies depending on device details. That is, certain actions or data inputs in NinjaOne affect accounts in Autotask when mapping is established. If the device has a DeviceUID, NinjaOne and Autotask use this data to facilitate mapping the integration. If the device does not have a DeviceUID, the rules outlined in the Mapping Behaviors section are followed.
Device name changes, status changes, or organizational updates in NinjaOne also synchronize with the Autotask application—see mapping behaviors for a list of scenarios.
Viewing Configuration Item Details in Autotask
Use the Configuration Item Search page in Autotask to determine whether a device contains a serial number (or service tag if the device is VMware), and to which account (i.e., organization) it is tied in Autotask. This is a quick way to view what information is shared and/or affected between NinjaOne and Autotask.
- From the Autotask console, click the three horizontal lines in the top left corner, select CSR and click Configuration Items.
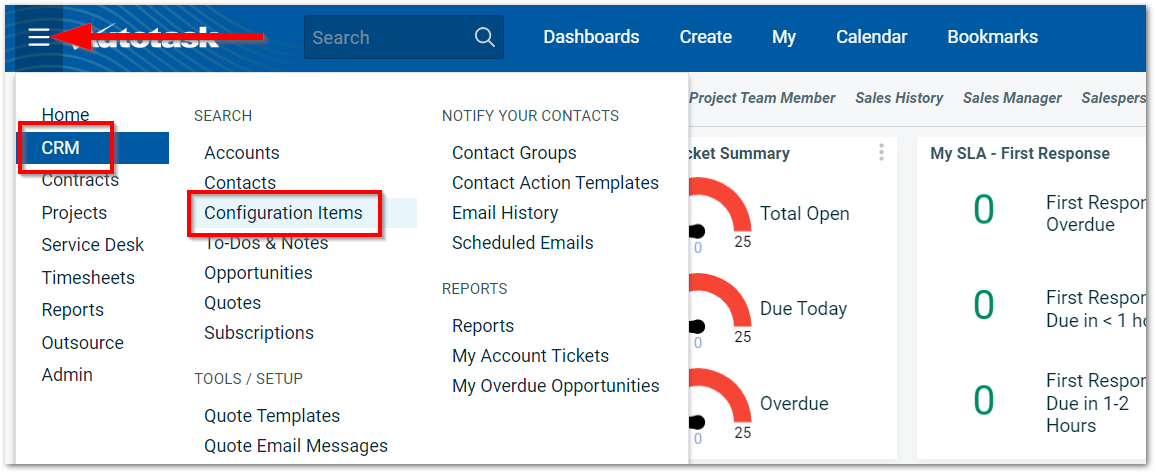
- Enter your criteria into the search filters, or simply click Search to view all accounts and devices.

The results display at the bottom of the page.
Use the Column Chooser in Autotask to add Configuration Item: NinjaRMM columns to this table.
Mapping Behaviors
| Configuration Detail | Mapping Behavior |
|---|---|
| Organization owns a single device that contains a serial number but is not assigned a DeviceUID. | The devices are mapped by serial number and a DeviceUID will be assigned. |
Organization owns several devices that contain serial numbers but are not assigned a DeviceUID. | If there are more than one device with matching serial numbers, NinjaOne does not map to Autotask. Instead, NinjaOne automatically creates a new device in Autotask with an assigned DeviceUID. |
| Organization owns several devices; some of the devices contain serial numbers and some do not. | The devices without serial numbers are mapped by device/reference name. |
| Organization does not have a device created in Autotask. | The device is automatically created in Autotask with matching data. |
| Technician updates a device's assigned organization in NinjaOne. | Device follows the Autotask mapping settings in NinjaOne; the Configuration Item in Autotask updates to show the account name matches the device's new organization. |
| Technician updates a device's name in NinjaOne. | Autotask updates to reflect the changed name of the device and displays the data under "Reference Name".
|
| Device is deleted from NinjaOne. | If the "Mark configuration inactive if corresponding NinjaOne device is deleted" option was checked when creating a device role mapping, then Autotask automatically updates to show the device is inactive. If that option was not checked, then the device must be manually marked as inactive in Autotask; otherwise, the status does not change in Autotask. |

Mapping an Organization with an Autotask Account/Company:
- In the NinjaOne console, click Administration in the left navigation and open the Apps tab. Select Autotask and then click Edit next to Settings.

The Autotask settings editor page displays with the Accounts tab open by default. You should see a list of all organizations created in NinjaOne automatically included under the Account Mapping field. - Click the organization name to open the Account Mapping popup window.
- From the Autotask Account dropdown, select the company that needs to be mapped to the selected NinjaOne organization. From the Ninja Device Role Mapping, you can optionally select the device role if any were added to the Autotask Settings > Device Roles tab.

- Click OK.
The page updates to display the mapping details. - Click Save in the top right corner of the Autotask editor page.