
Topic
This article describes the Bitdefender GravityZone Integration and the steps required to set it up in your NinjaOne instance.
Environment
- NinjaOne Integrations
- Bitdefender GravityZone
- Microsoft Windows
- Apple macOS
Description
Bitdefender is a state-of-the-art security solution that can protect your customer endpoints from multiple angles. It provides consolidated risk analytics, device hardening, next-generation antivirus, Endpoint Detection and Response (EDR), and Managed Detection and Response (MDR) in a single platform. With an extensive API and comprehensive task automation, Bitdefender reduces costs and significantly enhances your security posture.
The integration enables you to use the NinjaOne platform to view and manage quarantined, active, and blocked threats found by Bitdefender GravityZone on your Microsoft Windows or Apple macOS endpoints. Quick access options empower you to take immediate actions directly within NinjaOne or click through to the impacted endpoint in the GravityZone application to perform more comprehensive triage.
View additional tutorials in our video library.
Index
Select a category to learn more:
- Prerequisites
- Activate the Bitdefender GravityZone Integration
- Mappings
- Access the GravityZone Console
- Deploy the GravityZone Policy to Machines
- Bitdefender GravityZone for Linux
- Additional Resources
Prerequisites
Before enabling the integration, you must familiarize yourself with the following environmental requirements and considerations.
Licensing
In NinjaOne, you can control which devices will install Bitdefender GravityZone through policy assignments. Refer to the section within this article titled Deploy the GravityZone Policy to Machines to learn how.
Note the following requirements for using Bitdefender GravityZone with NinjaOne:
- You cannot use trial licenses to deploy agents with the Bitdefender GravityZone integration in NinjaOne. Your account must be on a monthly subscription.
- The NinjaOne account email you use for the integration must match the GravityZone account email.
- You must have an additional partner account.
You must access the GravityZone portal to view the following items, as they are not available in NinjaOne:
- License add-ons and their allocation to companies
- Active licenses per company
- Endpoint licenses per add-on
Bitdefender GravityZone provides help guides for calculating the endpoint license usage through reports; refer to Use cases | Bitdefender (external link) for more information. You can also monitor license status through notifications on the Bitdefender GravityZone portal; refer to Notifications | Bitdefender (external link) for more information.
Permissions
Only system administrators can activate the Bitdefender GravityZone Integration. When the integration is active, technicians with the appropriate permissions can access administrative controls or run GravityZone scans on devices.
To grant the technician permission, open their account page or role, select System, and manage the options for GravityZone Admin and GravityZone Scan Options. For more information about permissions, refer to NinjaOne Platform: Permission Settings for Technicians.
Compatibility
Refer to the following notes to learn about compatibility requirements for this integration.
- The GravityZone Active Directory module is incompatible with the NinjaOne GravityZone integration.
- The GravityZone integration is only compatible with Microsoft Windows and Apple macOS devices.
- NinjaOne does not support ARM-based processors when deploying installations.
Networking Allowlist Requirements
You must add https://gravityzone.bitdefender.com/ to your networking allowlist so the NinjaOne agent can download the GravityZone installer.
For more details, refer to NinjaOne Global Allowlist Information.
Software Development Kit Limitations
If you use the SDK Bitdefender integration, be aware of the following:
- The Bitdefender SDK will uninstall automatically during the GravityZone setup process. When the policy settings change, NinjaOne will try to uninstall the SDK and install GravityZone. If NinjaOne fails to remove the Bitdefender SDK, we recommend that you uninstall it manually before attempting the Bitdefender GravityZone installation on the device again. To learn more about policy settings, refer to the section Deploy the GravityZone Policy to Machines.
- The configured Bitdefender SDK policy settings will not transfer to the GravityZone policy setting configuration.
Bitdefender GravityZone Accounts Provisions
GravityZone accounts will provision to the region matching the NinjaOne account, as shown in the following table.
| NinjaOne Instance | GravityZone Instance |
|---|---|
| EU | EU |
| OC | EU |
| NA | USA |
| NA2 | USA |
| CA | USA |
The integration will break if you are migrating your account from one region to another. You must uninstall all devices and obtain a new GZ console in your new account region.
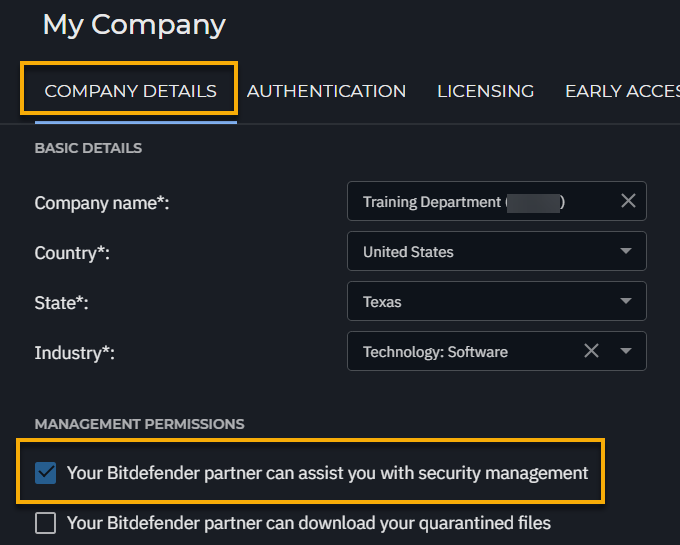
- From the GravityZone platform, click the user menu and select My company.
- The My company configuration page displays. Under Company Details, select the checkbox for Your Bitdefender partner can assist you with security management. This setting is required to install the integration with NinjaOne.
- Open the Licensing tab. Then, click Change Partner.
- Refer to the table in section Bitdefender GravityZone Accounts Provisions to determine your GravityZone instance.
- Enter the corresponding value in the Change partner → Partner company → Company hash field.
- EU: 9edf6ce203ea6227fb2b8ac6adf6877c
- USA: 3fa11f8c08b045e13c7bb90aefa1d6ff
- Click the Change Partner button again to confirm and save.
For more details, refer to Changing a managed company's subscription as an MSP Partner — Bitdefender Support Center (external link).
Activate the Bitdefender GravityZone Integration
After you've provisioned your Bitdefender GravityZone account, you must activate the integration in NinjaOne by completing the following workflow:
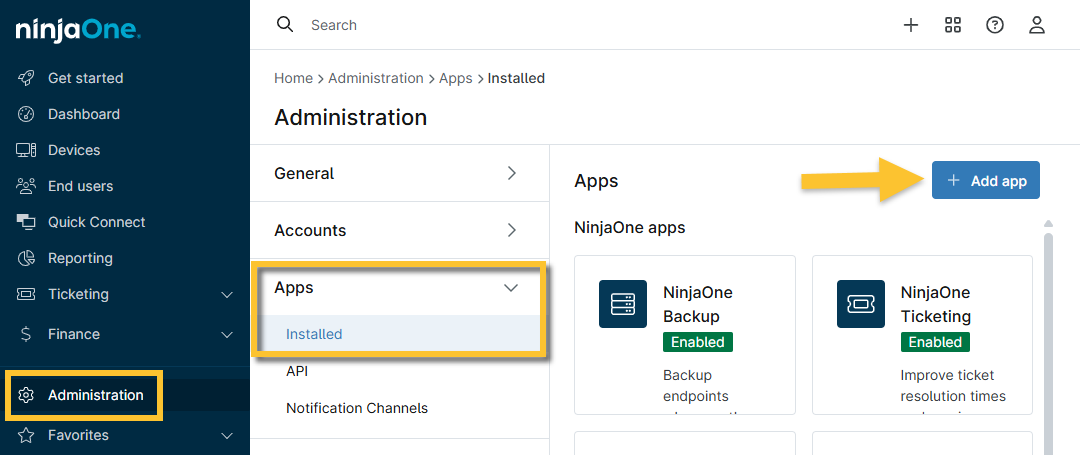
- In NinjaOne, navigate to Administration → Apps → Installed. Then, click Add Apps.
- The Add Apps dialog appears. Locate and click the Bitdefender GravityZone app.
- When the Confirm app addition dialog appears, click Continue to add the app.
- NinjaOne will add the app in a deactivated state. Click Enable to continue the setup.
- After you have activated GravityZone, select whether you would like to set up a new account or integrate an existing one.
Set Up a New GravityZone Account
- After you complete the steps above, the Bitdefender GravityZone setup dialog will open. Select Setup new GravityZone account.
- Input your NinjaOne account email in the text field and click Next.
- Follow the prompts to verify your identity, and then click Done in the account creation confirmation dialog.
- Proceed to this article's Mappings section.
Connect An Existing GravityZone Account
- After you complete the steps to activate the integration, the Bitdefender GravityZone setup dialog will open. Select Integrate with existing GravityZone account.
- Paste your Company ID from the Bitdefender GravityZone platform.
To obtain your GravityZone Company ID, perform the following steps:
- From the GravityZone platform, click your account name and select My Company from the drop-down menu.
- Open the Licensing tab and click the paper icon on the right side of the Company ID field to copy the data.
To activate the integration with NinjaOne, you must select the Management Permissions checkbox in the Company Details tab on the My Company account page.
For more details, refer to Manage your company — Bitdefender Support Center (external link).
- In NinjaOne, click Next after selecting the integration option. Paste the copied data into the Company ID field.
- Click Next and verify your MFA using your preferred method.
- Click Continue. On the next screen, acknowledge the setup terms by selecting the checkbox to proceed. Click Next.
- Enter your NinjaOne account email into the provided textbox to verify that the Company ID entered is correct. Click Next.
NinjaOne will save your GravityZone Company ID and name to the organization editor in the Bitdefender GravityZone tab.
Mappings
When the Bitdefender GravityZone integration is active, NinjaOne will provision new companies and installation packages in GravityZone that represent your NinjaOne organizations. These companies will have alphanumeric suffixes at the end of their names to denote that they originated from NinjaOne. You can map the companies created in GravityZone to their matching NinjaOne organizations via the Mappings tab on the Bitdefender GravityZone integration configuration page in NinjaOne.
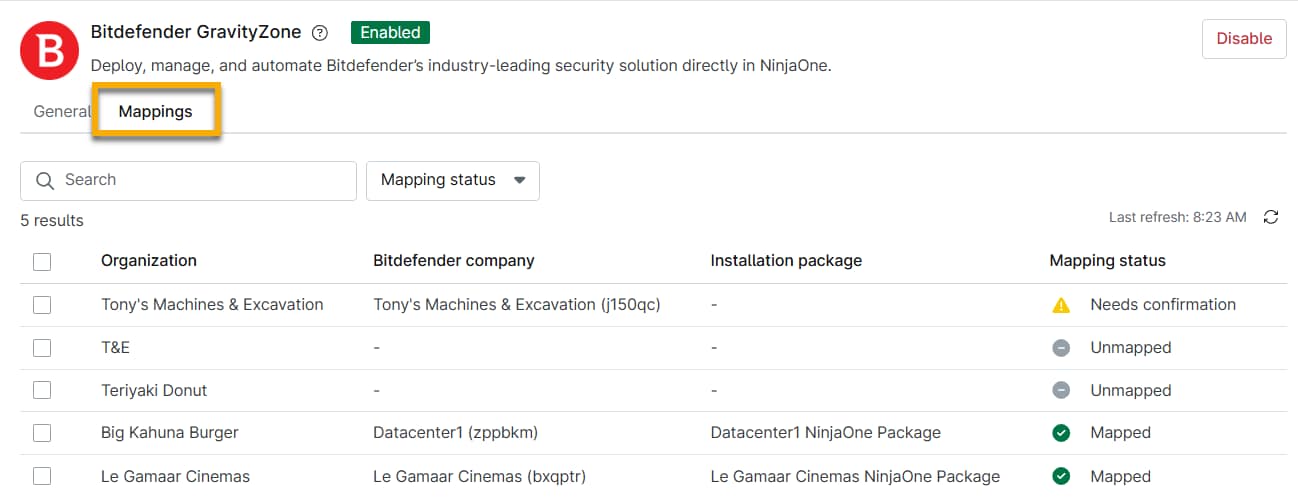
NinjaOne will generate new company entities in the following circumstances:
- When an existing organization has one or more devices with GravityZone deployed at the policy level.
- When you add a new device with GravityZone turned on in the policy.
For more details, refer to Bitdefender GravityZone Managed Device Mapping.
New devices deployed via NinjaOne are automatically located in the NinjaOne-created GravityZone company.
If you move a device from one organization to another, you must manually update this data in the GravityZone console. Moving a device from one company to another may create a duplicate, deactivated device in the source company. You can delete the device by dragging it to the Deleted folder in the GravityZone UI. Doing so does not create an extra license charge.
Configure Security Events
The security events tool will add Endpoint Detection and Response (EDR) incidents to the Threats table on the system and organization dashboards. System administrators can use these incidents to view threat details, JSON payloads, deep links, timestamps, and activity history.
- On the Bitdefender GravityZone application configuration page, click Edit in the Security events section.
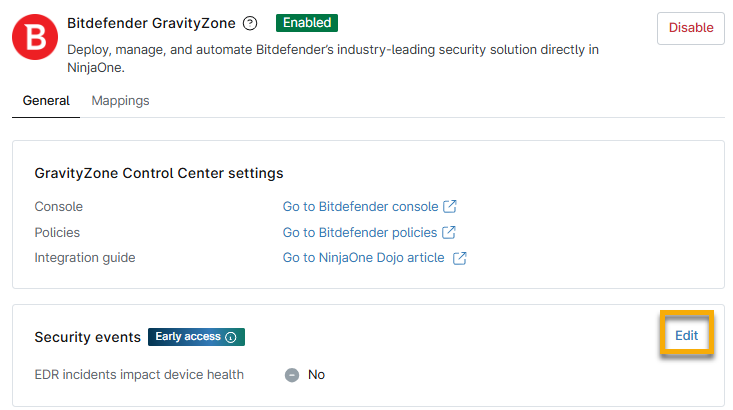
- Select Yes from the EDR incidents impact device health drop-down menu and click Update.
This action will add GravityZone incident logs to the Activities tab on the system and organization dashboards. When viewing details on the Activities page, you can copy the contents of the JSON data to your clipboard for troubleshooting and remediation.
Access the GravityZone Console
To access the GravityZone console from NinjaOne, perform the following steps:
- After you have activated GravityZone on your account, click Console to navigate to the GravityZone console.
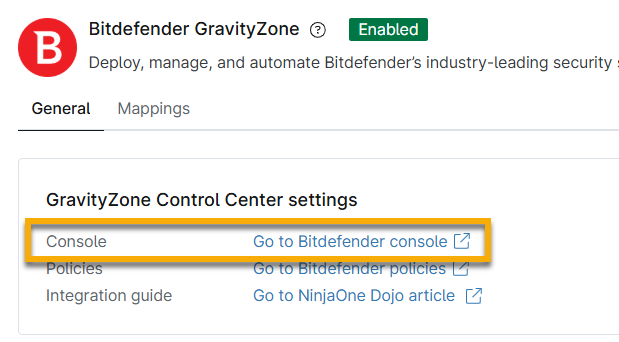
- Click Continue to proceed to the GravityZone console.
- Fill out the applicable fields to register your account. When prompted to install GravityZone, you can optionally click Install on this computer now; however, you are not required to complete this step to access GravityZone.
Deploy the GravityZone Policy to Machines
To deploy the antivirus software to your devices, perform the following steps:
- In NinjaOne, navigate to a Windows or macOS policy from the Administration → Policies menu and open the Antivirus section.
- From the Antivirus integration drop-down menu, choose Bitdefender GravityZone.
- Click Confirm to continue.

If you are switching from the Bitdefender SDK integration to the GravityZone integration, this action should also trigger the SDK to uninstall from machines. During the transition, your devices will be temporarily unprotected.
If you switch from GravityZone to any other antivirus, you must first select Disabled, which will reset the Antivirus integration drop-down menu. After it is deactivated, other antivirus options will become available.
Switching from GravityZone to Webroot or SentinelOne must follow a specific process, as they are incompatible. You must first uninstall and decommission the GravityZone agents (which means that NinjaOne will not provision GravityZone on new devices) before implementing a different antivirus. Otherwise, you must pay for both antivirus products.
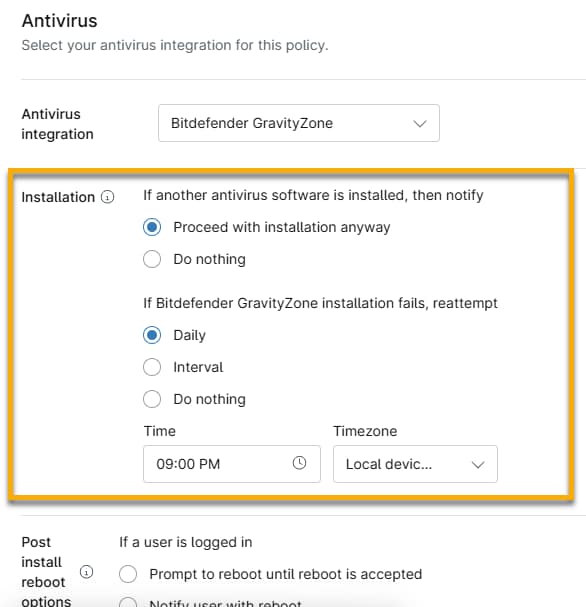
- Configure the preferred installation and post-install reboot options. Choose what to do if another antivirus software is installed. You can proceed with installation or take no action.
- Choose whether to reinstall Bitdefender if the initial installation fails. You can attempt to schedule the installation at a specific time each day or at an interval for up to 12 hours.
- Set post-installation reboot options. The first option determines how to handle the reboot if an end user is logged in on the device. The Period configuration setting occurs from the time the user logs into the device. The second option sets post-installation reboot options for devices when the users are not currently logged in. Refer to the table following Figure 7 for a description of each action.
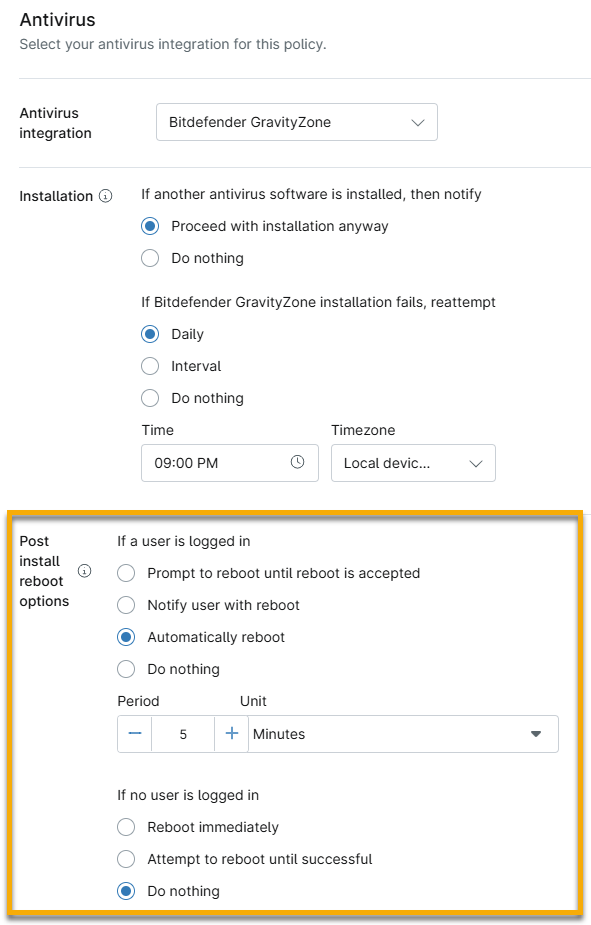
| Action | Description |
|---|---|
| Prompt to reboot until reboot is accepted. | The device's owner will receive a prompt that they must accept before a reboot occurs. If the end user does not accept, the reboot will not trigger. You can set the notification Period to prompt the user every minute, hour, or day. |
| Notify user then reboot | The device's owner will receive a prompt that the device will reboot at a set time, which you must configure in the Period field. |
| Automatically reboot | The device's owner will not receive a notification that the device will reboot. The reboot occurs at the time you configure in the Period field. |
| Do nothing | The device will not reboot. |
- After you deploy GravityZone, you will notice the GravityZone app at the device level in the Settings → Apps tab (this may take a few minutes to display). You should also find all GravityZone-related activities displayed in the Activity logs on the dashboard.
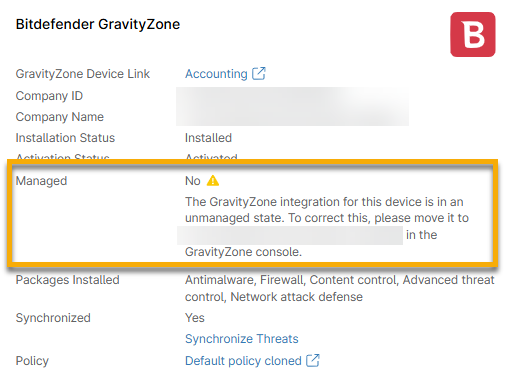
- Review the application details. If the Managed field has a value of No, then follow the instructions on the screen in NinjaOne. You can find additional instructions in our document, Bitdefender GravityZone Managed Device Mapping. Otherwise, refer to Bitdefender GravityZone: Enable and Install Modules to learn more about enabling and installing additional GravityZone modules.
How to Find All Devices with GravityZone Installed
You can use the Devices search page in NinjaOne to determine which managed devices have GravityZone installed as an antivirus. To do so, perform the following steps:
- Click Devices in the sidebar menu.
- Select Load group.
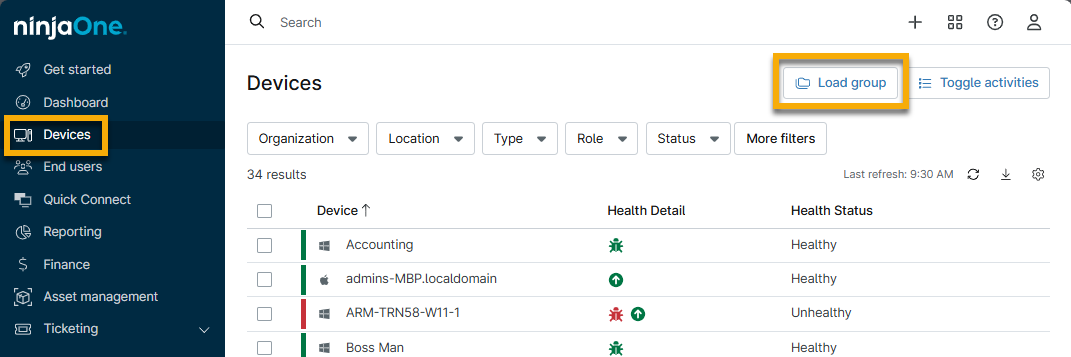
- Use the search field to find and select Has Bitdefender (SDK/GravityZone) on.
Bitdefender GravityZone for Linux
Currently, the Bitdefender GravityZone Integration in NinjaOne does not support Linux. This section provides some resources to help you perform manual installations directly on your Linux endpoints.
- Bitdefender Endpoint Security Tools for Linux quick start guide (external link)
- How to install the GravityZone security agent on Linux machines (on-premises) (external link)
- Uninstall security agents — Bitdefender Support Center (external link)
To manage and monitor antivirus components on Linux endpoints, use the GravityZone platform.
Additional Resources
The following learning content will help you take full advantage of the Bitdefender GravityZone feature set.
- Bitdefender GravityZone Partner Account Registration and Provisioning
- Bitdefender GravityZone and NinjaOne: Enable and Install Modules
- Bitdefender GravityZone and NinjaOne: Threat Scan and Remediation
- Bitdefender GravityZone and NinjaOne: Troubleshooting
- Deactivate or Remove the GravityZone Integration in NinjaOne
- Bitdefender GravityZone Management Flows - Videos (external link)
- Bitdefender GravityZone Protection Layers Availability - Documentation (external link)