Topic
This guide explains how to use Microsoft Entra ID to set up Security Assertion Markup Language (SAML) with NinjaOne.
Environment
- NinjaOne Integrations
- SAML 2.0
- Microsoft Entra ID
Description
Single sign-on (SSO) allows technicians to access the NinjaOne application using a single set of login credentials from their preferred identity provider (IdP). NinjaOne uses SAML for authentication. You can use SSO with both the standard and branded NinjaOne web applications.
You can use any IdP that supports SAML 2.0. This guide provides instructions on setting up SSO with Microsoft Entra ID as the example IdP. For generic SSO implementation, refer to NinjaOne Identity Access Management: Configure Single Sign-On.
NinjaOne supports both Service Provider-initiated (SP) and IdP-initiated workflows.
- Service Provider (SP) initiated workflow: You navigate to NinjaOne to log in and are forwarded to the identity provider to authenticate the session.
- Identity Provider (IdP) initiated workflow: You navigate to your identity provider to log in and click the NinjaOne app tile to launch NinjaOne.
How to Integrate Microsoft Entra - Part 1 (NinjaOne, Inc., 03:08) — Refer to NinjaOne Identity Management with System for Cross-domain Identity Management (SCIM) for Part 2
Chapters
- 00:00 - Intro
- 00:15 - Creating an Enterprise app
- 00:32 - Assigning groups of users
- 00:55 - Configuring SAML in NinjaOne
- 02:16 - Existing user authentication
- 02:32 - IdP support for other tools
- 02:50 - Part 2 featuring SCIM
Index
Select a category to learn more:
- Configuring NinjaOne SAML in Microsoft Entra
- Setting up SSO in Entra ID
- Assigning Users to Authenticate via SSO
- Common Configuration Issues
- Additional Resources
Configuring NinjaOne SAML in Microsoft Entra
Before you can set up SSO for your users, you must configure SAML for the IdP. To do so, perform the following steps:
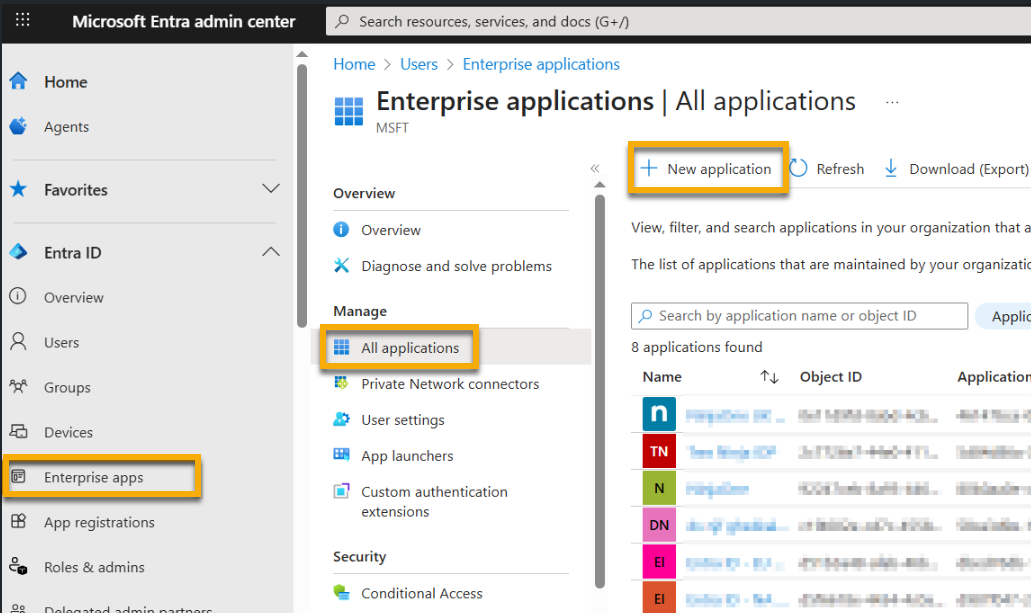
- Navigate to your Microsoft Entra admin center. Click the Entra ID drop-down menu in the sidebar and then click Enterprise apps.
- From the Enterprise applications screen, click New application.
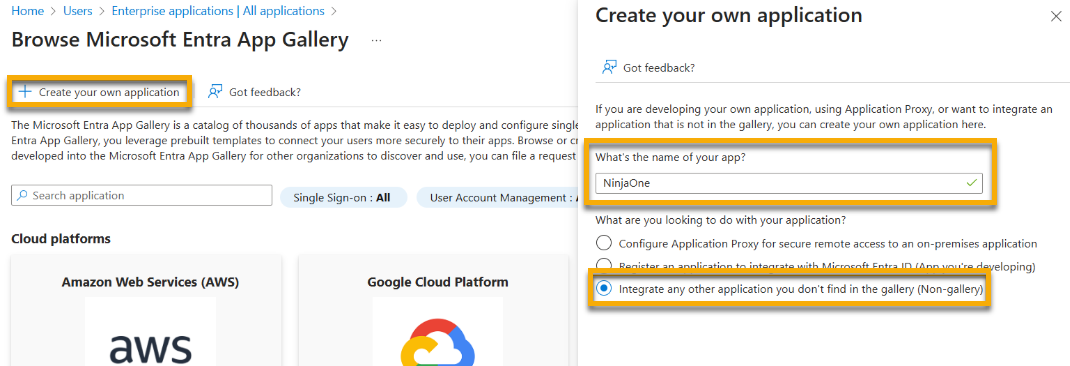
- Click Create your own application.
- The page will prompt you to enter a name for the application. We recommend using the name NinjaOne.
- Select the option to Integrate any other application you don't find in the gallery. Then, click Create.
- On the next screen, select Assign users and groups.

- Click Add user/group. Click None Selected to choose your target users or groups, and then click Select.
- Click Assign.
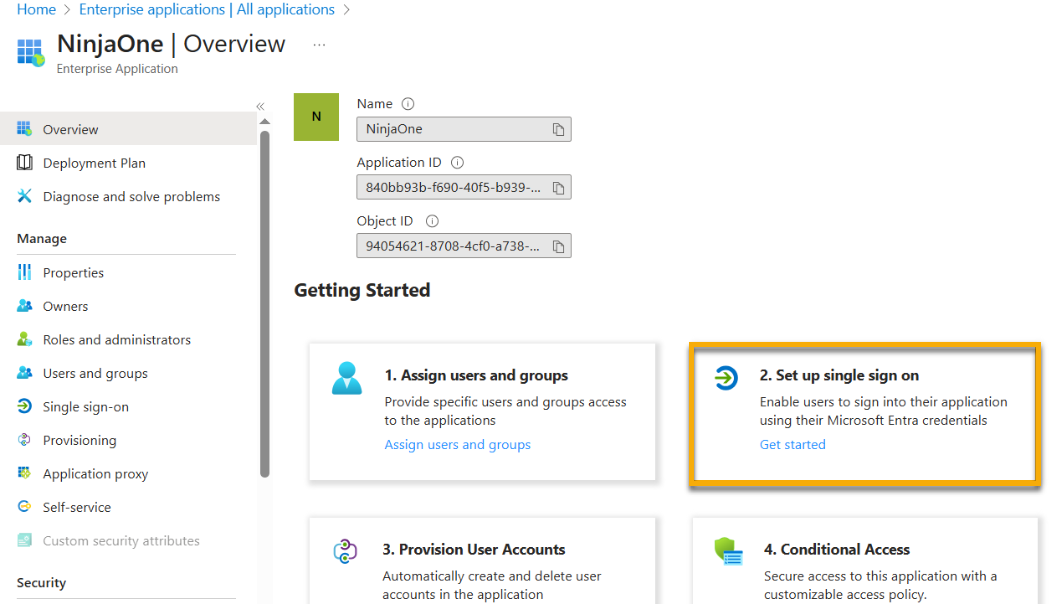
- Return to the overview page for the next step.
Setting up SSO in Entra ID
To set up SSO for your Entra IdP, perform the following steps:
- On the Overview page of the new NinjaOne enterprise app that you created in the previous section of this article, click Set up single sign on.
- Select SAML as the SSO method. You will automatically navigate to the Single sign-on properties.
- Click Edit in the Basic SAML Configuration section.
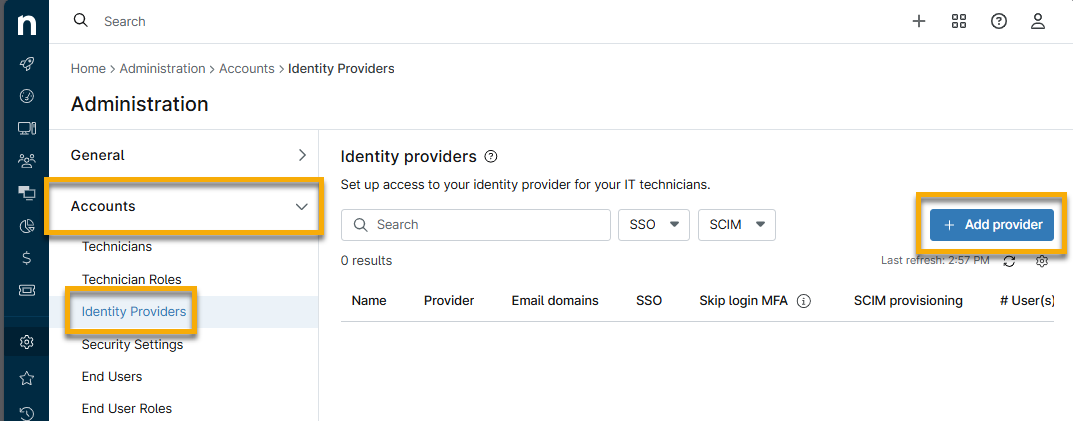
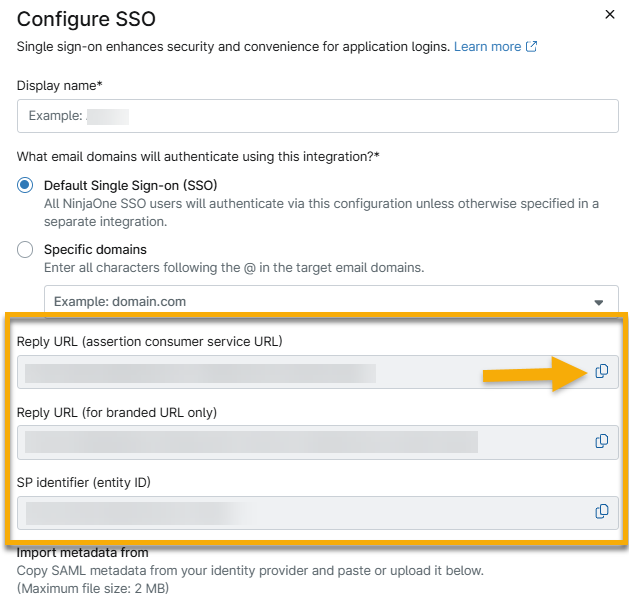
- In a separate browser tab, log in to NinjaOne as a system administrator. Navigate to Administration → Accounts → Identity providers and click Add provider.
- Provide a display name and set the email domains as needed.
- Copy the SP Identifier (entity ID) and all Reply URLs and store them for later use.
- Return to the Microsoft Entra admin center. Click Add identifier for the Identifier (Entity ID) field and paste the SP identifier (entity ID) from NinjaOne.
- Click Add reply URL for the Reply URL (Assertion Consumer Service URL) field and paste the Reply URL from NinjaOne.
- Optionally, you can configure SSO with your branded NinjaOne site. Click Add reply URL again and add the branded Reply URL from NinjaOne.
- Select one of the Reply URLs as the Default. The default URL will be the landing page for IdP-initiated logins.

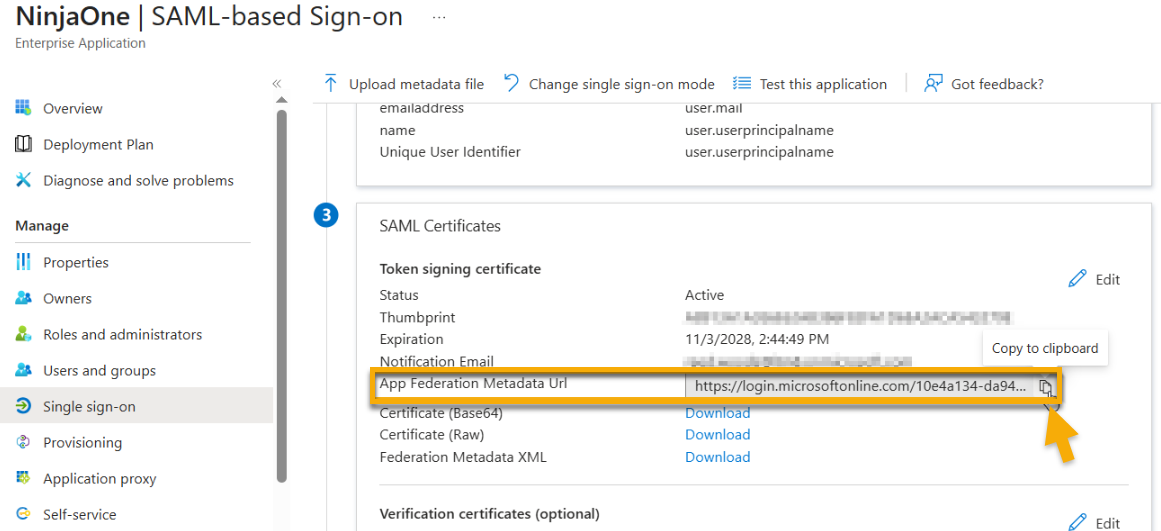
- Save the data in the Basic SAML Configuration section and then open the SAML Certificates section of the Single sign-on tab. Click the copy button for App Federation Metadata Url.
- Return to the IdP page in NinjaOne. Paste the App Federation Metadata Url data into the Import metadata from field as a URL.
- Activate IdP-initiated login and strict SAML validation as needed.
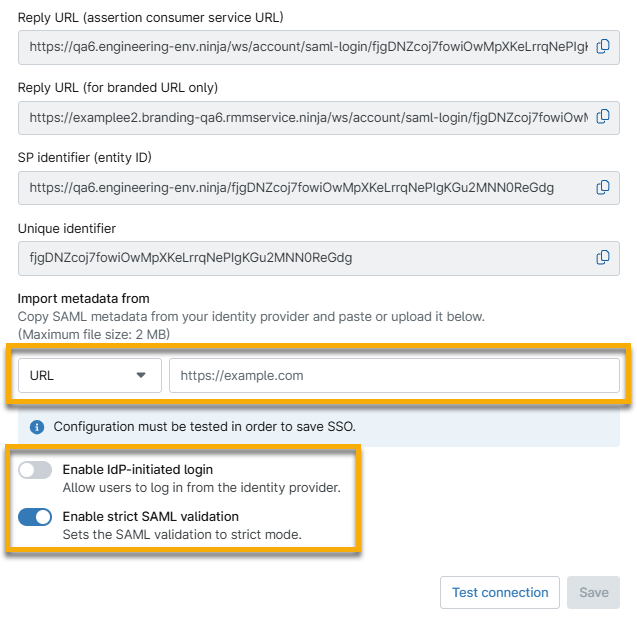
- Test the connection and then click Save when the connection is successful.
Assigning Users to Authenticate via SSO
You can manually set the authentication type for user accounts via the All users page in bulk, in a user’s security settings (during user update and user creation), or automatically via SCIM provisioning. Use the following steps to modify the authentication type via the All users page.
- In NinjaOne, navigate to Administration → Accounts → All users and select the checkbox for one or more technicians or end users.
- Click Actions → Change authentication.

- Select Single Sign-On (SSO) from the Change authentication type dialog.
- Click Update to save changes.
Common Configuration Issues
By default, NinjaOne uses the user.userprincipalname attribute to match a NinjaOne user to their account in Entra ID. If this attribute value does not match the NinjaOne username (email address), consider updating the Unique User Identifier (Name ID) to user.mail, user.othermail, or any attribute that will match an account’s NinjaOne username.
To adjust the unique user identifier in Entra ID:
- Navigate to the enterprise application in Entra → Single sign-on → Attribute & Claims and click Edit.
- Click Unique User Identifier (Name ID).
- Set the Source attribute to an attribute that will match each user’s NinjaOne username (email address).
- Click Save.

When using IdP-initiated login, users can access the NinjaOne enterprise app via app tile in their My Apps dashboard and the O365 App Launcher. If the app tile is missing, you may need to enable app visibility; to do so, perform the following steps.
- Navigate to the enterprise application in the Entra admin center on the Properties page.
- Set Visible to users to Yes.
- Click Save.

Additional Resources
Refer to Security Assertion Markup Language (SAML) – NinjaOne Dojo to learn more about configuring SAML for NinjaOne.