
Topic
This article explains how to activate the QuickBooks integration within the NinjaOne Billing application.
To learn how to use NinjaOne Billing, refer to NinjaOne Billing: Getting Started with Professional Services Automation (PSA).
Environment
- NinjaOne Billing
- NinjaOne Integrations
- QuickBooks
Description
After activating the NinjaOne Billing feature, you can activate the QuickBooks integration. This integration allows you to map organizations and products in NinjaOne to QuickBooks data.
After you click Enable in the Integrations tab, you will automatically navigate to the QuickBooks login page. Sign in using your existing Intuit Account. If you do not already have an account, you can create one at this point in the process.
Important Considerations
Consider the following notes before proceeding:
- You must use an account with QuickBooks administrator permissions.
NinjaOne will not sync any invoices that you created before activating the integration.
You must update your agreements with the settings for the new integration, or they will not sync.
How to Activate the Integration
When QuickBooks is activated, a Settings button will appear; click this button to configure and sync your QuickBooks settings with NinjaOne.

Figure 1: Integrate your QuickBooks account with NinjaOne Billing
- Customers: Map your organizations created in NinjaOne to the customers you created in QuickBooks. If the names match, you can use the Auto Map button. If not, select the checkbox next to any mapped or unmapped organization to view the Change Mapping option. The Auto Map option displays a dialog that allows you to confirm the mapping is correct.
- You can type in the customer's name as it is reflected in QuickBooks or select an option from the drop-down menu. Then, click Update to confirm.
- When you map the organization to a QuickBooks customer, selecting it will also display a Clear Mapping option.
- At this time, we do not support mapping locations or sub-customers.
- QuickBooks resource: Add and manage customers in QuickBooks Online (intuit.com).
- QuickBooks resource: Group products and services into different categories in QuickBooks Online (intuit.com).
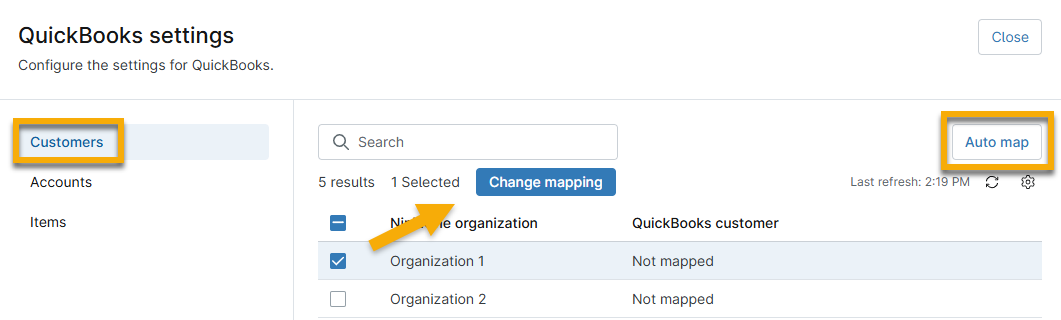
Figure 2: Map your NinjaOne organizations to QuickBooks customers
- Accounts: Map high-level PSA product types to your QuickBooks chart of accounts.
- QuickBooks resource: Add an account to your chart of accounts in QuickBooks Online (intuit.com).
- QuickBooks resource: Learn about the chart of accounts in QuickBooks Online (intuit.com).
- Items: Map your products in NinjaOne to items created in QuickBooks.
- QuickBooks resource: Add product and service items to QuickBooks Online (intuit.com).
Import Tax Codes for Invoices
After you integrate your accounting tool, you can add your account tax codes.
- In the NinjaOne Billing app, click Accounts and select Import accounts or Add account code.
- When you select Import accounts, NinjaOne will pull a list of tax codes from your QuickBooks or Xero account.
- Select the checkbox next to each code you want to import, and then click Continue.
- You can edit the account code or name on the Review accounts page.
- Click Import to confirm your selection.
- When you select Add account code, you must create a new account code and name.
After you import the account codes, you can create invoices from the tax codes in the Finance sidebar menu. To learn more, refer to NinjaOne Billing: Invoice Settings.
Additional Resources
Refer to NinjaOne Billing: Resource Catalog to view all related articles.