Topic
This article explains how to configure email and notification settings for NinjaOne Ticketing.
Environment
NinjaOne Ticketing
Description
NinjaOne Ticketing allows you to configure inbound email addresses, allow or block specific domains, create email templates, and manage the emails that technicians and end users receive related to ticket activity in NinjaOne.
Index
Select a topic to learn more:
System Email Notifications
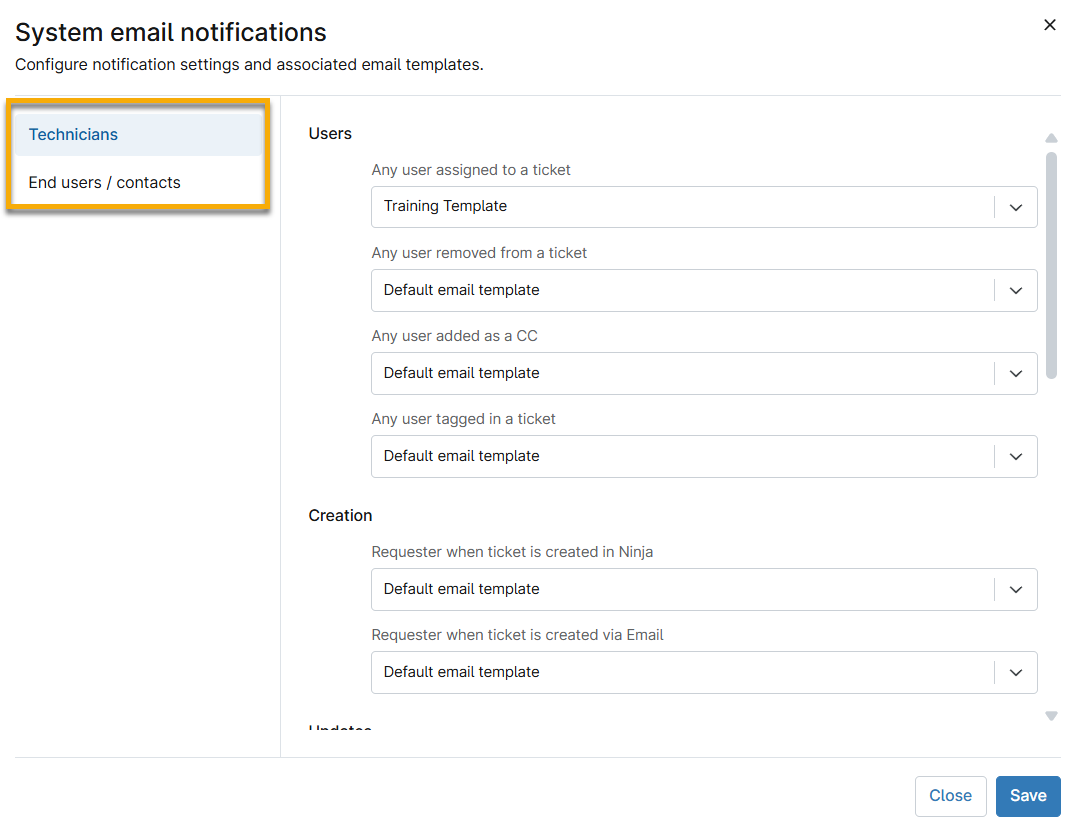
System notification email settings allow you to activate or deactivate email notifications for various types of system or ticketing events, depending on whether the user is a technician or an end user. If you are a system administrator, NinjaOne will prompt you to configure these settings during the initial setup for NinjaOne Ticketing. You can update these settings at any time.
- Navigate to Administration → Apps. Select NinjaOne Ticketing.
- Use the sections in the sidebar menu of the System email notifications dialog to switch between technician and user notifications and then select whether the recipient will receive a notification and, if so, which email template to use for the notification.
Email Configuration for NinjaOne Ticketing
If you have not already activated this product, refer to NinjaOne Ticketing: Setup and Configuration for further instructions. Then, perform the following steps to configure email settings.
- Navigate to Administration → Apps. Select NinjaOne Ticketing.
- Open the Email tab at the top of the configuration app page and select an option from the tab drop-down menu.

The Email tab allows you to create different email aliases using your custom ticketing domain and automate settings for ticket creation from emails sent to those addresses.
- A support email alias will be automatically created for all Ticketing instances and will be set as the default address initially.
- The default email will be the sending address for new tickets generated manually.
Inbound Email Addresses
You can add as many inbound email addresses as necessary for your ticketing management.
- Select Inbound Email Addresses from the Email drop-down menu and then click Add in the top right corner.
Use the following table as a guide to complete the applicable fields.
Field Description Email Display Name Enter the email alias. Incoming Email Username Set the local part of the email address. Outgoing Email Username This field will automatically mirror the username set for incoming emails. Forwarding Addresses Forward emails from your custom domain mailbox to your NinjaOne support email address. Enter the original addresses to which emails should be sent before being forwarded to NinjaOne. When adding new emails to this field, click Enter on your keyboard to set the data. You can add multiple accounts. Form You must first create a form before you can select an option from this drop-down; otherwise, NinjaOne will use the default form that comes with the Ticketing tool. Refer to NinjaOne Ticketing: Setup and Configuration for further instructions. Type - Problem = service disruption or issue; you can add incidents to problem tickets to resolve underlying issues
- Question = a query to answer or an investigation
- Task = action item for a technician
Priority Use to communicate how quickly the issue should be resolved (high, medium, or low). Severity Use to communicate how bad the root issue is (critical, major, moderate, or minor). Tags If there are currently no tags to select, you can create them in this field and save them for future tickets. Use tags to dictate which boards a ticket applies to, or create automations based on those tags. Refer to NinjaOne Ticketing: Setup and Configuration for further instructions. Click Save.
For the forwarding address feature to function properly, the email forwarded or redirected to NinjaOne must maintain the original sender and recipient in order for this functionality to work. Note that some apps, such as Outlook, use a rule labeled "redirect to" rather than "forwarding."
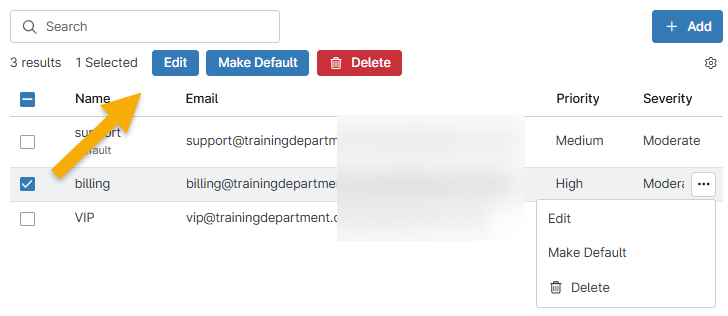
To edit, delete, or make an email alias default, select the checkbox and then click the applicable option at the top of the table. Alternatively, move your cursor over the row and click the ellipses button to view these options.
Email Lists: Allow or Block Emails
The Allowlists tab provides the option of using allowlists and blocklists and can aid in automating incoming tickets. Additionally, customers have the option to enable ticket creation for unknown email addresses without requiring manual approval.
Open the Email tab and select either Allowlist or Blocklist, and then click Add. Use the following sections to configure the email list. The options will be slightly different depending on whether you are allowing or blocking.
Allowlist Configuration
To configure the allowlist, perform the following steps:
Select an option from the Type drop-list. Depending on the selection you make, the field below Type changes to allow you to enter either a domain name or an email address.
Type Description Domain Allow all emails from a specific domain. Email Allow a specific email address. All Unmatched Senders Create tickets automatically if the sender is unknown. This type bypasses manual approval and the Pending Emails board. - Provide the allowed domain name or email (enter the full email address).
- Optionally, select an organization to which these emails are routed.
- Click Save.
Blocklist Configuration
To configure the blocklist, perform the following steps:
- Select either Domain (block all emails from a specific domain) or Email (block a specific email) from the Type drop-down menu.
- Depending on the selection you make, the field below Type changes to allow you to enter either a domain name or an email address.
- Provide the blocked domain name or email (enter the full email address).
- Click Save.
Templates
In the Email Lists tab, this feature allows you to create an email that can be automatically sent to technicians or end users when specific ticket activity occurs, such as an event-based or time-based automation.
This template type should not be confused with a response template, which you can create within a ticket or at NinjaOne Ticketing → Automation → Response Templates.
- Email template: Use placeholders to set pre-defined information that alerts technicians and users when a certain activity occurs on a ticket.
- Response template: Set pre-defined actions to provide faster, more consistent ticket updates, responses, and resolutions. Must be selected manually for each use.
To add an email template:
- Click Add.
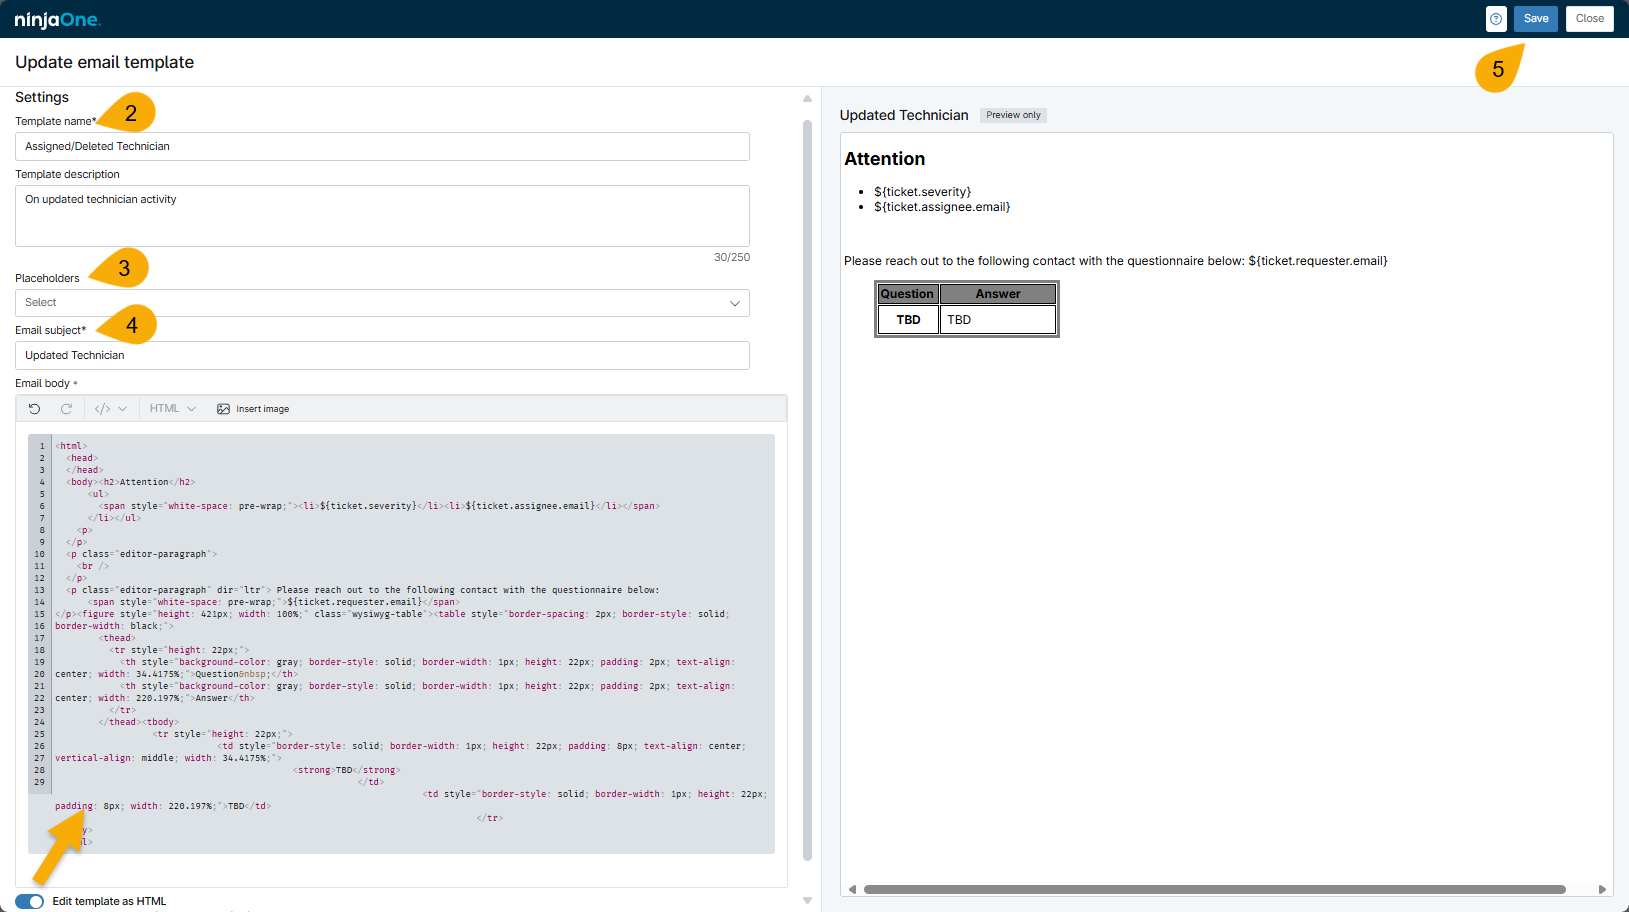
- Enter a name for the template and, optionally, a description. The name should help you identify the type of notification you are sending when you select it from the drop-down menu for Notifications.
- Select a Placeholder option from the drop-down menu. The placeholder describes the expected value and pulls that data from the ticket into the body of the email. Refer to NinjaOne Ticketing: Email Template Placeholder Definitions to view placeholder definitions.
- When you select the placeholder, you copy the value to your clipboard; you must click inside the Email body field and paste the value to add it to the template. After you paste the placeholder, you can select another placeholder and repeat this step until you have included all necessary placeholders.
- If the ticket does not contain the requested data, then the placeholder will return a None value.
- Use the toggle below the Email body field to edit the template in HTML, which allows you to further customize the formatting of the email. If you do not use HTML to control formatting, the Editor field will center the text automatically, as shown in the Preview space.
- Include a subject title for the email, which will be visible to the recipient in their inbox.
- Review the preview on the right side of the page; when finished, click Save.
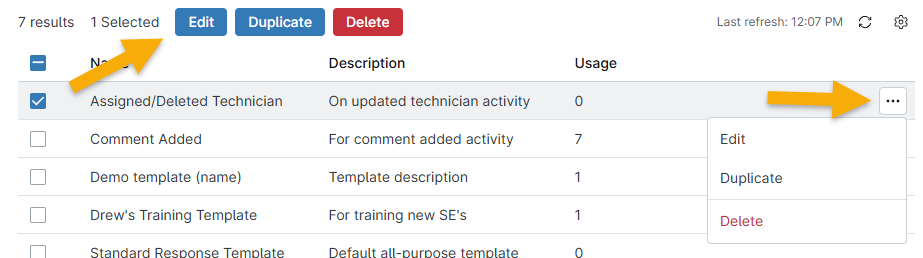
You can create as many templates as necessary to manage communication over different types of ticket activity. Once created, you can edit, duplicate, or delete the templates by clicking the box next to the template name and then selecting the applicable option.
- You cannot delete the template if the Usage column reflects a number higher than zero. The Usage column indicates the number of notifications using the template.
- Duplicating a template provides you with the option to modify the copied template. Duplicated templates will automatically include "(Copy)" in the title unless you manually change it; NinjaOne will not allow you to save a title that is already in use.
Notification Rules
Use notification rules to prevent automated emails from being delivered to specific email addresses. Notification rules can reduce the amount of traffic from notifications and solve email looping issues.
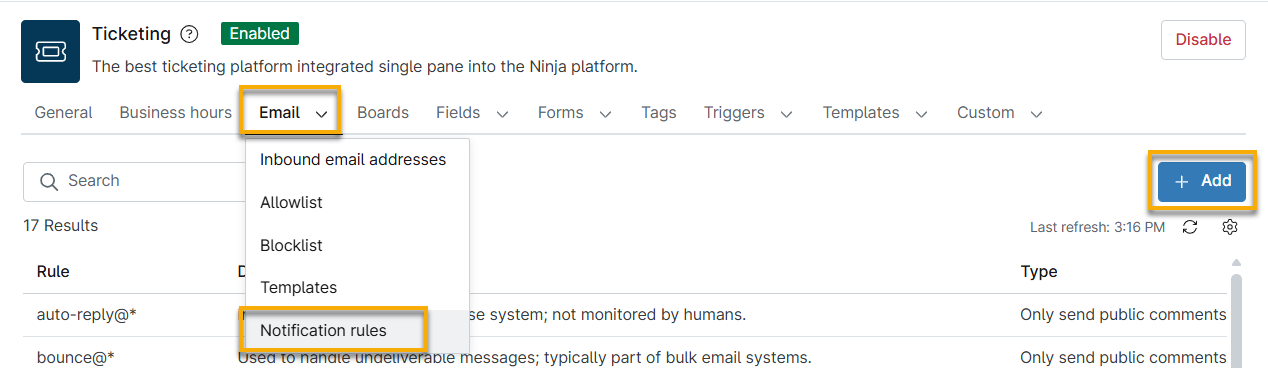
- Navigate to the NinjaOne Ticketing application and open the Email → Notification Rules tab.
- Click Add.
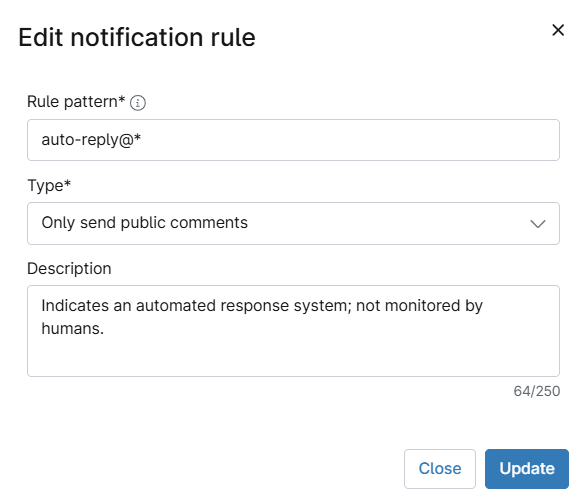
- In the configuration dialog, enter the notification rule into the Rule pattern field. Acceptable formats for rule patterns include:
| Rule Pattern Type | Example Format | Notes |
|---|---|---|
| Full email addresses | [email protected] | This rule affects a specific email address. |
| Domain wildcards | user@* | This rule affects all email domains, such as Outlook, Gmail, and Hotmail, including business and school email domains. |
| Prefix wildcards | *@email.com | This rule affects all email addresses for a specific domain. |
| Combined wildcards | user*@email.com | You can combine wildcards for the address prefix and domain. |
- Select the responses that the address should receive from the Type drop-down menu.
- Optionally, add a description.
- Click Update.
Default Notification Rules
NinjaOne has created a set of default rules to address common issues that you may experience with automated ticketing notifications. You can edit or delete any of these default rules.
The following table describes each rule.
| Rule | Description |
|---|---|
| noreply@* | Outbound-only address. Replies are not monitored and often bounce automatically. |
| no-reply@* | Variant of noreply@* which you can use for one-way communication. It is not intended for replies. |
| donotreply@* | The mailbox is not monitored, and replies may be discarded or receive an automated response. |
| do-not-reply@* | Replies are not accepted. You should use this address in transactional emails. |
| mailer-daemon@* | Mail server address for delivery failure notifications. |
| mail-daemon@* | An alternate form of mailer-daemon, used to bounce messages from mail servers. |
| postmaster@* | Standard administrative mailbox for mail servers; may bounce the email or generate an automated response. |
| bounce@* | Handles undeliverable messages; typically part of bulk email systems. |
| bounces@* | Plural form used in mailing systems to process multiple bounce types. |
| auto-reply@* | Automated response system not monitored by humans. |
| unmonitored@* | Staff do not check the mailbox. Replies are ignored or deleted. |
| noresponse@* | The mailbox does not accept incoming messages. |
| support@* | The common support mailbox may be monitored, but often generates an automated response or routes via ticketing. |
| helpdesk@* | Helpdesk systems often automatically acknowledge emails, which can trigger loops if not filtered. |
| customer.service@* | Customer service addresses may use auto-responders or routing rules. |
| webmaster@* | The website admin mailbox is often used for system alerts or error reports. |
| MicrosoftExchange* | Exchange system-generated addresses. This is typically used for delivery reports or system notifications. |
Additional Resources
Refer to Ticketing: Resource Catalog to learn more about NinjaOne Ticketing.