Topic
This article describes how to use the Network Discovery utility to detect and manage networked devices in your organization.
Environment
NinjaOne Network Management System (NMS)
Description
This utility replaces the legacy Network Management System (NMS) download and installer. You can now perform network discovery directly from the NinjaOne platform. Network Discovery scans your IP ranges for active devices, profiles them using SNMP and other protocols, and adds them to NinjaOne for ongoing monitoring and management. You can run discovery on demand or on a scheduled basis, making it suitable for both initial network onboarding and continuous inventory maintenance. Before deploying the NMS delegate, ensure your environment meets the system requirements described in the linked article below.
Refer to our NinjaOne NMS System Requirements article before installing the NMS delegate.
Video: Network Discovery overview
Index
Select a topic to continue:
- NMS Delegate Architecture
- Configuring Network Discovery
- Credential Settings
- Credential Types
- Additional Credential Options
- Running and Saving Network Discovery
- Running a Network Discovery Job
- Saving and Scheduling a Network Job
- Viewing Saved Network Discovery Jobs
- Editing Saved Jobs
- Viewing Network Discovery Job History
- Re-running Historical Network Jobs
- Saving Historical Network Jobs
- Viewing Job Instances From the Job History Tab
- Claiming Ownership of a Network Discovery Job
- Applying Ping Conditions Through Advanced Settings
- Advanced Settings Explained
- Adding Discovered Devices to Your Organization
- Assigning Device Roles to Discovered Devices
NMS Delegate Architecture
Refer to Figure 1 for an overview of the NinjaOne NMS architecture, and note the following points:
- To use NinjaOne's network management suite, deploy the NinjaOne NMS Delegate separately for every customer whose Simple Network Management Protocol (SNMP)-capable devices you want to monitor.
- The NMS Delegate is a separate installation from the NinjaOne monitoring agent, but you can install both agents in parallel. The NMS Delegate performs network discovery (manually) and adds the associated devices to the system.
.png)
Configuring Network Discovery
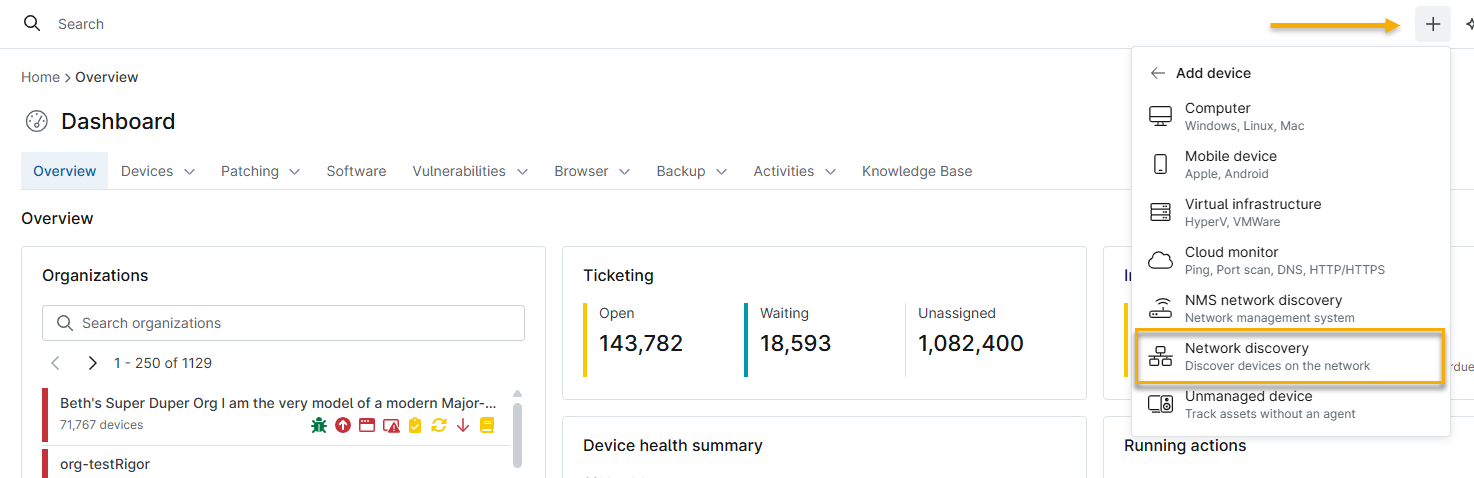
- In the NinjaOne platform, click the + icon, then select Add device.
- Click Network Discovery.
- The Network Discovery window opens. Configure the network and location parameters for discoverable devices and add any credentials they may require.
- In the Network Discovery window, configure the following settings:
| Setting | Description |
|---|---|
| Organization | Select the organization to which the network belongs. |
| Location | Specify the physical location for discovery. If an organization has only one location, this field should automatically populate. |
| Network probe | Select the device to use as the network probe.
Refer to NinjaOne NMS: System Requirements for NMS-supported Windows operating system versions. |
| Preview probe IPs | This option opens a table from which you can confirm the probe's local IP addresses and subnets, and copy or send the network range to the IP Targets window. This option only appears if you select a network probe. |
| IP targets | Enter comma-separated IP addresses, IP ranges, and subnets for your discovery range. For example:
|
- In the Credentials (optional) section, enter any credentials used by the devices you are discovering. Refer to the Credential Settings section of this article for more information.
Credential Settings
You can use the Credentials section of the Network Discovery window to add optional credentials, enabling a more granular device discovery search. If your credential is not listed, perform the following steps:
- In the Network Discovery window, click Create credential. The New Credential window opens. Select a credential type from the list (SNMP v1, SNMP v2, SNMP v3, Telnet, or SSH).
- The New Credential window displays the appropriate configuration fields for the selected credential type. Refer to the Credential Types table in this article for more information.
If you are not entering credentials, continue to the Running and Saving Network Discovery section of this article.
SNMP Considerations
- NinjaOne uses SNMP to discover, profile, and monitor your devices.
- An SNMP community uses a string to access a router's network device and is available only with the SNMPv1 and SNMPv2c protocols. FedRAMP deployments do not support these protocols.
- SNMPv3 requires username/password authentication and an encryption key. SNMPv3 is the required SNMP protocol for FedRAMP deployments. MD5 authentication and DES encryption are not available; use SHA-based authentication and AES-based encryption.
- SSH credentials perform two functions:
- Backing up configurations of specifically supported NMS devices. This process uses Enabled (Privileged) Mode.
- Establishing remote terminal connections from within the NMS device.
- NinjaOne currently supports Windows credential use for gathering additional details and installing the NinjaOne Windows Agent.
Constraints for Deployment in FedRAMP Environments
NinjaOne NMS operates under FIPS 140-2 cryptographic requirements in FedRAMP environments. The following FedRAMP-specifics apply when configuring credentials:
- The FIPS-enabled NMS delegate does not support SNMP v1, or v2. These options may appear in the UI but will not function correctly.
- SNMPv3 is the required protocol for SNMP management. Within SNMPv3, the MD5 authentication algorithm, SHA-1 Hashing algorithm, and DES encryption algorithm are not available.
- Use SHA-based authentication and AES-based encryption only. Telnet is available, but we do not recommend its use in FedRAMP environments because it lacks encryption and does not meet FIPS 140-2/140-3 cryptographic requirements. NinjaOne displays a warning when you create Telnet credentials, and you can proceed at your discretion.
- In FedRAMP deployments, NinjaOne may mask or restrict sensitive credential information in NMS delegate logs.
Credential Types
Refer to this table for an explanation of the settings for each credential type.
| Credential Type | Credential Settings |
|---|---|
| SNMP v1 and v2 | These options are only available in non-FedRAMP deployments,
|
| SNMP v3 |
|
| SSH |
|
When you have completed your entries, click Add. Your credentials are now available from the Credential drop-down menus.
Additional Credential Options
As an option, you can select an additional credential:
- In the second SNMP drop-down menu: NinjaOne also tries this credential in addition to the first one selected.
- In the SSH drop-down menu: NinjaOne uses SSH credentials when backing up the configuration.
Running and Saving Network Discovery
After configuring Network Discovery, you can click Run discovery to perform the discovery immediately, or click Save and close to save the network discovery job.
Running a Network Discovery Job
After you click Run discovery, NinjaOne searches for eligible devices on your network. During the network discovery job, NinjaOne creates a service named Ninja NMS Manager Service and a corresponding process named nmsmanager.exe, which promotes the device to become the NMS delegate. If you close this window while the job is running, NinjaOne displays an alert.
- Click Close and continue to close the Network Discovery window and keep the job running.
- Click View job history to open the Job history tab. Refer to the Viewing Network Discovery Job History section of this article for more information.
Saving and Scheduling a Network Job
Saving network discovery jobs enables you to re-run specific job configurations as needed, or on a custom schedule.
- Set up your network discovery job as described in the Configuring Network Discovery section of this article. When finished, click Save and close. The Save network discovery window opens.
- Activate the Enable discovery job toggle, then use the drop-down menus to enter a job name and configure an optional job schedule. You can schedule network jobs to run on an hourly, daily, weekly, or monthly basis.
Network Discovery Job Schedule Settings
Enter the following settings when scheduling a network job. When finished, click Apply. The job appears on the Saved jobs tab.
| Setting | Description |
|---|---|
| Recurrence | Set the time interval between jobs. |
| Start date | The date that the sequence of scheduled jobs begins. |
| Days of the week (weekly only) | Choose the days on which the job runs. |
| Day of the month (monthly only) | Choose the day of the month on which the job runs. |
| Time and Time Zone | Select the time of day and the appropriate time zone to perform the first job. |
| End | Select one of the following options to end the job:
|
Viewing Saved Network Discovery Jobs
The Saved jobs tab allows you to view all jobs that you have saved after running.
- In NinjaOne, navigate to Administration → Devices → Discovery and click the Saved jobs tab. This tab displays a list of saved jobs, which you can filter by data column.
Viewing Network Scan Details
Click a saved network job to open the Network scan details window. The window displays the following:
| Category | Description |
|---|---|
| Job settings | View the job name and status. |
| Network scan settings | View the following network scan details:
|
| Credentials | List the following found credentials by type:
|
| Advanced settings | View the following information:
|
Editing Saved Jobs
- Place your cursor over a job, then click the actions menu when it appears, and choose one of the following options from the drop-down menu:
- Edit: Change the job's scheduling parameters.
- Clone: Create a duplicate of the job.
- Enable or Disable: Activate or deactivate a job.
- Delete: Remove the job from the Saved jobs list.
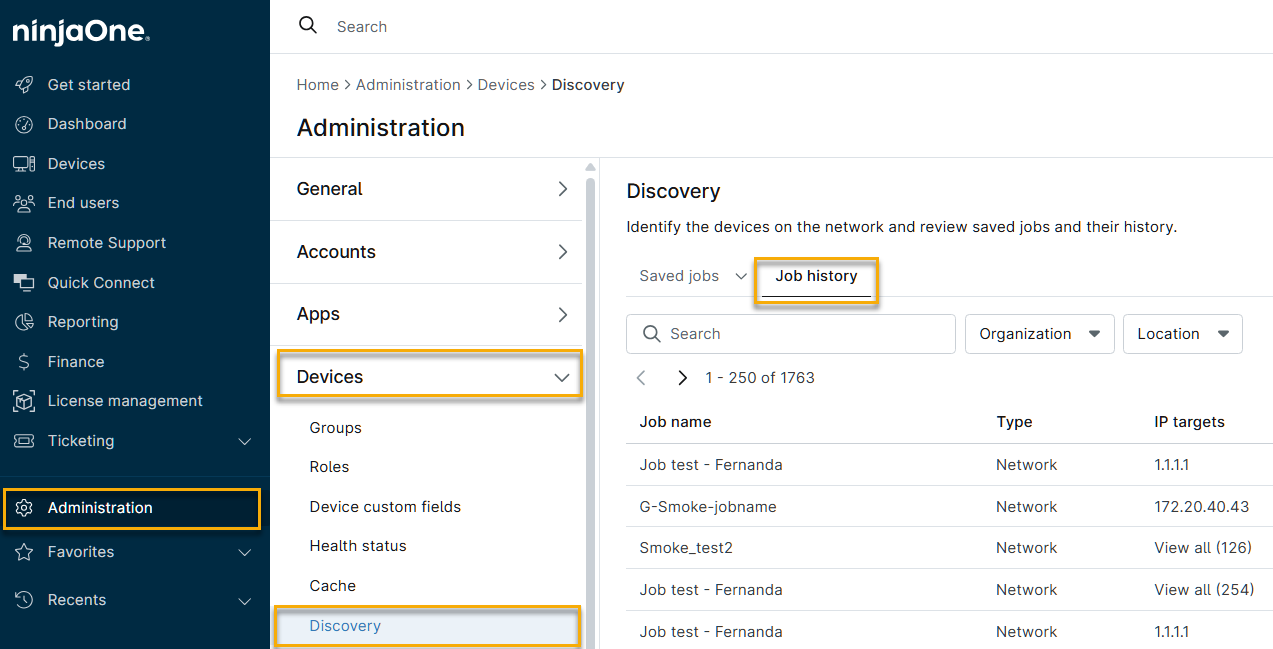
Viewing Network Discovery Job History
The Job history tab shows all executions of each network discovery job for the past 90 days.
In NinjaOne, navigate to Administration → Devices → Discovery and click the Job history tab. NinjaOne displays a table that lists all previously run network discovery jobs, which you can filter by data column.
Re-running Historical Network Jobs
You can re-run any job instance from the Job history tab.
- In the Job history tab, place your cursor over a job, then click the actions menu when it appears and choose Run from the drop-down menu.
Saving Historical Network Jobs
You can add any job instance from the Job history tab to your Saved jobs list.
- In the Job history tab, place your cursor over a job, then click the actions menu when it appears and choose Save.
- The Save network discovery job window opens. Configure the following settings:
| Setting | Description |
|---|---|
| Job name | Give the network job a descriptive name. |
| Schedule | Set an optional run schedule for the job. Refer to the Saving and Scheduling a Network Job section of this article for more information. |
| Organization | Select the organization to which the network belongs. |
| Location | Specify the physical location for discovery. If an organization has only one location, this field should automatically populate. |
| Network probe | This drop-down menu contains all Microsoft Windows devices currently online that have the NinjaOne agent installed. Refer to NinjaOne NMS: System Requirements for NMS-supported Windows operating system versions. |
| IP targets | Enter comma-separated IP addresses, IP ranges, and subnets for your discovery range. For example:
|
| Credentials (optional) | Refer to the Credential Settings section of this article for more information. |
Viewing Job Instances From the Job History Tab
You can view details of specific job run dates and save previously run jobs to your Saved jobs list for future reference.
Viewing Job History Details and Scan Results
Click a saved network job to open the Network scan details window. From the Job history tab, a window opens containing two tabs:
- General: This tab displays the same information as the Network scan details window when accessed from the Saved jobs page.
- Scan results: Clicking this tab displays the results of the network scan for each historical execution of the network job. The window displays a list of each historical job instance, with the following data columns:
- IP address
- DNS information
- Ping time
- Ports
- Credentials used
Claiming Ownership of a Network Discovery Job
If the user who created the network discovery job has been deactivated, you can become the new owner of that job by opening the Network scan details window on either the Saved jobs or Job history tab and clicking the Claim ownership button.
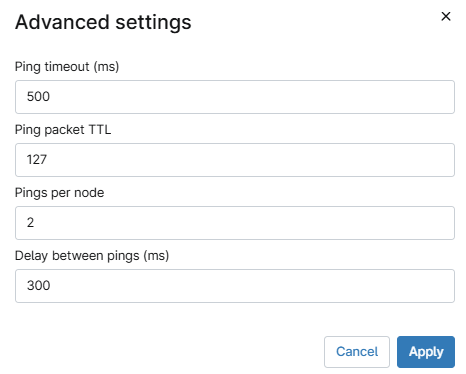
Applying Ping Conditions Through Advanced Settings
Ping conditions are optional, but they let you fine-tune how NinjaOne NMS checks device availability, tailoring the process to your specific network and devices. To apply ping conditions for network discovery:
- Click Advanced settings.
- If your device is not local (for example, on a VPN), consider increasing the Ping timeout (ms) and Ping packet TTL settings.
Advanced Settings Explained
Refer to this table for an explanation of each advanced setting.
| Setting | Description |
|---|---|
| Ping timeout (ms) | Specify how long, in milliseconds, to wait for a reply. The initial packet is sent, waits for a reply, and gives up at a preset timeout. |
| Ping packet TTL | Set the Time to Live (TTL) at a specified threshold. |
| Pings per node | Specify the number of pings sent to each host to test if the host successfully responds to each. |
| Delay between pings (ms) | Specify the number of milliseconds that pass between each ping. |
For any device not previously used as a network probe, NinjaOne creates a new service that promotes the device to become the NMS delegate. The service is named Ninja NMS Manager Service, and the corresponding process name is nmsmanager.exe.
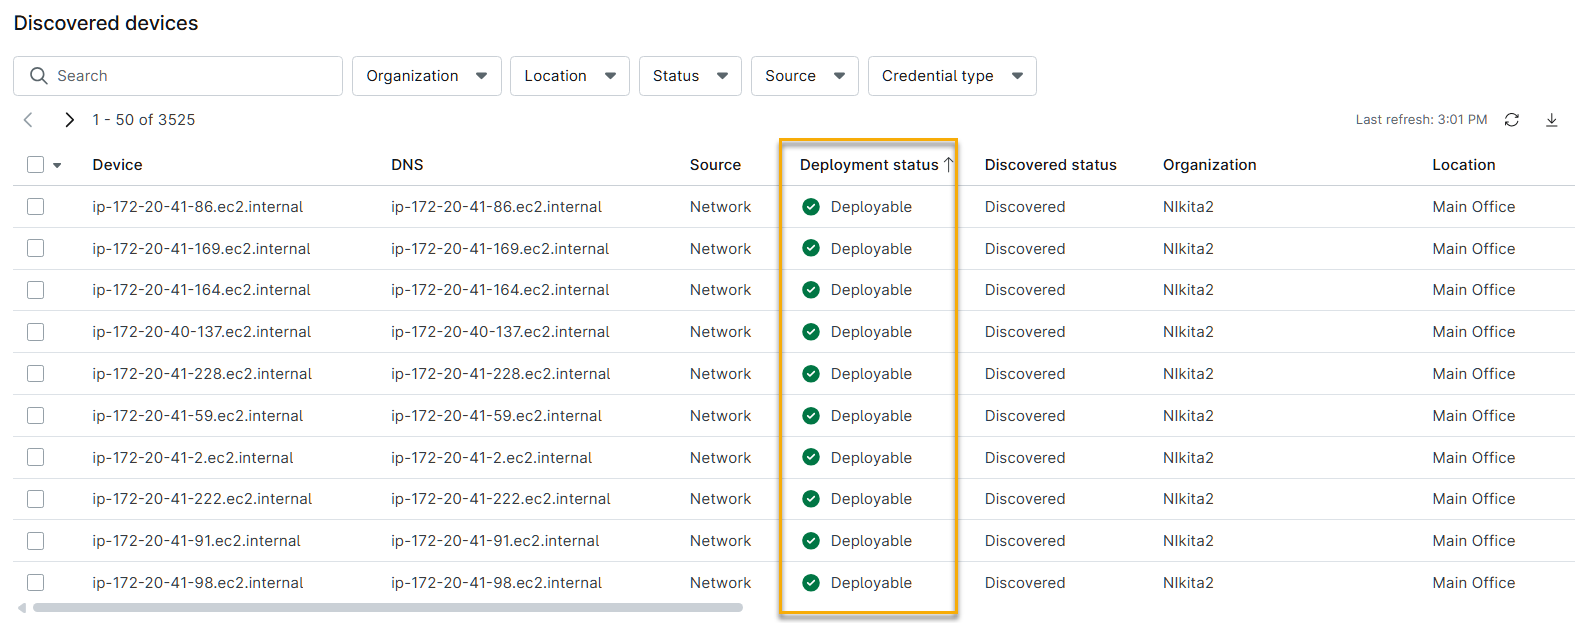
Adding Discovered Devices to Your Organization
After the network discovery job finishes, you can convert discovered devices to NinjaOne devices, which can be either managed (for example, mobile device management (MDM), Agent, and NMS) or unmanaged.
In NinjaOne, navigate to Dashboard → (Your Organization) → Devices → Discovered. NinjaOne will display the Discovered devices table.
Viewing Device Deployment Status
Before converting devices, review the Deployment status column in the Discovered devices table. This column shows each device's readiness to receive the NinjaOne agent. NinjaOne assigns the following possible statuses to each device:
| Status | Description |
|---|---|
| Agent already installed | The NinjaOne agent is already installed and running on this device. No deployment action is required. |
| Deployable | The device meets all prerequisites for agent deployment. NinjaOne can attempt to install the agent on this device. |
| Not applicable | NinjaOne cannot deploy to this device at this time. Select the status icon to see the specific reason. Common reasons include:
|
Converting a Device
From the Discovered devices screen, select the checkbox next to each device you want to convert, then click Add. Select one of the following conversion options:
| Option | When to use |
|---|---|
| Convert NMS device | Use this option for devices responding on the network that you want to bring into NMS management. |
| Convert unmanaged device | Use this option to add devices to your inventory without NinjaOne management. This option requires NinjaOne IT Asset Management (ITAM) to be activated in your instance. |
Assigning Device Roles to Discovered Devices
Device roles determine which NinjaOne policy governs the device. You must assign a role to each device if NinjaOne did not assess its role during discovery. Refer to NinjaOne Endpoint Management: Device Roles for more information.
- In NinjaOne, navigate to Dashboard → (Your Organization) → Devices → Discovered, then click the device name.
- In the device's dashboard, navigate to General → Settings → Device information → Edit.
- In the Edit device information window, use the Device role drop-down menu to select a new role, then click Update.
Additional Resources
Refer to NinjaOne NMS: Device Dashboard Navigation and Management for more information about viewing and configuring NMS devices.