Topic
Learn how to create and manage your products for NinjaOne's Billing tool.
Environment
NinjaOne Billing
Description
Products refer to the line items or merchandise being sold, which you can add to service agreements for invoicing purposes.
Want to learn more about NinjaOne Billing? Check out our video library.
First, enable NinjaOne's Billing tool. Learn how to here: NinjaOne Billing: Getting Started with Professional Services Automation (PSA).
Then, select a category to learn more:
- About Product Types
- Add the Product Types
- Add Products to an Active Agreement
- Add Products to a Ticket
- Additional Resources
About Quantity Source
The following table provides a description of each quantity type, which you must select when adding a new product.
| Quantity Type | Description |
|---|---|
| Manual | Create a custom product for tracking miscellaneous items (a group of products that do not fall into any of the other defined categories). This requires manual quantity updates. |
| Device counts | Create a managed devices product for automated billing of device counts. This includes devices in NinjaOne that can be mapped to a line item. This will be calculated automatically. |
| End user counts | Create a managed end-user product for automated billing based on end users in NinjaOne. You can include all or specific user roles. |
| Backup storage counts | Create a managed device backup storage product for automated billing of device backups. Apply rules by role, group, or storage inclusion type. |
| Time entries | Create a labor ticket time entry product for automated billing of ticket time entries. This includes time entries logged in NinjaOne Ticketing. These are calculated automatically and converted into line items on the invoice. For an in-depth explanation of creating these products, refer to NinjaOne Billing: How to Bill a Labor Ticket Time Entry Product. |
| Software licenses | Automatically bill products based on the number of licenses used or the number purchased in NinjaOne IT Asset Management. Refer to NinjaOne Endpoint Management: Software Licenses to learn how. |
Add the Product Types
Some product types will contain unique data fields for configuration. The following instructions provide guidance for all product type options.
- Add the product types by navigating to Administration → Apps → NinjaOne Billing and then opening the Products tab.
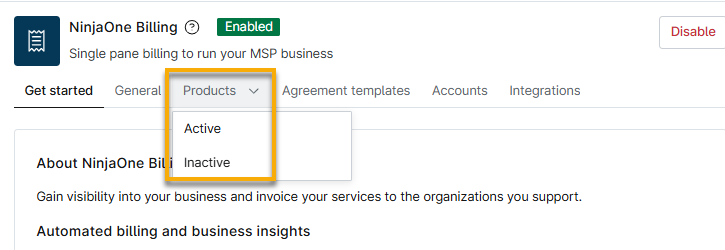
- Click Add and select the quantity type.
Click through each configuration section to learn more:
General
This section is included for all product types.
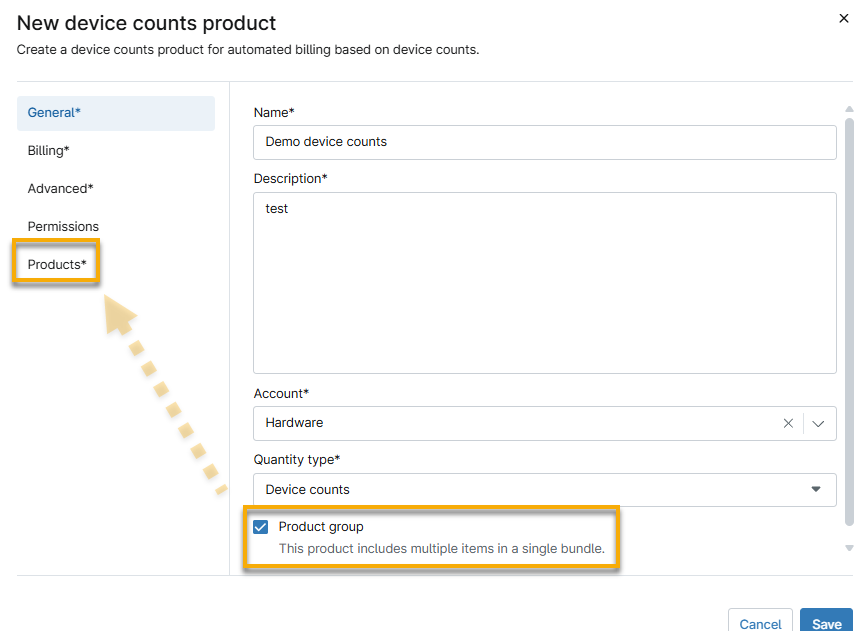
In the New product configuration dialog, add a name and description for the product.
If you add a time entry product, you will have an additional option to select an application user role. The "System automation" user role refers to automatic actions triggered by conditions. For more information, refer to NinjaOne Ticketing: Automation.- Select your account code from the Account drop-down menu. The account code allows you to map and track billing in your accounting tool. To learn more about account codes, refer to NinjaOne Billing: Account Codes.
- Select the Quantity type. You can refer to the About Quantity Source section within this article for definitions. Use the quantity type to determine which products can be added to specific billing automations and orders.
- Select the Product group checkbox to add the Products tab to the configuration dialog.
Billing
This section is included for all product types.
The following table provides a description of each field in the Billing tab.
| Billing Field | Description |
|---|---|
| Price | This is the price that is charged to the customer and may be referred to as "retail price." |
| Cost | This is the price you paid for the product. We will use this information for future enhancements and profitability reporting. |
| Taxable | Applies sales tax. |
| Billing |
|
| Default Quantity | This is the number of products charged to the customer. The Price will become price per quantity. |
Invoices
This section is only available for time entry products.
Activate the Include time toggle to include a specified amount of time with each invoice created for this product type. Refer to
Advanced
This section is available for all products except the manual product.
| Advanced Field | Description |
|---|---|
| Role | Select devices or end users by their roles. If you select "Specific role," you can choose multiple roles from the drop-down menu. Click Enter on your keyboard between each selection.
|
| Group | Select devices by their groups for billing criteria. You can select multiple groups and bill by all selected or any selected. |
| Auto Round Time Entries | Round up to a specific interval. This can be helpful if technicians have extra tasks that should be recorded as labor but cannot be or were not recorded on the ticket time stamp (for example, setup, finding new tickets, minimum work standards, and others). |
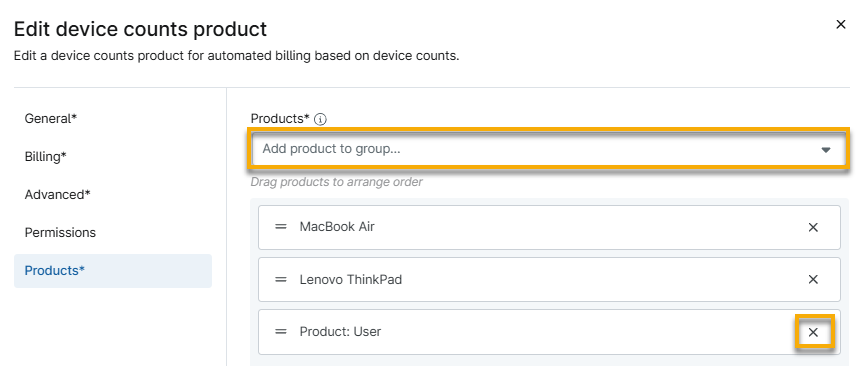
| Products | Select all products that should be grouped together for this product group. |
| Quantity source | This field appears for software license products. Select whether you want ot use the number of licenses currently used or the sum of all licenses. |
| Included count | This field appears for software license products. Select the number of licenses to deduct from the quantity source. |
Permissions
This section is included for all product types.
Select whether you want to give access to the products for all technicians or specific roles. The technician account or role must have the Billing permissions activated. Refer to
Add Products to an Active Agreement
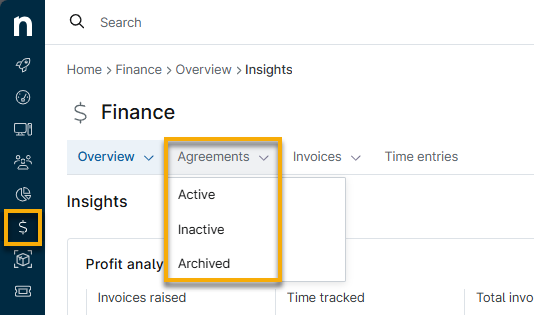
Access the Finance → Agreements page from the sidebar menu in NinjaOne. To learn more about this page, refer to
When you click Add, choose from New, Existing, or Non Catalog.
Learn more about each product type:
Add Products to a Ticket
You have a couple of options for adding products to tickets:
Products Tab
You can add products to tickets through the Products tab.
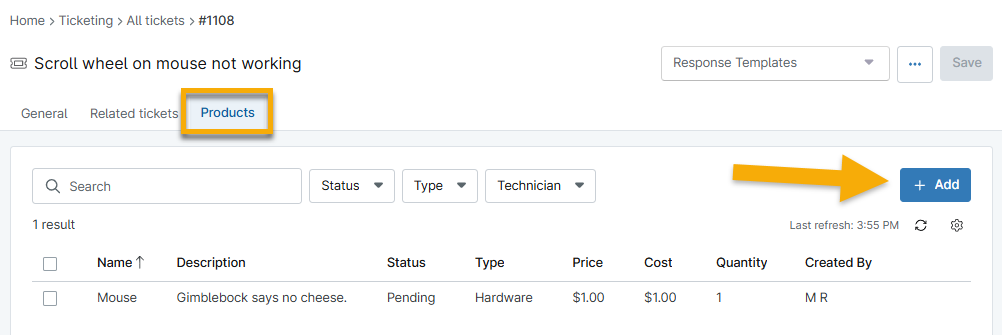
Figure 6: NinjaOne ticketing system → Add service product
- You cannot remove an agreement from the ticket if there are unbilled products associated with it.
- The agreement must be active.
- If you delete the organization, NinjaOne will remove the agreement from the ticket.
- If you change which agreement the ticket uses, you must save the ticket before adding new products.
- You must select a new agreement if you change which organization owns the ticket.
Labor Ticket Time Entry Products
Set a labor ticket time entry product by adding a comment on a ticket. You can also use this method to override the current product, ensuring that your time is billed correctly. This value defaults to the product that is configured by the time entry rules in the agreement for the assigned technician.
Additional Resources
Refer to NinjaOne Billing: Resource Catalog to view all related articles.