
Topic
This article describes how to view, approve, manage, and run commands on ChromeOS devices within NinjaOne Mobile Device Management (MDM).
Environment
- NinjaOne Mobile Device Management (MDM)
- Google ChromeOS
Description
NinjaOne Mobile Device Management (MDM) integrates ChromeOS into the same managed environment as your other mobile devices and endpoints, enabling you to oversee your entire device fleet from a single interface. After you connect your Google Workspace integration, your organization's ChromeOS devices automatically sync to NinjaOne, ready for you to review and approve. You can then keep device records up to date with on-demand syncing, monitor status and activity, and run remote commands, all without switching to the Google Admin console.
Select a topic to continue:
- Before You Start
- Activating and Connecting the Google Workspace App
- Syncing ChromeOS Devices
- Approving Discovered ChromeOS Devices
- Viewing ChromeOS Devices in the Device Grid
- Viewing the ChromeOS Device Dashboard
- Running Device Commands
- ChromeOS Devices in the Organization Dashboard
- Data and Domain Context
Before You Start
Before you can manage ChromeOS devices in NinjaOne, make sure your environment meets the following conditions:
- You must have Super Admin permissions in your Google Workspace tenant.
- Your ChromeOS devices must already be enrolled and visible in your Google Admin console.
- You must have the NinjaOne Google Workspace app installed in NinjaOne.
Activating and Connecting the Google Workspace App
You must activate and connect the NinjaOne Google Workspace application to your Google Workspace environment before NinjaOne can detect your ChromeOS devices.
Activate the App
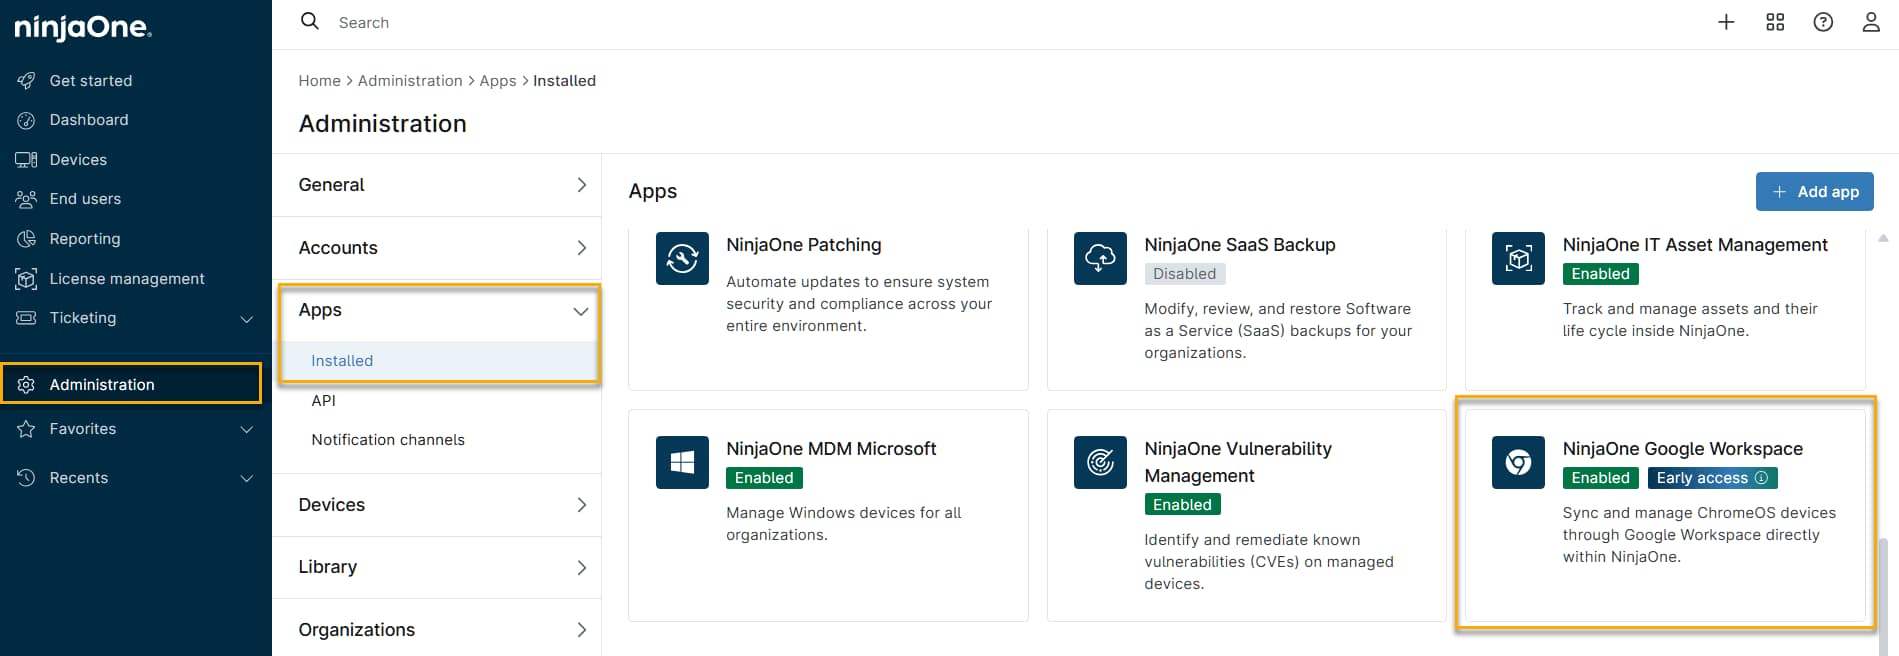
In NinjaOne, navigate to Administration → Apps → Installed, then click NinjaOne Google Workspace, then click Enable → Configure Google Workspace Connection.
Configure the Connection to Google Workspace
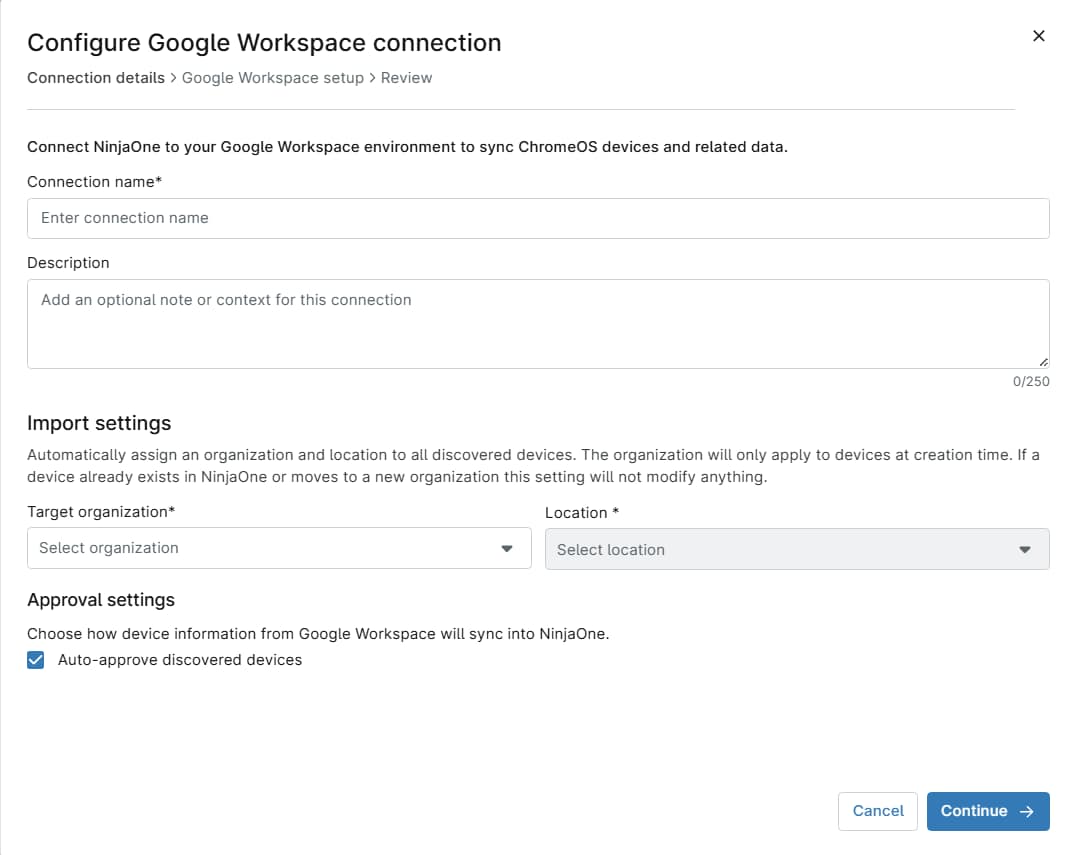
In the Configure Google Workspace Connection window, enter the following information. When finished, click Continue. The next connection window will open.
| Field | Description |
|---|---|
| Connection name | Give the connection a descriptive name. |
| Description | Add an optional note or context for this connection. |
| Target organization | Specify the NinjaOne organization to which discovered Google Workspace devices will belong. |
| Target location | Select a location within your organization. |
| Approval settings | Select the Auto-approve new devices checkbox to automatically approve new ChromeOS devices discovered on your network. If you do not select this option, you must manually approve devices that join your organization. Refer to the Approving Discovered ChromeOS Devices section of this article for more information. |
Connect to Google Workspace
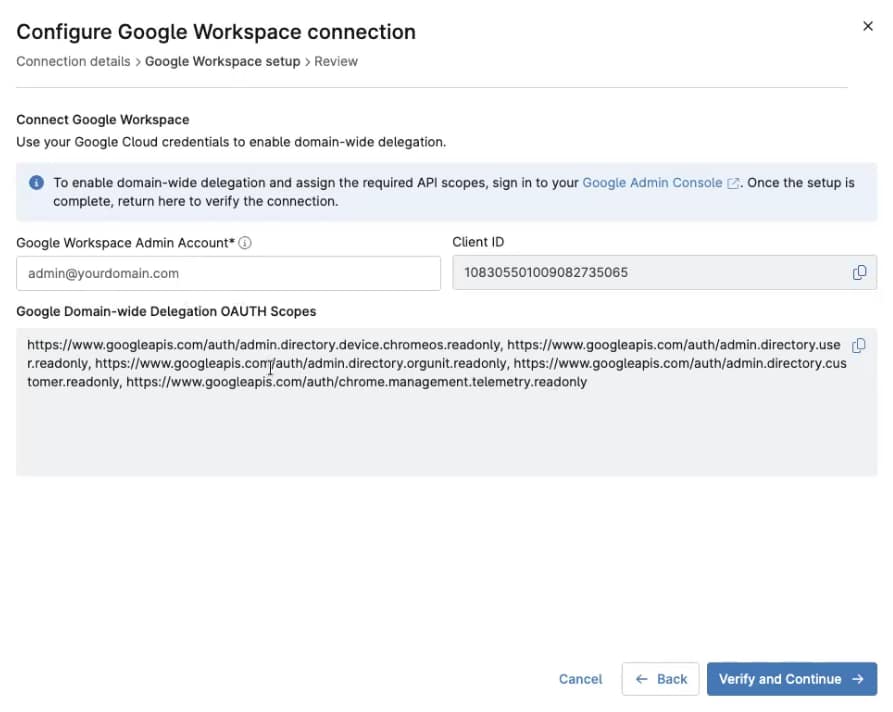
In this step, you'll create and authenticate the connection between NinjaOne and Google Workspace. You will need the Google Workspace Admin page open in a second browser tab to complete this part of the procedure.
- After configuring your workspace connection, the fields in the Configure Google Workspace Connection window will change.
- Google Workspace Admin Account: Enter the admin account name that NinjaOne will use to access your Google Workspace tenant.
- Client ID: Copy the value in this field to your clipboard. You will need to paste it into Google Workspace in step 4 of this procedure.
- Switch to your Google Workspace Admin page, navigate to Access and data control → API controls → Domain wide delegation and click MANAGE DOMAIN WIDE DELEGATION.
- Click Add new. The Add a new client ID window will open. Paste in the client ID you copied from step 2 of this section.
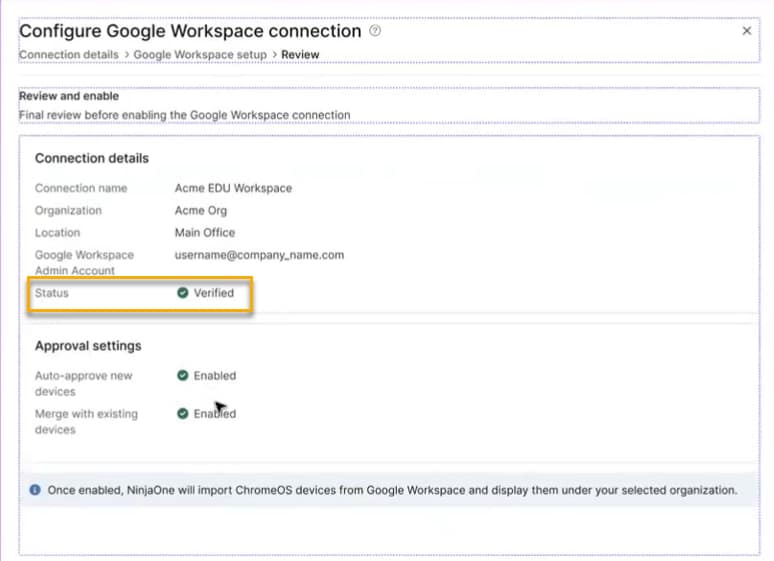
- Return to the Configure Google Workspace Connection window and click Verify and Continue. NinjaOne will initiate and test the connection to Google Workspace. A successful connection will show as verified in the connection details. Click Finish to complete the connection.
Syncing ChromeOS Devices
After completing the connection with Google Workspace, NinjaOne will discover your ChromeOS devices and will continue to sync ChromeOS device data automatically at a scheduled 6-hour interval. You can also trigger an immediate sync for a connection or for individual devices, and control whether syncing is active for a given Google Workspace connection.
Triggering a Manual Sync
A manual sync will update all ChromeOS device data for the selected Google Workspace connection.
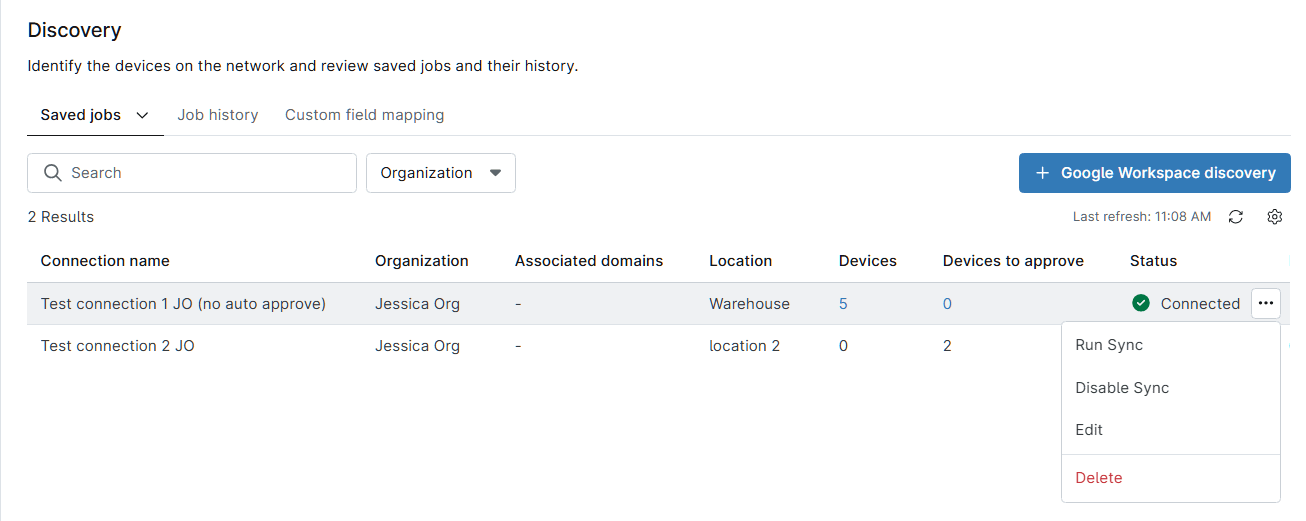
- In NinjaOne, navigate to Administration → Apps → Installed → NinjaOne Google Workspace and click View Google Workspace Connections.
- Move your cursor over the connection and click the Actions icon when it appears, then select Run sync from the drop-down menu.
Approving Discovered ChromeOS Devices
After a sync, NinjaOne lists newly discovered ChromeOS devices for review. If you did not enable Auto-approve new devices when you configured the connection, you must manually approve devices before they appear in the device grid as managed endpoints.
In NinjaOne, navigate to Administration → Apps → Installed → NinjaOne Google Workspace and click View Google Workspace Connections.
- The Devices column shows a link with the total number of synced devices. Click the link to view them in the NinjaOne device grid. Refer to the Viewing ChromeOS Devices in the Device Grid section of this article for more information.
- The Devices to approve column shows a link with the total number of devices awaiting approval. Click the link to open the list.
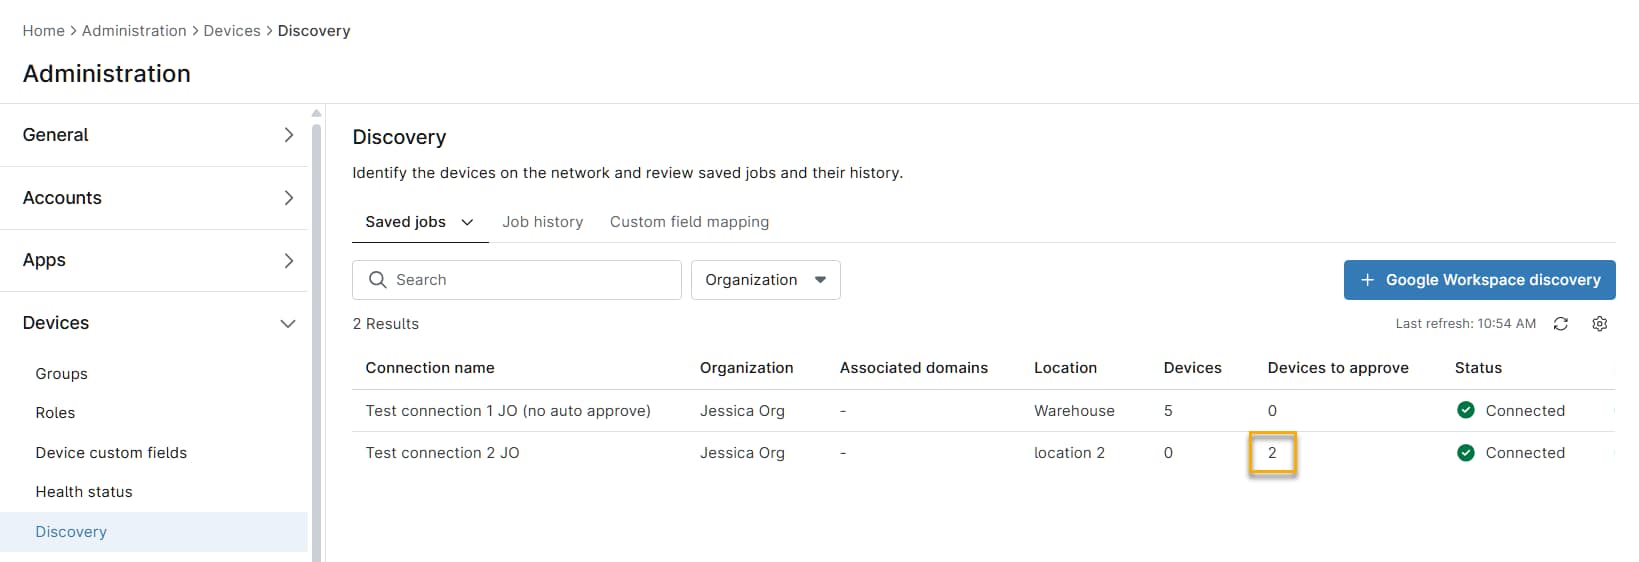
To approve devices, select them in the list and click Approve. NinjaOne promotes the devices to managed endpoints and adds them to the device grid. To remove the selected devices, click Delete. NinjaOne will remove the devices from the Discovered Devices table.
- If a discovered device's serial number matches a device that already exists in NinjaOne, a merge option will appear in place of the standard approve action. Merging links the discovered ChromeOS device to the existing device record rather than creating a new entry.
- If you delete a managed ChromeOS device from NinjaOne, the device becomes available for re-discovery on the next scheduled or manual sync.
Viewing ChromeOS Devices in the Device Grid
The device grid lists all managed endpoints in your NinjaOne environment. ChromeOS devices appear in the grid after your Google Workspace integration is active, your organization's devices have synced, and you have approved them in the Discovered devices table.
- In NinjaOne, click Devices.
- In the Device Type filter, select Google Workspace. Only ChromeOS devices appear in the grid.
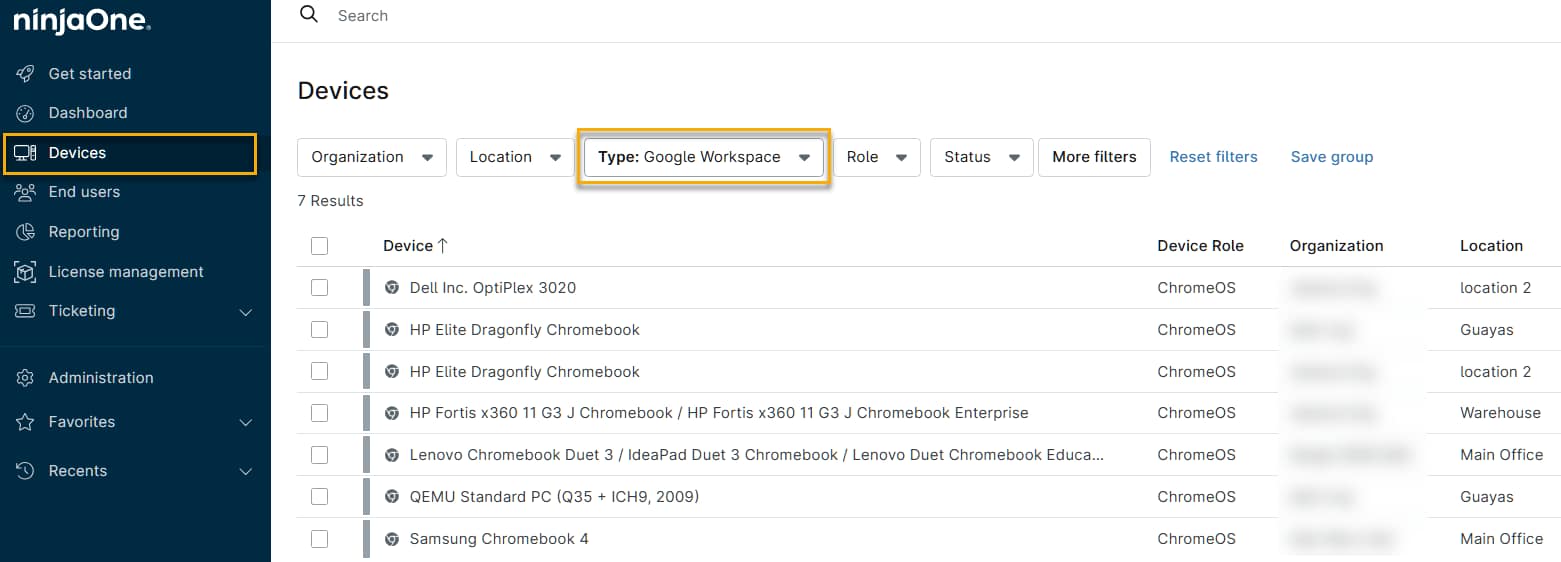
NinjaOne does not automatically assign a device owner from the last user's email in the current release. Device ownership assignment is planned for a future phase.
Viewing the ChromeOS Device Dashboard
Selecting a ChromeOS device from the device grid opens the device dashboard, which provides a detailed view of the device's current state, history, and available actions. The dashboard is organized into the following sections.
Device Name
The device header displays the ChromeOS device icon and the device's current online or offline status.
Overview Tab
The Overview tab contains two panels:
- Device information: This panel displays core device metadata, including the operating system, Chrome version, manufacturer and model, serial number, MAC address, IP address, enrollment date, last sync timestamp, assigned user, policy overrides, and the organization and location the device was mapped to during setup.
- Activities: This panel displays a chronological log of events for the device, including data sync events and device actions you run from the dashboard or device grid.
Details Tab
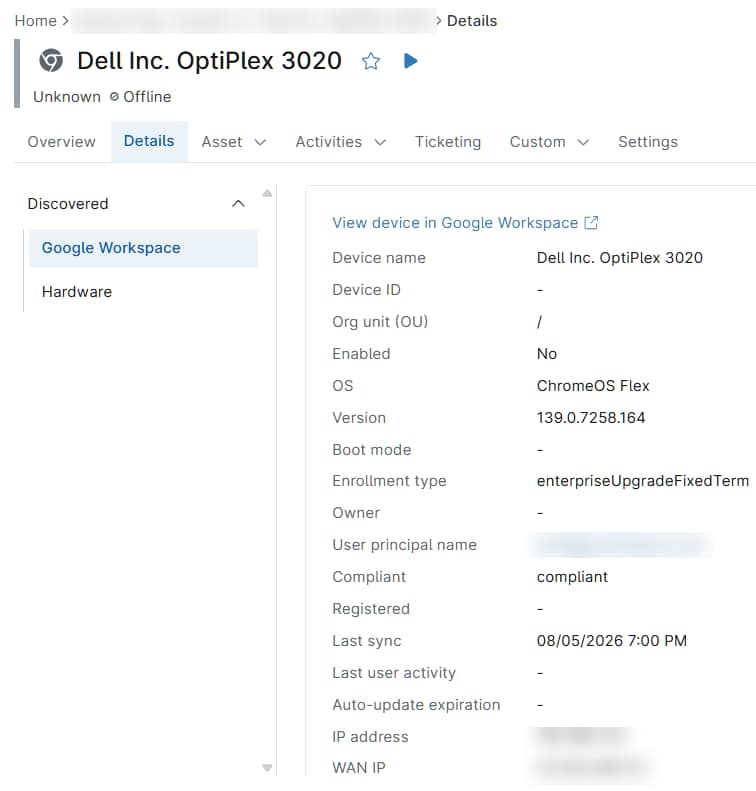
The Details tab displays the device's full metadata record organized into two sections: Google Workspace and Hardware.
- Google Workspace: This section includes a View device in Google Workspace link that opens the device record directly in Google Workspace, along with device information fields.
- Hardware: This section displays CPU, RAM, and firmware version.
Running Device Commands
NinjaOne sends device commands to ChromeOS devices remotely through the Google Workspace integration. Commands are available from the device dashboard and as row and bulk actions in the device grid. The following commands are available for ChromeOS devices:
- Reboot: This command restarts the device remotely.
- Set Volume: This command sets the device output volume to a value between 0 and 100.
- Wipe Users: This command removes all user profiles and data from the device. The device remains enrolled in your organization. This action cannot be undone.
- Powerwash: This command performs a factory reset of the device, removing all data and re-enrollment information. This action cannot be undone.
Wipe Users and Powerwash permanently delete data from the device and cannot be reversed. Confirm your selection before proceeding.
Running a Command from the Device Dashboard
To run a device command from the device dashboard, perform the following steps:
- In the device grid, select the ChromeOS device you want to manage. The device dashboard opens.
- In the device header, click the Run button . A drop-down menu appears listing the available commands.
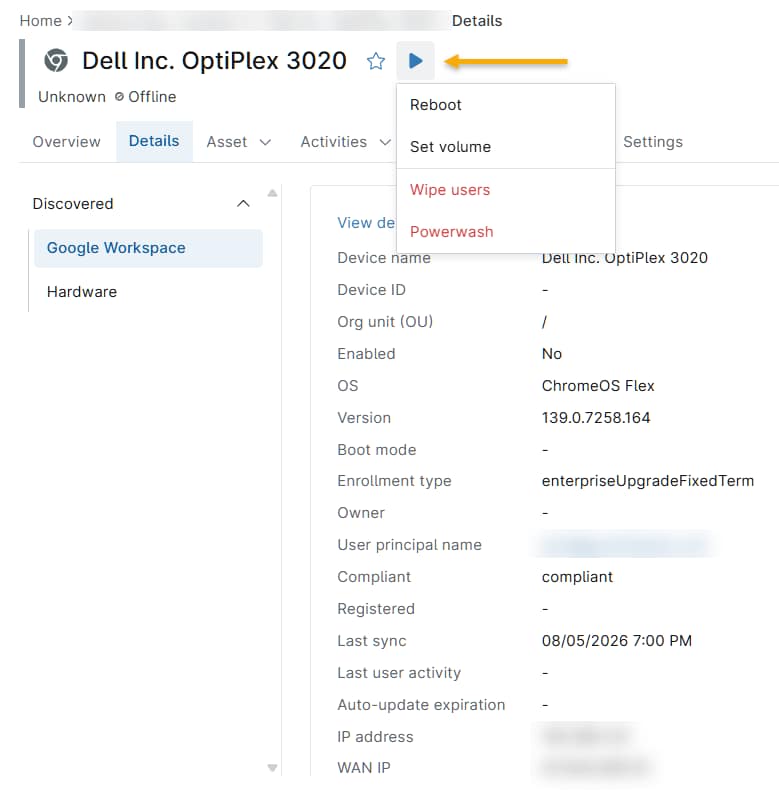
- Select the command you want to run. For Set Volume, enter a value between 0 and 100 in the window that appears, then confirm. For destructive commands (Wipe Users, Powerwash), review the confirmation dialog and confirm to proceed.
Running a Command from the Device Grid
To run a command on one or more ChromeOS devices from the device grid, perform the following steps:
- In the NinjaOne platform, navigate to Management → Devices.
- In the Device Type filter, select Google Workspace. Only ChromeOS devices appear in the grid.
- Select the checkboxes for the devices to receive the commands, then click the Run button and select Device commands to open the command menu.
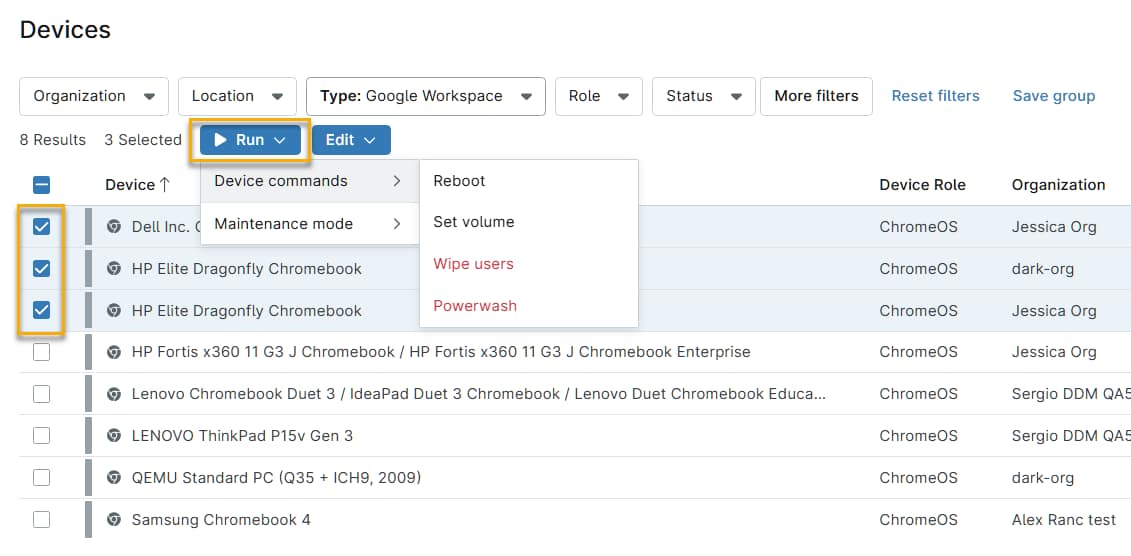
- Select the command you want to run. For Set Volume, enter a value between 0 and 100 in the window that appears, then confirm. For destructive commands (Wipe Users, Powerwash), review the confirmation dialog and confirm to proceed.
ChromeOS Devices in the Organization Dashboard
ChromeOS devices contribute to the organization-level Devices grid and to device health calculations in the organization dashboard. You can view the count and health status of ChromeOS devices alongside other managed endpoint types.
Data and Domain Context
NinjaOne associates each ChromeOS device with the registered domain it belongs to, providing organizational context. The organization and location values displayed on a device record reflect the mapping configured during Google Workspace integration setup and persist on the device record after the initial sync.