Topic
This article provides instructions for the image restore process for cloud and local backups.
Environment
NinjaOne Device Backup
Description
The image restore process described in this article explains how to restore complete volumes or even an entire device from an image backup. If you have cloud backups and only need to access specific files or folders from an image backup, you can mount an image backup to the cloud, which is a more straightforward process. refer to NinjaOne Backup: Mounting Image Backups to the Cloud for details on that procedure.
Refer to the sections below for more details on image restores:
- Image Restore Overview
- Image Restore Manager
- Restore Options
- Utilities: Downloading an Offline Image for Use with Bootable Media
- Utilities: Injecting Drivers on a Windows Installation Volume
- Image Restore Resume
- Additional Resources
Image Restore Overview
The image restore process for cloud backups and NAS backups is similar to the process of file/folder restores, with the exception that the NinjaOne Device Backup tool processes only the number of files corresponding to the number of volumes you are restoring. For example, if the backup plan creates three volumes, the tool would need to process a total of three files.
The number of files that NinjaOne has to process also depends on the number of revisions that may have been made to the data up until the point in time you are restoring. For example, if the plan has retained 30 revisions and the primary drive has undergone many changes over the course of those 30 backups, then the image restore tool may need to access up to 30 different versions of the file to complete the restore.
There are several factors you should consider when evaluating the speed of a restore:
- The type of restore (offline restores will take longer than other restores due to the process required to create and store the archives). We do not recommend offline restores due to their more complicated process, which can significantly increase restore time.
- The speed of the target disk (restore target).
- For NAS restores, the speed of the disk on the NAS device.
- The speed of the internet connection or LAN connection.
- The stability of the connection.
- The CPU speed available for decompression and decryption.
- The destination disk must be larger than the original partition size.
As an example, if you have a 1GB network speed (high) but are restoring to a VM with one core and 2 GB of memory (low), this restore job may be slow to complete even though the network speed is high.
The following sections outline the options and procedures for completing an image restore.
Image Restore Manager
The first step to perform an image restore is to download the Image Restore Manager. There are two different locations where you can download the Image Restore Manager.
The Image Restore Manager only supports Microsoft Windows 8.1 or later versions.
The two methods you can use to download Image Restore Manager are as follows:
Method 1
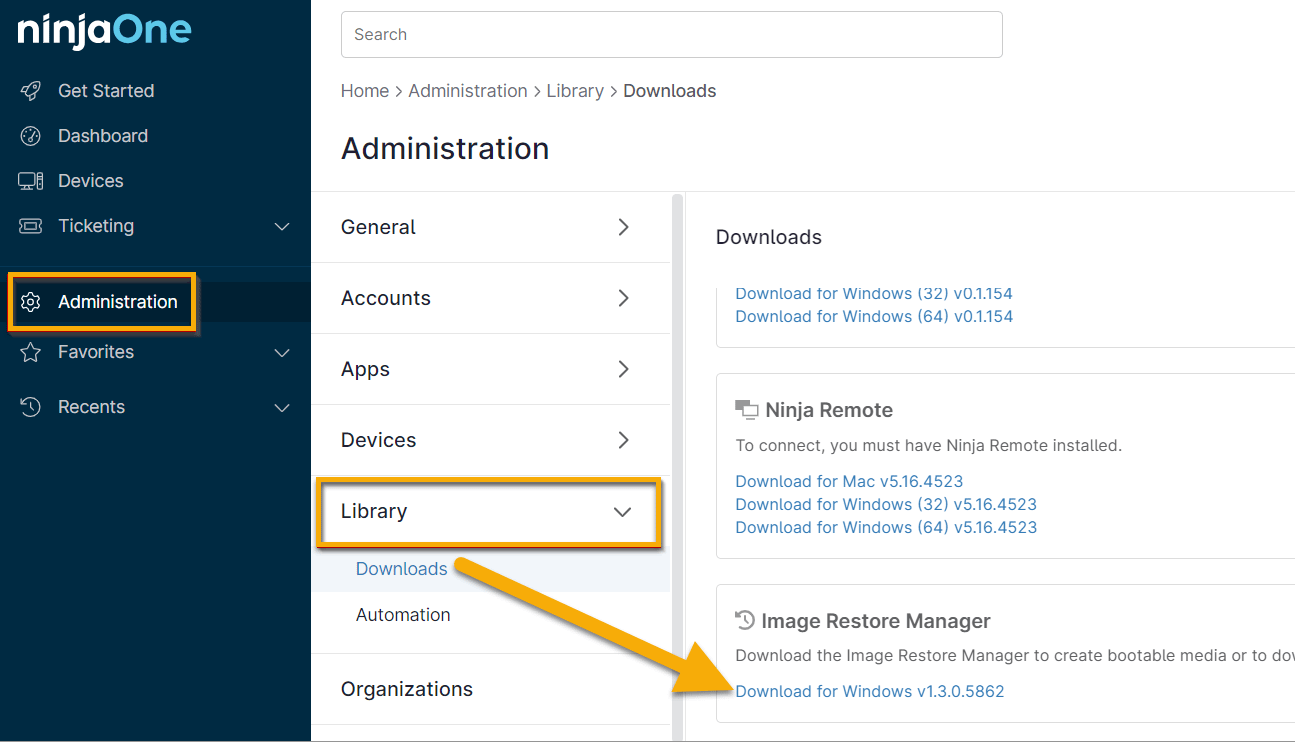
Navigate to Administration → Library → Downloads and click the link to download the Image Restore Manager.
Method 2
Navigate to a device with NinjaOne Device Backup enabled, move your cursor over the backup icon (![]() ) and selecting Invalidate Image Authorization Key. Note that performing this action will invalidate all generated image authorization keys for the device.
) and selecting Invalidate Image Authorization Key. Note that performing this action will invalidate all generated image authorization keys for the device.
- You can only use an image authorization key once. Once you have used an authorization key to grab the backup data, you cannot use it again.
- You can generate multiple image authorization keys for a device.
When an Image Restore Key is created or invalidated, it will display in the System Activities pane.
Restore Options
Once you have downloaded the Image Restore Manager tool, you will have two different restore options and multiple restore functions in the Utilities section:
Restore Options
Utilities
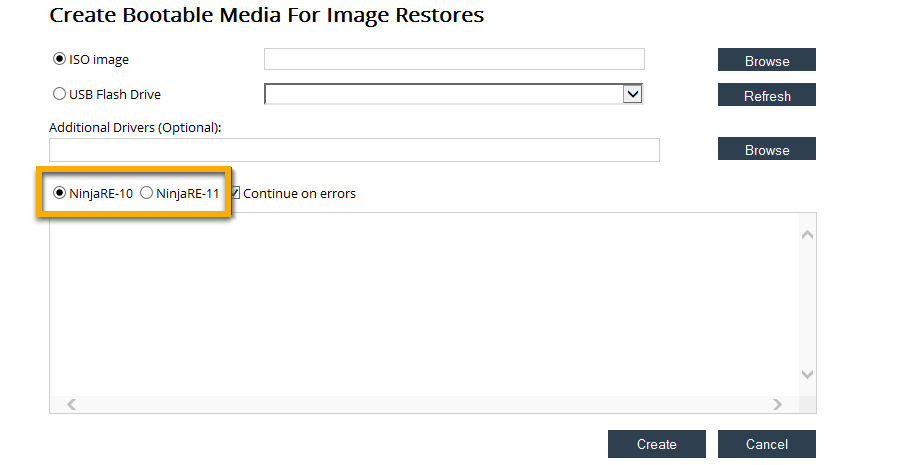
Create Bootable Media for Image Restores
This option allows you to create bootable media that contains the Image Restore tool, which in turn allows you to boot a machine and perform a bare metal restore.
Browse to select the destination for your ISO image or select a USB flash drive from the drop-down menu. All available removable drives will automatically populate in this drop-down.
You can select additional drivers to install with the bootable media when applicable. You must have the Windows ADK installed to inject drivers.
Indicate whether you are restoring Windows 10 (NinjaRE-10) or Windows 11 (NinjaRE-11). If you are restoring from Windows 11, use Win-RE11; for all other versions, use WinRE-10.
Finally, select whether to continue with the bootable media creation process if NinjaOne encounters errors, then click Create.
When creating a bootable USB or ISO, NinjaOne hosts a customized version of Microsoft WinPE, which is Microsoft's tool for preinstallation environment (PE) images created on Windows 10 or newer. The compatibility of the image is the same as WinPE, and the creation steps are similar, with the difference being the packages that you can enable. You can learn more about WinPE at learn.microsoft.com (external link).
To boot from the USB media, ensure that you've selected the USB drive as the boot drive in your BIOS. Then, follow the on-screen prompts to perform a bare metal restore.
Restore to a Hyper-V Virtual Machine
If you are restoring to a Hyper-V virtual machine, you must choose the appropriate generation of VM. To obtain information on making the correct choice, navigate in the NinjaOne console and select the machine you are attempting to restore. Navigate to Backup → Manage → select your image plan. Note the disk layout of the volume on which your Windows operating system is installed (typically C:).
- If the disk layout is MBR, you must choose Generation 1 for your virtual machine.
- If the disk layout is GPT, you must choose Generation 2 for your virtual machine.
The above section only applies to virtual machines running on Hyper-V. The rest of this documentation also applies to other restore needs.
Restore Volumes or Disks
This option allows you to recover full disks or individual volumes directly from the cloud, or from a local storage device (depending on where backup data is stored). You also have the option to restore from an offline image archive.
To begin the restore process:
Select the source of the restore and enter a Restore Authorization Key.
Figure 7: Restore an Image (click to enlarge) When using a downloaded image as the source, if you opted to download the image in non-NJA format, you can opt to select the JSON file and specify VHDX files to restore only specified volumes. Otherwise, select the .nja file only.
Choose which plan and restore point you want to download. A preview of the backup content will be available in the window on the right.
Figure 8: Restore an Image (click to enlarge) Drag and drop the backed-up data to its destination disk. You can choose to either drag an entire disk to a destination or individual volumes.
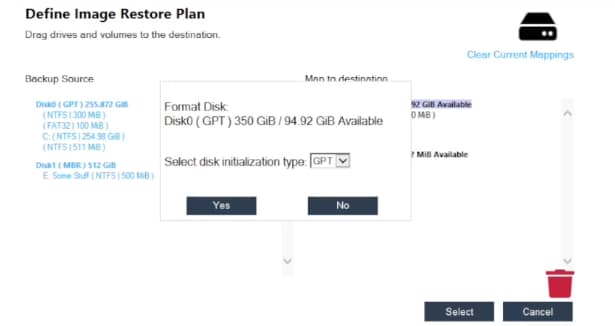
Figure 9: Define Image Restore Plan (click to enlarge) Note that the disk initialization type must match between the original and destination disks (MBR or GPT). You can change the disk initialization type by clicking a destination disk, clicking the trash can icon, and changing the disk initialization type in the drop-down menu.
Figure 10: Disk initialization type (click to enlarge) If you drag a volume to a disk that does not have a boot partition, NinjaOne will prompt you to choose whether to add one automatically.
Figure 11: No boot partition (click to enlarge) Finally, review and confirm the restore plan.
Figure 12: Review (click to enlarge)
- Within the Image Restore Manager, if you drag and drop an individual volume, it will restore the volume. However, if you drag and drop the whole disk, this will wipe the disk. It may also not retain the original drive letter since you are restoring the drive.
- In the summary screen displayed for reviewing and confirming the restore, the restore will remove anything marked with an X and add anything with a plus sign (+).
Utilities: Downloading an Offline Image for Use with Bootable Media
This option allows you to download a backup image from the cloud or a hybrid location and save it to a local storage device for use in an offline restore.
- This process is for customers who need to restore a specific file or folder from an Image Plan that is using a Local Only backup destination.
- If an Image Plan has the Backup Destination set to 'Local Only', users are required to download the entire partition where the needed file/folder resides.
- This process downloads a .VHDX file that contains the entirety of the backed-up data for the selected partition. Therefore, users must confirm that the device on which they are performing the download has sufficient space on the drive to download the file.
To begin the download process:
Enter a Restore Authorization Key and choose where to download the image archive to, and then click Select to proceed.
Figure 14: Download Image Archive (click to enlarge) You can also opt to save the archive in .nja format, which allows you to extract the VHDX files and layout files as standalone files, a process that you can perform using most archiving tools. If you opt to do so, NinjaOne will prompt you with the following confirmation message :
Figure 15: NJA confirmation (click to enlarge) If you opt not to save the download in .nja format, then your files will be in the non-compressed, raw VHDX and JSON layout format. Alternatively, if you only need to select specific files from your image, you can use the cloud mounting option.
Next, choose which plan and restore point you want to download. Then, select the partition where the file or folder you need to restore resides. A preview of the backup content will be available in the window on the right.
Figure 16: Backup Content Preview (click to enlarge) - Click Select to proceed.
- Confirm that all information is correct and then click Download to begin downloading the image.
- Once the download is complete, navigate to the location where the VHDX file was downloaded.
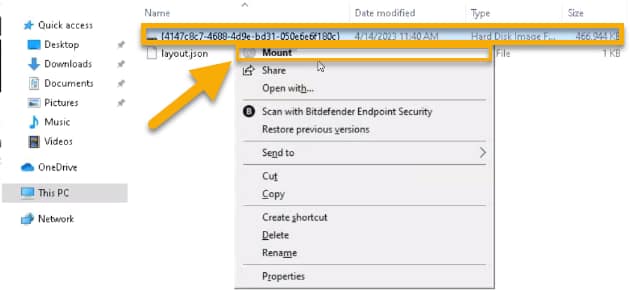
Right-click on the hard disk image file (.VHDX) and select the Mount option.
Figure 17: Mount (click to enlarge) This action assigns a drive letter and allows you to navigate to and retrieve the needed file/folder.
Utilities: Injecting Drivers on a Windows Installation Volume
This option allows you to add additional drivers to an offline Windows installation. When restoring on a physical device, it is essential to note that the PE image has access to only the network drivers shipped by default with Windows. Additional drivers are sometimes necessary when restoring to dissimilar hardware.
To begin the process of injecting drivers:
- Enter the path to the existing offline Windows installation and the path containing the drivers you want to install.
Choose whether to continue the driver injection if the system encounters errors and whether to include sub-folders from the path containing the drivers. You must have the Windows ADK installed to inject drivers.
Figure 18: Install Drivers (click to install)
Image Restore Resume
NinjaOne provides the ability to resume a restore job that has been cancelled or interrupted.
When an image restore is in progress, and the partition is less than 2 terabytes, the system creates a staking point (or "checkpoint") every 5 minutes. Partitions greater than two terabytes have a 10-minute interval for staking points. If you click Cancel on an image restore, NinjaOne will make a last attempt to update the staking points. When resuming the image restore, you will resume from the most recent staking point.
Important Notes:
- The Image Restore Manager must be online and have a working connection.
- Staking points can only lock in at a resumable point as long as it's fully continuous. If there is a thread that hasn't been fully committed, NinjaOne will not save its progress.
- You don't need a new restore token to resume.
- The image restore manager may also stake bytes on a disk so that it may start at a specific partition rather than at a checkpoint.
- The image restore resume feature is not compatible with offline sources at this time. It must be cloud or hybrid.
- Image Restore Key Activities creates system-level activities when an Image Restore Key is created and invalidated.
- An activity message when someone resumes an image restore job: "Image restore resumed for Plan_Name on node Node_Name. The settings are available in Policy Editor→ Activities → Backup as Image Restore Resumed.
To resume an image restore job
- Start an image restore.
- Follow through the steps by clicking Select.
- Select the checkbox to agree to execute.
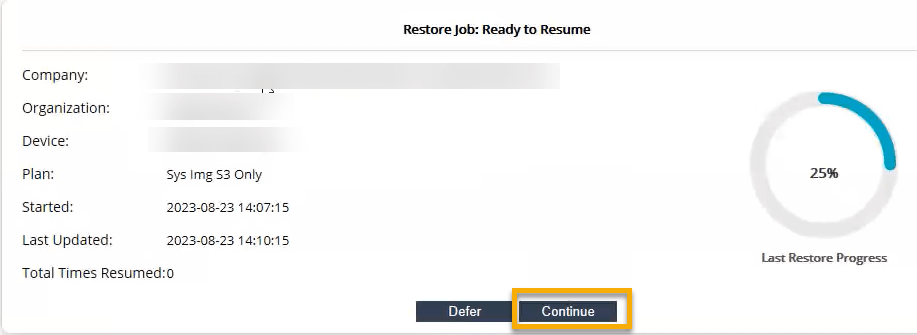
- Once the job has stopped and you receive an activity log notifying you of the event, you can click Resume Previous Resume Job.
Click Continue and go through the mapping steps.
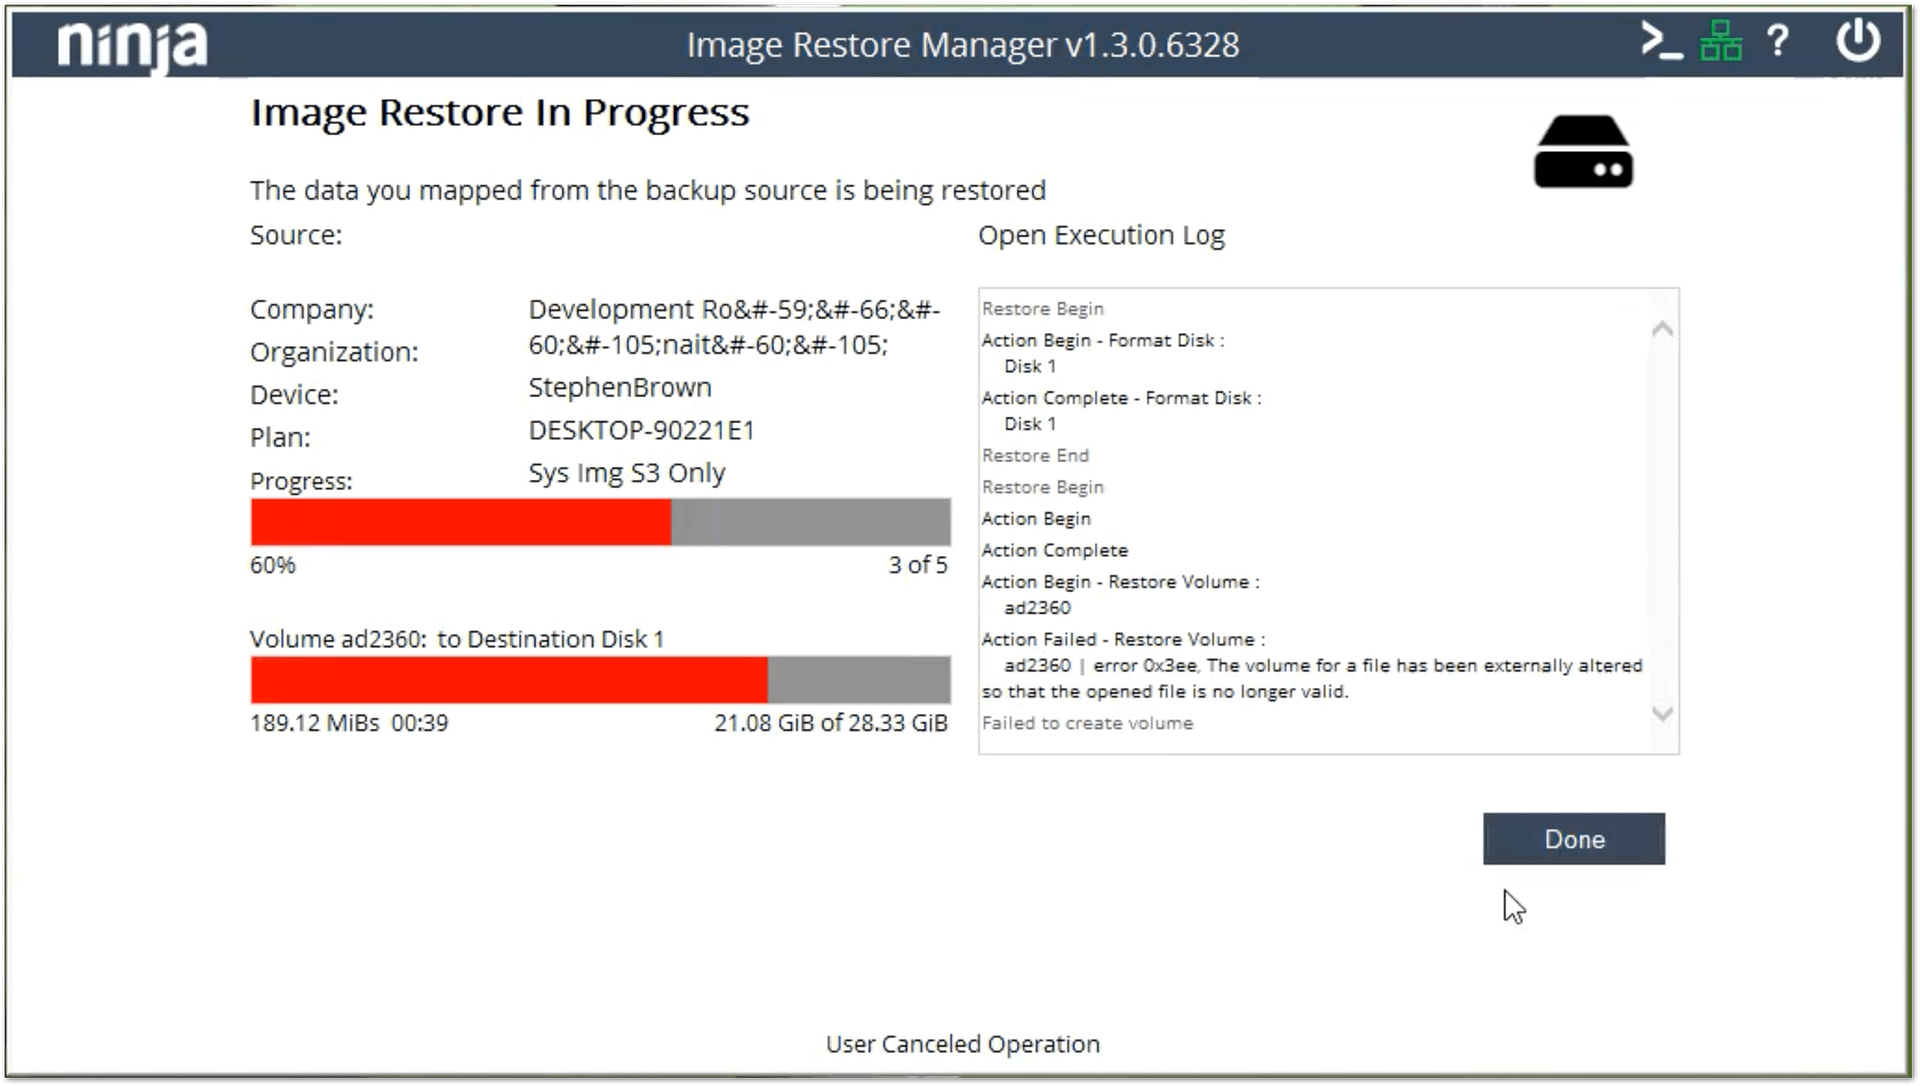
Figure 20: Ready to Resume (click to enlarge) Once you agree to execute, you will lose the previous staking point and resume where it left off previously. It may take a few moments for NinjaOne to retrieve the data from the cloud. The Image Restore in Progress window displays the progress and details of the image restoration.
Figure 21: Image Restore In Progress (click to enlarge)
Additional Resources
NinjaOne Backup: Mounting Image Backups to the Cloud