Topic
Understand Partner Portal fundamentals for simpler client management.
Environment
Description
NinjaOne SaaS Backup is a cloud backup platform that helps businesses securely backup, manage, recover, and protect their business information. The automated and incremental backups simplify the backup, recovery, and compliance experience. It works with Microsoft 365 (Hosted Exchange, Groups and Teams, SharePoint, OneDrive), Gmail (including Calendars, Contacts, and Tasks), and other IMAP email servers. NinjaOne uses 256-bit (AES) encryption at rest and in transit, supporting multifactor authentication (MFA).
Index
- Dashboard: Protection Coverage and Seat Usage
- In-Place Archive Backup
- Seat Details
- AD Group Backup
- Partner Email Notification
Dashboard: Protection Coverage and Seat Usage
The dashboard on our partner portal empowers partners to visually monitor data generated from all organizations under supervision. Within the Reporting Dashboard, partners can obtain both an overview and detailed reports of:
- Protection Coverage: Displays the percentage of backed-up accounts out of all accounts, along with the number of unbacked accounts.
- Seat Usage: Shows the number of paid seats being used for backup.
- Organizations: Tracks the status of active, suspended, and unsubscribed organizations. This section offers a shortcut link to access more detailed information on the Organizations page.
- Accounts: Provides insights into active, deactivated, and total account numbers. The section includes Account details shortcut link to navigate to the Account page, showing more detailed information.
You can get a quick overview on the dashboard page with widgets that allow you to make quick and informed decisions to safeguard your customer’s data. For those desiring more granular insights, you can view lists of organizations with additional calculations on protection coverage and seat usage. This allows partners to prevent data loss by adding unbacked accounts to backup and maximize seat usage.
Each widget has a link to the report details page, which breaks down the data and can be exported to a CSV file. 
When viewing the report details, hover your cursor over the tooltips to see an explanation of the data provided. 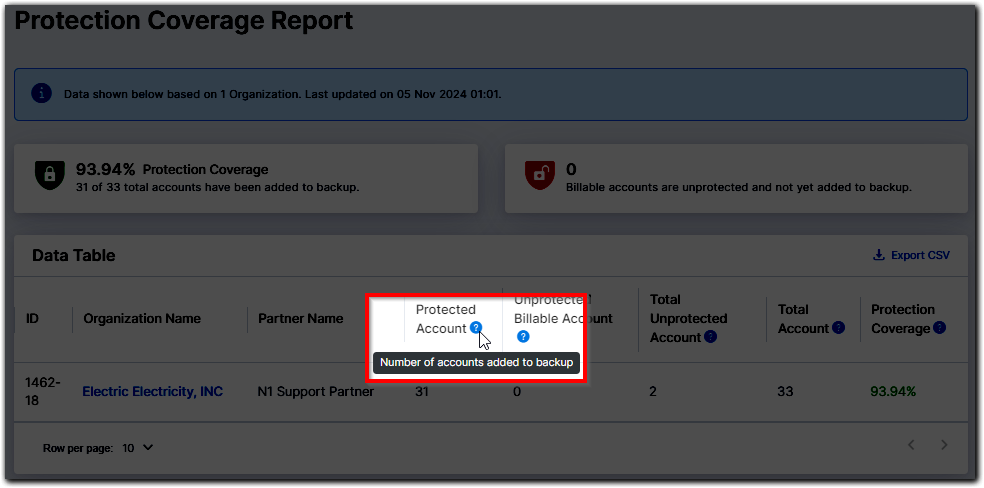
How To Find Protection Coverage
From the main partner portal Dashboard (i.e., the landing page after successful login), view the top left widget. 
The system calculates the percentage using the formula:
How To Find Seat Usage
- Login to the partner portal.
- On the left navigation bar, click Dashboard, then Reporting Dashboard.
- The Seat Usage widget is on the right side of the page.
The system calculates the percentage using the formula:
In-Place Archive Backup
When a mailbox is added to the Archive, existing emails will be backed up directly connecting to the mailbox. Then, a journal rule will be created for your tenant and the mailboxes will be assigned to be Archived. This sends a copy of each incoming and outgoing message to an external journal mailbox. Then you will get the messages from the external journal mailbox.
Once an Archiver organization is authenticated, the system creates a journal rule and distribution group mailbox. All mailboxes you add to the backup are added as distribution group members. Therefore, all incoming and outgoing emails get copied to our journal server. Later, our system filters those emails and displays them for the corresponding account.
How To Enable Online Archive Backup
- Click the Organizations tab.
- Click the organization or click the ellipsis (three vertical dots), and then click View Details.

- Select the Features tab.
- Enable the M365 Backup toggle.
Once Online Archive (In-Place Archive) Backup is enabled for an organization, we will backup online archive data under all mailboxes of the organization.
How to check the Online Archive (In-Place Archive) Backup
Please check the folder list of the mailbox. Online archive data will be displayed under the folder name “In-Place Archive.” It is also displayed when you search by folder name on the “Advanced Search” page.
Archiver Product
We will start backing up all messages under the online archive folder as soon as online archive backup is enabled. It is considered an initial backup for the online archive folder. Later, if users move any emails from a normal folder to an online archive folder, we will not back up such emails again. As Archiver email backup takes place through journaling, there won’t be any emails missed.
Backup Only Product
Online archive data would be backed up during the email backup schedule (12 times daily). You can check online archive backup using the folder list of the mailbox. Online archive data will be displayed under the “In-Place Archive” folder. It is also displayed when you search by Folder name in the “Advanced Search” page.
Seat Details
Seats break down the license usage of the organization. It won’t appear to be a basic/personal plan type. You can modify the seats within an organization if automatic licensing is disabled. Hover your cursor over tooltips to see seat type information.
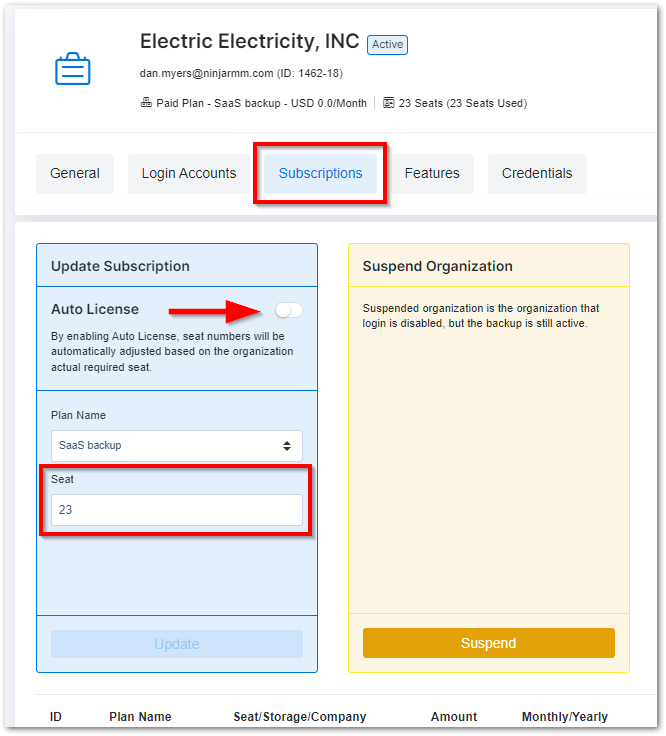
How to Modify Seats
- Click the Organizations tab.
- Click the organization or click the ellipsis (three vertical dots), and then click View Details.
- Select the Subscriptions tab.
- In the Update Subscription box, ensure the Auto License toggle is not activated. Input the new seat number, and then click Update.
How To Automatically Adjust Seats
You can enable Auto License, which automatically adjusts (upgrades and downgrades) seats based on the required seats.
For Example, consider a client with 10 active mailboxes backed up with the current purchased seats being 10. If five new mailboxes are added to Backup under the End-User Portal, Auto License would automatically add five seats to the organization. Similarly, when mailboxes are deleted from Backup, seats would be automatically reduced based on the current usage.
How To Find Seat Usage Details
- Click the Organizations tab.
- Click the organization or click the ellipsis (three vertical dots), and then click View Details.
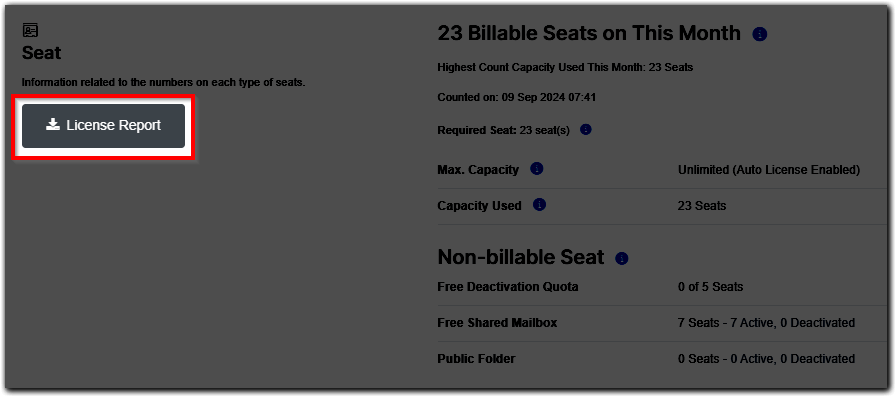
- In the General tab, scroll down to the Seat section located at the bottom of the page.
How To Export Seat Details
- Click the Organizations tab.
- Click the organization or click the ellipsis (three vertical dots), and then click View Details.
- In the General tab, scroll down to the Seat section located at the bottom of the page.
- Click the License Report button.
- Click the Yes, continue button on the pop-up confirmation.
If successful, you will see a green banner success message. - Open your email inbox and locate the email with the subject “Your CSV Download is Ready.”
- Click the generated link before it expires in 96 hours.
AD Group Backup
AD Group Backup allows you to add backups more efficiently. Once the AD Group is registered, our system monitors if any new users are added or if any existing users are removed on the M365 side. The corresponding account’s backup is activated or deactivated based on the status.
How to Add Users from an AD Group to Backup
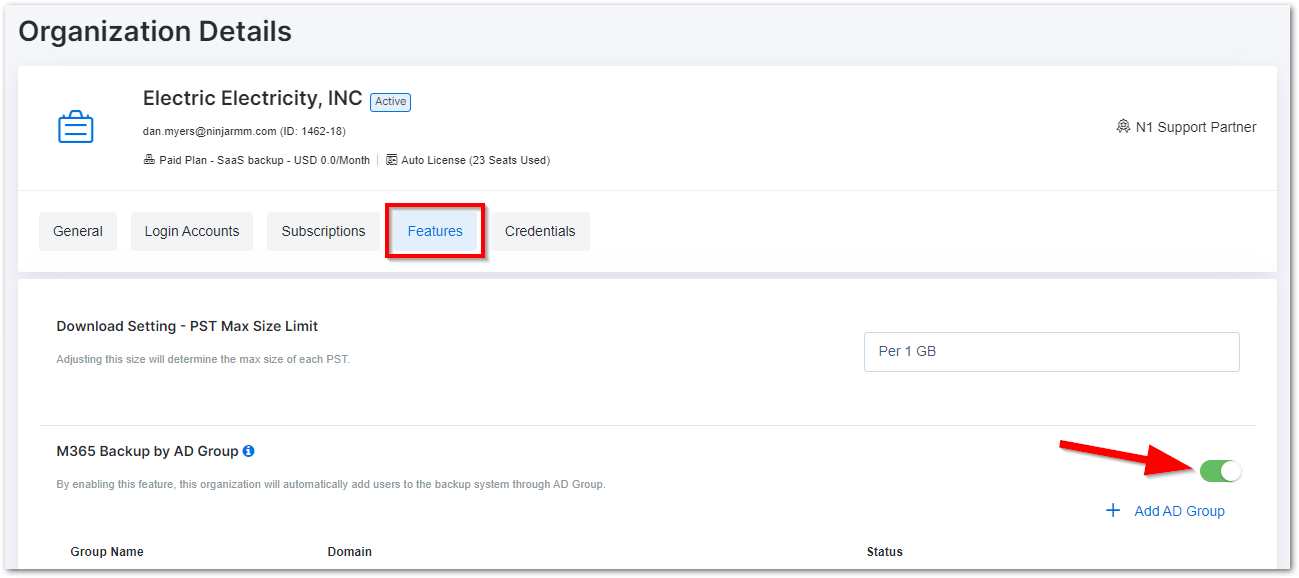
- Click the Organizations tab.
- Click the organization or click the ellipsis (three vertical dots), and then click View Details.
- Open the Features tab.
- Enable the M365 Backup by AD Group toggle, input the AD Group name, and click the Yes, continue button. Please note that if the organization still needs to add an M365 backup, it will show the instructions.
- You can click Checking Now to verify the registered AD Group.
Partner Email Notification
You can manage your email notifications under Settings on the User Management page. You can enable email notifications in three categories: Errors, Invoices, and General.
- Error Notifications cover backup error summary reports and MIME errors. Partners with the Owner, Super Admin, Admin, or Support role can receive these notifications. You can also select the Support tab in the Partner Portal to see all errors that exist in any organization. If you need support understanding the cause or fixing any errors, please report it to us through a support ticket; we would be happy to assist.
- Invoice Notifications contain payment reminders. Partners with the Admin or Finance roles can receive invoice notifications.
- General Notifications cover a wide range of information, such as insufficient seats, deactivation and reactivation of subscriptions, and NFR reports. Partners with the Owner, Super Admin, or Admin role can receive these notifications.
How to Enable Notifications for New Users
- Navigate to the Settings menu and click User Management.
- Click the + New User button.
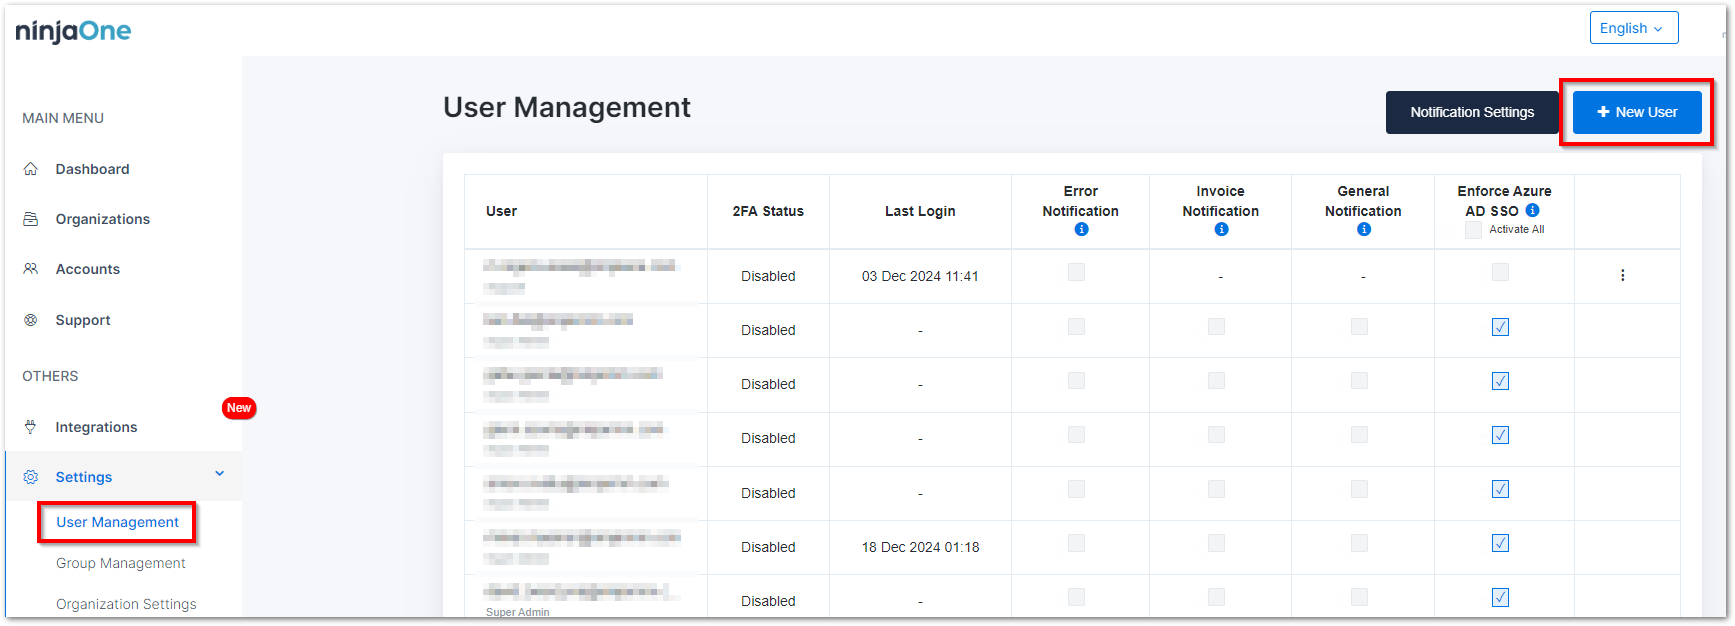
- Fill in the form with their email and set a password, role, and notifications.
- Click the Save button.
How to Enable Notifications for Existing Users
- Navigate to the Settings menu and click User Management.
- Activate the checkbox under the category column you want to enable (Error Notification, Invoice Notification, or General Notification).
Notification Frequency
You have the option to receive notifications daily, weekly, or monthly. By default, all notifications are set to daily except a seat availability report that is set to weekly.
To change your notification frequency, please follow these steps:
- Navigate to the Settings menu and click User Management.
- Click the Notification Settings button.
- Select daily, weekly, or monthly for each notification.