User Idle Warning
IT support technicians rely on tools like NinjaOne for remote access and management. However, periods of inactivity can trigger automatic logoffs, disrupting workflows and potentially impacting productivity. NinjaOne provides administrators with the ability to customize idle time settings to better suit their team’s needs. This article explains how to adjust idle timeouts for technicians within the NinjaOne platform.
What is Idle Time, and Why Does it Matter for Technicians?
Idle time in this context refers to the duration a technician’s NinjaOne session remains inactive, typically without any interaction or active remote sessions. NinjaOne employs idle timeouts as a security measure to prevent unauthorized access in case a technician steps away from their computer. However, these timeouts need to be balanced against the potential for workflow disruptions.
How to Change the Idle Time Warning in NinjaOne
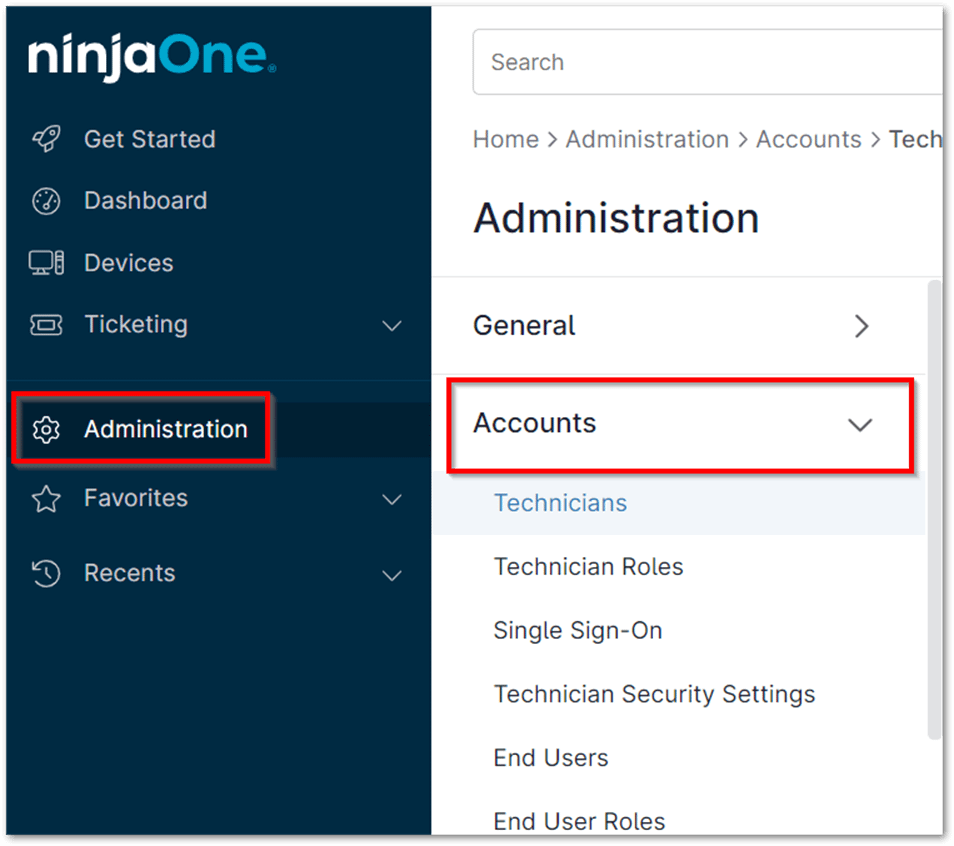
1. Go to Administration > Accounts, and in the Technicians tab, select the technician whose user idle warning time frame you want to modify.

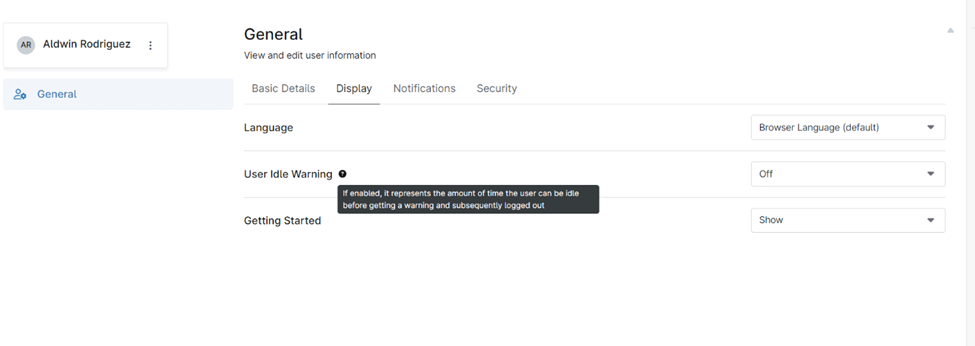
2. In the user editor, navigate to the Display tab under General, and use the User Idle Warning drop-down menu to set your preferred time. Choosing ‘Off’ will disable idle time warning.

3. If session activity remains idle, a 5-minute auto-logout countdown will start. If the user remains inactive during this period, they will be automatically signed out.
Notes:
- The default User Idle Warning is set to 1 hour.
- The selected User Idle Warning time frame is enforced even if NinjaOne is open in an inactive browser tab.
- For optimal security, it is recommended to manually log out of NinjaOne when you’re done using the app.
- If the User Idle Warning is disabled, the user won’t receive an idle warning, but their NinjaOne session will still automatically expire after 24 hours.
The Benefits of Customizing Idle Timeouts in NinjaOne
- Enhanced Security: Maintain a reasonable level of security by automatically logging off inactive technicians, reducing the risk of unauthorized access.
- Improved Productivity: Minimize workflow interruptions by setting idle timeouts that accommodate typical session lengths and tasks.
- Flexibility: Tailor idle timeouts to different technician roles or teams based on their specific needs and work patterns.
Strategies for Idle Timeout Management
- Communicate Changes: Inform technicians about any changes to idle timeouts and the reasons behind them.
- Gather Feedback: Periodically collect feedback from technicians to ensure the chosen idle timeouts are practical and not hindering their work.
- Balance Security and Usability: Strive for a balance that upholds security standards without causing unnecessary disruptions to technicians’ workflows.
Examples of Use Cases for Idle Timeout Management in NinjaOne
- Enhancing Security: Automatically log off inactive technicians to protect sensitive customer data and prevent unauthorized access to NinjaOne features and client systems.
- Promoting Accountability: Encourage technicians to actively manage their sessions and avoid leaving remote connections open unnecessarily.
- Balancing Security and Productivity: Find the right balance between security measures and allowing technicians the flexibility to work without constant interruptions from automatic logoffs.

