Topic
This article discusses SaaS Backup integrations in NinjaOne.
Environment
NinjaOne SaaS Backup
Description
NinjaOne SaaS Backup is a cloud backup platform that helps businesses securely back up, manage, recover, and protect their business information. The automated and incremental backups simplify the backup, recovery, and compliance experience.
Our integration automates service ticket generation, allowing for more efficient support management from a single platform. It also syncs subscription changes to simplify billing operations. Our integration marketplace now includes ConnectWise, Autotask, and HaloPSA, offering you greater operational flexibility and efficiency.
Compatible applications
NinjaOne SaaS Backup works with:
- Microsoft 365 (Hosted Exchange, Groups and Teams, SharePoint, OneDrive)
- Gmail (including Calendars, Contacts, and Tasks), and other IMAP email servers.
NinjaOne uses 256-bit (AES) encryption at rest and in transit, supporting multi-factor authentication (MFA).
Index
- Getting Started
- Key Capabilities
- Connecting to Autotask
- Connecting to HaloPSA
- Connecting to ConnectWise
- Frequently Asked Questions
Getting Started
To get started, partners need to:
- Ensure connectivity by entering the correct credentials.
- Perform ticket and organization mappings. (Plan mapping is not required.)
Key Capabilities
- Direct PSA Connection: Partners can now connect directly to their PSA from the portal without prior activation, simplifying plan and organization creation and mapping.
- Plan Mapping: Map plans to multiple PSAs simultaneously.
- Organization Mapping: Organizations can only be mapped to one PSA at a time. Transitioning requires disconnecting from the current PSA first.
Connecting to Autotask
- Complete Partner Setup in Autotask
- Connect to Autotask on NinjaOne's Partner Portal
- Create a New Plan with Autotask Integration
- Create a New Organization Connected Through Autotask Integration
- Set Up a New Security Role in Autotask
- Revoke Autotask Integration
Complete Partner Setup in Autotask
- Launch Autotask.
- Log in using valid credentials.
- Navigate to Admin, then Company Settings & Users.
- Expand Resources/Users (HR) and click on Resources/Users.
- Click on New API User.
- In the General section, fill in all mandatory information and select an appropriate Security Level. For guidance on creating a new Role, refer to the Setting Up a New Security Role in Autotask documentation.
- Click Generate Key and Generate Secret. Save both the Key and Secret for later use during integration on NinjaOne's Partner Portal.
- Select "NinjaOne - Cloud Backup" as the Integration Vendor.
- Click Save and Close.
Connect to Autotask on NinjaOne's Partner Portal
- Log in to the Partner Portal. On the left navigation bar, click the Integrations menu (marked with the plug icon).
- On the Autotask card, click Connect.
- Input the previously generated Key and Secret into the respective fields, and then click Next Step.
Upon successful connection, you are officially connected to Autotask. The system will display a success banner and redirect you to the ticket mapping form. - Complete the form by selecting the suitable options, then click Next Step. All fields are required, so ensure none are left blank.
You can skip this step and continue with the ticket mapping later.
When you return to the Integration page, you will find a Connected badge next to Autotask.
Upon successful ticket mapping, the system shows a banner with a completed ticket mapping setup. You can continue to do plan and organization mapping.
If you click the Revoke All Ticket Mapping button, it will only reset the ticket mapping form. Your Autotask connection won't be affected.
Create a New Plan with Autotask Integration
- To map the plan, click Manage. You'll be redirected to the Integration page for mapping.
- From the available options, select Service, then click Connect (blue icon).
After successfully mapping the plan, you will notice a green checkmark indicating success, and the Unlink button will appear. - Upon returning to the plan page, click Menu, and select View Integration. You will now see the Synced badge indicating that the plan is synchronized with the integration.
Edit Existing Plans Mapped with Autotask Integration
- Click the Menu button, then select View Integration.
A popup will appear. - Click Manage to proceed with mapping the plan with Autotask.
You will be redirected to the Integration page. Please continue to select Service and proceed until it is successfully synced.
Create a New Organization Connected Through Autotask Integration
- Select the plan that is synced with the Autotask integration.
- Upon successful organization creation, a new pop-up will appear for mapping requirements. Click the Manage button to redirect you to the Integration page.
- Select Company, Contract, and Contract Service, then click Connect (blue icon).
- Upon successful organization mapping, a green checkmark will appear, and the Unlink button will be displayed.
Edit an Existing Organization and Map with Autotask
- Go to the Integration page, click on Option, then select Manage Connection.
- Click on Organization Mapping, find the organization you want to edit, select Company, Contract, and Contract Service, then click Connect (blue icon).
Once successful, the system will display a green check and the Unlink button.
Set Up a New Security Role in Autotask
- Launch Autotask URL.
- Log in with valid credentials.
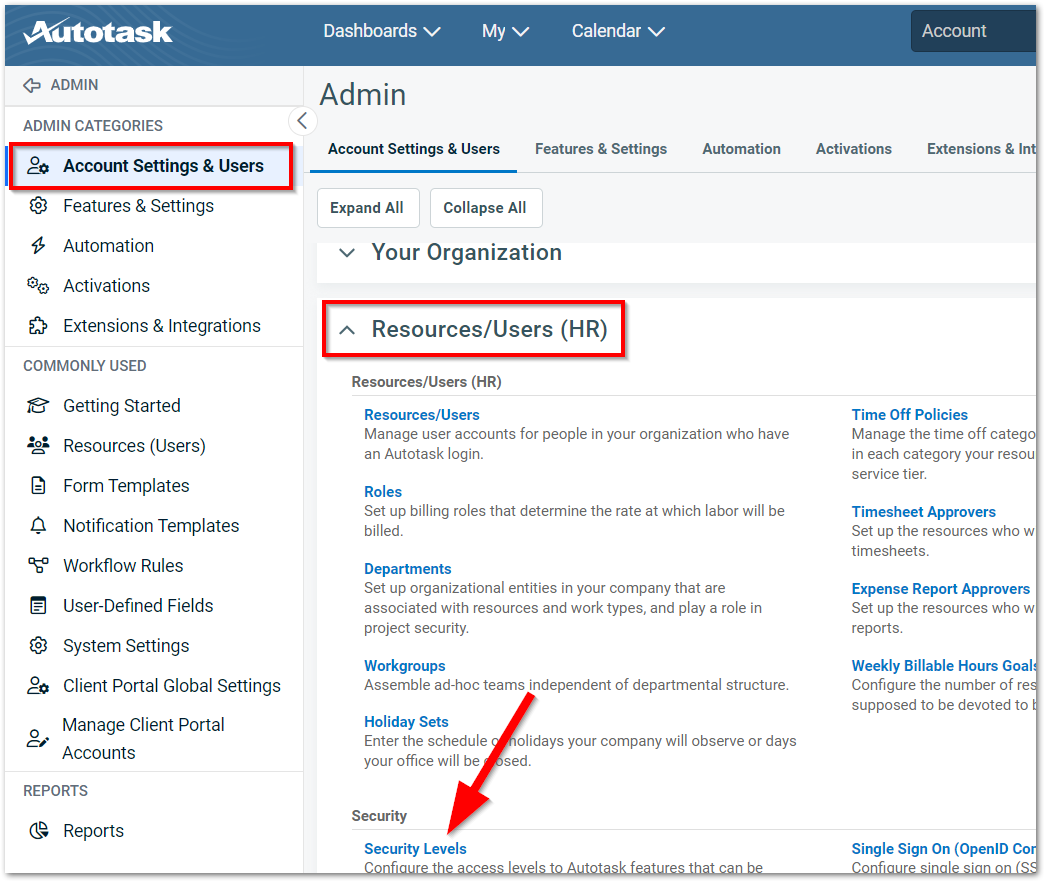
- Navigate to Admin, then Account Settings & Users.
- Expand Resources/Users (HR) and select Security Levels.
- To create a new security level, click the unordered list icon to the left of the API User (system) (API-only) security level and choose the Copy option.
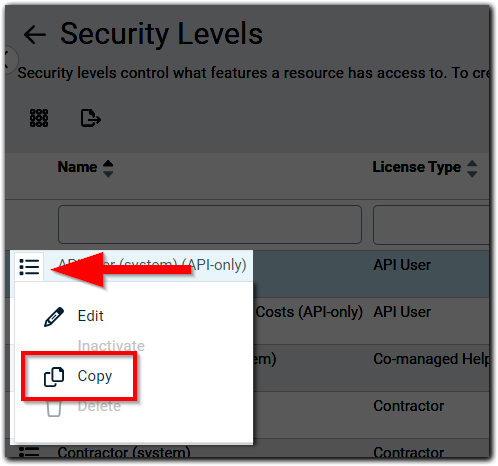
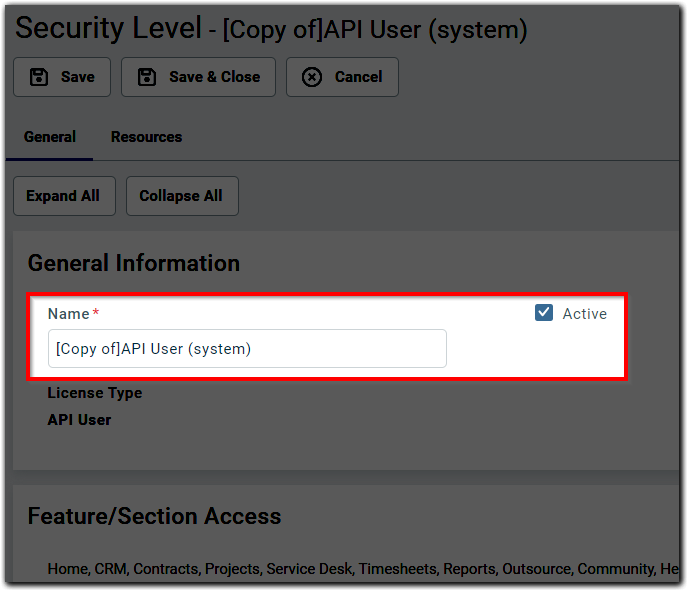
The copy modal displays. - Enter a name for the new security level and select the Active checkbox.
- Set permissions for the API user as follows:
- Contracts
- Object Permissions:
- View = All
- Add = Yes
- Contract Visibility (for contracts you have access to) = Full
- Object Permissions:
- CRM
- Click on the No Permission link and set the following permissions individually:
- Company & Contact Access = All
- Customer & Cancellation = All
- Vendor & Partners = All
- Prospects, Leads, & Dead = None
- Companies: Add = Yes, Edit = All, Delete = All; Rest all fields = None
- Click on the No Permission link and set the following permissions individually:
- Inventory = Click on the No Permission link.
- Projects = Click on the No Permission link.
- Service Desk
- Click on the No Permission link and then set the following permissions individually:
- Object Permissions (Tickets):
- View = All
- Add = Yes
- Edit = Yes
- Delete = All
- Object Permissions (Tickets):
- Click on the No Permission link and then set the following permissions individually:
- Documents & Knowledge base = Click on the No Permission link.
- Timesheets = Click on the No Permission link.
- Reports = Click on the No Permission link.
- Admin
- Click on the No Permission link and then set the following permissions only by checking the checkbox for:
- Resources/Users
- Products, Services, & Inventory
- Click on the No Permission link and then set the following permissions only by checking the checkbox for:
- Contracts
- Once all the permissions are configured, click on Save & Close.
Revoke Autotask Integration
- Log in to NinjaOne Partner Portal.
- Navigate to the Integration page.
- Select Option then Revoke Autotask on the Autotask card.
The system will display the same page with the Connect button active after revoking has been successful.
Connecting to HaloPSA
Complete Partner Setup in HaloPSA:
- Role Creation within HaloPSA
- Agent Creation within HaloPSA
- Application setup within HaloPSA
- Connect to HaloPSA on the Partner Portal
- Create a New Organization Synced with HaloPSA
- Edit an Existing Organization with HaloPSA
- Revoke HaloPSA Integration
Role Creation within HaloPSA
- Launch HaloPSA. Note that the URL is different from partner to partner.
- Navigate to Configuration > Teams & Agents > Roles. Click New to create a new role.
- Fill in the necessary information:
Details:
- Role Name: HaloPSA API role.
- Click Save, then click Edit.
Permissions:
- Feature Access:
- Tickets Access Level: Select "Read and Modify."
- Customers Access Level: Select "Read Only."
- Suppliers Access Level: Select "Read and Modify."
- Software Licensing Access Level: Select "Read and Modify."
- Tickets Permissions:
- Can add new Tickets: Select "Yes."
- Can Edit Tickets Which Are Not Assigned to Them: Select "Yes."
- Ticket Type Restrictions:
- Allow use of all Ticket Types: Select "Yes."
- Client Restrictions:
- Allow use of all Customers: Select "Yes" for convenience. If you want to control access only for specific customers used with the integration, select "No" and choose the relevant customers in the Accessible Customers dropdown.
- Click Save.
Agent Creation within HaloPSA
- Navigate to Configuration > Teams & Agents > Agents.
- Click the New button to create a new agent.
- Fill in the following details for the agent:
Details:
- Account Details:
- Username: Type "API agent."
- Roles: Select "API role."
- Activate "Account Active."
- Activate "Is an API-only Agent."
- Agent Details:
- Default Team: Select "No Default Team."
- Work Hours: Select "Default Working Hours."
- Approval Settings:
- Remove "Can approve Invoices."
- Click Save.
Application setup within HaloPSA
- Navigate to Configuration > Integrations > HaloPSA API.
- Click View Applications.
- Click New to create a new application.
- Enter a meaningful application name and ensure the Active box is checked.
- Set the Authentication Method to "Client ID and Secret (Services)."
- Copy the Client Secret and save it for future reference.
- Set Login Type to "Agent."
- Select the agent created in the previous steps.
- Click on the Permissions tab and select permission type as “all:standard”.
- Click Save and copy the Client ID for future reference.
Connect to HaloPSA on the Partner Portal
- Log in to the Partner Portal.
- Navigate to the Integration menu on the left navigation bar.
- Click the Connect button on the HaloPSA card.
- Fill out the form with the correct credentials and click the Next Step button.
The Site URL can be found at Configuration > Integrations > HaloPSA API > API Details (Remove "/API" from the resource server URL).
Upon successful connection, a success banner will confirm the integration. You will be redirected to the ticket mapping form. Returning to the Integration page will display a Connected badge next to HaloPSA. - Fill out all required fields in the ticket mapping form and click Next Step.
- Upon successful ticket mapping, a banner will confirm completion. You can proceed with organization mapping.Important Note: Clicking the Revoke All Ticket Mapping button resets the ticket mapping form without affecting your HaloPSA connection.
Create a New Organization Synced with HaloPSA
- Follow the standard procedure to create a new organization.
After creating the organization, a pop-up will display all connected integrations. - Click Manage in the HaloPSA section.
The system will redirect you to the Manage Connection page. - Select Customer and Software License, then click Connect. The Connect button will disable if required fields are empty.
Upon successful mapping, a green checkmark will appear, and the unlink button will be accessible.
Edit an Existing Organization with HaloPSA
You can edit the mapping from either the Organization or Integration page:
From the Organization page:
- Select the organization and click View Integration under the menu button.
- Click Manage in the HaloPSA section.
- The system will redirect you to the Manage Connection page; select the Customer and Software License, and then click the Connect button.
From the Integration page:
- Select Manage Connection under the HaloPSA option.
The system will redirect you to the Manage Connection page; select the Customer and Software License, and then click the Connect button.
Revoke HaloPSA Integration
- Log in to the Partner Portal.
- Navigate to the integration page.
- Select Option, and then Revoke Connection on the HaloPSA card.
The system will display the same page with the Connect button active after revoking has been successful.
Connecting to ConnectWise
- Complete Partner Setup in ConnectWise
- Connect to ConnectWise on the Partner Portal
- Create a New Plan with ConnectWise Integration
- Create a New Organization Through ConnectWise Integration
- Set Up a New Security Role in ConnectWise
- Revoke ConnectWise Integration
Complete Partner Setup in ConnectWise
- Launch ConnectWise URL and log in.
- Navigate to System, then go to Members and open the API Members tab.
- Click the New (+) icon.
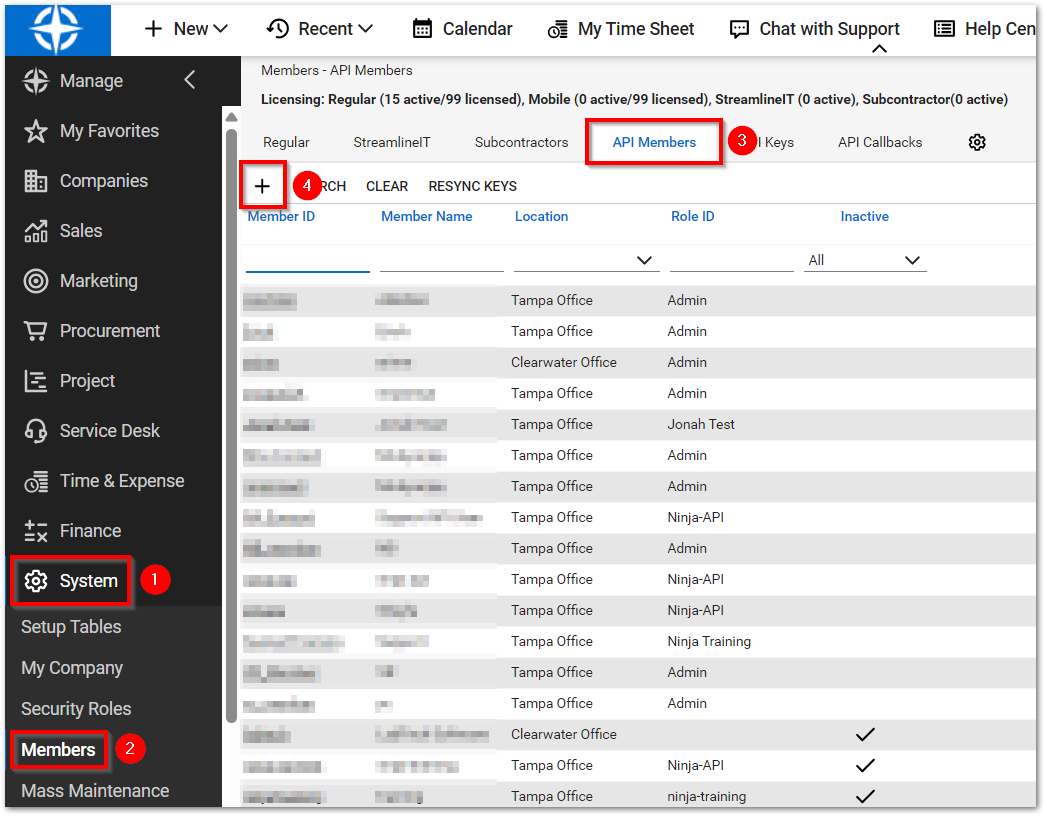
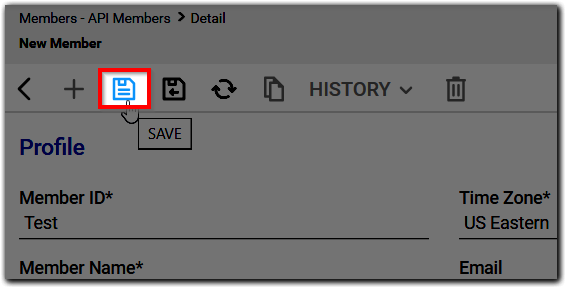
The New Member configuration page displays. - Fill out the required information. You can utilize a custom role in the Role ID field. For guidance on creating a new role, refer to the section titled Set Up a New Security Role in ConnectWise near the bottom of this article.
- Click the Save icon when finished entering all data.
- Navigate to the API Keys tab within the New Member record and click the New (+) icon.

- Enter the description and then click the Save icon.
- Copy both the Public and Private Keys for later use during integration on the Partner Portal.
Connect to ConnectWise on the Partner Portal
- Log in to the Partner Portal.
- Navigate to the Integration menu on the left navigation bar.
- Click the Connect button on the ConnectWise card.
- Fill the Site URL and Company Identifier fields with valid values, then use the Public and Private Keys generated from the ConnectWise platform (section above). Click Next Step.
- Site URL: ConnectWise Manage cloud URL. Please note that this URL should have the prefix "api" (e.g.: api-na-myconnectwise.net).
- Company Identifier: Identifier for the MSP's company.
- Public Key: The public API Key generated from Step 6 of the section above.
- Private Key: The private API Key generated from Step 6 of the section above.
Upon successful connection, a success banner will appear, and you'll be redirected to the ticket mapping form.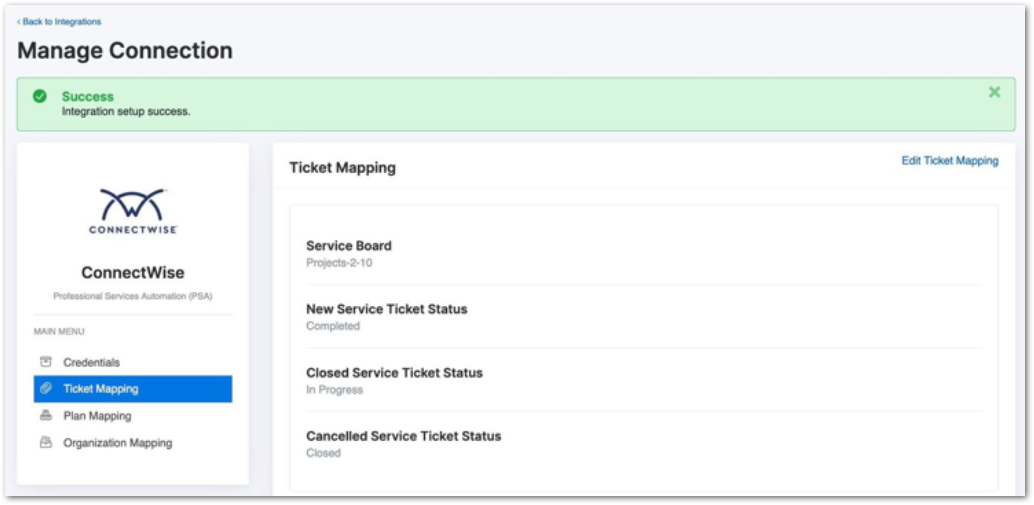
- Select the appropriate options, and then proceed by clicking Next Step. It is important to note that all fields are mandatory, so make sure none are left blank.
Upon successful ticket mapping, a banner will be displayed confirming the completion of the ticket mapping setup. You can then proceed to perform plan and organization mapping as needed.
Create a New Plan with ConnectWise Integration
- From the newly created plan modal, click Manage to map the plan.
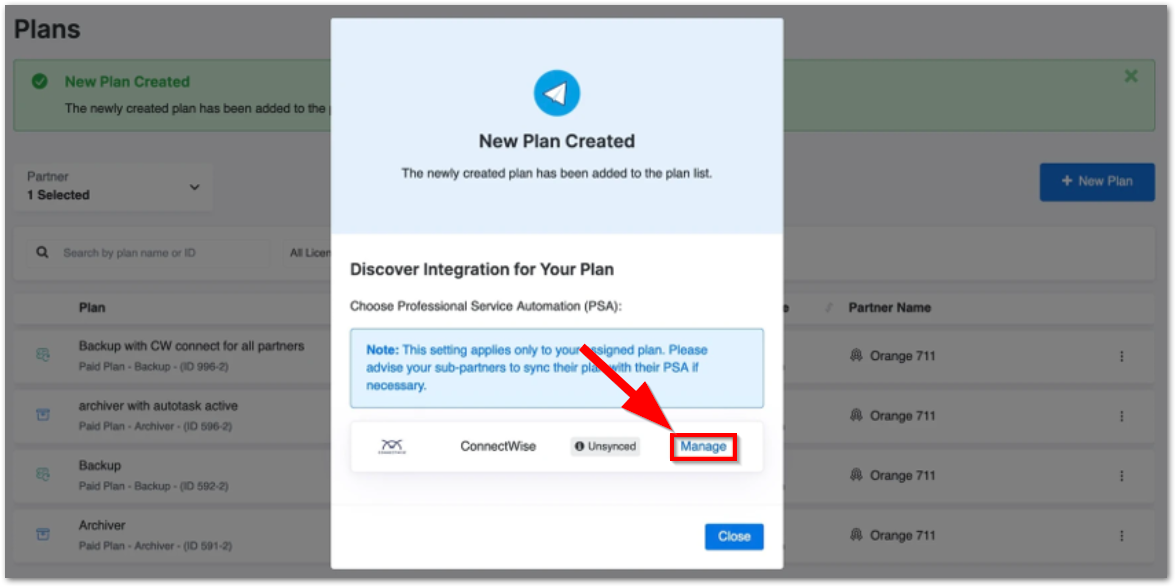
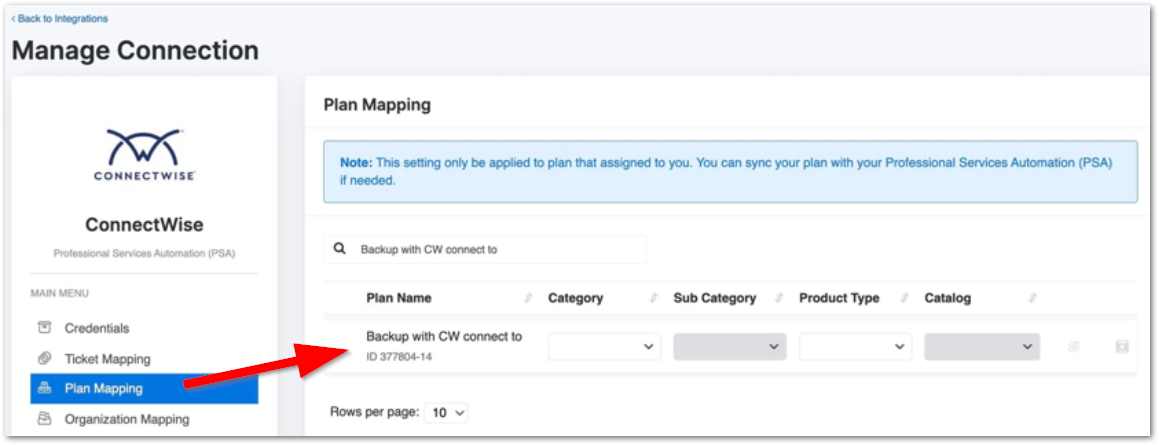
You'll be redirected to the Integration page for mapping. - Select the Category, Subcategory, Product Type, and Catalog from the available options, then click Connect. Please note that the Connect button will be disabled if any of the required columns are left empty.
After successfully mapping the plan, you will notice a green checkmark indicating success, and the Unlink button will appear. - Upon returning to the plan page, click on the Menu button (three vertical dots) and select View Integration.
You will now see the Synced badge indicating that the plan is synchronized with the integration.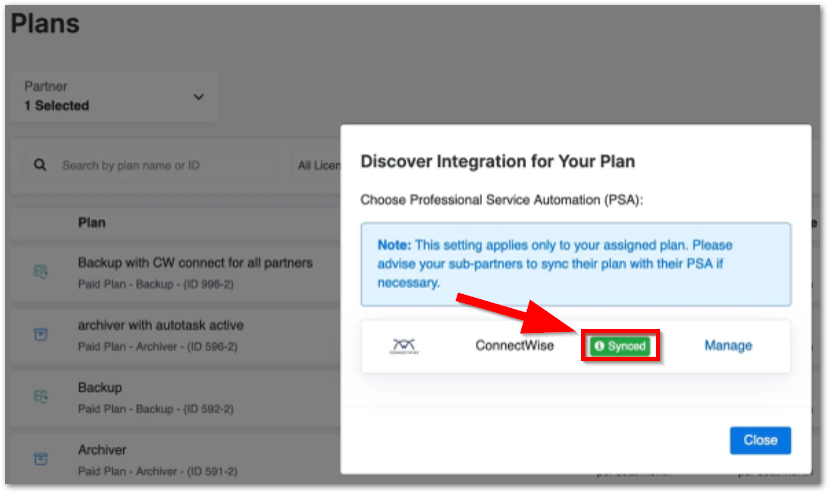
Edit Existing Plans Mapped with ConnectWise Integration
- Click Menu, then select View Integration.
A popup will appear. - Click Manage to proceed with mapping the plan with ConnectWise.
You will be redirected to the Integration page. - Please continue to select the Category, Subcategory, Product Type, and Catalog until the synchronization process is successfully completed.
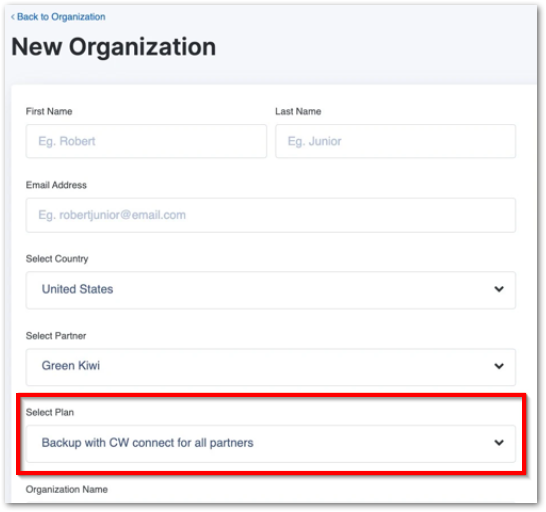
Create a New Organization Through ConnectWise Integration
There is no change in the process compared to the existing flow for creating an organization when connected to ConnectWise.
- Select the plan that is synced with the ConnectWise integration.
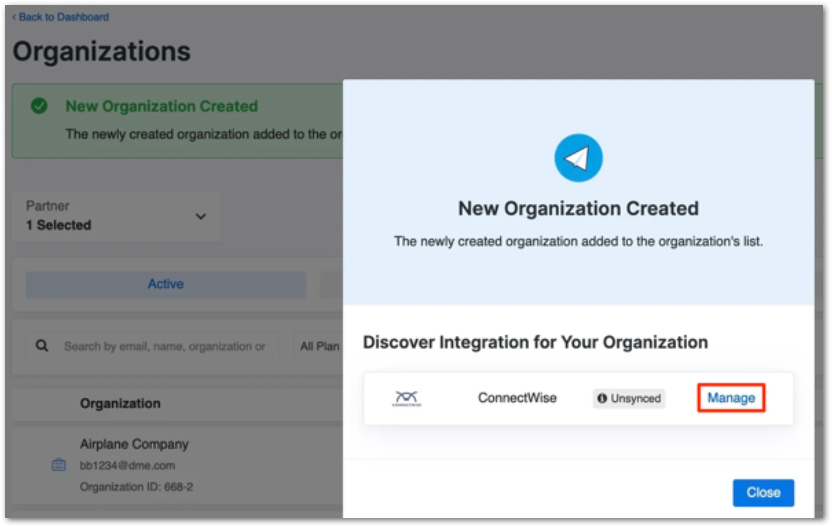
Upon successful organization creation, a new modal will appear for mapping requirements. - Click the Manage button to redirect you to the Integration page.
- Select Company, Agreement, and Agreement Addition from the available options.
- Click Connect to proceed with the mapping. Please note that the Connect button will be disabled if any of the required columns are left empty.
- Upon successful organization mapping, a green checkmark will appear, and the Unlink button will be displayed.
Edit an Existing Organization and Map with ConnectWise
Option 1: Using the Integration Page:
- Navigate to the Integration page.
- Click Option and select Manage Connection under the ConnectWise section.
- Locate the organization you want to edit in the Organization Mapping section.
- Select the appropriate Company, Agreement, and Agreement Addition.

- Click Connect to map the organization with ConnectWise.
Option 2: Using the Organization Page:
- Go to the organization page.
- Click on the Menu button (three vertical dots) and select View Integration.
- Click on Manage to proceed.
You will be directed to the Integration page. - Select the Company, Agreement, and Agreement Addition for the organization.
- Click Connect to complete the mapping.
Set Up a New Security Role in ConnectWise
- Launch ConnectWise URL.
- Log in with valid credentials.
- Navigate to System, then Security Roles.
- Click New Item (+ icon).
- Enter the Role ID and save it.
- Specify the required roles and permissions as follows, then click Save:
Companies > Company Maintenance: Add, Inquire
Companies > Configurations: Add, Edit, Inquire
Finance > Agreements: Add, Edit, Delete, Inquire
Procurement > Product Catalog: Add, Edit, Inquire
Project > Project Tickets: Add, Edit, Inquire
Project > Project Tickets - Dependencies: Add, Edit, Inquire
Project > Close Project Tickets: Add, Edit, Inquire
Service Desk > Service Tickets > Add, Edit, Inquire
Service Desk > Service Tickets - Finance > Add, Edit, Inquire
Service Desk > Service Tickets - Dependencies > Add, Edit, Inquire
Service Desk > Close Service Tickets > Add, Edit, Inquire
System > Table Setup > Add, Edit, Inquire
System > Custom Menu Entry > Add, Edit, Delete, Inquire
Revoke ConnectWise Integration
- Log in to the Partner Portal.
- Navigate to the Integration page.
- Select Option then Revoke Connection on the ConnectWise card.
The system will display the same page with the Connect button active after revoking has been successful.
Frequently Asked Questions
- Who has access to the Integration page?
- The guide outlines the sequence from integration connection to plan and organization mapping. Can this sequence be altered, for example, by dealing with organization mapping before plan mapping?
- Can my plan be mapped with multiple integrations?
- Since sub-resellers don’t have access to the Plan page, does it mean that they can’t map their plans with ConnectWise or Autotask?
- Can my organization be connected to multiple integrations?
Who has access to the Integration page?
Master reseller, direct reseller, and sub-reseller with Owner, Super Admin, and Admin roles can access the Integration page.
The guide outlines the sequence from integration connection to plan and organization mapping. Can this sequence be altered, for example, by dealing with organization mapping before plan mapping?
Only ticket mapping is optional. Here are the rules:
You can map plans and organizations before successfully mapping tickets.
You cannot map organizations before successfully mapping plans; otherwise, you'll encounter an error.
Can my plan be mapped with multiple integrations?
Yes, you can map a plan with multiple integrations. You will see both integrations listed.
Since sub-resellers don’t have access to the Plan page, does it mean that they can’t map their plans with ConnectWise or Autotask?
Sub-resellers, despite not having access to the Plan page, can still map plans assigned to them with both ConnectWise and Autotask integrations. They can navigate to the Integration page and click on Plan Mapping.
Can my organization be connected to multiple integrations?
No, an organization can only be connected to one integration. If connected to multiple integrations, one must be revoked.