Topic
This article explains how to set up Platform SSO for your Apple macOS devices with Microsoft Entra ID using NinjaOne. It also walks through the registration process so that the end user can see when their device is enrolled in NinjaOne Mobile Device Management (MDM).
Environment
- NinjaOne MDM
- Apple macOS
- Microsoft Entra
Description
Platform SSO is a technology developed by Apple for macOS that allows identity providers (IdPs) to manage SSO to their enterprise apps based on the user's local login to the device itself. Find more information about this product on the developer site: Platform Single Sign-on for macOS - Apple Support (external link).
Depending on the specific implementation, Platform SSO can allow for different types of functionality. Currently, existing local user accounts on a macOS device will receive a notification to authenticate and register for Platform SSO for their account. Technicians can optionally define the policy to allow for subsequent local user accounts to be created through authentication of the IdP in the local device login window.
Index
- Pre-requisites
- Platform SSO with Microsoft Entra ID
- 1. Deploy the Intune Company Portal app to NinjaOne devices
- 2. Set up the Platform SSO Extension MDM profile in NinjaOne
- 3. Registering with Platform SSO on the device using a Secure Enclave key
- 4. (Optional) Skip the Required Privacy Notice for Microsoft AutoUpdater
- 5. (Optional) Allow Other Users to Log in With Their Entra ID Credentials
- Additional Resources
Pre-requisites
To configure Platform SSO, you must follow certain requirements regardless of the IdP and MDM, though the exact steps may vary depending on the implementation.
- The IdP (such as Microsoft or Okta) must support the Platform SSO protocol.
- The macOS device must be enrolled in MDM.
- The relevant Platform SSO Extension (a native macOS app) must be deployed to the device.
- The Platform SSO Extension MDM profile must be deployed to the device.
Platform SSO supports three authentication methods for users as a protocol. The IdP used for authentication must also support these same methods; otherwise, only a subset of these methods may be available for a particular IdP.
- Secure Enclave-backed key: In most cases, this is the preferred and the most secure authentication method when using Platform SSO with an IdP that supports it. With this authentication method, the user creates a local password for the device. Once Platform SSO is registered, the device generates a hardware-bound cryptographic key that is used for SSO with any websites and apps that are federated with the IdP for authentication.
- As the authentication key is bound to the physical device and is never known to the end user, this allows for a password-free and phishing-resistant authentication method to enterprise apps. With this approach, the local device password effectively acts as a device personal identification number (PIN) used to access only the physical device.
- Smartcard: A smartcard or hard token is used to log into the macOS locally. Once logged in, the same smart card is used for SSO into any apps that are federated with the IdP for authentication.
- Passcode: The user's IDP password is synced with the local device password. This password is used to SSO into any apps that are federated with the IdP for authentication.
- While this does provide an added convenience for the end user as the local device password becomes the same as their IdP password, it does create an added phishing risk. If a malicious third party were to learn the IDP passcode, they could potentially access both the physical device and any enterprise apps federated with the IDP. For this reason, we recommend leveraging a Secure Enclave-backed key when devices are primarily used by a single user.
Platform SSO with Microsoft Entra ID
Microsoft Entra ID supports Platform SSO and all three end-user authentication options.
Users will generally see the initial system notification after both the NinjaOne Agent and Microsoft Company Portal apps are installed on the device, which may take several minutes following the initial MDM enrollment. If the registration notification does not appear, log out of the device locally and then log back in to initiate it.
1. Deploy the Intune Company Portal app to NinjaOne devices
For Platform SSO with Microsoft Entra ID, Microsoft uses the Company Portal app to broker SSO functionality. The Company Portal app can be downloaded from Microsoft here (downloadable package file).
Once downloaded, you can use the following steps to deploy it to your macOS devices enrolled in NinjaOne MDM:
- Within the NinjaOne console, navigate to Administration → Library → Automation.
- Click Add and select Installation.

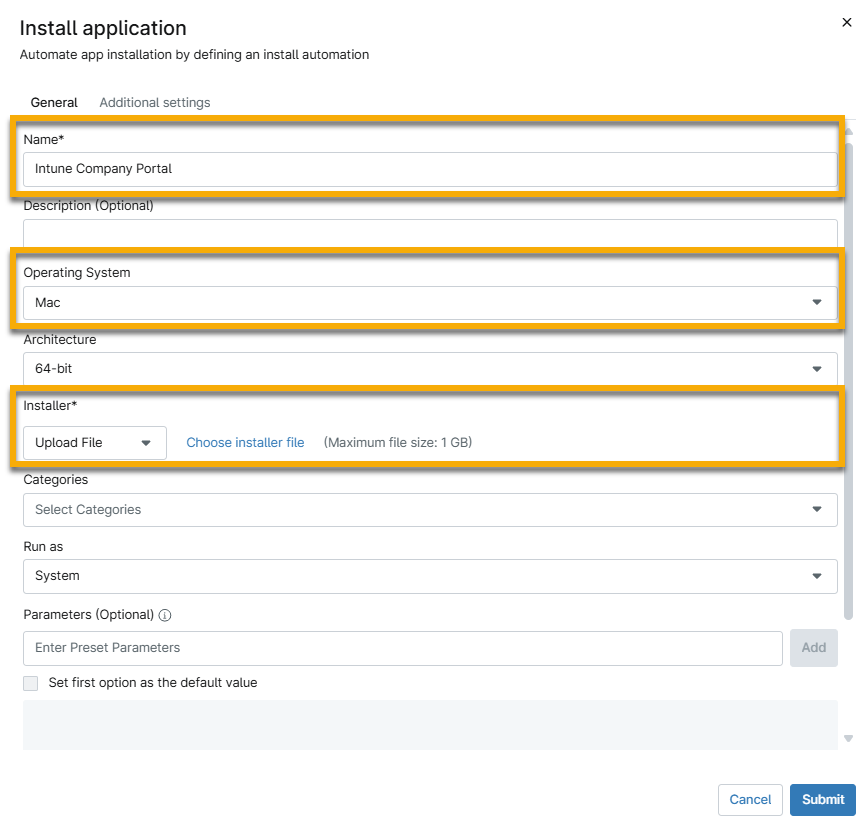
- On the Install Application modal, configure the following settings, and then select Submit.
- Name: Enter a name such as "Intune Company Portal."
- Operating System: "Mac."
- Installer: Leave the drop-down menu at the default Upload File option and click Choose installer file. Upload the Company Portal PKG installer.
- Verify that the configuration passes review and appears in the Automation Library. It may take a few minutes for the installation to validate.
- Add the automation to your Mac policy. Navigate to Administration → Policies → Agent Policies, and create a new policy or edit your existing policy. If you need instructions for creating a new policy, refer to NinjaOne Policies: Create and Manage a Policy.
- Select the Scheduled Automations tab and click Add a Scheduled Automation.
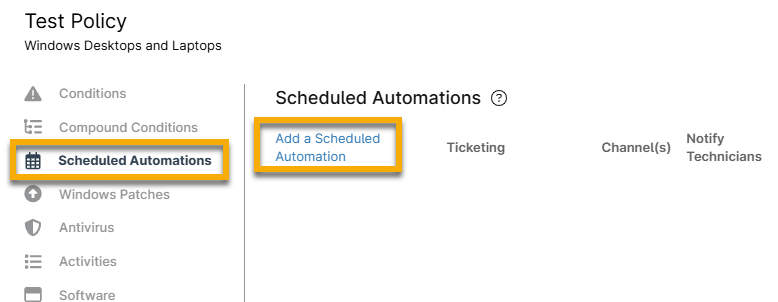
- Give the scheduled automation a name, and choose to run the automation that you uploaded previously in Step 3. Choose an appropriate schedule, such as Run Once Immediately.

- Click Add. Then, save the policy.
The Company Portal app should deploy to all managed macOS devices per your configured schedule.
2. Set up the Platform SSO Extension MDM profile in NinjaOne
You can copy the mobileconfig file at the end of this section and paste it directly into a Custom Payload in a macOS NinjaOne policy to configure Platform SSO with Entra ID.
Consider the following configurable fields:
- AuthenticationMethod: Lines 13–14. Set to one of the following depending on your desired experience:
- UserSecureEnclaveKey
- Password
- SmartCard
- AccountDisplayName: Lines 15–16. This name is displayed to end users during the Platform SSO registration process.
- EnableCreateUserAtLogin: Lines 19–20. If set to "true," new local user accounts will be created automatically after authenticating with Entra ID at the local login screen.
- NewUserAuthorizationMode: Lines 21–22. If creating new users is allowed, set this to one of the following to determine the permission level of the user accounts:
- Standard
- Admin
- UserAuthorizationMode: Lines 23–24. This supports the same values as NewUserAuthorizationMode. The permission applies to an account each time the user authenticates.
- TokenToUserMapping: Lines 25–31. If allowing new local users to be automatically created, this dictionary defines the values from the IDP used for the local Account Name and Full Name.
- AccountName: Lines 28–29. The string value listed in the template represents the first name of the assigned owner of the device (example:
preferred_username). - FullName: Lines 30–31. The string values listed in the template represent the first and last names of the assigned owner of the device (example:
name).
<?xml version="1.0" encoding="UTF-8"?><!DOCTYPE plist PUBLIC "-//Apple//DTD PLIST 1.0//EN"
"http://www.apple.com/DTDs/PropertyList-1.0.dtd">
<plist version="1.0">
<dict>
    <key>PayloadContent</key>
    <array>
        <dict>
            <key>ScreenLockedBehavior</key>
            <string>DoNotHandle</string>
            <key>RegistrationToken</key>
            <string>${device.id}</string>
            <key>PlatformSSO</key>
            <dict>
                <key>AuthenticationMethod</key>
                <string>UserSecureEnclaveKey</string>
                <key>AccountDisplayName</key>
                <string>Entra ID</string>
                <key>EnableAuthorization</key>
                <true />
                <key>EnableCreateUserAtLogin</key>
                <false />
                <key>NewUserAuthorizationMode</key>
                <string>Standard</string>
                <key>UserAuthorizationMode</key>
                <string>Standard</string>
                <key>TokenToUserMapping</key>
                <dict>
                    <key>AccountName</key>
                    <string>preferred_username</string>
                    <key>FullName</key>
                    <string>name</string>
                </dict>
                <key>UseSharedDeviceKeys</key>
                <true />
            </dict>
            <key>ExtensionData</key>
            <dict>
                <key>AppPrefixAllowList</key>
                <string>com.microsoft.,com.apple.</string>
                <key>browser_sso_interaction_needed</key>
                <integer>1</integer>
                <key>disable_explicit_app_prompt</key>
                <integer>1</integer>
            </dict>
            <key>TeamIdentifier</key>
            <string>UBF8T346G9</string>
            <key>ExtensionIdentifier</key>
            <string>com.microsoft.CompanyPortalMac.ssoextension</string>
            <key>Type</key>
            <string>Redirect</string>
            <key>URLs</key>
            <array>
                <string>https://login.microsoftonline.com</string>
                <string>https://login.microsoft.com</string>
                <string>https://sts.windows.net</string>
                <string>https://login.partner.microsoftonline.cn</string>
                <string>https://login.chinacloudapi.cn</string>
                <string>https://login.microsoftonline.us</string>
                <string>https://login-us.microsoftonline.com</string>
            </array>
            <key>PayloadIdentifier</key>
            <string>56DD5560-5BFF-41E5-8197-939FB3374BA3</string>
            <key>PayloadType</key>
            <string>com.apple.extensiblesso</string>
            <key>PayloadUUID</key>
            <string>56DD5560-5BFF-41E5-8197-939FB3374BA3</string>
            <key>PayloadVersion</key>
            <integer>1</integer>
        </dict>
    </array>
    <key>PayloadDisplayName</key>
    <string>Microsoft PSSO</string>
    <key>PayloadIdentifier</key>
    <string>Microsoft.PSSO-EAE14F52-5119-4CF3-AACE-EA485054A4FD</string>
    <key>PayloadType</key>
    <string>Configuration</string>
    <key>PayloadUUID</key>
    <string>EAE14F52-5119-4CF3-AACE-EA485054A4FD</string>
    <key>PayloadVersion</key>
    <integer>1</integer>
</dict>
</plist>
3. Registering with Platform SSO on the device using a Secure Enclave key
To begin this step of the process, the macOS device must be enrolled in NinjaOne MDM. For instructions to do so, refer to
The following steps outline the instructions that the user must perform on their device:
This completes the Platform SSO registration. The user should now be able to use SSO to automatically authenticate any Microsoft Entra ID login prompt. This authentication will be tied to the local account on the macOS device. When they log in to the local account, it will authorize the subsequent SSO based on the Secure Enclave key.
4. (Optional) Skip the Required Privacy Notice for Microsoft AutoUpdater
Normally, when the Company Portal installs, it will also install the Microsoft AutoUpdater automatically and display a Require Privacy Notice that the user must acknowledge.
By deploying the following Custom Payload, you can skip the display of this notice. If you are already deploying a Custom Payload to configure Microsoft AutoUpdate, you can simply include the AcknowledgedDataCollectionPolicy key, with the value set to the string RequiredDataOnly on Line 8–9:
<?xml version="1.0" encoding="utf-8"?>
<!DOCTYPE plist PUBLIC "-//Apple//DTD PLIST 1.0//EN" "http://www.apple.com/DTDs/PropertyList-1.0.dtd">
<plist version="1.0">
	<dict>
		<key>PayloadContent</key>
		<array>
			<dict>
				<key>AcknowledgedDataCollectionPolicy</key>
				<string>RequiredDataOnly</string>
				<key>PayloadType</key>
				<string>com.microsoft.autoupdate2</string>
				<key>PayloadDisplayName</key>
				<string>Microsoft AutoUpdate Settings</string>
				<key>PayloadIdentifier</key>
				<string>0F4CE0C7-22AD-454C-B9FE-FF025EED58EF</string>
				<key>PayloadUUID</key>
				<string>0F4CE0C7-22AD-454C-B9FE-FF025EED58EF</string>
				<key>PayloadVersion</key>
				<integer>1</integer>
			</dict>
		</array>
		<key>PayloadDisplayName</key>
		<string>Microsoft AutoUpdate Settings</string>
		<key>PayloadIdentifier</key>
		<string>CB4A399D-1CCF-458C-A192-AD1066F7E7B6</string>
		<key>PayloadUUID</key>
		<string>CB4A399D-1CCF-458C-A192-AD1066F7E7B6</string>
		<key>PayloadType</key>
		<string>Configuration</string>
		<key>PayloadVersion</key>
		<integer>1</integer>
	</dict>
</plist>
5. (Optional) Allow Other Users to Log in With Their Entra ID Credentials
If the Platform SSO MDM profile is configured with EnableCreateUserAtLogin set to "true," then other users will be able to log in to the device using their Entra ID credentials.
From the login page, choose to log in with an "Other…” user, and then enter in the Entra ID username and password directly into the fields. The local user account will automatically get created, with the account name and display name populated from the lookup values in the TokenToUserMapping dictionary from the MDM profile.
Additional Resources
Refer to the following resource(s) to learn more about SSO and other identity management services in NinjaOne: Identity Authentication and Management: Resource Catalog.