Topic
This guide describes how to dynamically create NinjaOne technicians or end users via SCIM based on Microsoft Entra ID group membership.
Environment
- NinjaOne Integrations
- Microsoft Entra ID
Description
These steps outline the creation of Microsoft Entra ID User Roles, assigning those roles to Microsoft Entra ID Groups, and configuring SCIM to provision End User and Technician accounts within NinjaOne.
Select a category to learn more:
- Create and Assign User Roles to Groups in Microsoft Entra ID
- Provision and Map User Attributes
- Group Mapping in NinjaOne
Create and Assign User Roles to Groups in Microsoft Entra ID
- Access the Microsoft Entra admin center and navigate to Applications → App registrations in the side navigation menu.
- Select the enterprise application created for Single Sign-On and SCIM with NinjaOne.
Figure 1: Applications → App registrations (click to enlarge)
- In the Manage flyout menu that opens, click App roles.
- Click Create app role.
- The Edit app role modal will open.
Figure 2: App roles → Create app role → Edit app role (click to enlarge)
- Configure the role as follows:
In the Display Name field, enter Technician for technician accounts or endUser for end-user accounts.
Set the Allowed member types to Both (User/Groups + Applications).
Copy the Display name you created into the Value field.
- Input a brief description of the role's purpose in the Description field.
Select the check box below the Do you want to enable this app role? field.
- In the Microsoft Entra side navigation menu, navigate to Applications → Enterprise applications.
- Select the enterprise application created for Single Sign-On and SCIM with NinjaOne.
Figure 3: App roles → Create app role → Edit app role (click to enlarge)
- In the Manage flyout menu that opens, select Users and groups.
- Select the check box of the target group for the desired role
- Navigate to Edit Assignment.
- In the Select a role field, click None Selected.
- The Select a role modal opens. Click the check box for the role you'd like to assign.
- Click Select to save your changes.
Figure 4: Select a role (click to enlarge)
Provision and Map User Attributes
- Select Provisioning from the Manage flyout of the NinjaOne Enterprise Application.
Figure 5: Enterprise applications → Provisioning (click to enlarge)
- Select Attribute mapping → Provision Microsoft Entra ID Users.
- Select the Show advanced options check box.
- Click Edit attribute list for customappsso.
Figure 6: Advanced options (click to enlarge)
- Add a new attribute to the Edit Attribute list with the following characteristics:
- Name: urn:ietf:params:scim:schemas:extension:ninjaone:2.0:User:userType
- Type: String
- Required: Not selected
- Navigate back to Provisioning → Attribute mapping → Provision Microsoft Entra ID Users.
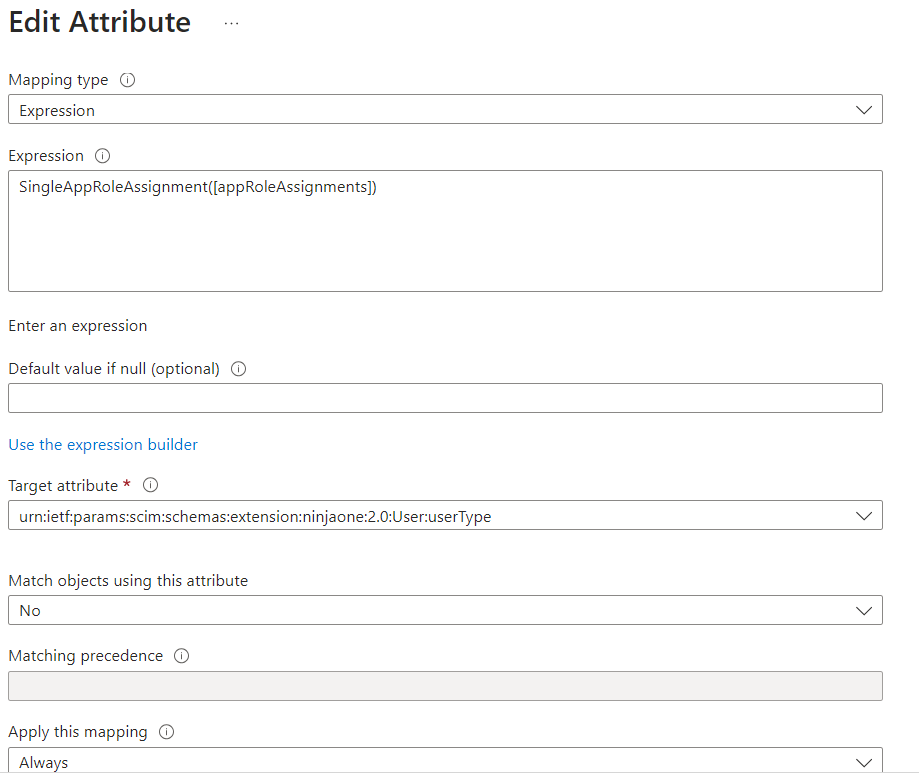
- Select Add New Mapping and configure the fields as follows:
- Mapping type: Expression
- Expression: SingleAppRoleAssignment([appRoleAssignments]) When pasting, be sure not to include spaces on either side of this expression, or it will not work.
- Target attribute: urn:ietf:params:scim:schemas:extension:ninjaone:2.0:User:userType
- Match objects using this attribute: No
- Apply this mapping: Always
Figure 7: Edit Attribute (click to enlarge)
Good to Know
To map end users to their correct organization, you'll need to add and configure the OrganizationID attribute. To learn how to configure this attribute, refer to NinjaOne Identity Management: Identity management (SCIM) With Okta.
To create global end users, use All as the user's organization ID.
Group Mapping in NinjaOne
Once you've provisioned the group in Microsoft Entra ID, it will appear in the Group Mapping section of the Administration → Accounts → Identity Providers page in the NinjaOne console. For further details about how to set up Group Mapping, review System for Cross-domain Identity Management (SCIM) with Okta.
Figure 8: Editing an identity provider (click to enlarge)