Topic
This article explains how to create a technician and configure their account in NinjaOne.
Environment
NinjaOne Platform
Description
There are two types of users in NinjaOne: technicians and end users. Technicians have access to the core platform to monitor the health of devices. End users have access to the self-service portal to submit tickets and access their devices remotely.
To learn how to create an end user account, refer to NinjaOne Platform: Create or Import End User Accounts.
Index
Select a category to learn more:
- Adding New Technicians
- Adding a System Administrator
- Importing Technicians in Bulk
- Resetting User Passwords
- Additional Resources
Adding New Technicians
To add a technician in NinjaOne, perform the following steps:
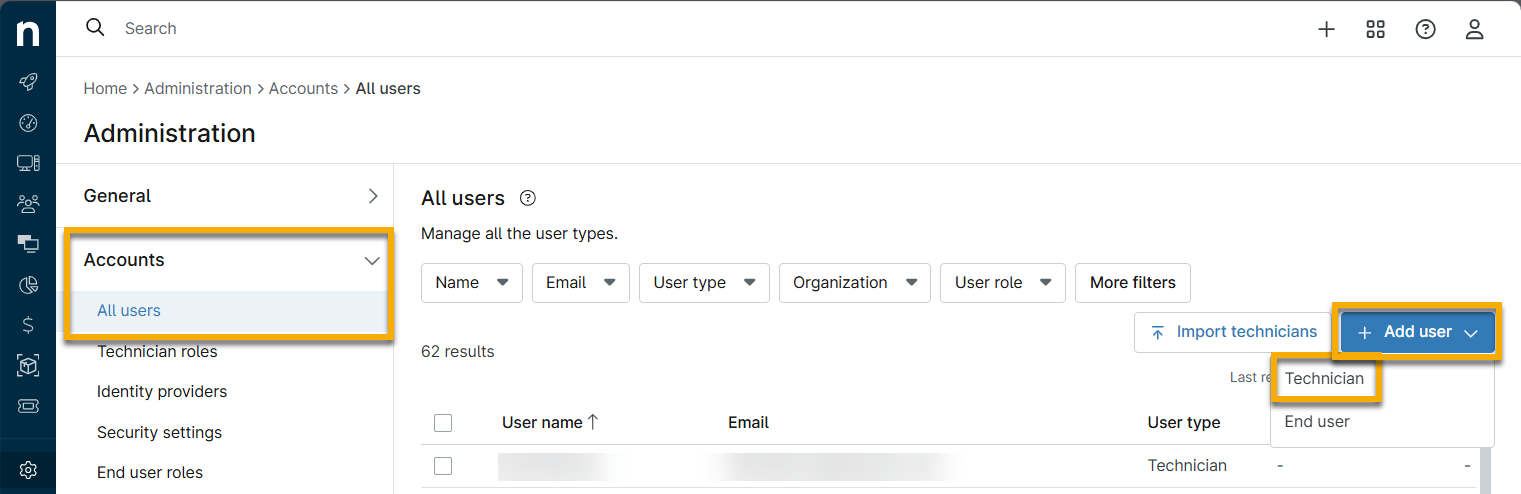
- Navigate to Administration → Accounts → All users and click Add user.
On the account configuration page, enter the new user's Basic Details in the General section. If you do not enter a phone number, the user will be prompted to enter their mobile phone number upon registration. NinjaOne uses this number if the user opts to use text-based authentication prompts and receive notifications, if configured. Refer to Login Security: Configure Single Sign-On in NinjaOne for more information.
For a list of phone numbers NinjaOne uses for Short Message Service (SMS) notifications, refer to NinjaOne SMS Phone Numbers.In the General → Display tab, select the user's preferred language, designate a user idle warning time, and choose whether you'd like them to view the Getting Started page upon login.
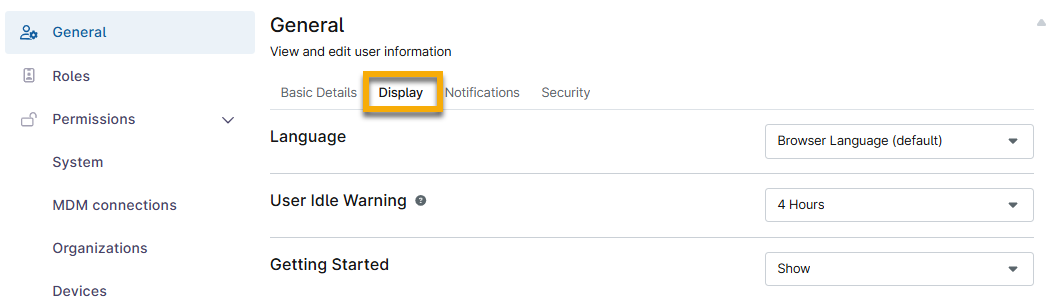
Figure 2: Configure the new technician's display settings - The default User Idle Warning is 1 hour, but you can set it to a maximum of 24 hours. This prompts the user and signs them out if they do not respond to the prompt.
- NinjaOne applies the selected User Idle Warning timeframe when the console is open in a browser (even if the tab is inactive).
- We recommend manually logging out of NinjaOne when you are no longer using the app, as this is still the best security practice.
In the General → Notifications tab, you can enable this user to receive notifications for alerts either from all organizations or selected organizations based on the user's organization access. You can then configure a schedule and severity or priority settings for both email and SMS alerts. Refer to NinjaOne Platform: Permission Settings for Technicians for more information.

Figure 3: Configure the new technician's notification settings - You must assign a technician to a role for them to receive notifications.
- The assigned Severity and Priority settings work in tandem with the severity and priority assigned to NinjaOne conditions or activities that are configured to send notifications. Users receive notifications for conditions or activities that match both their assigned selected severity or priority, and any higher severities or priorities.
- NinjaOne sends email and SMS notifications to the email and phone number assigned to the user. Notifications that trigger outside of the set schedule will not be delivered to the user at any point.
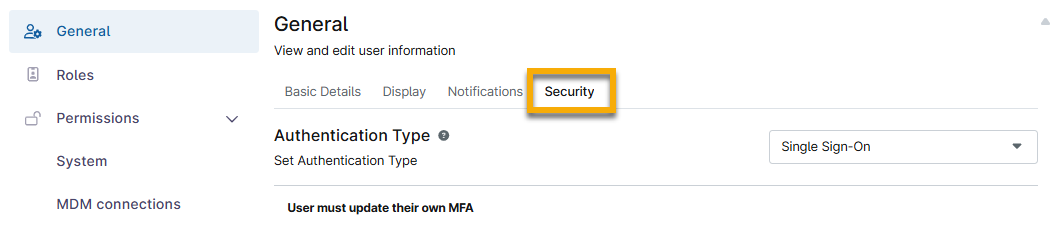
- In the General → Security tab, choose what type of authentication they will use to sign in. The user will be prompted to set up MFA (Multi-Factor Authentication) during registration. To learn more about these options, refer to Login Security: Configure Single Sign-On in NinjaOne and NinjaOne MFA: Multi-Factor (2-Factor) Authentication for details.
- Finally, either assign the user to a role (or multiple roles) or set up their explicit permissions. For more information about roles, refer to User Role Permissions. For more information about the available permissions, refer to NinjaOne Platform: User Permissions and Options.
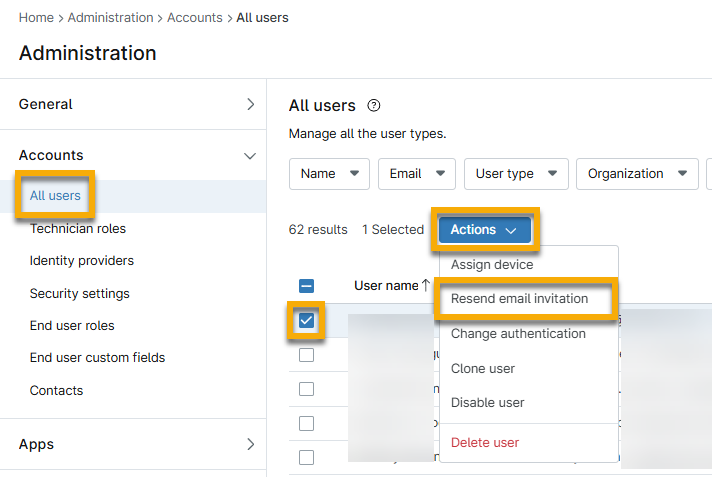
- Saving the new user will trigger an email invitation to be sent to the user, prompting them to complete the setup of their new NinjaOne account. If needed, you can resend this invitation by clicking Resend Invite next to the technician's name on the user list. This invitation expires after 24 hours.
Upon clicking Accept Invitation, the new user is prompted to create their password and set up MFA.
When a user has successfully completed registration, the Email invitation column status changes from "Pending" to "Registered" on the All users page. If a system administrator changes the user's email address while the invitation is still pending, NinjaOne will send a new invitation to the updated email address.
The system will log a user out of all open sessions when:
- Configuring self-MFA
- Resetting a password
- Configuring an email
- Configuring a phone number
Adding a System Administrator
To create a system administrator, you can use the instructions in the previous section. You will specify the designation of system administrator through a role:
- In the Roles section on the account configuration page, click Add Role and then select from the modal.
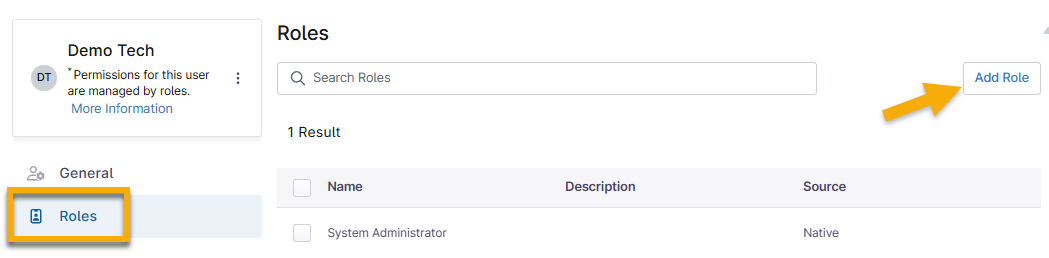
- In the configuration modal, select System Administrator and then click Add Selected Role.
- Click Save Changes.
Importing Technicians in Bulk
The Import Technicians tool allows you to paste in tab-delimited comma-separated value (CSV) data, which NinjaOne will automatically detect and extract the values corresponding to each column. NinjaOne validates the data to ensure accuracy before importing it; invalid data formats or values will cause the entire import to fail.
If you want to use an application programming interface (API) endpoint for import, use POST ws/appuser/bulk-import.
Email addresses should not contain Umlauts (German) as this will cause the import to fail. Do not include punctuation for names or dashes for phone numbers. Do not start or end an email with a period (dot) or hyphen (dash).
When importing technicians in bulk, you are required to provide the following data:
- First Name: This field cannot be blank or empty and must use letter characters only. The system accepts a maximum of 150 characters per value.
- Last Name: This field cannot be blank or empty and must use letter characters only. The system accepts a maximum of 150 characters per value.
- Email: This field must be unique to the system (that is, not currently in use for an existing technician or end user account) and must follow the format
<local-part>@<domain-part>. The system accepts a maximum of 64 characters per value.
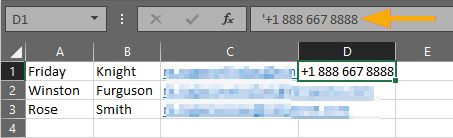
- Phone Number (optional): This field must include the country code. If you are using an Excel file to organize this data, Excel will think you are providing a formula when you use + to add the country code at the beginning. To prevent this, add an apostrophe before the +. NinjaOne will validate the number based on the rules of the corresponding country; if an invalid phone number is provided, the entire import will fail.
- Country code: +1
- Phone number: 888 667 8888
- Format should be: '+1 888 667 8888 (you must add an apostrophe before the plus (+) sign).
To import technicians:
If you are not using Microsoft Excel to copy and paste (for example: a Microsoft Windows server that doesn't have Office installed) a tab-delimited export is acceptableif you set the view to just the Name, Last Name, Email Address, and Business Phone columns, then export as a tab-delimited text file and strip the header row in Notepad before you copy and paste.
- Navigate to Administration → Accounts → All users and then click Import Technicians.
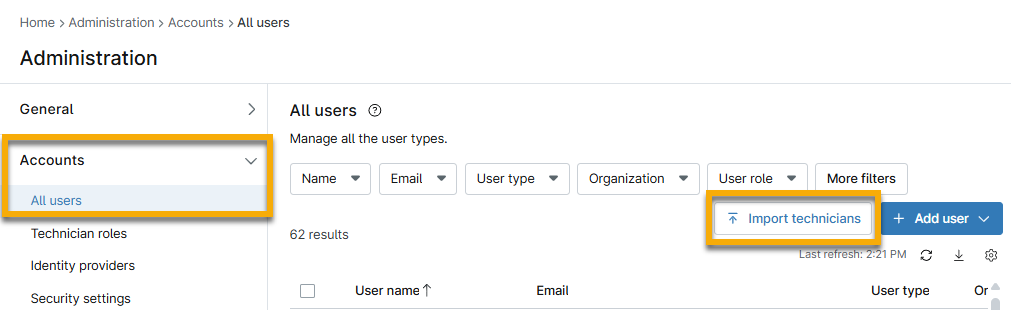
- Paste the CSV content directly into the modal and click Import.
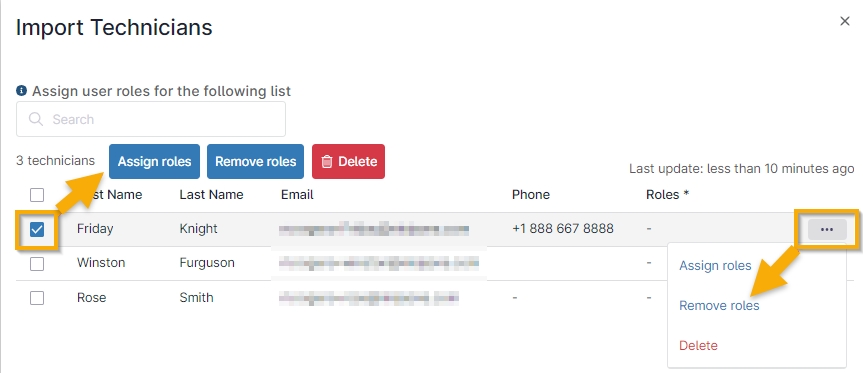
The data will display on the screen for you to confirm or assign roles at your discretion.
Assign Individual Roles in Bulk Import
When you import the technicians, you can assign them to roles by selecting one or more checkboxes and then clicking Assign roles (this process also grants you the opportunity to delete any technicians from this list). Alternatively, move your cursor over the name and click the ellipses to view the same options.
You do not need to assign roles to technicians when importing them into NinjaOne; this step is optional.
Resetting User Passwords
Navigate to Administration → Accounts and select a user from the list. Then, in the Basic Details tab of the General settings, click Change Password.
As soon as you click OK on the reset password prompt, the user will automatically log out (if they were logged in). The password reset email link will expire 24 hours after you send it.

Additional Resources
For information about the different options available in each subsection, refer to User Permissions: Permission Options.
For all other information about user management, refer to User Management: Resource Catalog.