Topic
This article explains how to create automations for NinjaOne Ticketing.
Environment
NinjaOne Ticketing
Description
Ticketing automations can be used to streamline workflows by automatically assigning tags, users, priority, and more. Some automations update tickets when triggered by "ANY" or "ALL" specified conditions. When the selected or combined condition(s) are met, a ticket is automatically updated with the criteria that were configured for that automation.
Select a category to learn more:
- How Ticketing Automation Works
- Create Automation Rules for the Ticketing Application
- Frequently Asked Questions About Ticketing Automations
- Additional Resources
How Ticketing Automation Works
You can configure automation for NinjaOne Ticketing by using the Triggers and Templates tabs on the application configuration page (Administration → Apps → NinjaOne Ticketing).

Figure 1: Ticketing automation → Triggers and templates
The following table provides a description for each automation type:
| Automation Type | Description or Purpose |
|---|---|
| Triggers | |
| Event-based | These automation rules trigger when any or all of the specified conditions are met. Conditions can include actions (ticket created), business hours, ticket type or status, assigned organization, associated custom fields, and more. |
| Time-based | These automations trigger based on conditions pertaining to events and time. This option can be used to enable notifications for tickets that have been open and are not meeting timelines. Important Note: The more conditions you add under ALL, the narrower the requirements will be for that ticket to be routed to the board. If you have conditions under both ALL and ANY, and the ticket meets the ANY conditions but not the ALL conditions, then the ticket will not be routed to the board. |
| Templates | |
| Activity rules | These automation rules can be used for system activities. When a ticket is created, it will use the fields configured for the selected ticketing form. Refer to Device and System Activity Notification Feed for more information about using ticketing rules when managing system activities. |
| Condition rules | Configure the settings to be used on ticket creation and updates from conditions. When a ticket is created, it will use the fields configured for the selected ticketing form. For this automation, you can select what happens when the condition is reset or retriggered. Refer to Policies: Condition Configuration for more information about using ticketing rules when configuring conditions. |
| Script rules | These automation rules can be used for scheduled automations at the policy level. When a ticket is created, it will use the fields configured for the selected ticketing form. Refer to Policies: Scheduled Automations for more information about using ticketing rules with scheduling automations. |
| Response templates | The response template automation creates a canned template that allows for a quick response to common tickets. You can use it to add a comment or perform a different action on a ticket. Response templates can be added from the ticket page. Refer to NinjaOne Ticketing: Ticket Handling for more information about using response templates. |
Create Automation Rules for the Ticketing Application
To configure ticketing automations, perform the following steps:
- Go to Administration → Apps → NinjaOne Ticketing.
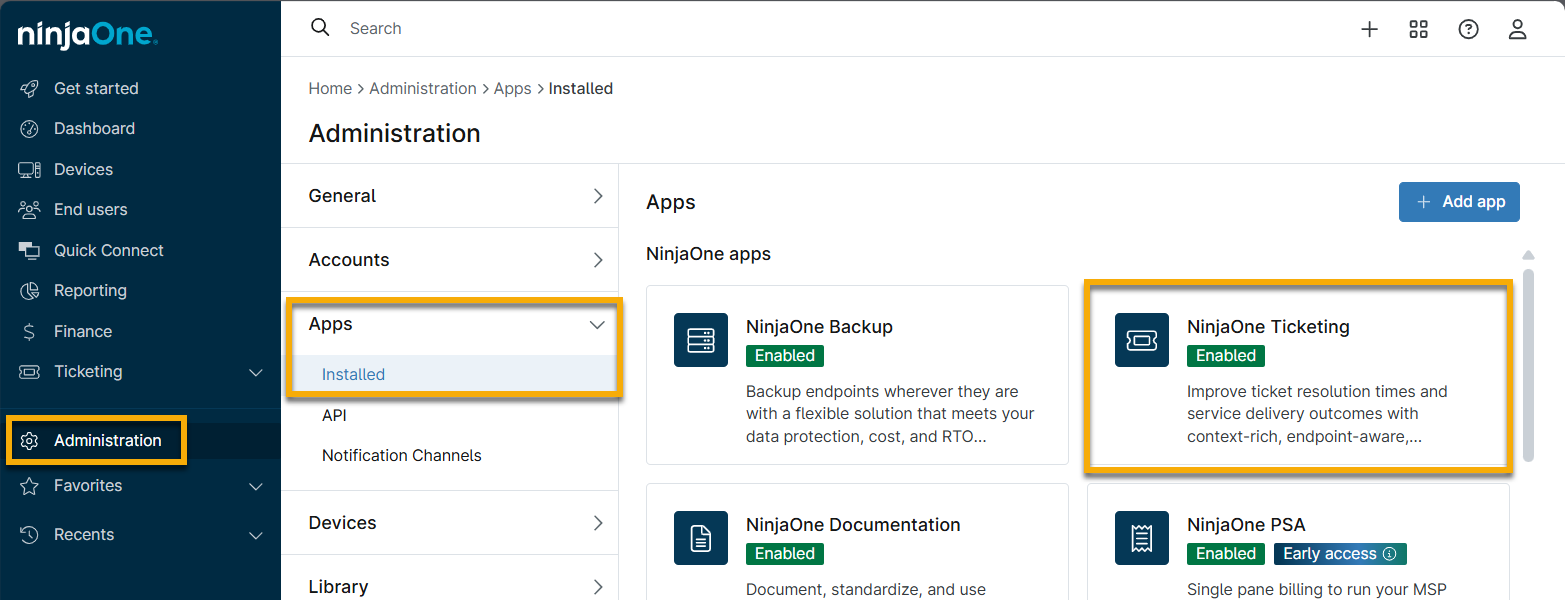
Figure 2: Access the NinjaOne Ticketing application
- Use either the Triggers or Templates tabs to create ticketing automations. Select a category to see instructions based on your automation needs:
Ticketing Automations: Triggers
Select which type of trigger automation you would like to create for NinjaOne Ticketing:
Create Event-based Ticketing Automations
To create an event-based rule, perform the following steps:
- Open the Event Based tab and click Add to begin.
- Use the toggle switch to enable the condition and enter a unique identifier into the Name field.

Figure 3: Event-based ticketing automation → General information → Enable
- Open the Conditions tab.
- Click Add condition under either Meets all conditions or Meets any conditions classifications. Once you decide the conditions, you can select the action that will be taken for that criterion in the Actions tab (which we will explain in Step 5). You will also see options to add custom fields that were configured for automation (refer to Custom Field Setup for more information). For a description of each condition offered in the drop-down menu, refer to NinjaOne Ticketing: Automation Configuration Definitions.
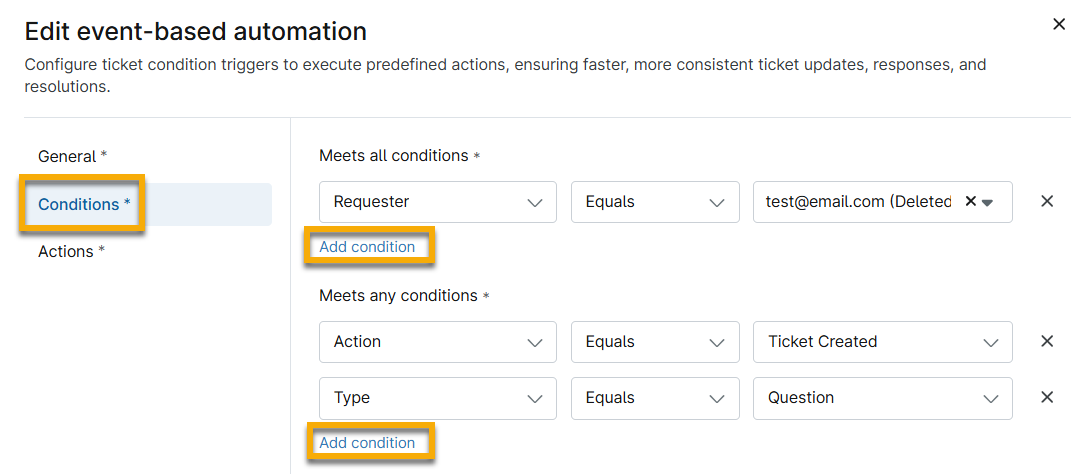
Figure 4: Event-based ticketing automation → Conditions
Note that tickets can exist on multiple boards simultaneously, and if the conditions for a specific board are no longer met then it will be removed from that board.
- Open the Actions tab and add at least one action to perform when the condition(s) is met. For a description of each action offered in the drop-down menu, refer to NinjaOne Ticketing: Automation Configuration Definitions.
- Click Save.
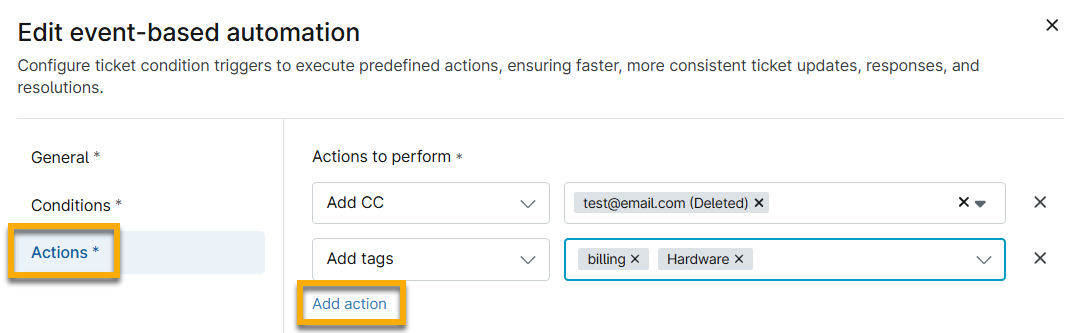
Figure 5: Event-based ticketing automation → Add actions to trigger when conditions are met
Create Time-based Ticketing Automations
To create a time-based rule, perform the following steps:
- Open the Time-based tab and click Add to begin.
- Enter a name and optional description.
- In Conditions, click Add under either the ALL or ANY classifications to determine what tickets will be routed to the board. For a description of each condition offered in the drop-down menu, refer to NinjaOne Ticketing: Automation Configuration Definitions.
Note that tickets can exist on multiple boards simultaneously, and if the conditions for a specific board are no longer met it will be removed from that board.
- Next, open the Actions tab and add at least one action to perform when the condition is met. Then, click Save. For a description of each action offered in the drop-down menu, refer to NinjaOne Ticketing: Automation Configuration Definitions.
- Add tags and Add CC will publish new tags and contacts in addition to the ones originally created with the ticket. In contrast, Set tags and Set CC will clear all current tags and contacts and publish the new tags or contacts.
- Send Notification allows users to have the automation send a notification to a configured Notification Channel.
Ticketing Automations: Templates
Select which type of template automation you would like to create for NinjaOne Ticketing:
Activity Rule
To create an activity rule, perform the following steps:
- Select Templates → Activity rules and click Add to begin.
- When creating or editing a new activity rule, several options can be configured in the Ticket creation tab. For a description of each option, refer to NinjaOne Ticketing: Automation Configuration Definitions.
- Once you have completed the configuration, click Save.
Once saved, you can select the checkbox next to the template name to edit it, make it default (if applicable), or delete it. You cannot delete a template that is set as the default.
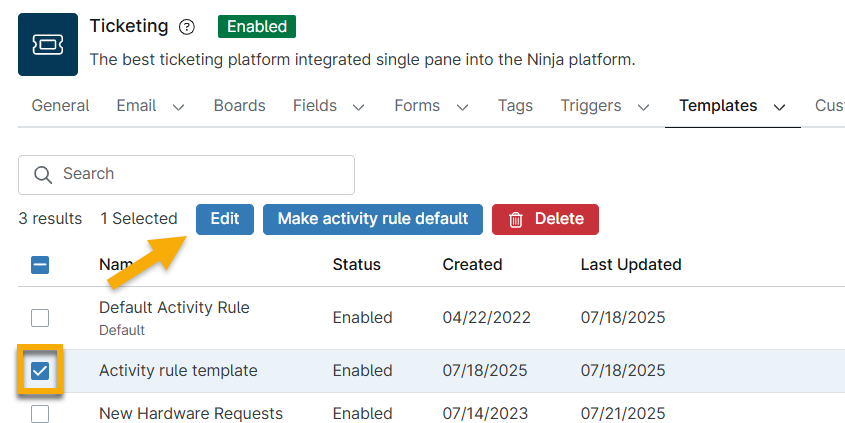
Figure 6: Activity rule template automation → Template actions
Condition Rule
Condition rules provide automation for how Ticketing handles incoming tickets triggered by NinjaOne conditions.
- Open the Templates → Condition rule tab and click Add to begin.
- In the General section, use the toggle switches to enable the condition. Assign a name to the new condition rule.
- Configure the settings in the Ticket creation tab. An asterisk (*) indicates that the field is required. For a description of each option offered in the drop-down menu, refer to NinjaOne Ticketing: Automation Configuration Definitions.
- Open the On Condition Reset tab and configure the ticket behavior when the NinjaOne condition is reset. Select the new status for the ticket in this case, as well as any time that should be automatically applied to the ticket timer.
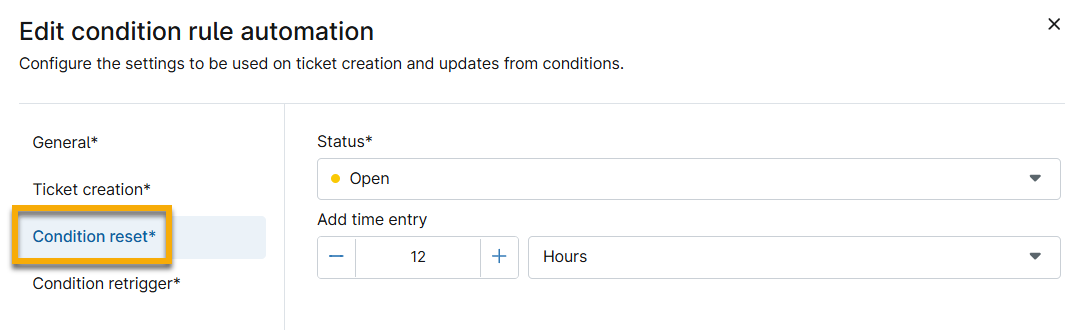
Figure 7: Condition rule template automation → Condition reset
Open the On Condition Retrigger tab and configure the ticket behavior for situations in which the NinjaOne condition re-triggers after having been reset.
The Action field determines whether the previously existing ticket should be appended or if a new ticket should be opened, in addition to the status for the appended or new ticket.- Click Save.
Response Template
The response template automation allows for a quick response to common tickets.
- Open the Templates → Response template tab and click Add to begin.
- Use the toggle switches to enable the condition and assign a unique identifier to the Name.
- In the Actions tab, click Add action to select the action this response template will execute. For a description of each action offered in the drop-down menu, refer to NinjaOne Ticketing: Automation Configuration Definitions.
- Click Save.
Script Rule
Script rules provide automation for how Ticketing handles incoming tickets triggered from scheduled scripts.
- Open the Templates → Script rules tab and click Add to begin.
- Use the toggle switches to enable the condition and give the Name a unique identifier.
- Configure the settings in the Ticket creation tab. An asterisk (*) indicates that the field is required. For a description of each option offered in the drop-down menu, refer to NinjaOne Ticketing: Automation Configuration Definitions.
Enable or Deactivate Automations in Bulk
Technicians with access to the Ticketing permission for Administrative Actions can enable or deactivate automations in bulk. For more information about permissions, refer to
FAQ About Ticketing Automations
For more FAQ, please refer to NinjaOne Ticketing: FAQ.
- Is there a way to modify the messaging on automated responses in the ticketing system?
- How can I automate tickets for patch failures?
- How can I receive reminders about outstanding tickets?
- How can I make sure that we are notified if an unmatched sender creates a ticket?
- If a ticket is created by a triggered condition, does it automatically close when the condition is no longer met?
- Which NinjaOne alerts can be configured to create tickets?
- Why are some incoming emails not creating new tickets?
- Will ticket boards and ticket counts be automatically refreshed when a ticket is created, updated, or deleted?
Is there a way to modify the messaging on automated responses in the ticketing system?
You can use event-based automations to send an email with a customized message. If using this method, We recommend making sure that the Notify Technician field on the system/policy activity is set to "No" to prevent duplicate responses.
How can I automate tickets for patch failures?
For Windows patches, you can use the "Windows Patch Management" activity in Administration → Policies → Activities.
How can I receive reminders about outstanding tickets?
You can use time-based automations to send notifications if a ticket has been open or paused for a certain amount of time.
How can I make sure that we are notified if an unmatched sender creates a ticket?
You can use an event-based automation or a pending email notification in System Activities.
If a ticket is created by a triggered condition, does it automatically close when the condition is no longer met?
Yes, but only if a condition rule was set to close the ticket.
Which NinjaOne alerts can be configured to create tickets?
Currently, NinjaOne conditions and scheduled scripts can be configured to create tickets.
Why are some incoming emails not creating new tickets?
When an email is received by NinjaOne Ticketing, NinjaOne determines whether the sender email address is associated with a NinjaOne user (either a technician or an end user) or a contact, or whether that email address or domain is included in any of the configured allow or block lists. If the email address does not meet any of these criteria, then the email will be placed into the Pending Emails board rather than immediately creating a ticket.
In order to create tickets, the email must be approved, at which point the sender's email address will be added as a contact. From this point forward, any future emails from that email address will automatically create tickets (since the address is now recognized as a contact).
Additionally, ensure the sender email address is not registered as a forwarding address within NinjaOne Ticketing. If it is, the email will be ignored to avoid an email feedback loop of automatic replies and will not create a ticket.
Will ticket boards and ticket counts be automatically refreshed when a ticket is created, updated, or deleted?
Yes. Ticket board counts will automatically be refreshed when a ticket is created, updated, or deleted.
Additional Resources
Refer to the following resources to learn more about NinjaOne Ticketing and automation: