Environment
NinjaOne Patching
Description
NinjaOne Patching allows you to create patching policies that automatically scan for and apply new software patches for your Microsoft Windows endpoints. You can configure scanning and update schedules, set patch approval rules, manage reboot behavior, and control which third-party applications are included in your patching workflow. NinjaOne also provides multiple views for monitoring patch status, release dates, and applicable devices across your environment.
Windows Third-Party Software Patch Management (NinjaOne, Inc., 1:49.00)
Select a topic to continue.
- Pending Reboots
- Enabling Software Patching
- Configuring Software Patching Settings
- Software Tab Actions and Settings
- Manually Scanning for or Applying Updates
- Supported Third-Party Software
Pending Reboots
If a patch requires a reboot that has not yet been performed on a device, as specified in the reboot options, NinjaOne will display a Pending reboot icon. Refer to our Pending Reboots article for more information.
Enabling Software Patching
You must enable software patching before you can use it to manage the patching of third-party applications.
- In NinjaOne, click Administration → Policies, then choose a Windows policy from the Agent policies list.
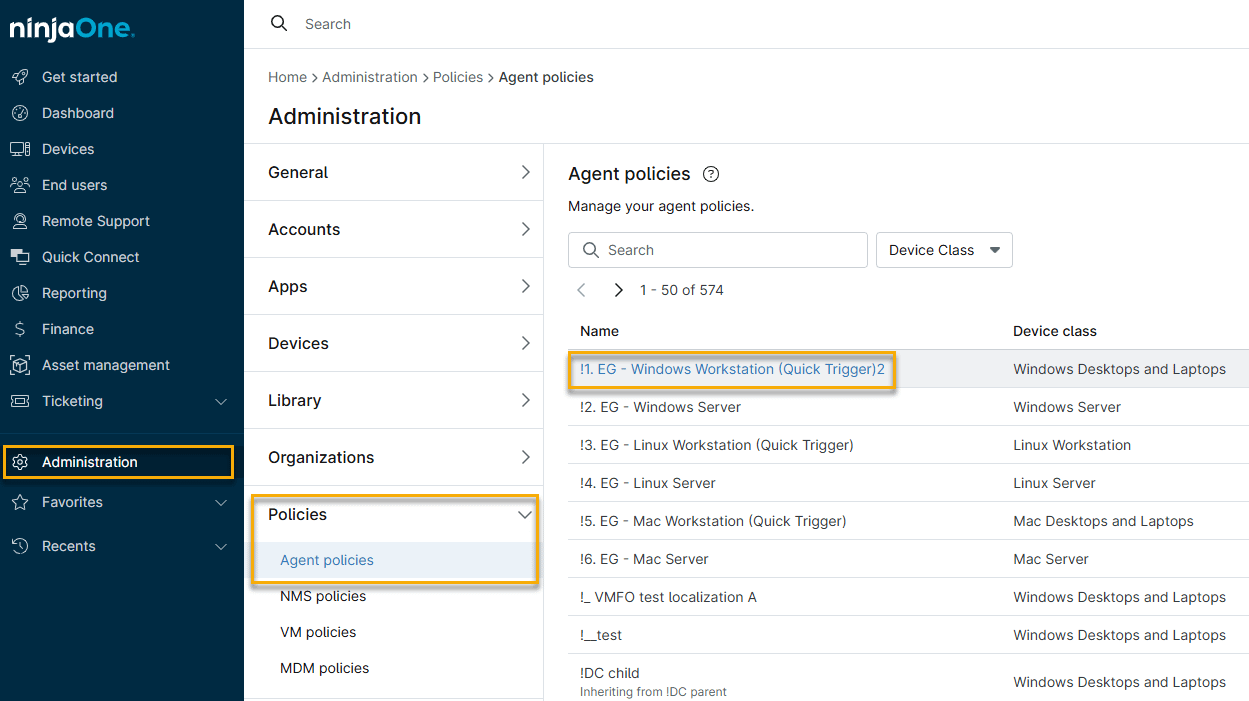
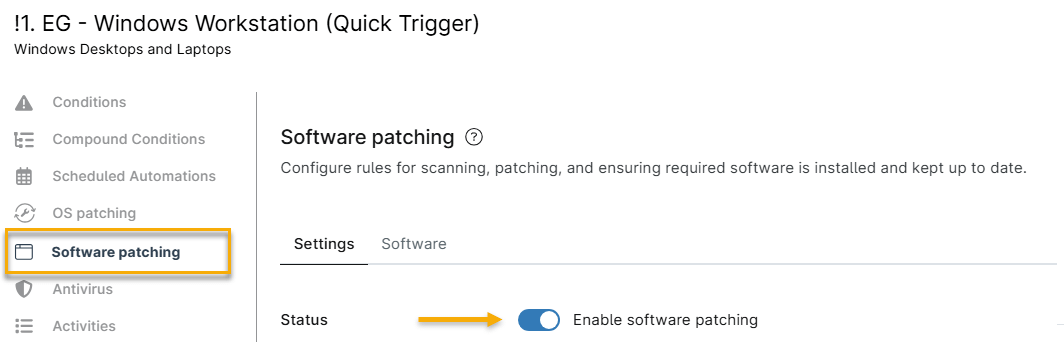
- Click the Software patching configuration tab, then activate the Enable software patching toggle.
Configuring Software Patching Settings
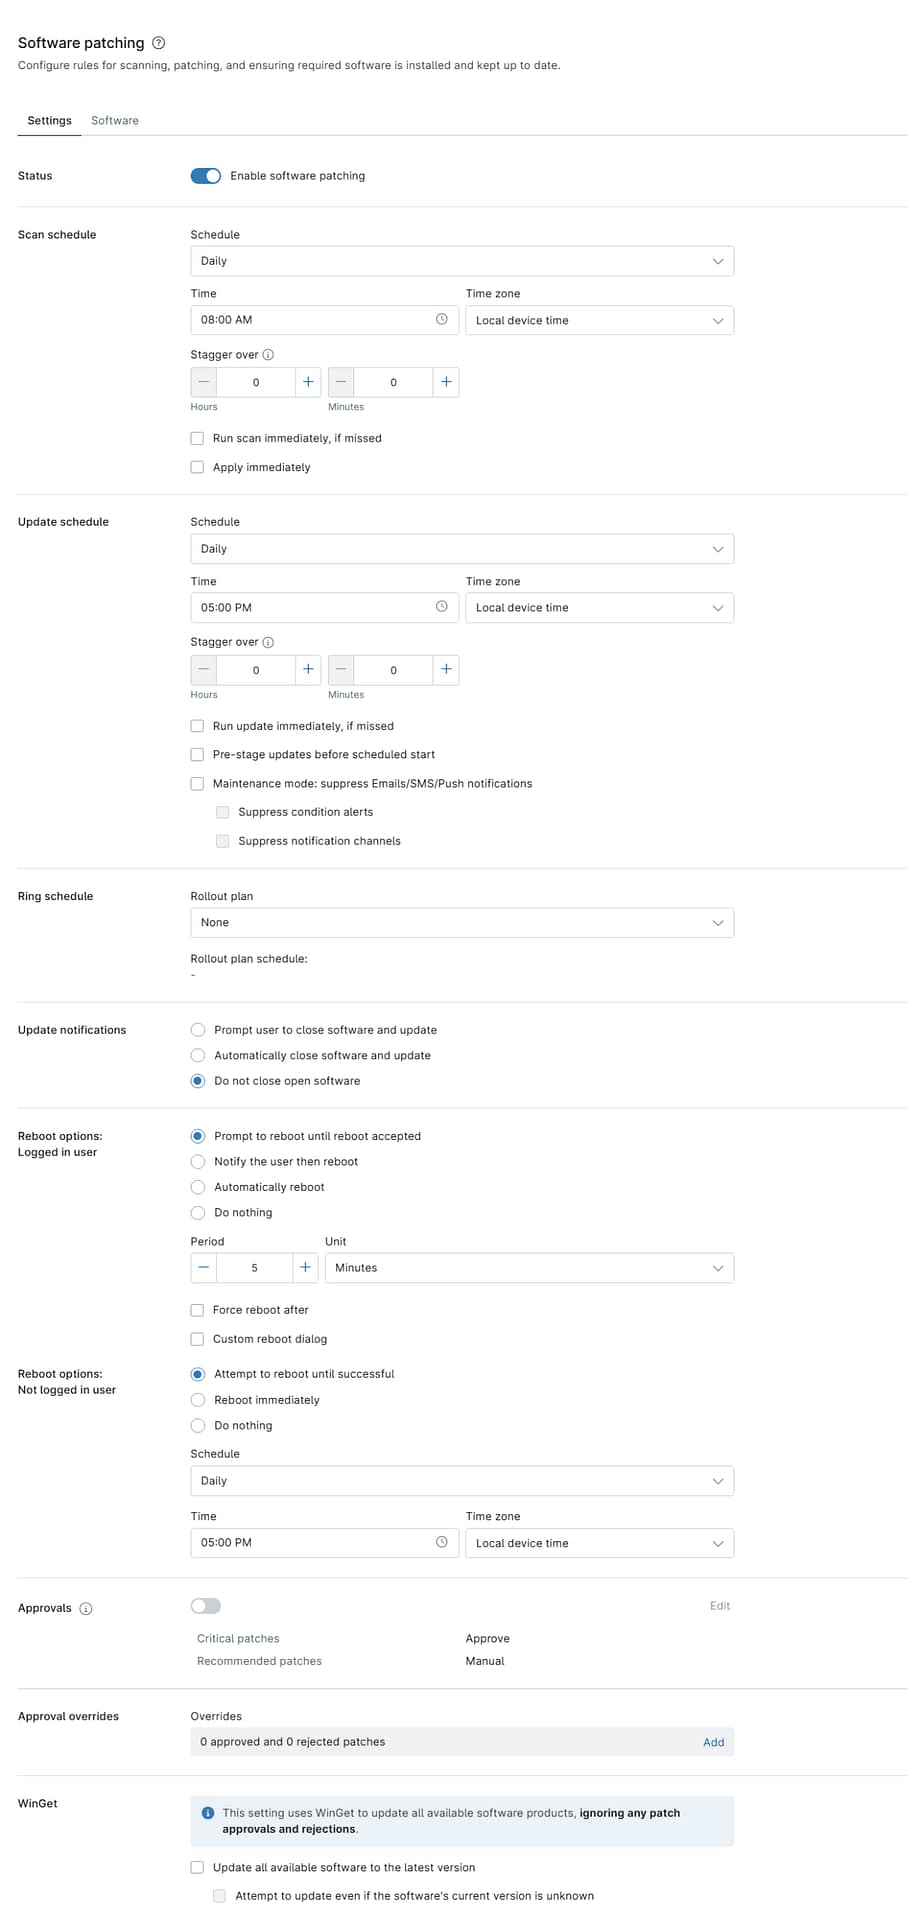
Options in the Settings tab include scanning and patching, required software installation, and maintenance. When you finish your configuration, click Save to apply the new settings.
General Settings Explained
Use the table below to learn more about each setting.
| Setting | Description |
|---|---|
| Scan schedule | This parameter set determines when the device will scan for available new patches.
|
| Update schedule | These settings specify when NinjaOne should apply the updates found while scanning.
|
| Ring schedule | Ring deployment is a patching strategy that lets you roll out software updates in controlled waves instead of pushing patches to every device at once. You can assign devices to rings within a rollout plan. Refer to NinjaOne Patching: Ring Deployment for Windows Third-Party Patching for more information. |
| Update notifications | Choose how NinjaOne notifies users when NinjaOne needs to update software that cannot be patched in the background. Select from the following options:
If you choose Notify the user, then close the software and update, you will be able to configure the following settings:
|
| Reboot options | These settings let you specify reboot behavior after NinjaOne patches a device. You can configure settings for both logged-in and logged-out users. Refer to the Reboot Options section of this article for more information. |
| Approvals | In this section, you can configure approval settings for all NinjaOne software not listed on the Software tab. Click the Critical patches and Recommended patches links to set NinjaOne to automatically approve, reject, or require manual approval for patches. The NinjaOne Agent defines these categories as follows:
Refer to NinjaOne Endpoint Management: The Software Inventory for more information. |
| Approval overrides | Here, you can set NinjaOne to override your patching policy for specific patches. Click the link to open the Overrides list, then search for the patch name. Use the second drop-down menu to select whether to approve or reject the patch. Examples of scenarios in which patches would appear in the Overrides section include:
|
| winget | This option lets you automate the update process for WinGet-supported software.
For more information, read NinjaOne Patching: WinGet (Windows Package Manager) Integration Guide. |
Reboot Options
These settings let you specify reboot behavior after NinjaOne patches a device. You can configure settings for both logged-in and logged-out users.
Reboot Options: Logged-in User
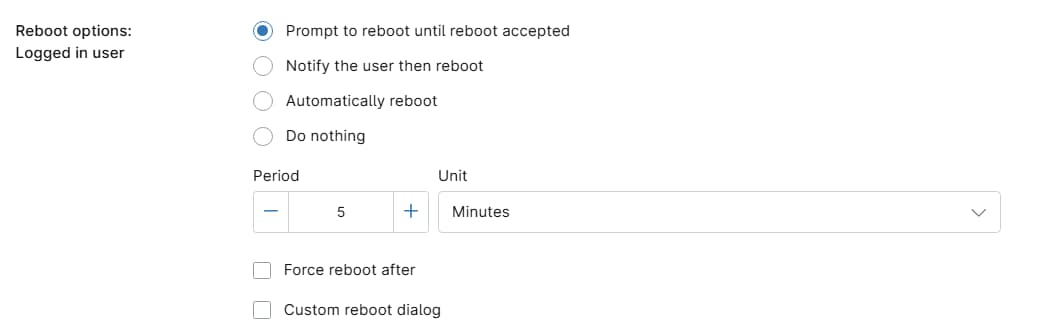
When a user is actively logged in to a device, you can choose how NinjaOne communicates the need to reboot, from prompting the user to act, to waiting a set period before rebooting automatically. Use the table below to learn more about each setting.
| Setting | Description |
|---|---|
| Prompt to reboot until reboot accepted | NinjaOne displays an on-screen prompt instructing the user to reboot and allow the update to complete.
|
| Notify the user, then reboot | NinjaOne sends the user a notification, then automatically reboots the machine and completes the update. Refer to NinjaOne Endpoint Management: Device and System Activity Notification Feed for more information. Use the scheduling options to determine how long NinjaOne should wait before sending the notification and triggering the reboot. |
| Automatically reboot | NinjaOne reboots the device after the update installation completes. Use the scheduling options to determine how long NinjaOne should wait before rebooting the device. |
| Do nothing | NinjaOne will not perform any automatic reboot actions on the device. |
| Period | If you selected Prompt to reboot until reboot accepted, use these fields to specify the prompt frequency. Select the checkbox to force a reboot after a specific number of prompts. |
| Reboot dialog | Select this checkbox to add custom text to the reboot prompt. |
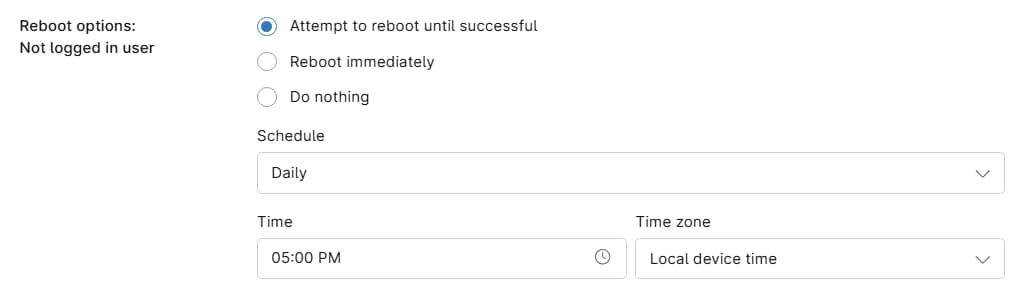
Reboot Options: Not Logged-in User
When no user is logged in to a device, these settings control how NinjaOne handles the reboot directly. Use the table below to learn more about each setting.
| Setting | Description |
|---|---|
| Attempt to reboot until successful | NinjaOne keeps trying to reboot the device, even if reboots fail, until it successfully completes the action. Use the scheduling options to determine the reboot attempt frequency. |
| Reboot immediately | NinjaOne reboots the device as soon as the update is ready. |
| Do nothing | NinjaOne will take no action to reboot the device. |
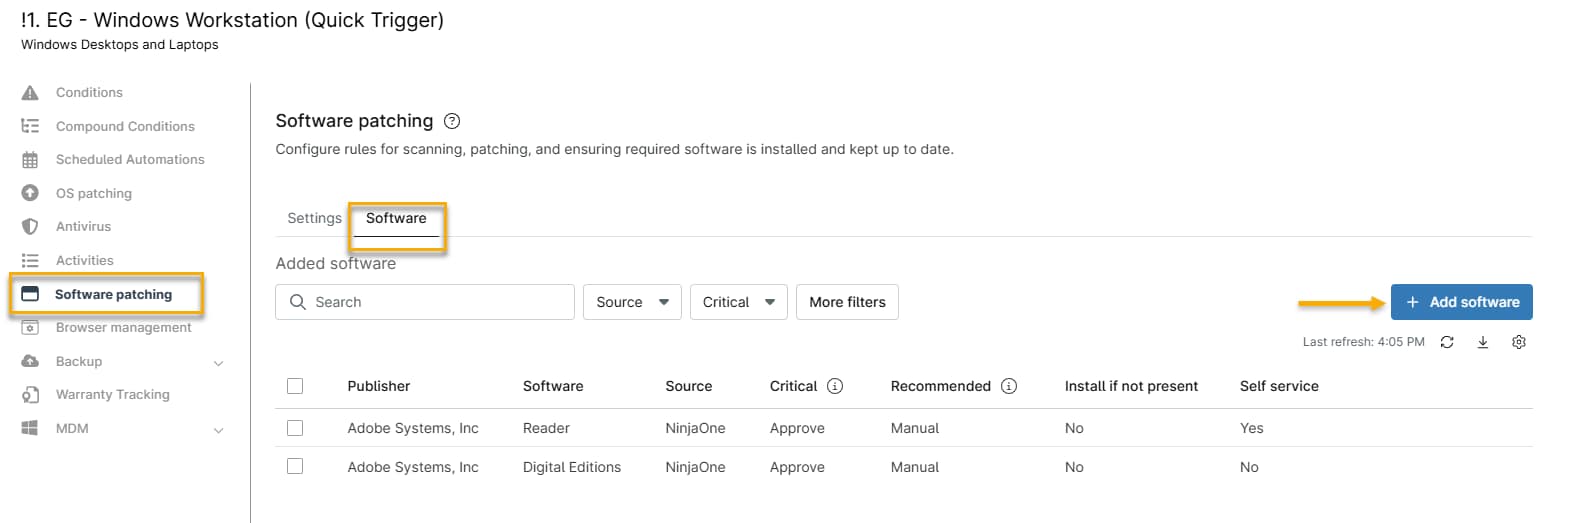
Software Tab Actions and Settings
The Software tab is where you can select which applications you would like to include in NinjaOne's third-party patching (3PP). From here, you can also configure approval settings for critical and recommended patches and specify if you wish to use the current policy when installing the updates.
When you enable software patching for a product, NinjaOne downloads all updates for that product on the machines affected by the policy. Those updates remain downloaded as long as you have third-party software patching activated for that product.
The Software Library
NinjaOne stores available applications in the Software library, which can show you the following information, based on the data columns you select
| Column | Description |
|---|---|
| Critical | Classify updates for this software title as critical, meaning they typically address major security vulnerabilities. |
| Enable self service | Indicate whether this software title is available in the end-user portal for allowed end users who are the assigned owners of applicable devices. |
| Install if not present | Indicate whether NinjaOne will automatically install this application on devices where it is not already present. |
| Publisher | Show the vendor or organization responsible for developing and distributing the application. |
| Recommended | Indicate whether updates for this software title are classified as recommended, meaning they enhance the user experience or address possible security vulnerabilities. |
| Software | List the official name and versioning of the specific application or package. |
| Source | Indicate which update engine is used to install or update the application (for example, NinjaOne or WinGet).
|
| WinGet ID | Display the unique package identifier that WinGet uses to identify the application. |
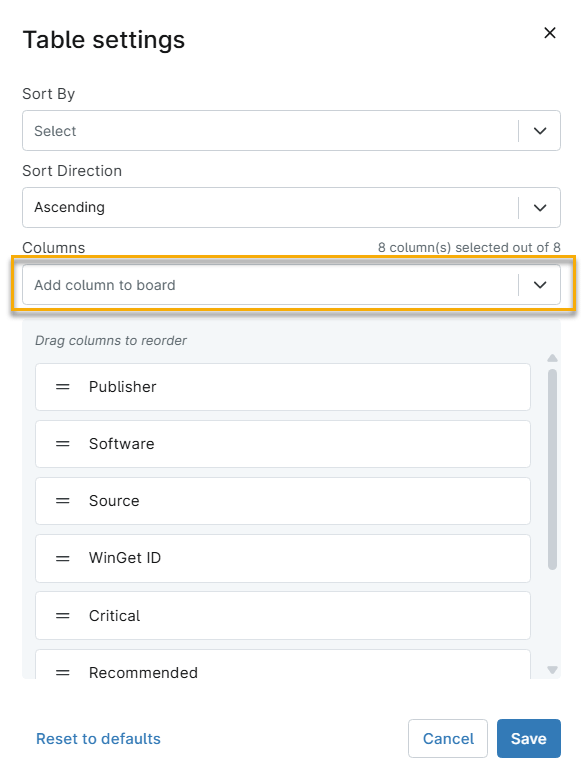
To select a column:
- Click the Actions icon. The Table settings window will open.
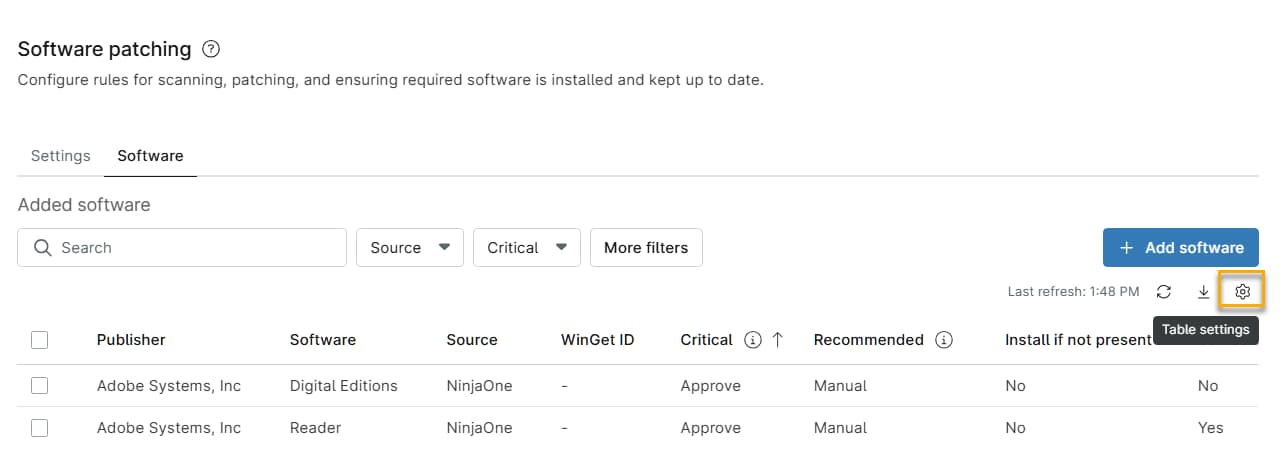
- Search for the column name in the Columns field. Click and drag columns in the column stack to reorder them.
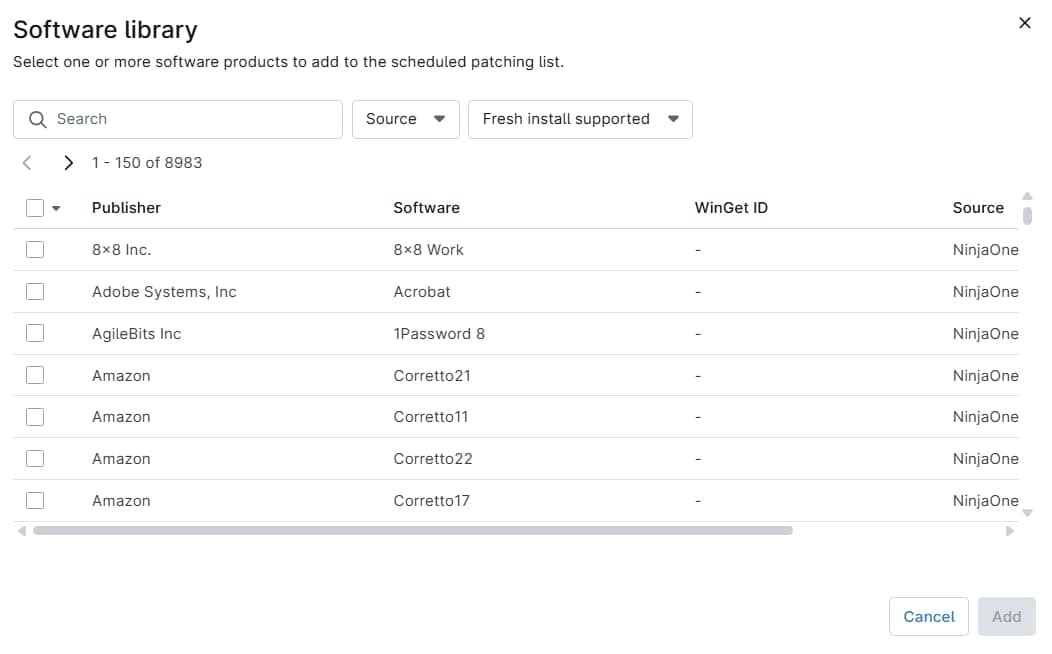
Adding Software to the Scheduled Patching List
To add new software to be installed and patched:
- On the policy's configuration page, navigate to Software patching → Software → Add software.
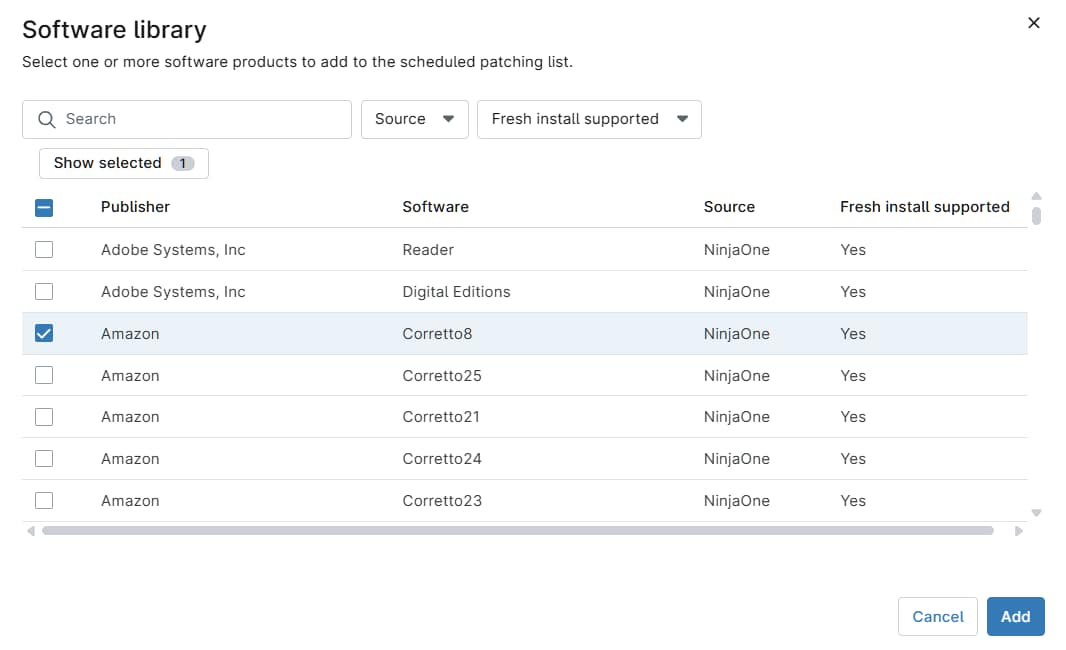
- The Software library window will open. Select the checkbox for any new software, then click Add.
Editing Patching Settings For Added Software
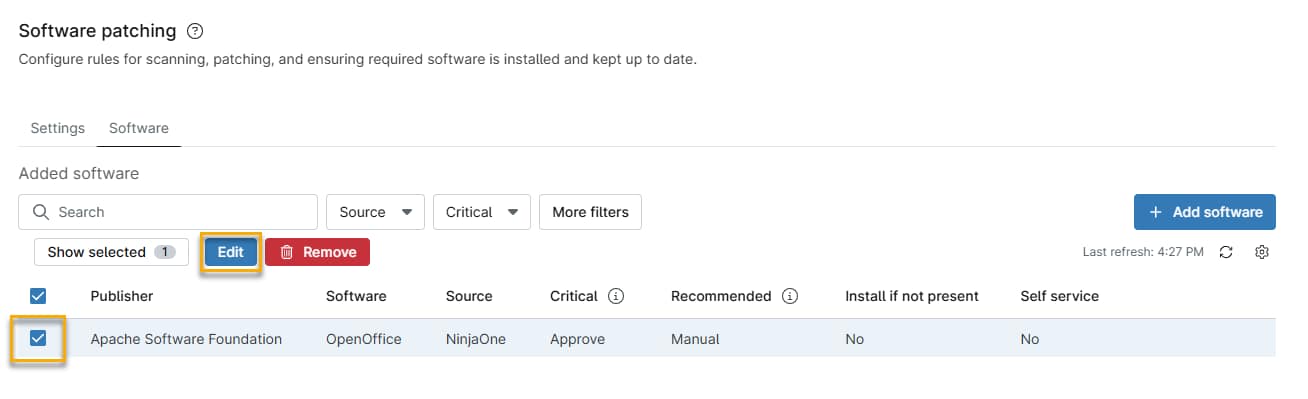
After adding new software, you can configure the approval and install settings for each patch type.
- Select the software (or choose Select All), then click Edit.
In the Edit software window, configure the following options:
| Option | Description |
|---|---|
| Critical patches | Specify automatic installation behavior for critical patches. Select Approve, Manual, or Reject. Refer to the Patch Approval Options section of this article to learn more. |
| Recommended patches | Specify automatic installation behavior for recommended patches. Select Approve, Manual, or Reject. Refer to the Patch Approval Options section of this article to learn more. |
| Install if application not present | After adding software, you can configure NinjaOne to automatically install many supported applications if they are not already found on devices in the policy. Choose Yes to automatically install the application on machines where it is missing. If you select No, the installer for that software shows in the Rejected software tab. You can approve the installation at a later time. |
| Enable self-service | Make the application available to allowed end users in the End User portal. The end users must be the assigned owners of the applicable devices. |
Patch Approval Options
You can choose one of three options for Critical and Recommended patches:
- Approve: Automatically approves all patches for the next update cycle.
- Manual: Patches in this category appear in a "pending" state, requiring manual approval or rejection (for either the devices or the entire policy).
- Reject: Automatically rejects all patches for that category.
Viewing Patch Scan and Installation Attempts
NinjaOne provides multiple ways to view patches installed on your system, patches pending installation, or patches that failed to install.
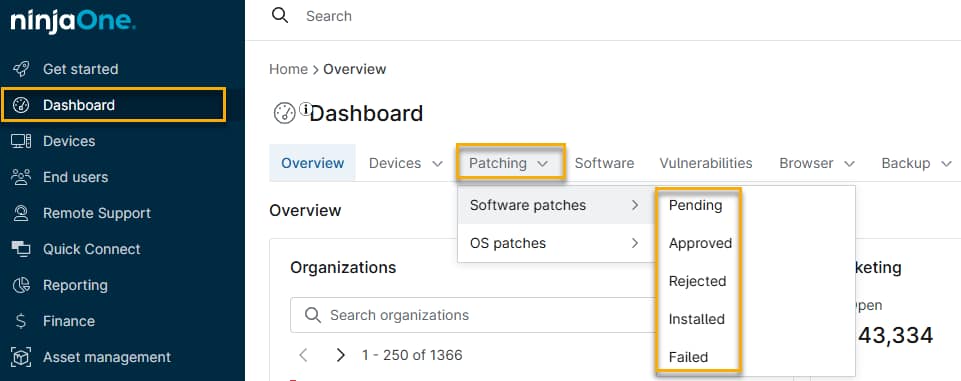
Viewing by Status in NinjaOne Dashboard
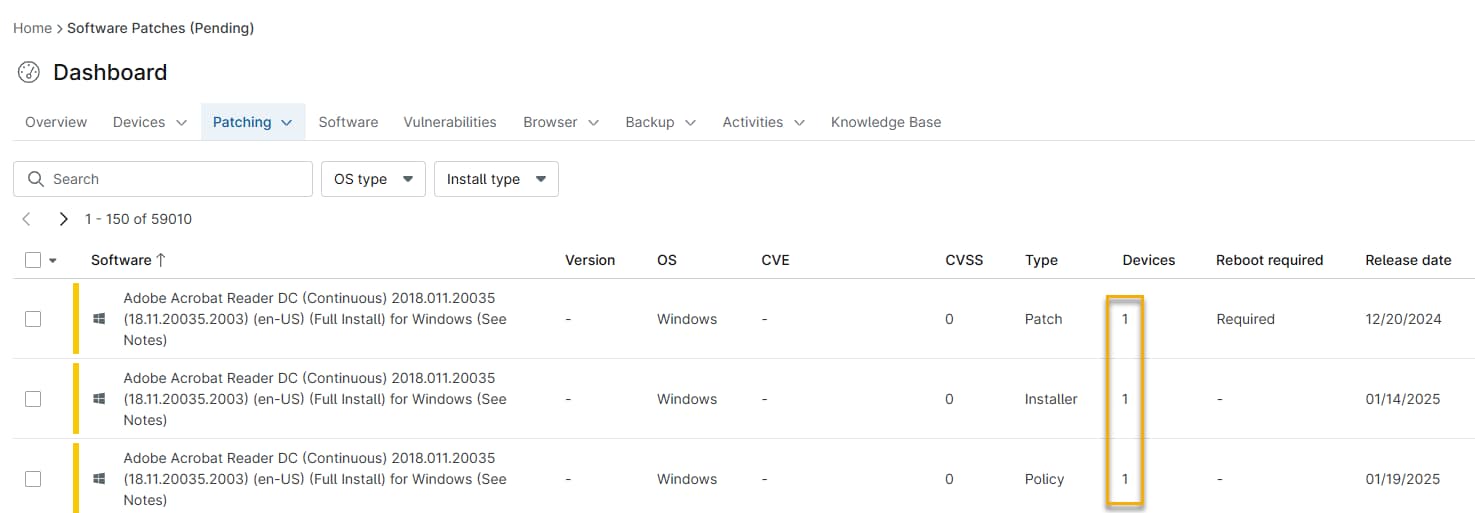
You can view patches found and patches installed in the System dashboard's Patching → Software patches tab. Use the flyout menu to filter by patch status (Pending, Approved, Rejected, Installed, or Failed). After a patch has attempted to install during an update cycle, you can view its details in the Software tab of the dashboard.
Viewing Patches by Release Date
Check the Release date column to learn the patch release date. If the manufacturer does not provide the release date, NinjaOne will use the first detected date instead.

Viewing Applicable Devices for a Patch
At the System or Organization dashboard level, you can click the number in the Devices column to list the devices to which the patch status applies. For example, clicking the number for a patch in the Approved tab shows the devices for which it is approved (but not yet installed).
Viewing Installed Applications
Applications will appear when you select Expand all. An N/A install status indicates that the manufacturer does not support installation for that software. Refer to the list of supported products below for more information about which options support installations.
Manually Scanning For or Applying Updates
You can run a manual patching cycle at any time.
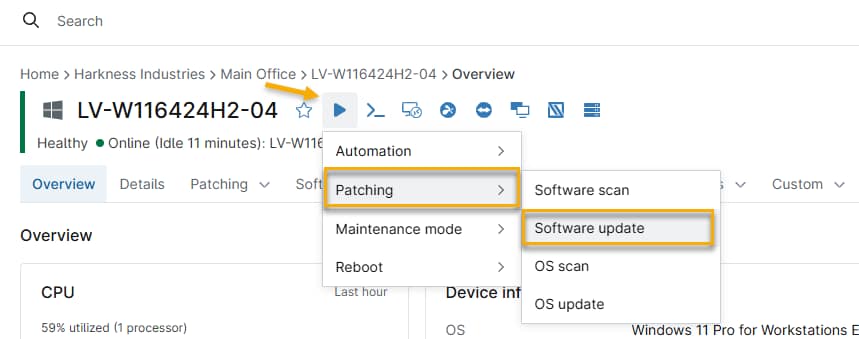
On a Single Device
You can run a manual patch scan and update cycle on demand from any endpoint. To do so, navigate to the Device overview, place your cursor over the Play action button, and select Patching → Software scan (to scan for new patches) or Software update (to apply existing patches).
On Multiple Devices
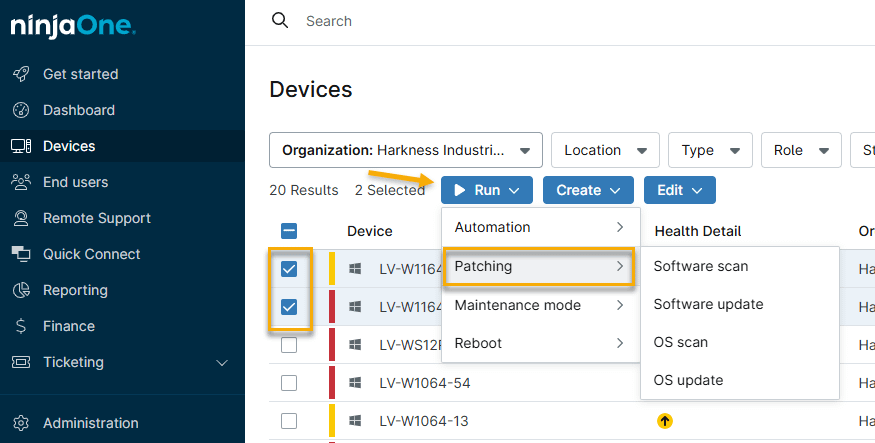
To scan and apply patches on multiple devices:
- The devices must be the same type.
- You must enable software patching for the policy that governs the device.
- Selected devices must be online.
Procedure
- In the Devices tab, select the checkboxes for the devices on which to run the scan and update cycle.
- Place your cursor over the Run button, then navigate to Patching → Software update → Software scan (to scan for new patches) or Software update (to apply existing patches). NinjaOne will show the third-party patching status at the device level. If you have patches set to approve or reject manually, you can take those actions from the Device overview.
Supported Third-Party Software
Refer to these tables for a list of third-party applications that support NinjaOne Patch Management.
Newly Added Applications
These applications have been added to our catalog in July, 2026.
| Publisher | Software | Architecture | Supports Install | Supports Background Updates |
|---|---|---|---|---|
| Box | Box Drive | x64 | Yes | No |
| Git | Git | x64 | Yes | No |
| Zoom | Zoom Rooms | x86 | Yes | No |
All Supported Applications
| Publisher | Software | Architecture | Supports Install | Supports Background Updates |
|---|---|---|---|---|
| 8x8 Inc | 8x8 Work | x64 | Yes | No |
| Adobe | Acrobat DC Continuous | x64 | No | No |
| Adobe | Acrobat DC Continuous | x86 | No | No |
| Adobe | Acrobat Reader DC Continuous | x64 | Yes | No |
| Adobe | Acrobat Reader DC Continuous | x86 | Yes | No |
| Adobe | Digital Editions | x86 | No | No |
| AgileBits Inc | 1Password 8 | x64 | Yes | No |
| Amazon | Corretto 11 | x64 | Yes | No |
| Amazon | Corretto 11 | x86 | Yes | No |
| Amazon | Corretto 17 | x64 | Yes | No |
| Amazon | Corretto 21 | x64 | Yes | No |
| Amazon | Corretto 22 | x64 | No | No |
| Amazon | Corretto 23 | x64 | No | No |
| Amazon | Corretto 24 | x64 | No | No |
| Amazon | Corretto 25 | x64 | Yes | No |
| Amazon | Corretto 8 | x64 | Yes | No |
| Amazon | Corretto 8 | x86 | Yes | No |
| Apache Software Foundation | OpenOffice | x86 | No | No |
| Apple | Bonjour | x86 | No | Yes |
| Apple | Bonjour | x64 | No | Yes |
| Apple | iTunes | x86 | Yes | No |
| Apple | iTunes | x64 | Yes | No |
| Apple | Mobile Device Support | x86 | Yes | Yes |
| Apple | Mobile Device Support | x64 | Yes | Yes |
| Audacity | Audacity | x64 | Yes | No |
| Audacity | Audacity | x86 | Yes | No |
| Box | Box Drive | x64 | Yes | No |
| Box | Box Sync | x64 | No | No |
| Broadcom | VMware Tools | x64 | Yes | Yes |
| Canneverbe | CDBurnerXP | x64 | No | No |
| Canneverbe | CDBurnerXP | x86 | No | No |
| Cisco | Jabber | x86 | Yes | No |
| Cisco | Webex | x64 | Yes | No |
| DB Browser for SQLite Team | DB Browser for SQLite | x86 | Yes | No |
| DB Browser for SQLite Team | DB Browser for SQLite | x64 | Yes | No |
| Docker Inc | Docker | x64 | Yes | No |
| Dominik Reichl | KeePass | x86 | Yes | No |
| Dominik Reichl | KeePass | x64 | Yes | No |
| Don Ho | Notepad++ | x64 | Yes | No |
| Don Ho | Notepad++ | x86 | Yes | No |
| dotPDN | Paint.NET | x64 | No | No |
| Dropbox Inc | Dropbox | x64 | Yes | No |
| Dropbox Inc | Dropbox | x86 | Yes | No |
| Evernote | Evernote | x86 | Yes | No |
| Evernote | Evernote | x64 | Yes | No |
| FileZilla Project | FileZilla Client | x64 | Yes | No |
| FileZilla Project | FileZilla Client | x86 | Yes | No |
| FileZilla Project | FileZilla Server | x64 | Yes | No |
| Foxit | PDF Editor 11 | x86 | No | No |
| Foxit | PDF Editor 12 | x86 | No | No |
| Foxit | PDF Editor 13 | x86 | Yes | No |
| Foxit | PDF Editor Subscription | x86 | Yes | No |
| Foxit | PDF Editor Subscription | x64 | Yes | No |
| Foxit | PDF Reader | x86 | Yes | No |
| Foxit | PDF Reader | x64 | Yes | No |
| Foxit | PDF Reader Enterprise | x86 | Yes | No |
| Foxit | PDF Reader Enterprise | x64 | Yes | No |
| Gen Digital | CCleaner | x86 | Yes | No |
| Gen Digital | CCleaner | x64 | Yes | No |
| Gen Digital | CCleaner Business Edition | x86 | Yes | No |
| Gen Digital | CCleaner Business Edition | x64 | Yes | No |
| GIMP Team | GIMP | x64 | Yes | No |
| Git | Git | x64 | Yes | No |
| GlavSoft | TightVNC | x64 | Yes | No |
| GlavSoft | TightVNC | x86 | Yes | No |
| Chrome | x64 | Yes | Yes | |
| Chrome | x86 | Yes | Yes | |
| Earth Pro | x64 | Yes | No | |
| Earth Pro | x86 | Yes | No | |
| Google Drive | x64 | Yes | Yes | |
| Greenshot | Greenshot | x86 | Yes | No |
| Greenshot | Greenshot | x64 | Yes | No |
| Igor Pavlov | 7-Zip | x64 | Yes | No |
| Igor Pavlov | 7-Zip | x86 | Yes | No |
| Inkscape Team | Inkscape | x64 | Yes | No |
| Logitech | Logi Options Plus | x64 | Yes | No |
| LogMeIn | GoTo Desktop App | x86 | Yes | No |
| LogMeIn | GoTo Desktop App | x64 | Yes | No |
| LogMeIn | GoTo Meeting | x86 | Yes | Yes |
| LucidLink Corp | Lucid Link | x64 | Yes | No |
| Martin Prikryl | WinSCP | x86 | Yes | No |
| Microsoft | .NET Framework | -- | No | No |
| Microsoft | .NET Framework 2.0 SP2 | -- | No | No |
| Microsoft | .NET Framework 3.0 SP2 | -- | No | No |
| Microsoft | .NET Framework 3.5 / 3.5 SP1 | -- | No | No |
| Microsoft | .NET Framework 4.5.2 | -- | No | No |
| Microsoft | .NET Framework 4.6 / 4.6.1 / 4.6.2 | -- | No | No |
| Microsoft | .NET Framework 4.7 / 4.7.1 / 4.7.2 | -- | No | No |
| Microsoft | .NET Framework 4.8 / 4.8.1 | -- | No | No |
| Microsoft | Advanced Threat Analytics | -- | No | No |
| Microsoft | ASP.NET MVC | -- | No | No |
| Microsoft | ASP.NET SignalR | -- | No | No |
| Microsoft | ASP.NET Web API | -- | No | No |
| Microsoft | ASP.NET Web Frameworks | -- | No | No |
| Microsoft | ASP.NET Web Pages | -- | No | No |
| Microsoft | Azure Information Protection Client | -- | No | No |
| Microsoft | Azure Site Recovery Provider | -- | No | No |
| Microsoft | Dynamics CRM 2011 | -- | No | No |
| Microsoft | Dynamics CRM 2013 | -- | No | No |
| Microsoft | Dynamics CRM 2015 | -- | No | No |
| Microsoft | Dynamics CRM 2016 | -- | No | No |
| Microsoft | Dynamics CRM 2016 SHS | -- | No | No |
| Microsoft | Edge | x86 | Yes | No |
| Microsoft | Edge | x64 | Yes | No |
| Microsoft | Exchange Server 2007 | -- | No | No |
| Microsoft | Exchange Server 2010 | -- | No | No |
| Microsoft | Exchange Server 2013 | -- | No | No |
| Microsoft | Exchange Server 2016 | -- | No | No |
| Microsoft | Exchange Server 2019 | -- | No | No |
| Microsoft | Forefront Endpoint Protection 2010 | -- | No | No |
| Microsoft | Internet Explorer | -- | No | No |
| Microsoft | Lync | -- | No | No |
| Microsoft | Lync 2010 | -- | No | No |
| Microsoft | Lync 2013 | -- | No | No |
| Microsoft | Lync Server 2010 | -- | No | No |
| Microsoft | Lync Server 2013 | -- | No | No |
| Microsoft | Microsoft 365 | x64 | No | Yes |
| Microsoft | Microsoft 365 | x86 | No | Yes |
| Microsoft | Monitoring Agent | -- | No | No |
| Microsoft | ODBC Driver 17 for SQL Server | -- | No | No |
| Microsoft | ODBC Driver 18 for SQL Server | -- | No | No |
| Microsoft | Office 2003 | -- | No | No |
| Microsoft | Office 2007 | -- | No | No |
| Microsoft | Office 2010 | -- | No | No |
| Microsoft | Office 2013 | -- | No | No |
| Microsoft | Office Live Meeting | -- | No | No |
| Microsoft | Office 2016 | x64 | No | Yes |
| Microsoft | Office 2016 | x86 | No | Yes |
| Microsoft | Office 2019 | x64 | No | Yes |
| Microsoft | Office 2019 | x86 | No | Yes |
| Microsoft | Office 2021 | x64 | No | Yes |
| Microsoft | Office 2021 | x86 | No | Yes |
| Microsoft | Office 2024 | x64 | No | Yes |
| Microsoft | Office 2024 | x86 | No | Yes |
| Microsoft | OLE DB Driver 18 for SQL Server | -- | No | No |
| Microsoft | OLE DB Driver 19 for SQL Server | -- | No | No |
| Microsoft | OneDrive | x64 | Yes | No |
| Microsoft | PowerShell 7 | -- | No | No |
| Microsoft | Service Bus for Windows Server 1.1 | -- | No | No |
| Microsoft | Silverlight | -- | No | No |
| Microsoft | Skype | -- | No | No |
| Microsoft | Skype (Business) | -- | No | No |
| Microsoft | Skype for Business Server 2015 | -- | No | No |
| Microsoft | SQL Full-Text Search Engine | -- | No | No |
| Microsoft | SQL Server 2008 | -- | No | No |
| Microsoft | SQL Server 2008 R2 | -- | No | No |
| Microsoft | SQL Server 2012 | -- | No | No |
| Microsoft | SQL Server 2014 | -- | No | No |
| Microsoft | SQL Server 2014-2016 Product Updates | -- | No | No |
| Microsoft | SQL Server 2016 | -- | No | No |
| Microsoft | SQL Server 2017 | -- | No | No |
| Microsoft | SQL Server 2019 | -- | No | No |
| Microsoft | SQL Server 2022 | -- | No | No |
| Microsoft | SQL Server Analysis Services (SSAS) | -- | No | No |
| Microsoft | SQL Server Database Engine | -- | No | No |
| Microsoft | SQL Server Integration Services (SSIS) | -- | No | No |
| Microsoft | SQL Server Management Studio (SSMS) 2014 and older | -- | No | No |
| Microsoft | SQL Server Replication Components | -- | No | No |
| Microsoft | SQL Server Reporting Services (SSRS) | -- | No | No |
| Microsoft | System Center 2012 R2 - Operations Manager | -- | No | No |
| Microsoft | System Center 2012 R2 - Orchestrator | -- | No | No |
| Microsoft | System Center 2012 R2 - Virtual Machine Manager | -- | No | No |
| Microsoft | System Center 2012 SP1 - Operation Manager | -- | No | No |
| Microsoft | System Center 2012 SP1 - Virtual Machine Manager | -- | No | No |
| Microsoft | System Center 2016 - Operations Manager | -- | No | No |
| Microsoft | System Center 2016 - Orchestrator | -- | No | No |
| Microsoft | System Center 2016 - Virtual Machine Manager | -- | No | No |
| Microsoft | Visual Basic | -- | No | No |
| Microsoft | Visual Studio | -- | No | No |
| Microsoft | Visual Studio 2010 | -- | No | No |
| Microsoft | Visual Studio 2010 Tools for Office Runtime | -- | No | No |
| Microsoft | Visual Studio 2012 | -- | No | No |
| Microsoft | Visual Studio 2013 | -- | No | No |
| Microsoft | Visual Studio Code | x64 | Yes | No |
| Mozilla | Firefox | x64 | Yes | Yes |
| Mozilla | Firefox | x86 | Yes | Yes |
| Mozilla | Firefox ESR | x64 | Yes | Yes |
| Mozilla | Firefox ESR | x86 | Yes | Yes |
| Mozilla | Firefox ESR 115 | x64 | Yes | Yes |
| Mozilla | Firefox ESR 115 | x86 | Yes | Yes |
| Mozilla | Thunderbird | x64 | Yes | Yes |
| Mozilla | Thunderbird | x86 | Yes | Yes |
| Mozilla | Thunderbird ESR | x64 | Yes | Yes |
| Mozilla | Thunderbird ESR | x86 | Yes | Yes |
| Omnissa | Horizon Client | x64 | No | No |
| Opera | Opera | x86 | Yes | Yes |
| Opera | Opera | x64 | Yes | Yes |
| Pidgin | Pidgin | x86 | No | No |
| RARLab | WinRAR | x64 | Yes | No |
| RealNetworks | Real Player | x86 | Yes | No |
| RealVNC | VNC Server | x64 | Yes | No |
| RealVNC | VNC Server | x86 | Yes | No |
| RealVNC | VNC Viewer | x64 | No | No |
| RealVNC | VNC Viewer | x86 | No | No |
| Scooter Software | Beyond Compare 5 | x86 | Yes | No |
| Scooter Software | Beyond Compare 5 | x64 | Yes | No |
| SeaMonkey Association | SeaMonkey | x64 | No | No |
| Simon Tatham | Putty | x64 | Yes | No |
| Simon Tatham | Putty | x86 | Yes | No |
| Stairwell | Inception Forwarder | x64 | No | No |
| Sublime HQ | Sublime Text | x64 | Yes | No |
| TeamViewer GmbH | TeamViewer | x64 | Yes | No |
| TeamViewer GmbH | TeamViewer | x86 | Yes | No |
| TechSmith | Camtasia Subscription | x64 | Yes | No |
| TechSmith | Snagit 2022 | x64 | No | No |
| TechSmith | Snagit 2023 | x64 | No | No |
| TechSmith | Snagit 2024 | x64 | Yes | No |
| TechSmith | Snagit 2025 | x64 | Yes | No |
| The Document Foundation | LibreOffice | x86 | Yes | No |
| The Document Foundation | LibreOffice | x64 | Yes | No |
| TortoiseSVN Team | TortoiseSVN | x86 | No | No |
| TortoiseSVN Team | TortoiseSVN | x64 | No | No |
| UltraVNC | UltraVNC Server | x64 | Yes | No |
| UltraVNC | UltraVNC Server | x86 | Yes | No |
| UltraVNC | UltraVNC Viewer | x64 | Yes | No |
| UltraVNC | UltraVNC Viewer | x86 | Yes | No |
| VideoLAN | VLC Media Player | x64 | No | No |
| VideoLAN | VLC Media Player | x86 | No | No |
| Wireshark Foundation | Wireshark | x64 | No | No |
| Zoom Communications | Zoom Workplace | x64 | Yes | No |
| Zoom | Zoom Rooms | x86 | Yes | No |