Topic
This article explains how to use NinjaOne IT Asset Management to manage software license usage and renewals.
Environment
NinjaOne IT Asset Management (ITAM)
Description
The new License management dashboard allows you to track and manage your software licenses across all devices. With this feature, you can:
- View the total number of licenses purchased and their expiration dates.
- View the number of licenses being consumed.
- Track consumption based on the type of license model used for that piece of software (per user, per device, or per site).
- Receive alerts for insufficient licensing and expirations.
- Quickly update license quantities and assignments.
To use NinjaOne's asset management feature, you must activate the application. For instructions, refer to
Index
Select a category to learn more:
- Enable Permissions
- Add Software Licenses
- Manage Software License Data
- Automate Billing for Software Licenses
- Usage History
- Troubleshooting
- Additional Resources
Enable Permissions
System administrators have the ability to execute license use cases by default. You must activate the permission for other technician roles or technicians without roles.
To enable permissions, select the applicable option from the IT Asset Management → Software Licenses drop-down menu. To learn more about technician permissions, refer to
The Add software license configuration dialog displays.
Refer to the following table for guidance when filling out the fields in the General section.
Field Description or Purpose Software license name Add a unique identifier. License type If you select any option other than Custom, a new section titled Assignment will appear in the configuration dialog. For more information, refer to Software License Assignment within this article. Publisher The drop-down menu may be empty the first time you use the Asset Management dashboard, though NinjaOne will attempt to identify installed manufacturers for the device. Click Add publisher to add the information. Once added, this name will appear as an option in the drop-down menu for future licenses. You can also add vendors from the NinjaOne IT Asset Management configuration page; refer to NinjaOne ITAM: Supplier Data to learn more. Vendor The drop-down menu may be empty the first time you use the Asset Management dashboard. Click Add vendor to add the information. Once added, this name will appear as an option in the drop-down menu for future licenses. License scope Select Global to include all organizations and locations. Select Limited to select specific organizations and locations from a drop-down menu. If you limit the scope to specific organizations, you can only assign devices associated with the organization. Additionally, the license information will appear on the organization dashboard at Asset → Licenses. Purchased quantity Click Edit to update the amount. License usage This field only appears if you select Custom for License type. Click Edit to update the number of licenses in use. Purchase date Enter the date you purchased the licenses. Cost configuration Select Total cost to enter the sum of all license costs, or select Per license cost to add the monetary value for a single license. If you select the latter option, NinjaOne will calculate the total cost based on the amount entered for Purchase quantity. - Open the Expiration date section and click the toggle if the software license has an expiration date. New fields will display, allowing you to enter the information and select whether you want to automatically renew the license or set an alert.
- If applicable, configure the Assignment data and then click Submit.
Software License Assignment
Your options for assigning software licenses in NinjaOne will vary depending on the option you selected for License type when configuring the data in the General tab of the Add software license dialog. The Assignment tab does not display if you select Custom as the License type.
Per device (automatic)
Assign the software license by detecting devices with certain software installed.
- Detect normalized software name: NinjaOne AI pulls this data when it detects software. This option is only available for those signed up for our Vulnerability Management program. Resource: NinjaOne Patching: OS Patch Sentiment Analysis (Patch Intelligence AI).
- Detect device groups: Learn more about device groups with our Search and Grouping article.
- Assign when any group matches: Rules will be applied to devices with any of the selected groups.
- Assign when all groups match: Rules will be applied to devices with all of the selected groups.
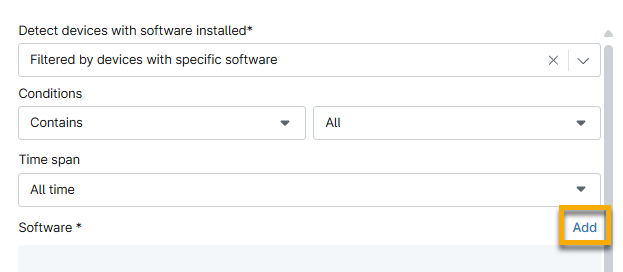
- Filter by devices with specific software: Identify which devices currently have a piece of licensed software installed.
- Use the Conditions drop-down menu to filter whether the device contains or does not contain any or all of the software specified. Specify what software to search by clicking Add.
Per device (manual)
Assign the software license to specific devices.
- Click Add and then select one or more devices from the drop-down menu.
- Click Add again to confirm.
Per end user (manual)
Assign the software license to specific end users, technicians, or contacts.
- Click Add and then select one or more options from the drop-down menu.
- Click Add again to confirm.
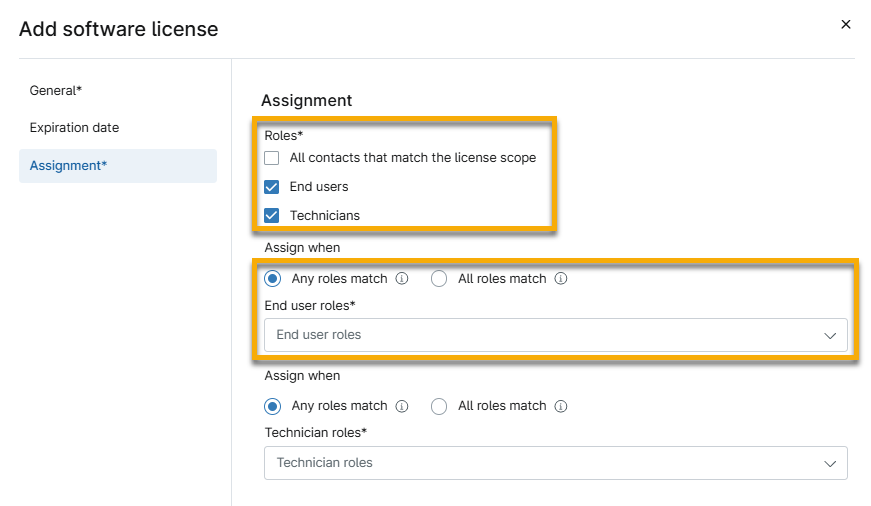
Per end user (automatic)
This option assigns licenses based on the user role. Select all checkboxes that apply.
When you select either the End users or Technicians options, additional fields will display where you must select the applicable mapping.
- Any roles match: If you select multiple roles from the End user roles drop-down menu, the user must include only one of the options.
- All roles match: If you select multiple roles from the End user roles drop-down menu, the user must include all of the options.
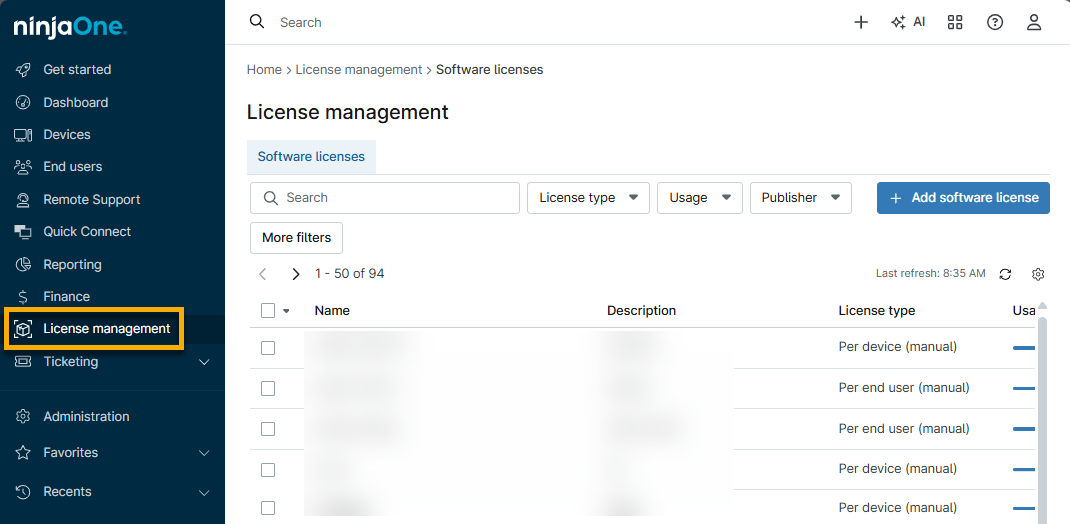
Manage Software License Data
The Asset → Licenses tab on an organization or device dashboard provides several columns of data that you can add, remove, or rearrange through the table settings (click the gear icon).
The tab will display icons for active and expired license terms, and also show a tooltip when the number of assignments exceeds the number of licenses.

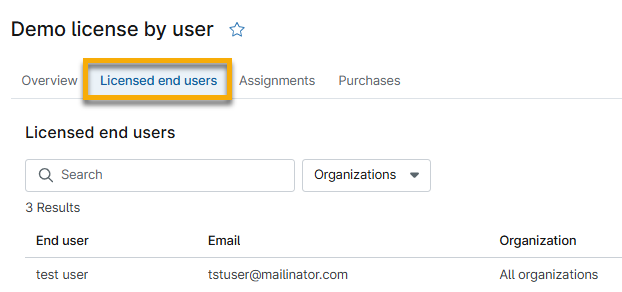
Click a license name to view the software license page, which includes details, a list of licensed end users, assignments, and purchases.
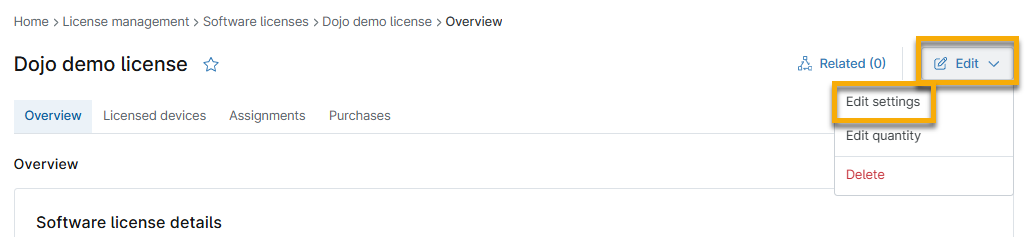
Change the License Quantity
You can edit license settings, change quantity (number of licenses purchased), or delete the license by clicking Edit on the software license page.
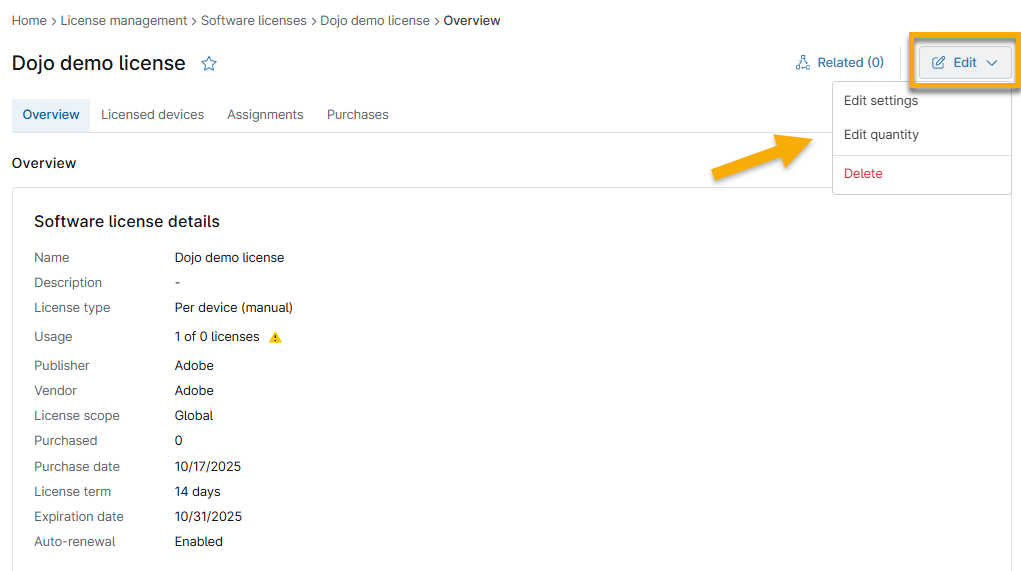
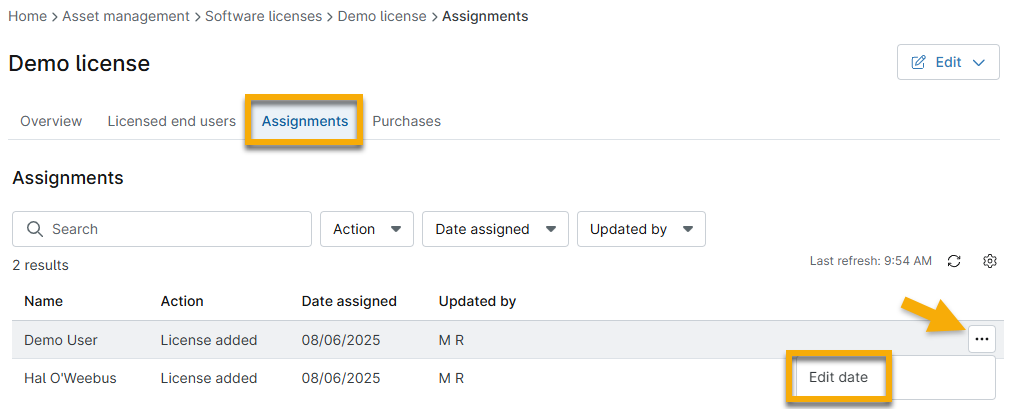
Change the License Assignment Date
From the individual software license page, you can also edit the date that a license was assigned.
Open the Assignments tab, click the ellipsis button next to the name, and then click Edit date.
Change the Licensed End User or Device
You can modify which end users or devices are associated with a license.
- From the software license page, click Edit and select Edit settings.
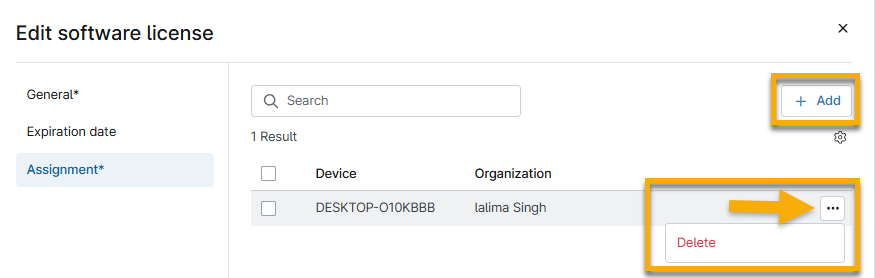
- Open the Assignment tab and update the data.
- For licensed users, click the X next to the role name to remove it, or select new roles from the available drop-down menu. If you still do not see the end user listed in the Licensed users tab, navigate to their account detail page and ensure they are a member of the selected user role.
- For licensed devices, move your cursor over the row and click the ellipsis button to view the option to delete the devices from the assignment. Click Add to include more devices.
- Open the Licensed devices or Licensed users tab. This tab name will vary depending on how the license was assigned.
- Verify that the new data is correct.
Automate Billing for Software Licenses
If you have NinjaOne Billing included in your subscription, you can automatically bill products based on the number of licenses used or the number purchased in NinjaOne IT Asset Management. To do so, perform the following steps:
- Navigate to Administration → Apps → Installed → NinjaOne Billing.
- Open the Products tab and click Add.
- In the Quantity source dialog, select Software license from the Quantity type drop-down menu. Click Create.
- In the General section, select Software from the Account drop-down menu to set Quantity type to Software license.
- The Cost source should automatically populate the Inherit from license data.
- The Included count will deduct the number of licenses from the Quantity source.
- Go through each section of the Software license product dialog to initiate billing. Refer to NinjaOne Billing: Products for detailed instructions.
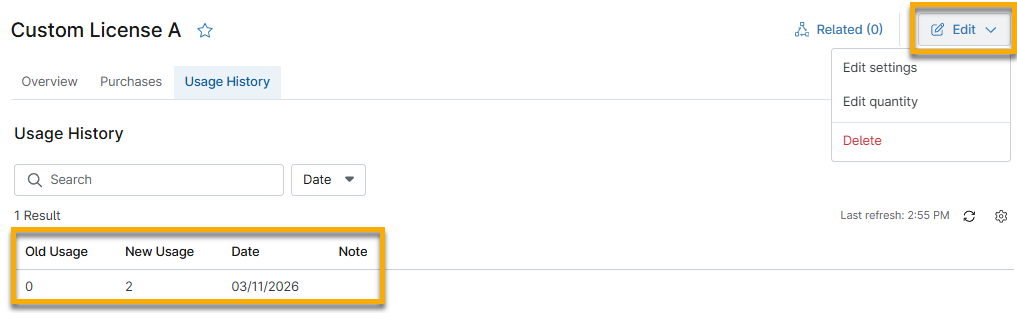
Usage History
When you make a custom software license entry, you can view an additional tab for Usage History.
Click Edit in the top right corner of the page to edit settings or quantity.
- Edit settings: Update the license details, such as name, type, publisher, purchased quantity and date, cost configuration, and expiration.
- Edit quantity: Set a new quantity for the purchased amount and usage. Each time you update the quantity, a new row displays in the Usage History tab to show the updated numbers for Old Usage and New Usage. You can add a note to summarize why you made the changes.
Troubleshooting
Use this section if you are experiencing issues with this feature.
The device is not displaying in the licensed device list
Problem
The Licensed devices tab on the software license dashboard does not show the licensed device.
Cause
An incorrectly configured assignment may cause this issue.
Solution
To resolve the issue, refer to the following best practices:
- If you selected Per device (automatic) as the license type, verify that you have assigned the device to one or more groups.
- Verify you have not set the assignment to All group matches if the device is only in one group.
Additional Resources
Refer to the following resources to learn more about ITAM in NinjaOne: