Topic
This article describes the notification and alert feature in NinjaOne, and provides instructions for setup.
Environment
NinjaOne Endpoint Management
Description
Notification channels send notifications on configured conditions, triggering and resetting, and push these alerts to designated Slack channels, email addresses, phone numbers, or webhook applications.
Notifications are configured in the Administration section under Apps; once set up, the channel displays on the page with an icon corresponding to the integration and channel type.
Before getting started, consider the following important notes:
- Only system administrators can create or modify a Notification channel.
- Notification channels follow organization alerting settings and ignore user alert settings.
- Notification channels currently cannot be used for notifications about scheduled tasks.
Index
Select a category to learn more:
- Enable Technician Permission for Notifications
- Set up Notifications
- Delete or Edit Notification Channels
- Configure Notification Delivery to Channels
- Configure Notification Delivery for Policy Conditions
- Additional Resources
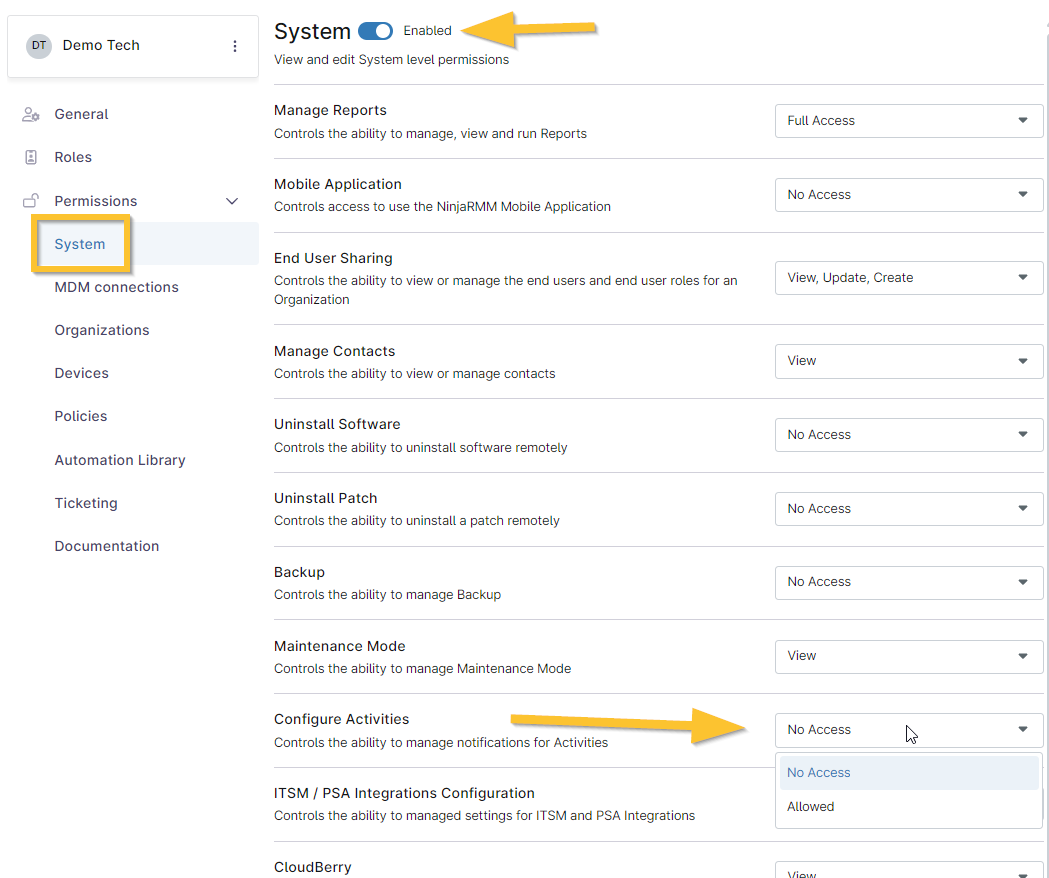
Enable Technician Permission for Notifications
You must enable permissions for technicians to manage notifications for activities. Enabling permissions will not grant them the ability to create or modify notification channels; only system administrators have that permission. Technicians will still need additional access to policies to manage policy-specific activities.
- Navigate to Administration → Accounts → All users or Technician Roles and then select a technician or role.
- Open the System tab under Permissions and ensure it is enabled.
- Scroll down to Configure Activities and select "Allowed."
- Click Save Changes in the top right corner of the account/role editor page.
The technician can now modify system activities under Administration → General → System activities.
Set up Notification Channels
To set up notifications for third-party channels, navigate to Administration in the left navigation pane and select Apps. Click Notification Channels and then click Add channel.
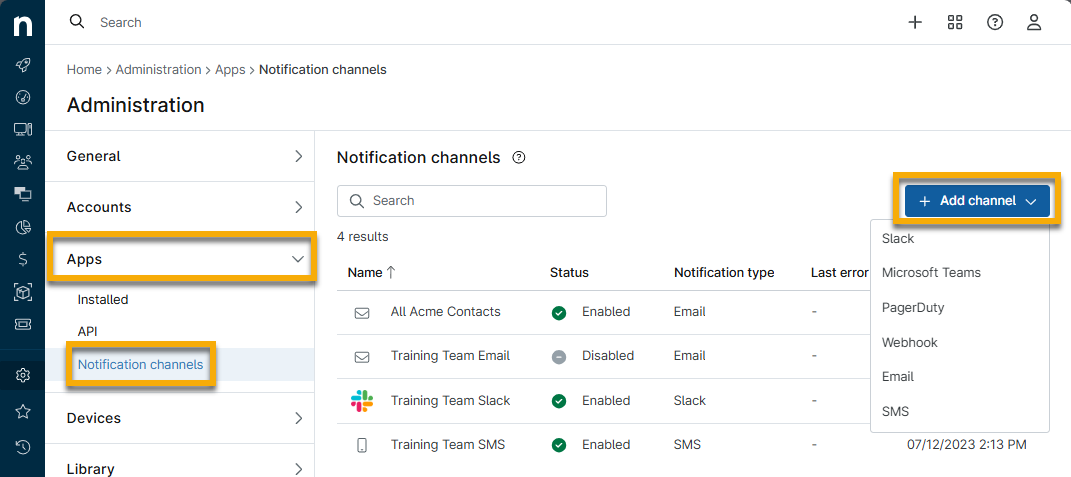
Choose your channel option:
Slack
To set up a notification channel for the Slack application, perform the following steps:
- Select the Slack option.
- Enter a title for the notification channel into the configuration box that appears and ensure that the Enabled toggle switch is activated (on
 , off
, off  ). Click Next.

NinjaOne redirects to Slack to identify the appropriate Slack channel to send notifications.
- Click the "search for a channel" drop-down menu to view available Slack channels or type a channel name into the field to see auto-populate options.
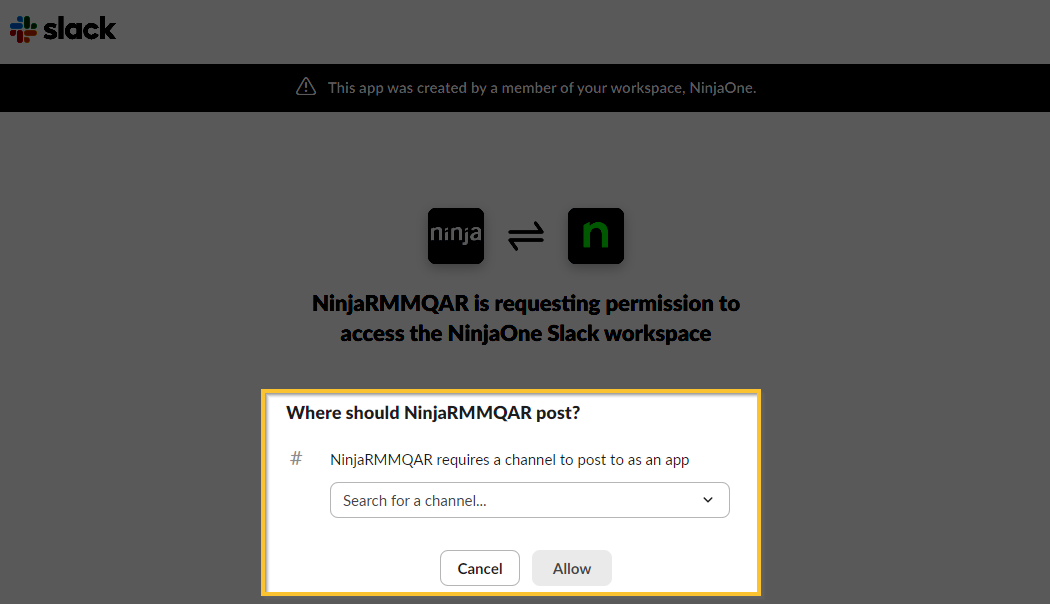
- Click Allow to be redirected back to NinjaOne, where the notification channel is now displayed.
Microsoft Teams
To set up a notification channel for the Microsoft Teams application, perform the following steps:
- Select the Microsoft Teams option.
- Enter a title for the notification channel into the configuration box that appears and ensure that the Enabled toggle switch is activated (on , off ).
In the Target field, enter the full Microsoft Teams webhook URL. If you need instructions for obtaining the webhook, refer to Microsoft's product guides.
Important Note: Remove :443 from the Target URL in the NinjaOne console before pasting the URL into the notification setup. Otherwise, a connection error will occur.
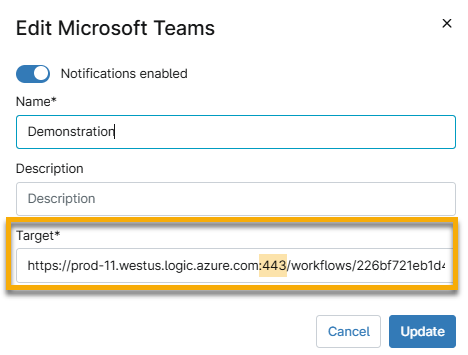
Once you have saved the channel and see it displayed in the NinjaOne console, users can edit the notification channel to use the new logic.azure.com webhook as outlined below:
- Open your account in Microsoft Teams.
- Select your team, move your cursor over the ellipsis on the right, and then click Workflows.

- Enter "Webhook" for the workflow setup and select a template.
- Enter a name, select the Teams connection, and then click Next.
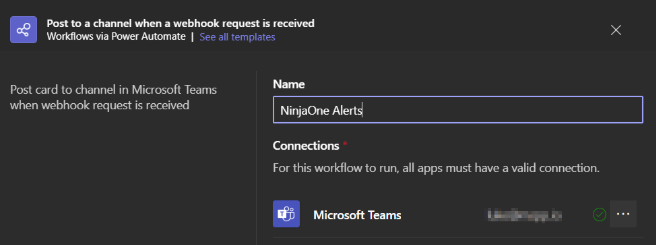
- Adjust the Details, if needed, and then click Add Workflow.
- Copy and save the resulting URL, and then click Done.
PagerDuty
To set up a notification channel for the PagerDuty application, perform the following steps:
- Select the PagerDuty option.
- Enter a title for the notification channel into the configuration box that appears and ensure that the Enabled toggle switch is activated (on , off ).
- To obtain the Service Integration Key field data, refer to PagerDuty's knowledge base. You can either create a new service to set up with your NinjaOne notification channel or click an existing service that you would like to use.
- In the Integrations portion of the process (Step 5 in PagerDuty's referenced knowledge base), activate the checkbox for the Events API V2 integration and then click Add.
- The service detail page displays again.
- On the Events API v2 Overview page, click the down arrow on the right side and then click the double-paper icon to copy the Integration Key.
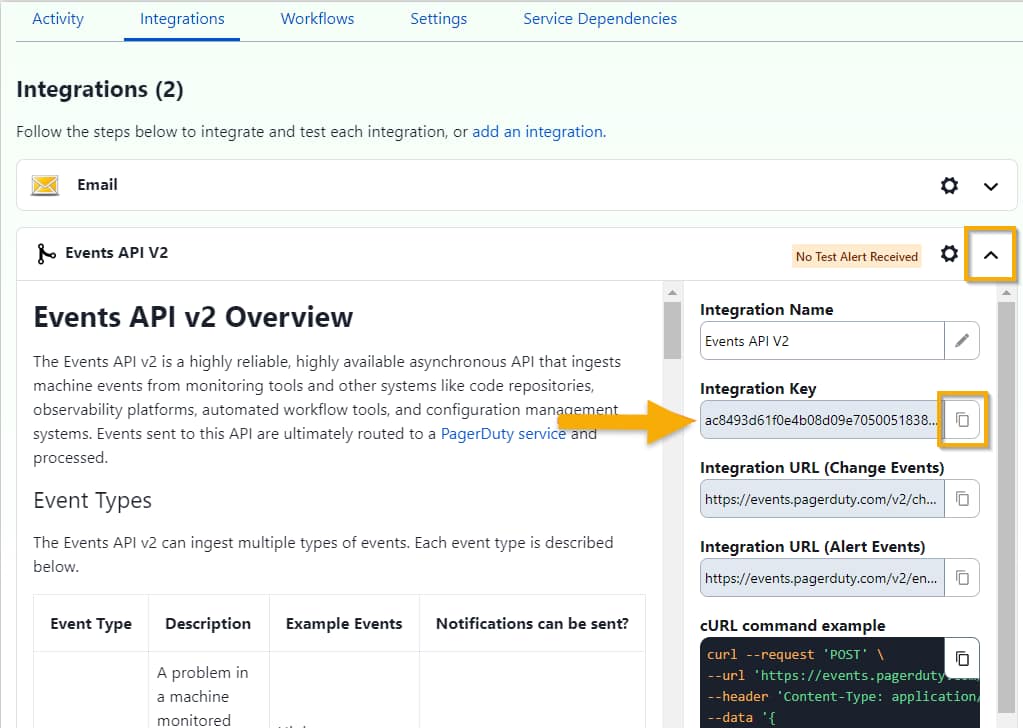
- Return to the NinjaOne page. Paste the copied PagerDuty integration key into the Service Integration Key field. Click Save.
Webhook
To set up a notification channel for the Webhook application, perform the following steps:
- Select the Webhook option.
- Enter a title for the notification channel into the configuration box that appears and ensure that the Enabled toggle switch is activated (on , off ). Add the Webhook URL to which you would like the notification(s) to be sent. Click Save.
To set up a notification channel for an email address, perform the following steps:
- Click Administration in the left navigation pane and select Apps.
- Click Notification Channels and then Add on the page's right side. Select the Email option.
- Enter a title for the notification channel into the configuration box that appears and ensure that the Enabled toggle switch is activated (on , off ). Add the email address to which you would like the notification(s) to be sent. Click Save.
SMS
If SMS has been turned off in your environment, the option will not be available.
- Click Administration in the left navigation pane and select Apps.
- Click Notification Channels and then click Add on the right side of the page. Select the SMS option.
- Enter a title for the notification channel into the configuration box that appears and ensure that the Enabled toggle switch is activated (on , off ). Add the name of the notification channel and the phone number to which you would like the notification(s) to be sent. Only one phone entry is permitted per SMS channel. Click Save.
Delete or Edit Notification Channels
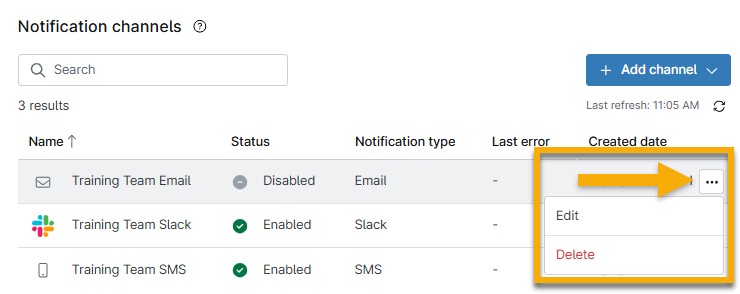
You can edit or delete notification channels in NinjaOne by moving your cursor over the channel and selecting Edit or Delete.
Configure Notification Delivery to Channels
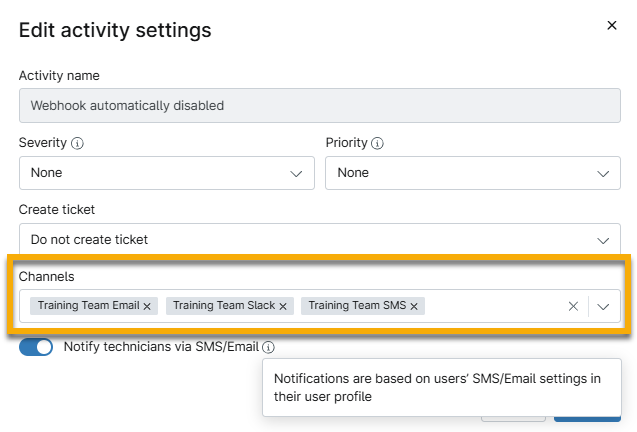
You can configure notifications triggered by events such as conditions, system activities, policy changes, and scheduled scripts to be sent to designated notification channels. In the previous sections of this article, we covered how to enable the notification channels; once enabled, you must select which system activities will be sent to those channels:
- Click Administration in the left navigation pane; open the General section and select System activities.

- Select any activity to open the editor.
The Activities configuration modal displays. - In the Activities configuration modal, use the Channels field to add any channels you want to include in this activity notification. Use the other fields to configure the notifications further and then click Save.
- For information about creating a ticket, refer to NinjaOne Ticketing: Create and Assign.
- For information about technician SMS and email settings, refer to Create a Technician in NinjaOne.
Configure Notification Delivery for Policy Conditions
When a condition is triggered for a policy, you can control whether technicians are notified of the occurrence. To do so, perform the following steps:
- Select a policy from Administration → Policies.
- Open the conditions tab and either create a new condition or edit an existing condition. Refer to Policies: Condition Configuration for instructions.
- Select a notification channel from the Channel(s) drop-down menu and then select "Send notifications" from the Notify Technicians drop-down menu.
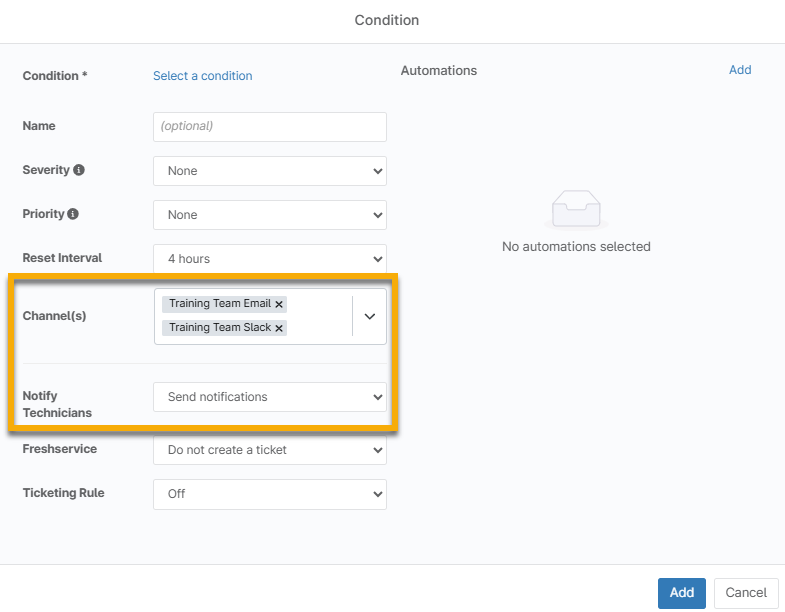
- Click Add or Save.
Additional Resources
Refer to Device Enrollment and Management: Resource Catalog to learn more about device management in NinjaOne.