Topic
This article provides tips, tricks, and best practices for using the NinjaOne OS Deployment feature to capture a Microsoft Windows image and deploy it to new machines. For complete instructions for using the NinjaOne OS Deployment tool, refer to NinjaOne: Deploying Windows Images With the OS Deployment Tool.
Environment
- NinjaOne Endpoint Management
- Microsoft Windows OS Image
Description
There are several steps you can take when creating and deploying your Windows OS image to ensure a smooth process. Review the following sections for information about each topic.
- General Image Capture Best Practices
- Generalizing Your Windows Image Before Capture
- Creating an Unattended Setup File
- Downloading the NinjaOne Agent
- Adding a NinjaOne Agent at Deployment Time
- Adding a NinjaOne Agent Before Image Capture
- Additional Resources
General Image Capture Best Practices
Below are a few best practices to keep in mind when creating and deploying OS images:
- If you are using BitLocker, we recommend fully decrypting and unlocking it on the target device or turning it off. Otherwise, the OS partition will appear as Unknown, and NinjaOne will not be able to detect the drive letter or any valid mountable file systems. The OS deployment tool only lists partitions that are mounted, readable, and have a supported new technology file system (NTFS).
- If you plan to deploy only one type of hardware, then building a hardware-agnostic image is not as important. You can build the image on actual hardware and capture it. However, very few businesses will fit this model, and capturing a unique image for every type of hardware can become a significant waste of time to manage.
- If you want to build an image that can be deployed on various hardware types, especially from different vendors, building a hardware-agnostic image is crucial. Most businesses fit this model. In this scenario, it's best to capture the image from a virtual machine without any special VM Tools installed, thereby omitting extra drivers and vendor-specific software. With this procedure, deploying drivers at deployment time, especially disk and network drivers, becomes more critical. This procedure is fully supported and encouraged in NinjaOne OS Deployment.
You should not install or update any apps from the Windows Store before you capture the image, as this can cause generalization or unattended setup to fail.
In your first image deployment test, only add the necessary start-up settings. Then, after a successful test, you can add more, so it will be evident if any of them cause your setup to fail. This step is a common area where people make mistakes, and it can cause the device to get stuck in boot loops during image testing. Refer to the Creating an Unattended Setup File section below for more details.
Generalizing Your Windows Image Before Capture
Generalizing is the process of preparing an image that you then use as a template for other devices by removing any device-specific information, such as drivers and Windows Security Identifiers (SIDs). It is always best to generalize the image before capture. If you do not generalize, then the SIDs in the original device remain unchanged in the image, and some services may mistakenly identify different systems as the same one. For example, WSUS is one service that may experience issues, and printer services may also encounter problems if you clone devices without generalizing them. To be safe, always perform generalization just before capture.
Using Sysprep to Generalize an Image
Sysprep is a tool available in Windows that you can use to generalize the device for cloning. Once your image is fully configured and ready for capture, run the following command from the command line within Windows as an administrator.
%WINDIR%system32sysprepsysprep.exe /generalize /shutdown /oobe
This command will generalize the image, power off the network to prevent any changes, reset the device to run the Out-of-Box Experience (OOBE), which resets factory startup defaults, and then power off the device.
Once you've powered off the device, you can boot using the NinjaOne WIM/USB/ISO to capture a clean image.
If sysprep fails for any reason, you can access log files in this location: %WINDIR%System32SysprepPanther.
For additional guidance on using and troubleshooting Sysprep, refer to Sysprep (Generalize) a Windows installation (external link).
Creating an Unattended Setup File
An unattended setup file allows you to automatically answer all the questions Microsoft asks during the operating system setup process. This process is also known as the OOBE. The setup file allows the device to boot up to the Windows login screen with all the settings preconfigured. You can configure hundreds of settings via this method; however, the more that you configure, the less portable the unattend.xml file becomes to different OS versions.
In your first image deployment test, only add the necessary settings. Then, after a successful test, you can add more, so it will be evident if any of them cause your unattended setup to fail. This step is a common area where people make mistakes, and it can cause the device to get stuck in boot loops during image testing. You can find guidance on the internet about creating unattended setup files using Microsoft's tool; however, that method can become more complex than necessary.
As an alternative to the Microsoft tool, you can use the online file generation tool on the schneegans.de website to create your file. To use this tool, navigate to Generate autoattend.xml files for Windows 10/11 (external link) on the schneegans.de website and follow the provided instructions to create your setup file. NinjaOne does not own the schneegans.de site, but it has historically done a great job at providing an easy way to make these answer files. Use your best judgment as to which method works best for you.
To entirely skip all the questions in the OOBE, the essential parts to configure on the above website are as follows:
- Windows display language
- Language
- Keyboard Layout
- Home location
- Processor architecture
- Product key
Once you've generated the unattended setup XML file, copy it to your deployment share location. This location is likely the same or similar to where your OS images are stored.
We recommend keeping your initial unattended setup file simple. There are a large number of settings, and selecting all options during initial setup may cause the file to become stuck in boot loops. Start with just a few settings and ensure your file works correctly before adding more settings, as some settings may conflict with specific configurations within your image and cause the unattended setup to fail.
Downloading the NinjaOne Agent
Follow these steps to download a NinjaOne agent MSI for use during your OS deployment, ensuring that every imaged device immediately connects to your NinjaOne instance.
In NinjaOne:
- Select the plus sign (+) in the top right corner of the screen.
- Select Device → Computer.
- For Windows, select the appropriate Organization, Location, and Role (Auto is fine for most customers).
- Select Generate Installer.
- Download the file.
Repeat the above procedure for any other organizations or locations you would like to make available during OS deployment.
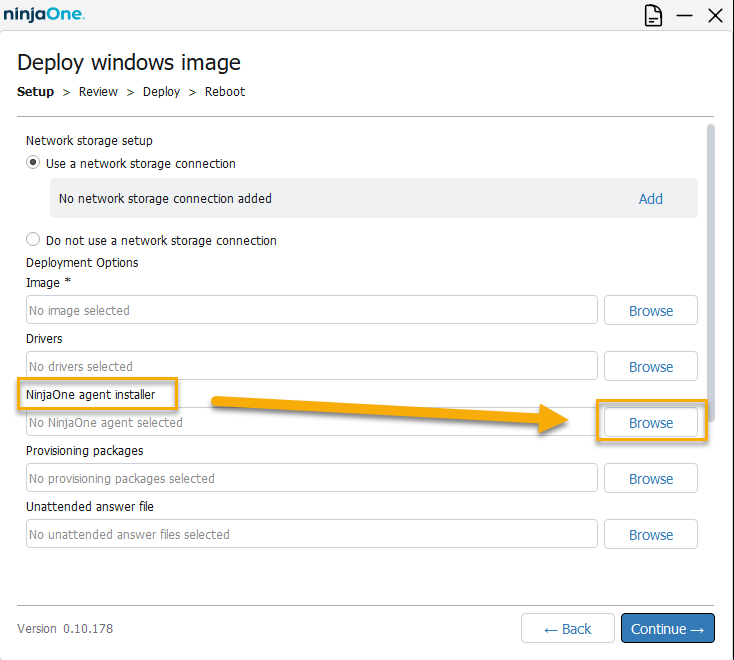
Adding a NinjaOne Agent at Deployment Time
Adding the NinjaOne agent at deployment time is more flexible than adding it directly within the captured image itself. It allows the technician to choose the organization and location to deploy to during deployment, so one image can service multiple organizations and locations, resulting in fewer images to manage. You can easily add the NinjaOne agent installer by following these steps:
- Download the NinjaOne agent installer for your NinjaOne instance as described in the Downloading the NinjaOne Agent section above.
- From the Deploy windows image page in the OS Deployment tool, click Browse to locate and add the file to your deployment.
- Complete the remaining image deployment steps. For a complete explanation of the entire deployment process, refer to NinjaOne: Deploying Windows Images With the OS Deployment Tool.
Adding a NinjaOne Agent Before Image Capture
Adding the NinjaOne agent before image capture works well, but it's less flexible than installing the agent at deployment time. It means you will be hardcoding the NinjaOne Organization and Location into the image itself, so all devices you image will contain this same information. This process will generalize the NinjaOne agent before capture, so it will register as a new device each time you deploy the image.
Refer to NinjaOne: Deploying Windows Images With the OS Deployment Tool.