
Topic
This article explains how to import your account codes to NinjaOne so you can generate quotes.
Environment
Create quotes and proposals, request approval or sign-off from your customers, and then convert these to billable items.
Description
Index
Select a topic to continue:
- Import Account Codes
- Import Products
- Generate Quotes
- Add Quote
- Manage Your Quotes
- Convert Quote to Invoice or Agreement
- Renew an Expired Quote
- Additional Resources
Import Account Codes
After you integrate your accounting tool, you can add your account codes.
- In the NinjaOne Billing app, click Accounts and select Import accounts or Add account code.
- When you select Import accounts, NinjaOne will pull a list of account codes from your QuickBooks or Xero account.
- Select the checkbox next to each code you want to import, and then click Continue.
- You can edit the account code or name on the Review accounts page.
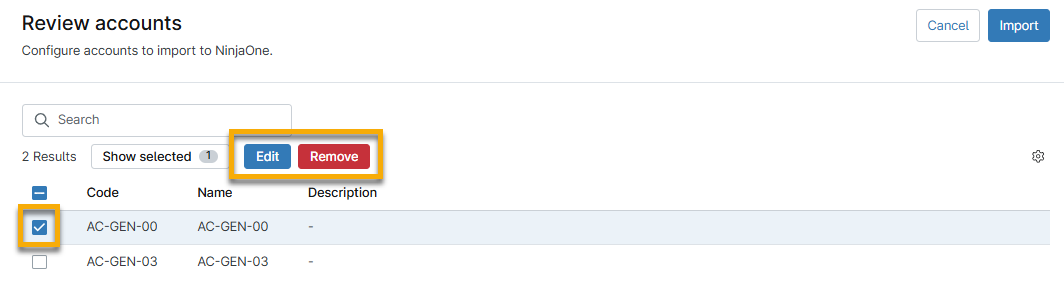
- Click Import to confirm your selection.
When you select Add account code, you must create a new account code and name.
After you import the account codes, you can import products from your accounting tool. Refer to the following section.
Import Products
Before you can start creating invoices from your accounting tool integration, you must import the products. Make sure you also imported your tax codes using the previous section.
- In the NinjaOne Billing app, click Products → Active and select Import products.
- NinjaOne will pull a list of tax codes from your QuickBooks or Xero account. Select the checkbox next to all products you want to import and click Continue.
- On the Review products page, select the checkbox and click Edit to update the product name, account, quantity, billing information, and permissions.
- If the product is not associated with an account code when you select it, edit the product and select the appropriate account code from the Account drop-down menu.

- When all of the data for your products is correct, click Import.
NinjaOne will also add these products to the integration's Settings page in the Items section.
You can now create quotes for these products. Refer to the following section to learn more.
Generate Quotes
Configure quote numbering and add a logo, sender information, a header, and a footer to PDFs. This workflow is almost identical to the Configure Your Invoice Settings section in NinjaOne Billing: Invoice Settings.
- In the NinjaOne Billing app, click Quotes → Settings and select Edit.
- When the Automatically generate quote numbers toggle is activated, you can select the next quote number and optionally set a prefix and suffix.
- Click Upload to add a custom logo. If you do not add a custom logo, the quote will display the NinjaOne logo.
- You can include the sender's information, such as the company name and address, on the quote. If you do not enter data into the Sender name or Sender address fields, the designated area will appear blank on the final version.
- Use the Quote header and Quote footer HyperText Markup Language (HTML) editors to create an optional header and footer for the quote. You can customize the text's appearance, and the Preview mode will show an example of the final version.
- Click Save.
You can now submit your quote using the imported tax codes and products. To learn more, refer to the Add Invoice section in NinjaOne Billing: Invoice Settings.
Add Quote
Create quotes and proposals, request approval or sign-off from your customers, and then convert these to billable items.
- From Finances → Quotes → Draft click Add quote and select Create new.

- The Quote number will generate automatically. Select the organization that will receive the quote and the point of contact within that organization who will receive the email.
- Set an expiration date for the quote. This is the last day the quote can be accepted or a decision to be made.
- Optionally, add a note to the request.
- Click Products in the sidebar menu. You can create new products from this page or add products you previously imported. To learn how to add new products, refer to NinjaOne Billing: Products.
- Set the pricing and quantities manually and then click Save.
- Click Create.
Manage Your Quotes
After you create a quote, you can edit, clone, preview, send, approve, or reject it by selecting the checkbox next to the quote number.

| Action | Description |
|---|---|
| Edit | Update the details of the quote. |
| Clone | Create a copy of the quote. You can update the quote details before finalizing the copy. |
| Preview | View what the quote will look like to the recipient. You can edit, reject, or approve a quote through this action. |
| Send by email | Send the quote to the selected point of contact. To use this action, you must have Custom SMTP server settings configured for NinjaOne Ticketing and invoice sending activated in NinjaOne Billing. |
| Approve | Manually approve the quote. |
| Reject | Manually reject the quote. |
When you or the recipient approves or rejects the quote, or if it expires, it will move from the Pending page to the applicable drop-down menu section.

Convert Quote to Invoice or Agreement
You can convert an approved quote to an invoice or service agreement.
- From Finances → Quotes → Approved, select the checkbox next to an approved quote.
- Click either Convert to invoice or Convert to agreement.
- Convert to invoice: Create a one-time payment.
- Convert to agreement: Create a payment interval. Use an existing agreement template to match items. Products from the quote and agreement template will be combined. Matching products will use prices from the quote.

- For either option, select a tax code and determine whether the invoice will accept credit card or ACH payments. If you are creating an agreement from the quote, these settings will be in the Integration data section.

- Click Convert.
- If you are creating an agreement, you must configure its individual settings. Refer to NinjaOne Billing: Agreement Services for more information.
You can now view the details for the invoice or agreement from the corresponding column hyperlink.

Renew an Expired Quote
If a quote expired and needs to be reevaluated, you can do so from Quotes → Expired.
Additional Resources
Refer to NinjaOne Billing: Resource Catalog to view all related articles.