Topic
This article explains how to configure and use response templates and forms when creating and updating tickets in NinjaOne.
If you have not yet enabled NinjaOne Ticketing, refer to NinjaOne Ticketing: Setup and Configuration to learn about ticketing fields.
Index
Select a category to learn more:
- Configure Custom Fields for Ticketing Forms
- Create a New Ticketing Form
- Edit or Deactivate Forms
- Use Forms With a Ticket
- Additional Resources
Configure Custom Fields for Ticketing Forms
Select a topic to learn more:
Add Custom Fields
Custom fields may be created in the Fields tab to further customize different ticketing forms. Learn more about custom ticketing forms in the following section.
- Open the Fields tab and select Active. Click Add in the top right corner and select a field type.
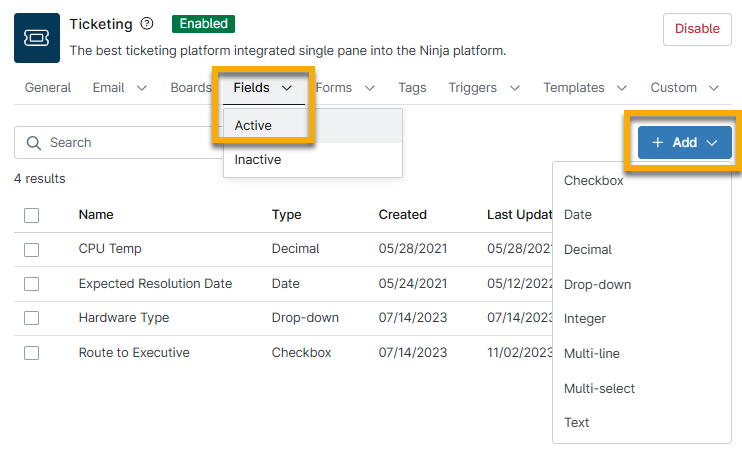
- Select a custom field type. To learn more about types, refer to Custom Fields by Type and Functionality. Some custom fields available in other areas of NinjaOne may not be compatible with NinjaOne Ticketing.
- Fill out the configurable settings, which vary according to the type of field being created. You can make the field required or optional for either technicians or end users. If the field is intended for end-user use, you have the option to add a custom title and description by selecting the checkbox above End user title (refer to Figure 9 for illustration).
- Click Create.
Edit or Deactivate Fields
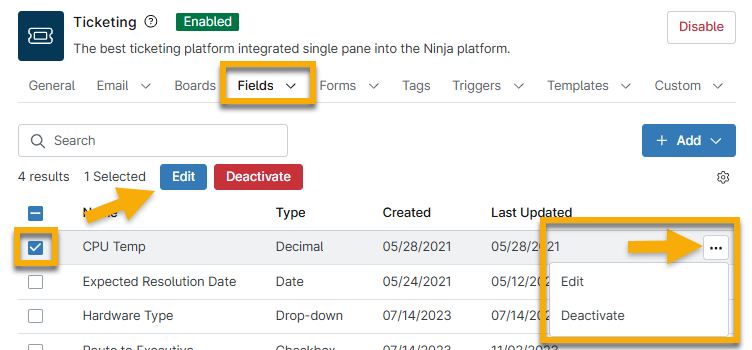
You can edit or deactivate fields by selecting the checkbox next to the field name and then clicking either the Edit or Deactivate button at the top of the list. Alternatively, move your cursor over the field name and click the ellipses button to view these options.
Restore Deactivated Fields
If you deactivate a field and want to restore it, open the Fields tab and select Inactive. Select the checkbox next to the field name and then click the Activate button at the top of the list. Alternatively, move your cursor over the field name and click the ellipses button on the far right to see this option.
Create a New Ticketing Form
To create a new ticketing form, perform the following steps:
- Navigate to Administration → Apps and select NinjaOne Ticketing.
- Select "Active" from the Forms dropdown and then Add in the top right corner.

The New ticket form modal displays with the General tab open by default.
- Enter a name for the form and fill out the other, optional fields as applicable. Refer to the following table for descriptions.
| Field | Data |
|---|---|
| Name | Provide a unique identifier for the board |
| Description | Optionally, provide a summary of what kind of tickets will be sent to this board. |
| End user title | Provide a separate form name for end users, if applicable. |
| Timers | Configure timer settings to track the amount of time it takes to resolve a ticket. |
| End user visible | Click this box to make the form visible to end users |
| End user default | Click this box to make the form the default option for new tickets submitted by end users through their portal. |
| Ticket fields | Select the fields you would like to include on the form. You can manage these fields from the NinjaOne Ticketing Fields tab. |
- Drag and drop the fields to create a custom order, and then click Save.
Edit or Deactivate Forms
You can edit or deactivate forms by selecting the checkbox next to the field name and then clicking either the Edit or Deactivate button. Alternatively, move your cursor over the form name and click the ellipses button to view these options.
You cannot deactivate default forms.

Restore Deactivated Forms
If you deactivate a form and want to restore it, open the Forms tab and select Inactive. Select the checkbox next to the form name and then click the Activate button. Alternatively, move your cursor over the form name and click the ellipses button to view this option.
Use Forms With a Ticket
You must select a form at the time of ticket creation. Each form contains a predefined set of fields that guide the requester in providing the necessary information, depending on the subject.

Additional Resources
Refer to the .