
Topic
This article explains how to configure your ticketing boards in NinjaOne.
Environment
NinjaOne Ticketing
Description
A ticketing board is a filter-based saved view of your tickets. Each board defines a set of conditions, and NinjaOne Ticketing automatically populates the board with every ticket that meets those conditions at any given moment. Tickets are not manually placed on boards; they appear and disappear based on whether they match the board's conditions.
A ticket can appear on multiple boards simultaneously if it meets the conditions for each. When a ticket no longer meets a board's conditions, NinjaOne Ticketing automatically removes it from that board. Boards and ticket counts refresh automatically when a ticket is created, updated, or deleted.
Use ticket boards to organize your tickets into different categories.
The boards described in the following table are available for each account by default. NinjaOne labels all default boards with the System tag.
| Board Name | Description |
|---|---|
| All tickets | All existing tickets in the Ticketing system |
| Open tickets | Tickets that have not been resolved |
| My tickets | Tickets assigned to the logged-in technician |
| Deleted tickets | Deleted tickets |
| Unassigned tickets | Tickets that have yet to be assigned to a technician |
| Organization Dashboard Tickets | Relates to the Ticketing tab on the organization-level dashboard |
| Device Dashboard Tickets | Relates to the Ticketing tab on the device-level dashboard |
Select a category to learn more:
Add a Ticketing Board
To add a new ticketing board, perform the following steps:
- Open the Boards tab and click Add.

- In the General section, provide a unique identifier for Name and, optionally, add a summary of what kind of tickets will be sent to this board for the Description.
Open the Conditions section. Use the following table as a guide to complete the applicable fields.
Field Data Meets all conditions You can add one or more conditions under this field. If you add multiple conditions, the ticket will be created only if all conditions are met.
The more conditions you add here, the narrower the requirements for routing that ticket to the board.Meets any condition You can add one or more conditions under this field. If you add multiple conditions, the ticket will be created if only one of the conditions is met. If you have conditions in both All and Any, and the ticket meets the Any conditions but not the All conditions, then the ticket will not be routed to the board. Tickets can exist on multiple boards simultaneously, and if the conditions for a specific board are no longer met, it will be removed from that board.
- Open the Columns and sorting section. Use the fields in this section to change the default sorting and display of the board. You can add or remove columns and rearrange the way they are presented, so you can see only the information that is important to you.
- Click Save.
Edit, Copy, or Delete a Ticketing Board
You can edit, copy, or delete custom boards by selecting the checkbox next to the board name and then clicking Edit, Copy, or Delete. Alternatively, move your mouse cursor over the board name and click the actions menu to view these options.
Default boards labeled System cannot be deleted, but you can edit and copy them.

Configure Board Layout
To change the layout of your ticketing board, perform the following steps:
- Click Display Order.

- Use the Visible boards field at the top of the configuration dialog to determine how many boards are visible in the sidebar menu before NinjaOne displays the Show All option (excluding the Pending Emails (#) option). This value can be set to any value between 1 and 20, and defaults to 5. An "eye" icon, as shown in Figure 4, will appear for each row that is considered "visible."
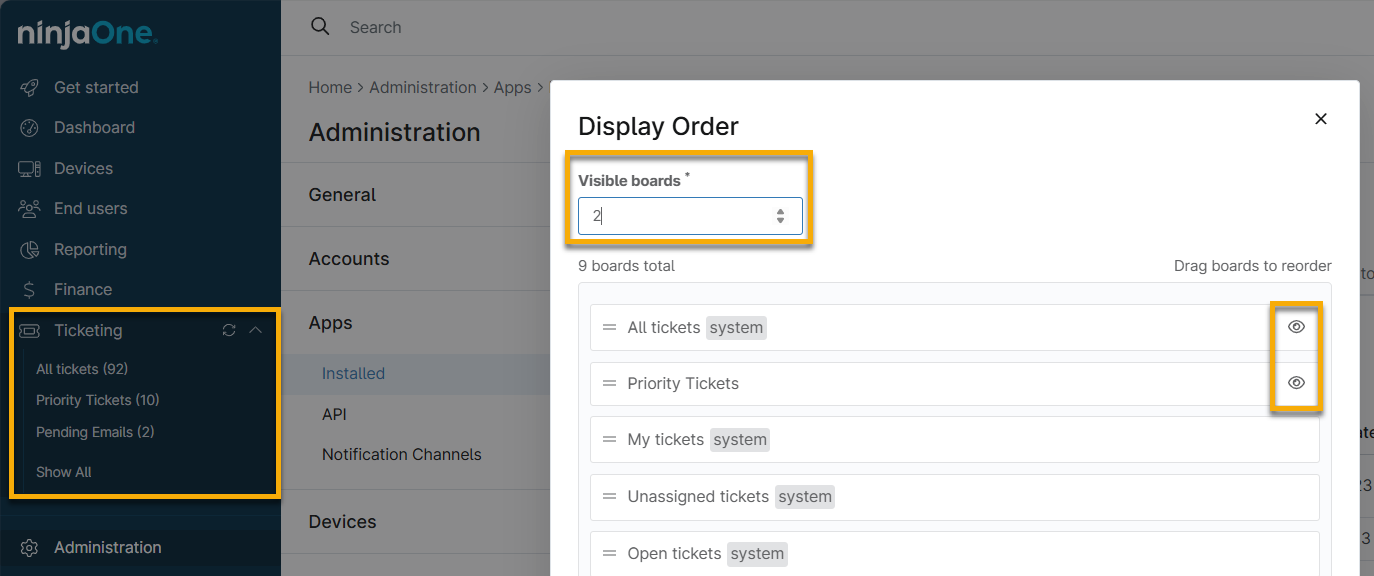
- To reorder the boards, click and hold the row and then drag it to the desired spot.
- Click Save to confirm changes.
Additional Resources
Refer to NinjaOne Ticketing: Resource Catalog to learn more about NinjaOne Ticketing.