Topic
This article describes how to use the NMS network discovery utility in your environment to detect and manage networked devices in your organization.
Environment
NinjaOne Network Management System (NMS)
Description
NMS Network Discovery allows you to scan your network for new devices and convert them to management by NinjaOne NMS. This process is separate from the current Network Discovery closed beta process and will be deprecated as part of the upcoming NinjaOne 13.0 release.
Refer to NinjaOne NMS: System Requirements before installing the NinjaOne Network Management System (NMS) agent.
View additional tutorials in our video library.
Index
- NMS Agent Architecture
- Run NMS Network Discovery Ad Hoc
- Add Devices to your Organization
- Assign Device Roles
NMS Agent Architecture
This section describes the agent architecture of NinjaOne NMS.
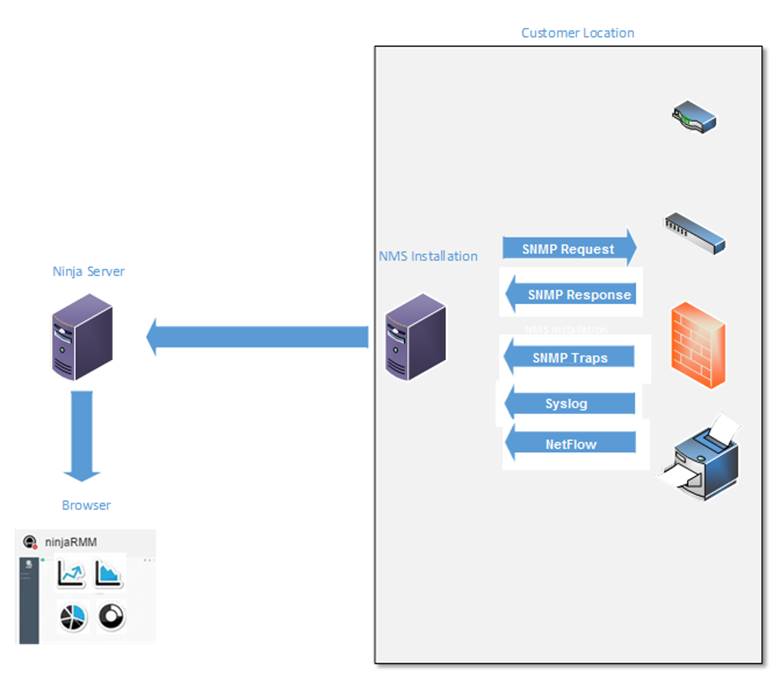
- To use NinjaOne's network management suite, deploy the NinjaOne NMS agent separately for every customer whose SNMP-capable devices you want to monitor.
- The NMS agent is a separate installation from the NinjaOne monitoring agent, but you can install both agents in parallel. The NMS agent performs network discovery (manually) and will add the associated devices to the system.
The following diagram illustrates the NMS agent architecture:
Run NMS Network Discovery Ad Hoc
Follow these steps to perform a one-time scan and discovery.
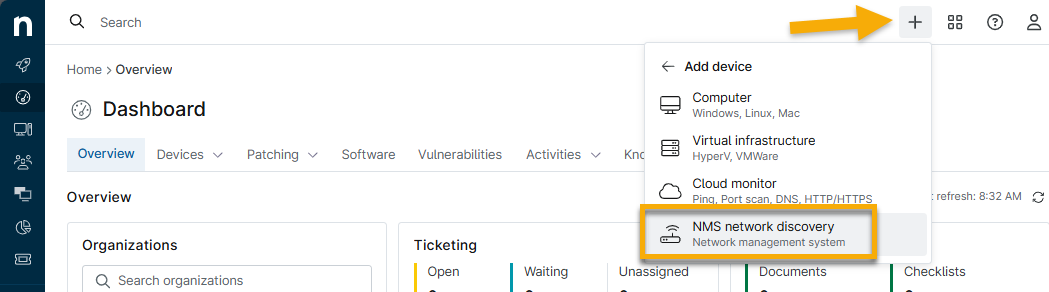
- In the upper-right section of the NinjaOne console, click the + icon, then select Add device.
- Click NMS network discovery.
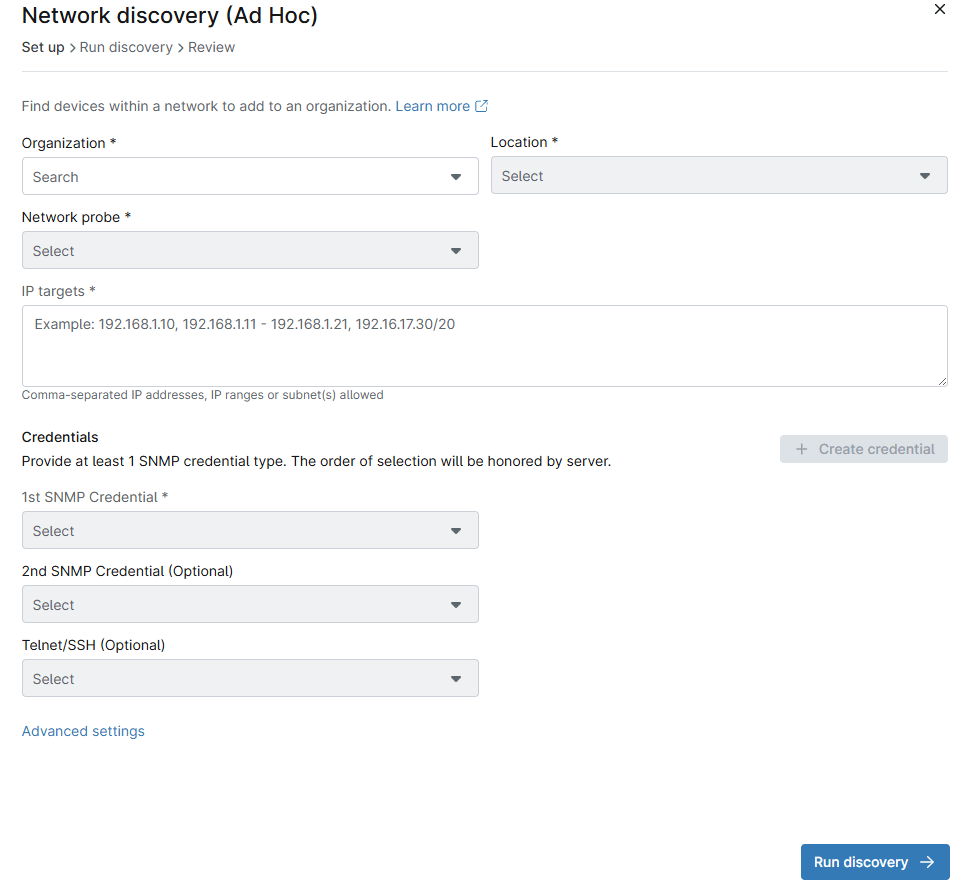
- The Network discovery (Ad Hoc) configuration modal will open. From the drop-down lists, select an organization and location. If an organization has only one area, the Location field should auto-populate based on the chosen organization.
- Select a device from the Network probe drop-down menu to perform the network discovery. This list will contain all online Windows devices with the NinjaOne Agent installed that are running one of the following operating systems:
- Windows 10
- Windows 11
- Windows Server 2016
- Windows Server 2019
- Windows Server 2022
- In the IP targets box, enter comma-separated IP addresses, IP ranges, and subnets for your discovery range. For example:
- 192.168.1.1, 192.168.1.2, 192.168.1.3
- 192.168.1.1 - 192.168.1.50
- 192.168.1.0/24
- If your credential is not listed, click Create credential, then select a credential type (SNMP v1, SNMP v2, SNMP v3, Telnet, or SSH). New fields will be displayed as shown in the Credential Types table below.
SNMP Considerations
Network Discovery uses SNMP to discover, profile, and monitor your devices.
- SNMP community leverages a string to access the router network device, and is only available with the SNMPv1 and SNMPv2c protocols.
- SNMPv3 requires username/password authentication and an encryption key.
Credential Types
| Credential Type | Credential Settings |
|---|---|
| SNMP v1 and v2 |
|
| SNMP v3 |
|
| Telnet/SSH |
|
When you have completed your entries, click Add. Your credentials are now available from the Credential drop-down lists.
Additional Credential Options
As an option, you can select an additional credential:
- From the second SNMP drop-down menu: If necessary, NinjaOne will also try this credential in addition to the first one selected.
- From the Telnet/SSH drop-down menu: NinjaOne uses Telnet/SSH credentials to back up the configuration.
Applying Ping Conditions Through Additional Settings
Ping is useful for testing network connectivity by sending data packets and measuring the response time.
| Setting | Description |
|---|---|
| Ping timeout (ms) | Specify how long to wait for a reply, in milliseconds. The initial packet is sent, waits for a reply, and gives up at a preset timeout. |
| Ping packet TTL | Allows you to set TTL (time to live) at a specified threshold. |
| Pings per node | Specifies the number of pings sent to each host to test if the host successfully responds to each. |
| Delay between pings (ms) | Specify the number of milliseconds that pass between each ping. |
For any device not previously used as a network probe, NinjaOne will create a new service that promotes the device to become the NMS delegate. The service is named Ninja NMS Manager Service, and the corresponding process name is nmsmanager.exe.
To apply ping conditions for network discovery:
- Click Advanced settings.
- If your device is not local (for example, on a VPN), We suggest increasing the ping timeout and TTL. Click Apply and then click Run Discovery. You can also click the X in the upper-right corner of the modal at any time to stop the current discovery process.
Add Devices to Your Organization
Once network discovery is complete, select the checkboxes to add one or more devices to your organization.
To cancel the process, click Stop discovery, then click Back to adjust your discovery configuration settings.
- From the IP type drop-down menu, refine your search by selecting one of the following:
- All IPs
- All responding
- All SNMP responding
- Existing devices
- Offline devices
- Click Review to finalize your selections.
Important Notes
- You can use the search box to locate specific devices.
- While all discovered devices will be in the selected organization, you can change the location of individual devices after adding them to NinjaOne from the Search tab or the device settings.
- You cannot select devices already added to your organization.
Assign Device Roles
The device role determines which NinjaOne NMS policy this device will use. On the Review page, assign a role to each device in the Device role column if the system did not determine its role during discovery.
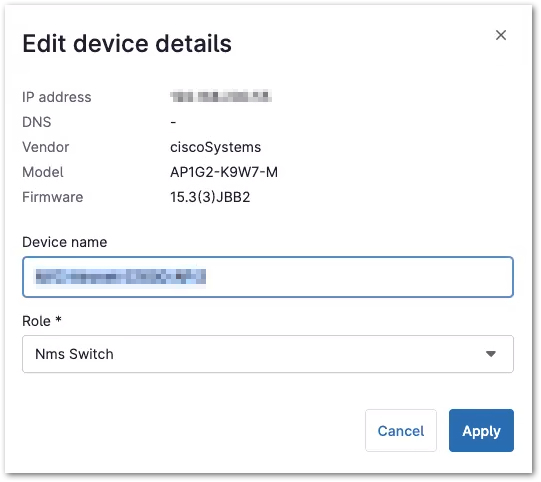
- Select one or more devices in the list, then click Edit.
- Select a role from the drop-down menu, then click Apply. To edit device details, click a device row, adjust the device name and role, then click Apply. You can also change a device's role after adding it to your organization. To learn how to edit device roles, refer to NinjaOne Endpoint Management: Device Roles.
- When your device review is complete, click Finish, then click Confirm. To return to the Review page, click Cancel.
- When the success notification window appears, click Close, or click Network probe to view the discovery device details. On the Network Probe device Overview tab, navigate to General→ Monitoring Hosts to view the devices added through network discovery.
In NinjaOne, you can now view your discovered devices in the Devices list, ordered by device name, associated customer, and assigned policy (which is dictated by the device role). For more information, refer to Find and Manage Endpoints from the Devices Search Page.