Topic
This guide covers selecting specific workloads, restoring data, downloading files, and managing backup settings.
Environment
Description
NinjaOne SaaS Backup is a cloud backup platform that helps businesses securely backup, manage, recover, and protect their business information. The automated and incremental backups simplify the backup, recovery, and compliance experience. It works with Microsoft 365 (Hosted Exchange, Groups and Teams, SharePoint, OneDrive), Gmail (including Calendars, Contacts, and Tasks), and other IMAP email servers. NinjaOne uses 256-bit (AES) encryption at rest and in transit, supporting multifactor authentication (MFA).
Index
- OneDrive Restore and Download
- My Drive (Google Drive) Restore and Download
- Shared Drive Restore and Download
OneDrive
With OneDrive for Business, you have various options to manage backups, restore data, download files, and configure backup settings based on specific needs.
- Select Specific Workloads: Choose specific OneDrive workloads to back up, available for both manual and Autodiscover.
- Restore Options: Restore an entire OneDrive, a single folder, or a single file, including point-in-time restores to access data as it existed on any date since the backup began.
- Flexible Destination: Restore data to the same user’s OneDrive or another user’s drive within the same tenant.
Add a Mailbox to Backup, Excluding OneDrive
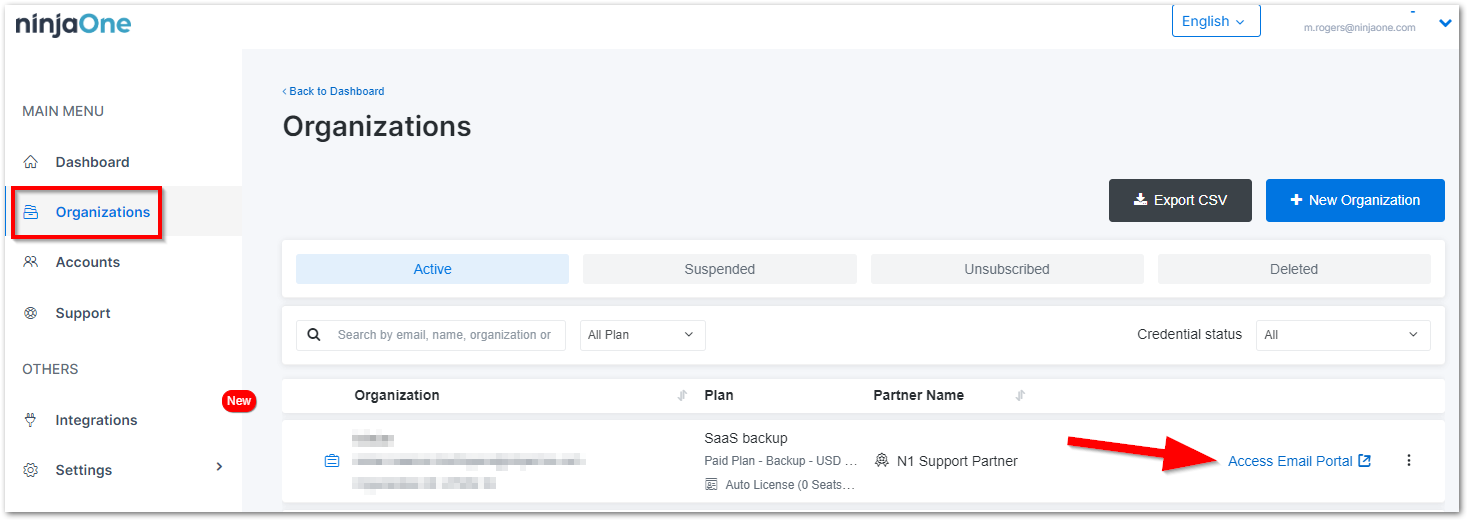
- Access the Organization Email Portal.
- Click +Add Backup, select Microsoft 365, and choose the account you want to modify.
- To exclude OneDrive, click Exclude.

The Exclusion List modal displays. - Select "OneDrive" from the Sub Product dropdown and then click Yes, Continue.
- On the Microsoft 365 page, select the account again, and click +Add to Backup.

The system shows an add-to-backup pop-up confirmation. - Ensure that the OneDrive toggle is disabled, then click the Yes, continue button.
Note: The OneDrive toggle indicates whether they will be added to the backup.
The system will display OneDrive in red, indicating it is excluded, and other products in gray, showing they are added to the backup.
Exclude OneDrive from Autodiscover
The Autodiscover feature automatically detects and includes new M365 accounts and sub-products, such as mailboxes and OneDrive, in backups.
- Access the Organization Email Portal.
- Click +Add Backup, select Microsoft 365, and choose the account you want to modify.
- Click the Autodiscover toggle switch.
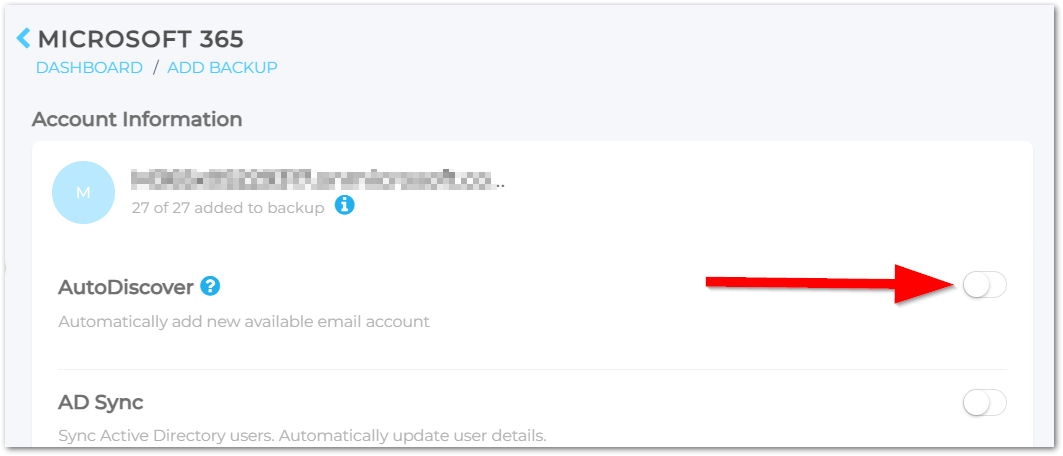
- Click the OneDrive toggle switch so that it is no longer green. Click Continue.

Once it is successful, the Autodiscover toggle will be active, and another toggle will appear below following the previous state.
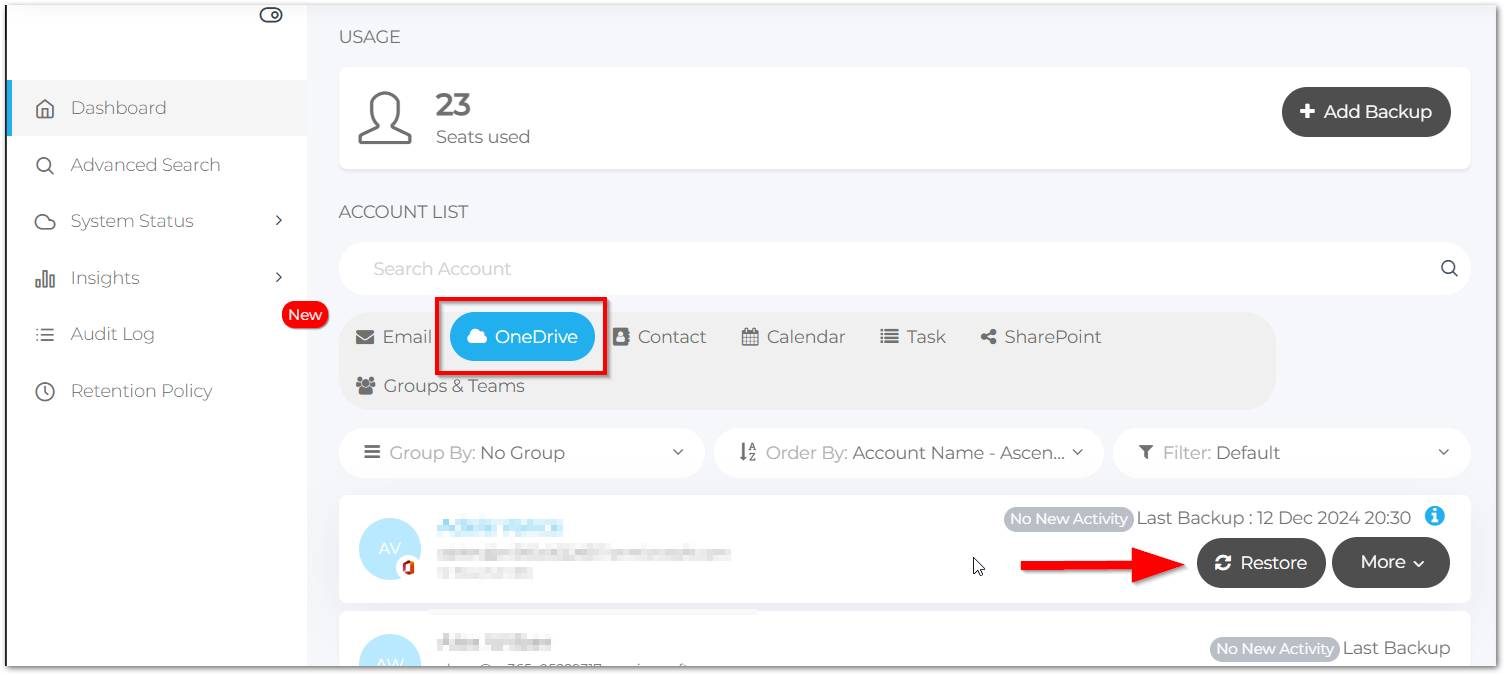
Restore OneDrive
- Access the Organization Email Portal.
- Under Account List open the OneDrive tab.
- To restore the entire user’s OneDrive data, hover over the user and click on Restore.
The Restore OneDrive modal displays. - Select from the following options:
- Backup date: This will restore the files and folders as they existed on the date selected
- Destination: You can choose the original user or another user within the same tenant
- Restore Method:
- Default Folder: This will restore everything to the same folder from which it was backed up
- Create New Folder: This will restore the data to a specified folder
- Advance Option: Use this to decide what to do in case a file conflict occurs during restore. Conflict arises when you restore a file to a location that already has a file with the same name and type.
- Create (Default): This will restore files as a duplicate of the existing one
- Append: Restores files by adding a new version to the existing file
- Overwrite: Replaces existing files with restored ones
- Skip: Skips the conflicting file
- Once the desired options are selected, click Start Restore and then Yes to continue.
- If you only want to restore specific files/folders, click on the user's name and select the items you are looking for. You can then proceed as outlined in Step 4.
My Drive (Google Drive)
For MyDrive, you can:
- Restore entire user’s MyDrive, Single Folder, Single File
- Do point-in-time restore
- You can restore a file, folder, or entire drive on any date since the backup started
- Restore data to the same user’s Drive or any other user’s drive in the same tenant
Restore MyDrive
Option 1:
- Access the Organization Email Portal.
- Go to the G Drive tab (if available).
- Hover your cursor on the user’s drive you wish to restore. If you want to restore the entire user’s MyDrive Data, click Restore.
- On the next screen, you will see the option to select:
- Backup date: This will restore the files and folders as of that date
- Destination: You can restore the same user’s OneDrive or another user's OneDrive in the same tenant
- Default folder: This will restore everything to the same folder from where the data was backed up from
- Create a new folder in the user’s OneDrive and restore the data there
- Advance Option:
- Use this to decide what to do in case a file conflict occurs during restore.
- Conflict arises when you restore a file to a location that already has a file with the same name and type.
- Select the options, choose Start Restore, and click Yes, Continue.
Option 2:
- If you want to restore selected files and folders, only click on the user whose data will be restored and locate the files/folders you want restored.
- Click Restore.
- Select the option to Restore the last backup version on the backup date or the Last and all previous versions on the backup date.
- As before, you will be given the option to select options:
- Destination: You can restore the same user’s OneDrive or another user's OneDrive in the same tenant.
- Default folder: This will restore everything to the same folder from where the data was backed up from.
- Create a new folder in the user’s OneDrive and restore the data there.
- Advance Option: Use this to decide what to do in case a file conflict occurs during restore.
- Create (Default): Restore files as a duplicate of the existing ones
- Append: Restore files by adding new versions of the existing ones
- Overwrite
- Replace existing files with the restored ones
- Skip: Skip restore for any files that already exist
- Select the options, select Start Restore, and click Yes, Continue.
Download MyDrive
- Access the Organization Email Portal.
- Go to the G Drive tab (if available).
- Hover your cursor on the user’s drive you wish to download. If you want to download the entire user’s MyDrive Data, click Data.
- On the next screen, you will see the option to select.
- Backup date: This will restore the files and folders as of that date.
- Click Generate Download and click Yes, Continue.
- If you want to download selected files and folders, click on the user whose data will be downloaded.
- Select the backup and the data you want to download.
- Click Download.
- Select the option to download the Last Backup Version or Last and all previous versions on the backup date.
- Click Generate Download and click Yes, Continue.
Shared Drive
Restore Shared Drive
- Access the Organization Email Portal.
- Click on the Shared Drive tab (if available).
- Hover your cursor on the required Shared Drive and click the Restore button.
- Select the date and time you want to restore.
- Select the destination you wish to restore to (Original or Other Shared Drive).
- To restore to other Shared Drive, select this option from the drop-down menu.
- Select the Restore method.
- Keep Folder Structure (default): This option restores by following the path and folder structure based on the latest backup.
- Restore to a New Folder: This option restores to a new folder at the root level of the destination.
- If this option is chosen, you will need to name the new folder.
- Finally, click Start Restore.
Download Shared Drive
- Access the Organization Email Portal.
- Go to the Shared Drive tab (if applicable).
- Hover your cursor on the Shared Drive you wish to download.
- If you want to download the entire Shared Drive, click Download.
- Choose the date and time you wish to download.
- Backup date – this will download the Shared Drive as of that date.
- Backup Time – select the version you wish to download (Shared Drive is backed up 3x daily).
- Select Generate Download, and click Yes, Continue.
If you only want to download one file or folder, follow this path:
- Access the Organization Email Portal.
- Go to the Shared Drive tab (if applicable).
- Expand the main Shared Drive.
- Select the files and folders and click Download.
- Select the version you want to download.