Topic
This article is a copy of the NinjaOne Best Practice guide from our NinjaOne Resource Center. You can download the data as a PDF at the bottom of this page.
Environment
NinjaOne Endpoint Management
Description
Index
Select a topic to learn more.
- Why Endpoint Hardening is Important:
- What Device Hardening Includes:
- Automate Endpoint Hardening:
- Adding a Custom Script to NinjaOne:
- Five Ways to Automate Device Hardening:
- Resources
- Glossary
Why Endpoint Hardening is Important
At its core, endpoint hardening is the overarching concept of reinforcing security at the device level. Because securing your endpoints is fundamental to every other security action you take, the investment you make in it will have a larger ROI than almost anything else. If you don't do it well, every other solution and step you take will have to be better, work harder, and have fewer gaps.
According to Microsoft's 2022 Digital Defense Report, many organizations aren't taking the basic steps needed to support comprehensive endpoint hardening. The following Figure 1 provides a few examples of key issues that have been negatively impacting cyber resiliency:
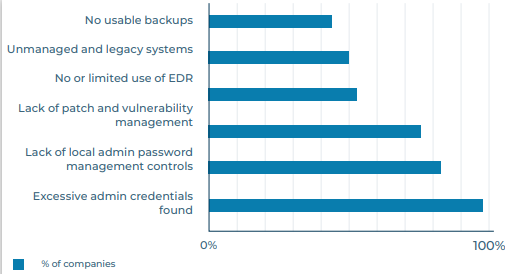
While advanced security measures are important, it's critical to remember that the fundamentals still need work. In the same report, Microsoft found that basic security protects against 98% of attacks. By implementing good security practices, you can start building up those layers of security and give bad actors fewer opportunities to attack.
Figure 2 highlights the technical cybersecurity recommendations of major English-speaking governments for small and medium-sized businesses. Investments here (many of which are device hardening recommendations) provide the greatest value.
What Device Hardening Includes
Device hardening includes any changes you'd make to a device to help improve the device's security.
Here are a few examples:
| Device Hardening | Examples |
|---|---|
| Account Access Protection |
|
| Device Configuration |
|
| Software Management |
|
| Auditing | Audit device hardening. |
This table is not an exhaustive list, but a starting point for organizations looking for next steps in their endpoint hardening process. Not every device hardening activity will be applicable to every environment, and many need to be adapted to your own environment. When improving endpoint security, remember that baselines are constantly changing, so security approaches should always be evaluated and refreshed on a regular basis.
It's also important to note that there are a number of critical actions that you may take to bolster your organization's security, but are not included in endpoint hardening, including:
- Identity and access management
- Advanced security solutions (SIEM, advanced antivirus, and similar)
- Security awareness training for end users
- Network strategy
- Cloud application security
- Mobile threat defense
All of these actions are crucial to ensuring security, but don't specifically target security at the device level.
Automate Endpoint Hardening
Before we get into some examples of how organizations can use NinjaOne to strengthen and simplify their approach to endpoint hardening, let's talk a little more about automation.
In general, IT automation:
- Reduces the potential for human error
- Reduces the time investment in manual tasks
- Reduces costs
- Standardizes device management and service delivery
- Improves IT employee satisfaction
- Improves the end-user experience
- Helps to support compliance
By taking advantage of the benefits of automation, the endpoint hardening process becomes much simpler, more efficient, and cheaper in the long run. Additionally, by setting these processes to run automatically, organizations can more quickly limit exposure to any potential vulnerabilities.
Within NinjaOne, various mechanisms help organizations easily execute an automated IT workflow. In the next section, we'll be demonstrating five examples of how organizations can use NinjaOne's automation tools to improve device security, including:
- Scheduled automations: When you want to take action against devices in a policy at a specific time.
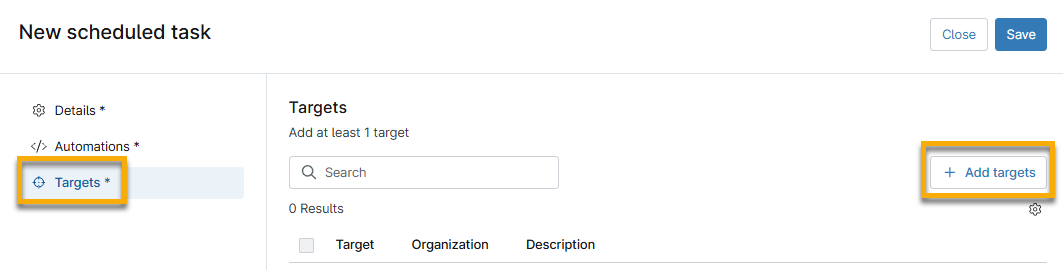
- Scheduled tasks: When you want to take action against devices in a group at a specific time.
- Script result conditions: When you want to regularly check information about a device and take action based on the returned results.
- Condition-triggered script: When you want to respond immediately to a state change on
a device. - Custom field triggered script: When you need information that NinjaOne doesn't collect by default, or for multi-step or complex automations.
Related Documentation:
- NinjaOne Endpoint Management: Scheduled Automations
- NinjaOne Endpoint Management: Scheduled Tasks
- NinjaOne Endpoint Management: Policy Condition Configuration
- Command Line Interface (CLI): Custom Fields and Documentation Scripting
Adding a Custom Script to NinjaOne
Because so many automations require customization to individual environments, custom scripts are critical to automation in NinjaOne. As such, it's important to know how to add new scripts to your Automation Library within the NinjaOne platform. To add a new script, you have a few different options. You can either:
- Add a new script using the script editor, or import a new script from your computer with NinjaOne Endpoint Management: Getting Started with Automation Scripting.
- Import a new script using the template library with NinjaOne Endpoint Management: Automation Script Templates.
Five Ways to Automate Device Hardening
This list of methods is not exhaustive, but a good snapshot of what you can do within NinjaOne to help automate and support endpoint hardening.
Deploy Device Security Configurations on Device Setup
In this example, we'll use the scheduled tasks mechanism to automate outside of policies.
When setting up new devices, you can use built-in tools for recent versions of Windows to improve device security. In this example, we will use BitLocker, which is included on every Windows 10 and 11 workstation. With NinjaOne, you can natively track the status of BitLocker, find devices that have BitLocker deactivated, and re-activate it using a custom script.
If you have not already added the script to activate BitLocker to the NinjaOne Automation Library, use the instructions in our NinjaOne Endpoint Management: Getting Started with Automation Scripting article. Then, perform the following steps:
- Open Devices in the sidebar menu and click More filters. Select BitLocker Status.
- Select the Disabled checkbox.
- Create Save group to create a dynamic group of devices that have BitLocker deactivated. For detailed instructions, refer to NinjaOne Endpoint Management: Save and Load Search Groups.
Dynamic groups always show up-to-date information. As you activate BitLocker on these devices, the devices will fall out of this group. As you onboard new endpoints that don't have BitLocker activated, they'll automatically appear in this group. You'll likely want to add some automated remediation to this process; to do that, refer to our
Enable Device Firewalls and Block Outbound Connections
In the following example, we'll use custom fields and policy conditions to detect a device state and trigger an automation. To learn how to add a new custom field, refer to NinjaOne Custom Fields: Getting Started.
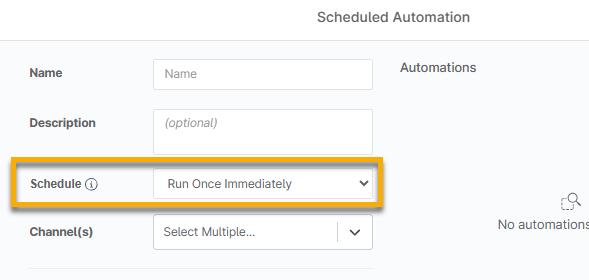
To check on the status of the device firewall in NinjaOne, we offer the following custom field and scheduled automations mechanisms. You can use custom fields in a variety of ways; in this particular method, they will store the output of a PowerShell script:
- Navigate to Administration → Devices → Device custom fields.
- Click +Add custom field and select Text.
- Enter "Firewall Status" in the Label field.
- Configure the inheritance and details to your preference.
- In the Permissions* section, select Read/Write from the Automations* and API* drop-down menu. You may want the Access field set to Read Only.
- Navigate to Administration → Policies and select a policy to which you would like to add this custom field. (If you're unfamiliar with policy setup, refer to NinjaOne Policies: Resource Catalog.)
- In the Conditions section, click Add a condition.
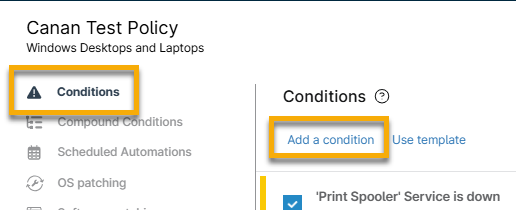
- From the Condition dialog, click Select a condition, and then select Script Result Condition from the Condition drop-down menu.
- Click Select Evaluation Script and select Firewall - Audit Status. If you have not yet added the custom script, follow the instructions in NinjaOne Endpoint Management: Getting Started with Automation Scripting.

- Click Apply. Click Add. Click Save.
- In the Conditions section, click Add a condition.
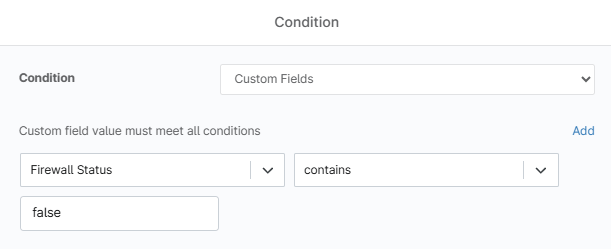
- Click Select a condition and choose Custom Fields from the drop-down menu.
- Click Add next to Custom field value must meet all conditions to generate two new drop-down menus.
- In the first drop-down menu, select the Firewall Status custom field you created. In the second drop-down menu, select contains. Type "false" in the text field (this will look for deactivated firewalls).
- Click Apply, and then click Add in the Automations section of the Condition dialog. Search for and select Set-WindowsFirewall to apply to the condition.

Using Custom Scripts with Conditions
To enhance firewall protection, you can also add a custom script to block outbound network communications.
Within that custom script, add the desired applications you'd like to block internet access to. For example, it's unlikely that Windows calculator or Notepad will need internet access (but can be faked and used as vectors of attack), so you can add them to the list of any applications within the custom script itself. For this example, we used this Block Outbound NetConns for win32 PowerShell script (external link). This resource is not an official NinjaOne script, so test extensively before using!
After you add the script to the Automation Library, you can add it to the same Check Firewall condition that you added the Set-WindowsFirewall script to.
Enable, Expand, and Parse Logs
In this example, we'll trigger an automation on device setup to change a device configuration.
Device configuration is only as good as the information that you're getting from it, which is where event logs come in. Logs help you understand what's happening on the device, and you may need to expand certain logs so you can get an accurate view of the health and security of your environment.
Before we take any additional steps, you'll want to add a new custom script to your library specifically for expanding those event logs. You can use our
Create a Local Admin Account and Automate Password Rotation
Detect and Remove Potentially Malicious Software
You can use NinjaOne's automation tools to easily detect and remove malicious or unwanted software from endpoints. Before you create the software detection condition, you'll need to add an Uninstall Application custom script to the NinjaOne Automation Library. You can use our Script Share folder or other community-provided scripts for this purpose.
- After you've added that custom script, navigate to the policy that you want to update and open the Conditions tab.
- Add a new condition and choose Software from the Condition drop-down menu.
- Select Exists from the resulting Presence drop-down menu and enter the name of the software that you'd like to detect into the Names field. If you add asterisks around the software name, it will pull in anything that uses that name in the software title—not just exact matches.
- Click Apply and then add the automation.
To ensure you're fully remediating your issues, test and confirm that this PowerShell script or uninstaller will successfully remove the application before deploying fully.
Resources
Endpoint hardening is essential, and with proper automation, you can easily implement and maintain it. If you've been looking for a tool to help you automate your IT workflow, get access to a free NinjaOne trial here:
https://www.ninjaone.com/freetrialform/
We've put together a list of a few security frameworks you can use when securing your network and devices:
- NIST Guide to General Server Security (external link)
- CIS Benchmarks for Microsoft Windows Desktop (external link)
- MITRE ATT&CK Security Knowledge Base (external link)
Glossary
The following table provides definitions of the acronyms used throughout this article. For more definitions, refer to NinjaOne Terminology.
| Term | Definition |
|---|---|
| API | Application programming interface |
| AV | Antivirus |
| BIOS | Basic Input/Output System |
| EDR | Endpoint detection response |
| HTTP | Hypertext transfer protocol |
| MFA | Multi-factor authentication |
| SIEM | Security information and event management |
| SMBv1 | Server message block (v1) |
| Telnet | Teletype network |
| UAC | User account control |
| UEFI | Unified extensible firmware interface |
| USB | Universal serial bus |