
Topic
This article provides instructions and requirements for setting up, downloading, and installing NinjaOne Remote.
Environment
NinjaOne Remote
Description
NinjaOne Remote is a remote access tool integrated into NinjaOne that allows technicians and end users to connect to and control remote devices over the internet.
NinjaOne Remote (NinjaOne, Inc., 02:59)
Select a category to continue:
- NinjaOne Remote's Capabilities
- How NinjaOne Remote Works
- Activating NinjaOne Remote
- Granting Permission to Use NinjaOne Remote
- Installing NinjaOne Remote on Devices
- Additional Resources
NinjaOne Remote's Capabilities
NinjaOne Remote supports the following capabilities:
- Remote desktop access: Connect to office computers to access applications and files when working off-site.
- Patch and software management: Deploy software updates, security patches, and maintenance tasks across multiple devices from a single remote session.
- Unattended access: Connect to end user devices without requiring confirmation from the device user, including from the NinjaOne mobile application. For more information, refer to NinjaOne Platform: The Mobile Application.
- Blank screen: Set connected monitors to display a blank screen during a session (requires Windows 10 20H1 2004 or later and administrator privileges).
- File transfer and session recording: Transfer files to or from a remote device, or record the session for later review.
- Remote printing: Print to a local printer from a remote session (requires administrator rights and the Quick Connect launcher running in elevated mode). For more information, refer to NinjaOne Remote: Quick Connect.
How NinjaOne Remote Works
NinjaOne Remote operates with the NinjaOne RMM agent for devices integrated into NinjaOne over port 443 (standard Secure Sockets Layer [SSL]). NinjaOne Remote supports the use of HTTP(S) and SOCKS5 proxies with network support.
- As a security measure, when a user initiates a connection from the player device to a remote (streamer) device, NinjaOne automatically terminates the connection if the player device's WAN IP address changes.
- NinjaOne acts as a relay for remote session traffic from the source device to the target device.
- As a best practice, we recommend against launching remote connections via mobile browsers. However, you can allowlist specific URLs for different remote instances.
Allowlisting and Compatibility
Refer to NinjaOne Global Allowlist Information for complete allowlisting requirements. You must follow both the global and regional requirements for your location.
NinjaOne Remote Player is compatible with:
- Microsoft Windows 10 (1709), Windows Server 2016 (1709), and newer.
- Apple macOS 12.0 (Monterey) and newer.
- Google Android
- Linux (Early Access)
- Apple iOS
NinjaOne Remote Streamer is compatible with:
- Microsoft Windows Server 2008 R2 (not SP or SP2; sas.dll is available only from Windows 7/2008 R2)
- Apple macOS 12.0 (Monterey) and newer.
- Google Android
- Linux (Early Access)
- Apple iOS
The NinjaOne Remote protocol itself primarily uses port 443 (standard SSL), but will use Transmission Control Protocol (TCP) port 7075 as a backup if port 443 does not respond. If the protocol successfully connects to port 7075, it will continue to use that port until it fails to connect.
Using SSL inspection (via a firewall or proxy) for your organization can interfere with secure connections. To avoid this, exclude NinjaOne Remote URLs from SSL inspection policies.
Default Streamer Settings
The NinjaOne Remote Streamer uses H.264 hardware encoding support for macOS desktop and mobile. NinjaOne enables automatic updates by default when a new version is released. You can manage settings at Administration → Apps → Installed → NinjaOne Remote → Default Streamer Settings.
NinjaOne will not update all devices at the same time. When a new release is available, NinjaOne will use a randomized timer (between 2 and 8 hours) for each endpoint in the division to ensure that bandwidth is not negatively impacted. If a device is waiting for the update to start, you can initiate it immediately by starting a remote session.
Offline devices will update immediately when they come back online.
Paths and Directories
This section contains the file paths and directory locations for the NinjaOne Player, NinjaOne Streamer, and QuickConnect Launcher (QCLauncher) apps.
Windows
Player (as a non-Administrator): C:Users{username}AppDataRoamingNinjaRemotencplayer.exe
Player (as Administrator): C:Program FilesNinjaRemotencplayer.exe
Player logs — %temp% (C:Users<user_name>AppDataLocalTemp)
Streamer: C:Program FilesNinjaRemotencstreamer.exe
Streamer logs — C:WindowsTemp
QC launcher: C:UsersPublicNinjaRMM LLC QClauncher.exe
QC streamer: C:UsersPublicNinjaRMM LLC QCncstreamer.exe
QC logs (Win) — C:UsersPublicNinjaRMM LLC QClogs [LAUNCHER'S LOG]
Dump files — C:WindowsSystem32*_nc_.dmp
MacOS
Player (application): Applications (Users/{username}/Applications/NCPlayer.app)
Player (executable): /Applications/NinjaRemote/ncplayer.app/Contents/MacOS/ncplayer
Streamer (application): /Users/{username}/Applications/NinjaRemote/ncstreamer.app
Streamer (executable): /Applications/NinjaRemote/ncstreamer.app/Contents/MacOS/ncstreamer
NC Streamer logs — Applications/NinjaRemote/logs
NC Player logs — click the 'i' icon in the Player to see the path to logs or run 'echo $TMPDIR' in Terminal
QC launcher (application): /Users/Shared/NinjaRMM LLC QC/launcher.app
QC launcher (executable): /Users/Shared/NinjaRMM LLC QC/launcher.app/Contents/MacOS/launcher
QC launcher logs — /Users/Shared/NinjaRMM LLC QC
Activating NinjaOne Remote
To configure NinjaOne Remote for organizations and devices, you must first activate it as an installed application. If NinjaOne Remote does not appear in Administration → Apps, you can activate it at the organization level.
Activate the NinjaOne Remote App
Follow this procedure to enable the NinjaOne Remote app prior to connecting with NinjaOne Remote.
- In NinjaOne, navigate to Administration → Apps → Installed.
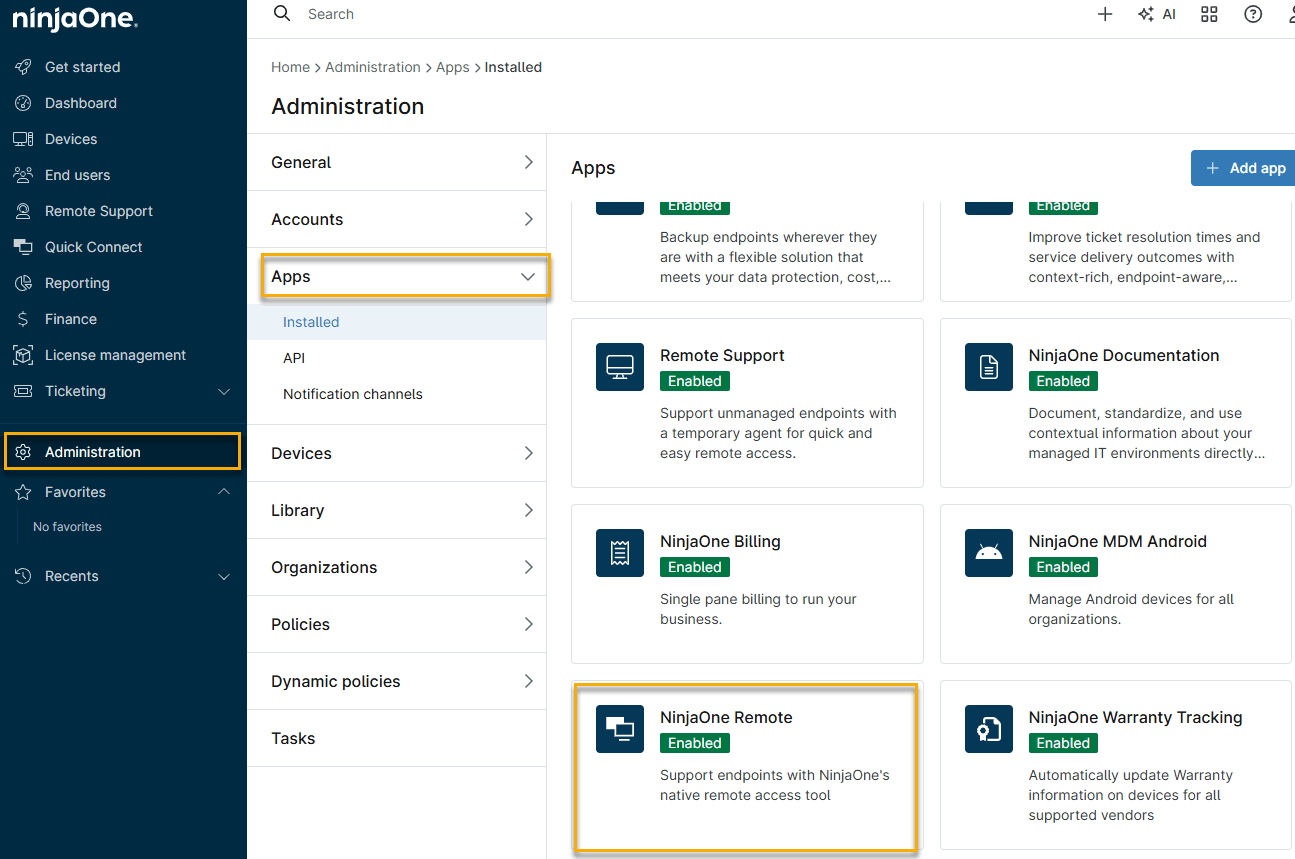
- On the Apps page, click NinjaOne Remote to open the app's configuration page, then click Enable.
Configure Advanced Settings
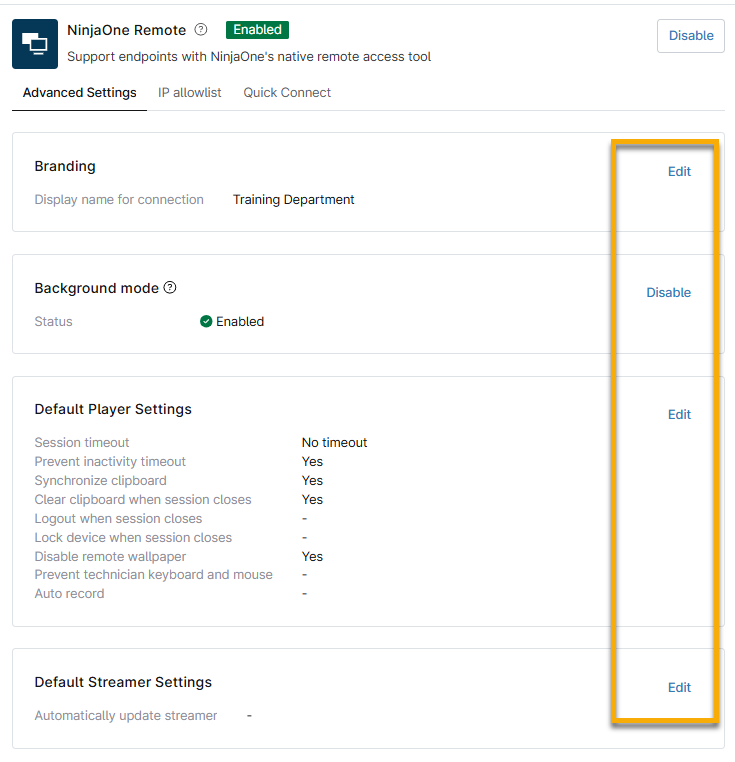
On the NinjaOne Remote configuration page's Advanced Settings tab, you can configure the following settings:
| Setting | Description |
|---|---|
| Branding | Choose a name from the drop-down menu. NinjaOne will display this branding when a technician connects to their endpoint via remote access. |
| Background mode | Remotely access and manage a device without disturbing the end user. For more information about the background mode feature, refer to NinjaOne Remote Background Mode. |
| Default player settings | Configure the following session settings:
You can also activate the checkboxes to enable the following session commands:
|
| Default streamer settings | Automatically update the streamer when a new version becomes available. |
Add an IP Allowlist
By adding an IP allowlist, you can ensure continuous remote access by preventing session termination when NinjaOne detects a trusted, pre-approved WAN IP address. The allowlist will not restrict NinjaOne Remote sessions to those initiated from the added IPs. The IP allowlist instead prevents termination if the player device switches to one of the listed IPs during the connection. Refer to NinjaOne Platform: Restrict User Login by IP Address to learn more.
- In the NinjaOne Remote configuration app, click the IP allowlist tab.
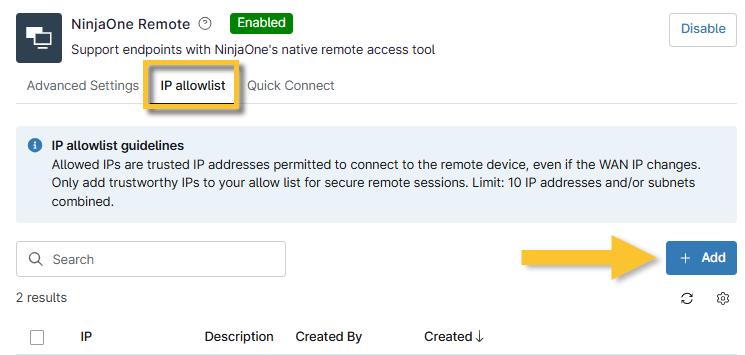
- Enter a WAN IPv4 address or subnet and a description (optional), then click Add.
- Continue adding IP addresses as needed.
- To adjust the table display, click the actions icon to open the Table settings window.

Granting Permission to Use NinjaOne Remote
System administrators have access to NinjaOne Remote by default. You must manually grant access to other technicians. To learn more about permissions, refer to NinjaOne Accounts: User Roles.
Technician User Permissions
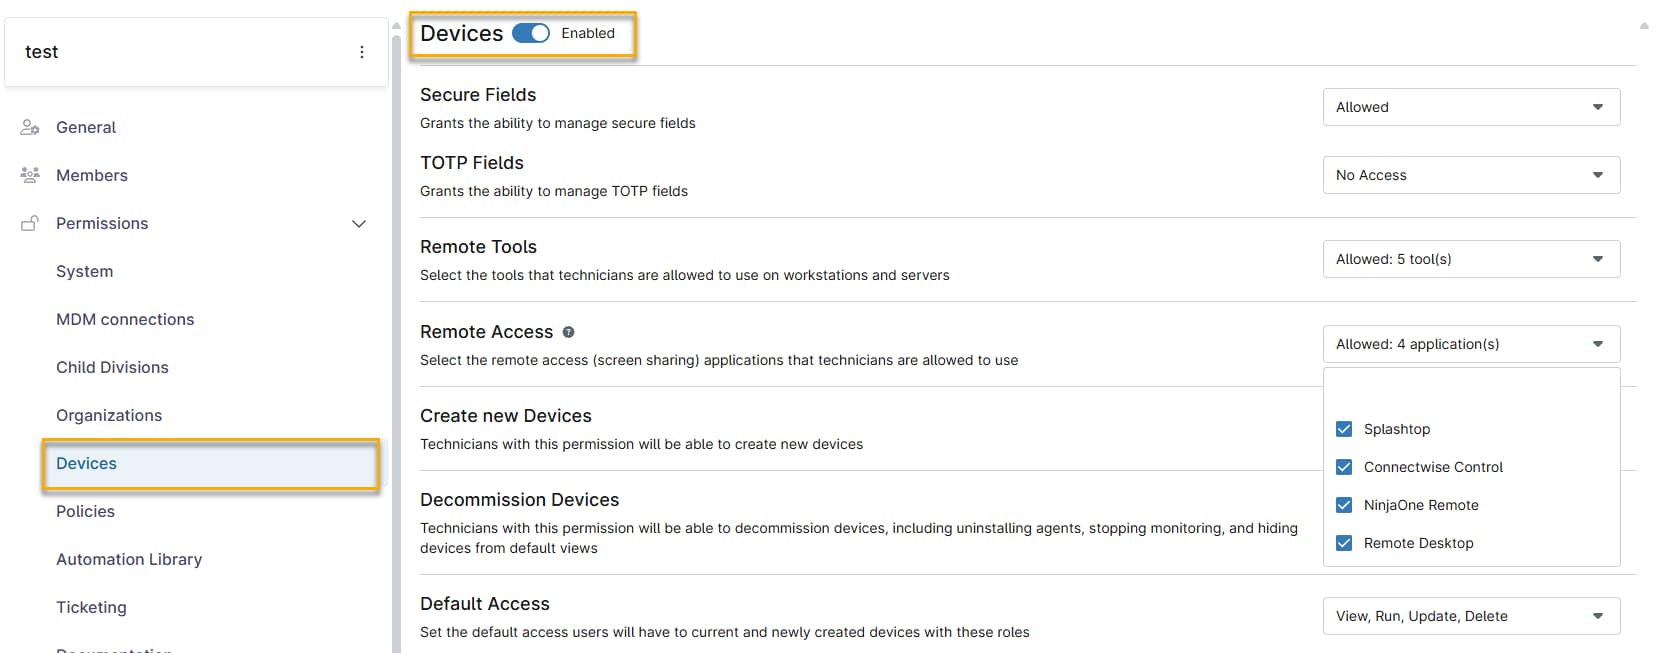
To give a technician access to use NinjaOne Remote, perform the following steps.
- Navigate to the configuration page for the technician or role needing NinjaOne Remote access.
- Open the Devices → Permissions and activate the Device Permissions toggle.
- Select NinjaOne Remote from the Remote Access drop-down menu.
End User Permissions
You can allow end users to access their own devices via NinjaOne Remote. Refer to NinjaOne Endpoint Management: End User Sharing for Device Access for more information. Once you configure an end user, grant that user the ability to initiate NinjaOne Remote sessions by following these steps.
- In NinjaOne, navigate to Administration → Accounts → All users.
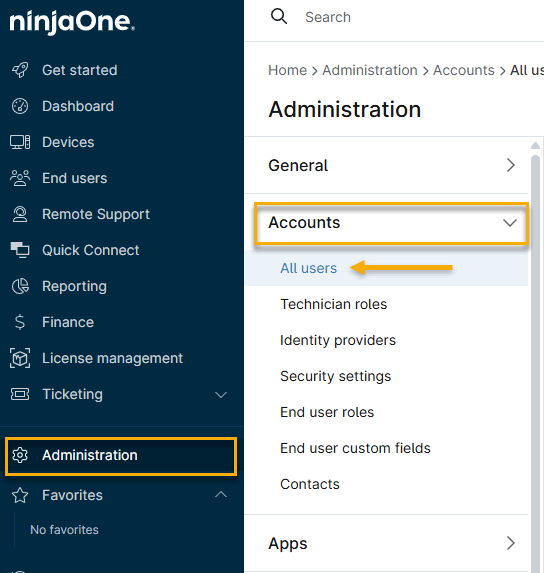
- On the All users page, click the User type drop-down menu and select End user, then select the user from the list.

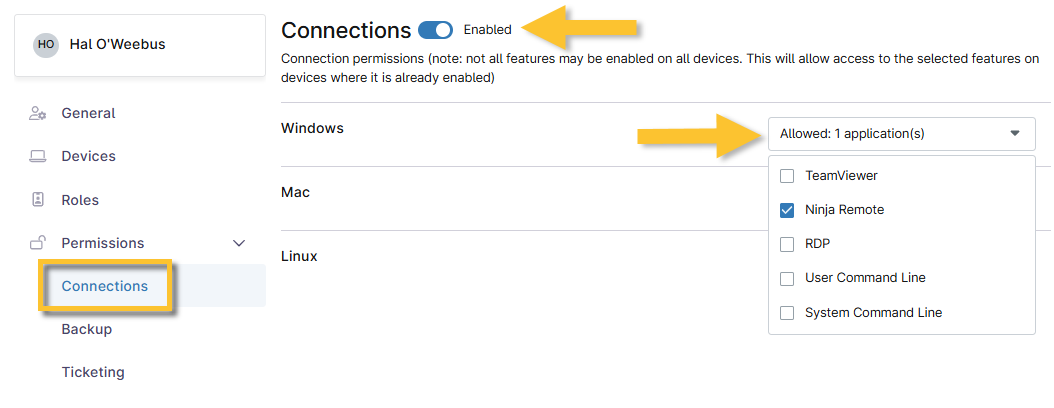
- Open Connections in Permissions and activate the Connections toggle. Select NinjaOne Remote from the drop-down menu for the device type.
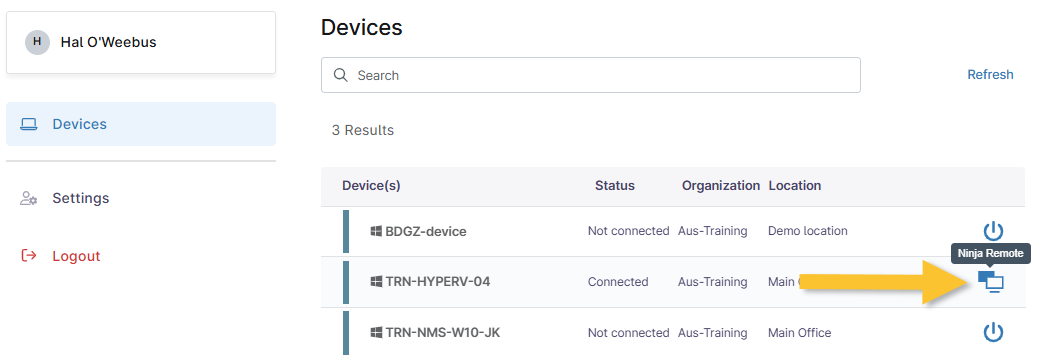
When the end user logs into their portal, the NinjaOne Remote icon will display next to any online devices to which they have access.
Installing NinjaOne Remote on Devices
To connect to devices via NinjaOne Remote, technicians must have the NinjaOne Remote standalone player application installed on their machines. Additionally, they must deploy the player through the organization settings. Refer to NinjaOne Remote: Deploying NinjaOne Remote to Devices for more information.
There are two places where you can download this app:
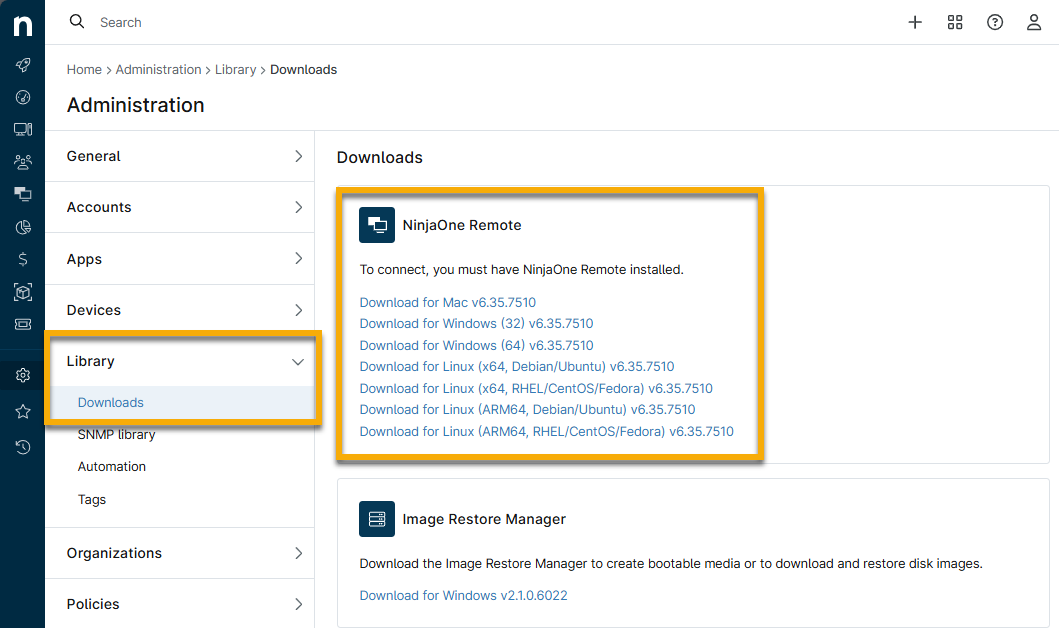
- When you initiate a connection via NinjaOne Remote, a window appears with the link to download the NinjaOne Remote app. This link populates based on your machine's detected OS.
- Navigate to Administration → Library → Downloads. Links to installers for both macOS and Windows (32-bit or 64-bit) are available in the NinjaOne Remote module.
Additional Resources
Refer to the following resources for more information about NinjaOne Remote: